CloudPOS.vu — Complete Manual
Everything in one document: configuration, selling, purchasing, POS operations, inventory, accounting and administration. Use the sidebar to jump to any chapter or section — installation and product configuration live in their own guides below.
Settings
Business identity, currencies, taxes, VSMS fiscalization, payments, integrations and system tools
The Business tab holds your company's identity — the information that appears on invoices, quotations, and receipts.
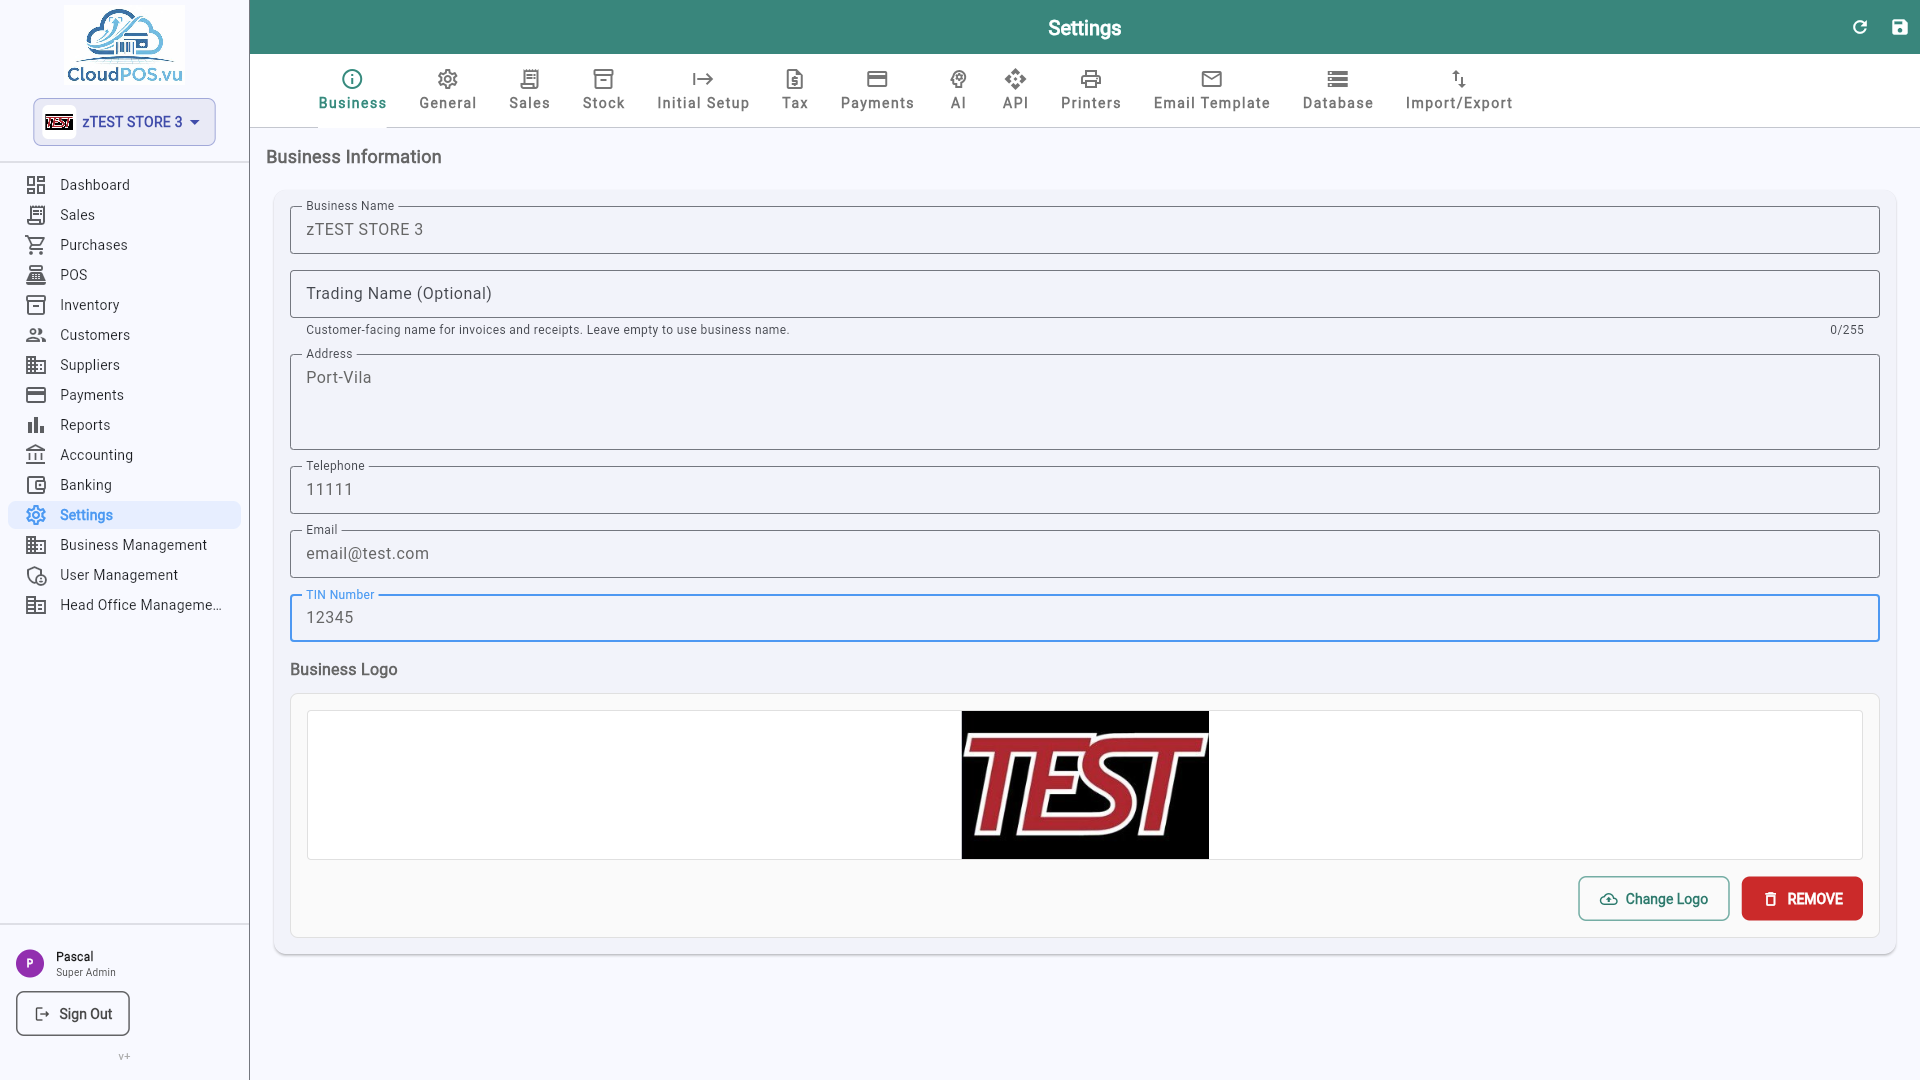
Upload a logo that appears on all printed documents. Supports PNG, JPG up to 2 MB.
The legal trading name shown on tax invoices and quotations.
Contact details displayed on customer-facing documents.
Your Tax Identification Number — required for VAT returns and customs.
The General tab controls how numbers, currencies, and dates appear throughout the application.
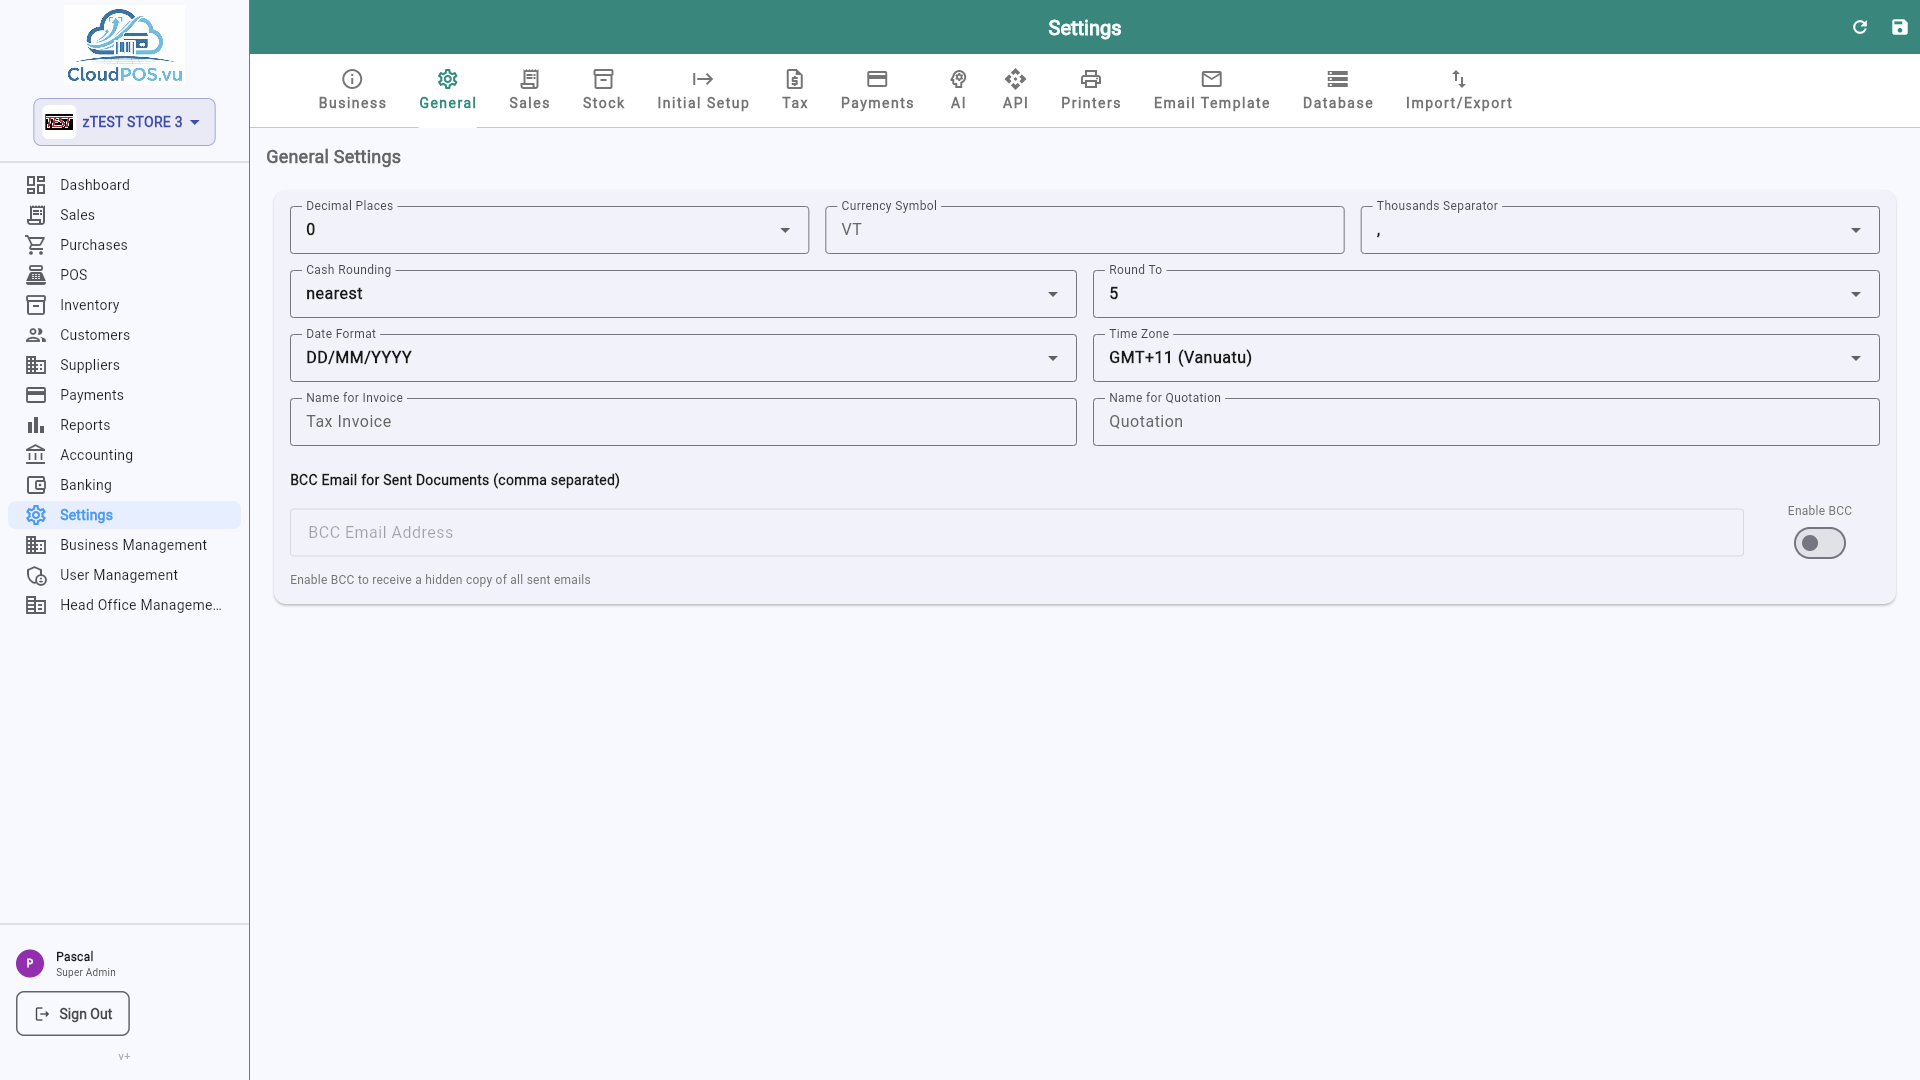
Number of decimal places for monetary values. Set to 0 for Vanuatu Vatu (whole numbers only).
The symbol displayed next to amounts — e.g. VT for Vatu, $ for USD.
Choose between DD/MM/YYYY, MM/DD/YYYY, or YYYY-MM-DD.
The Currencies tab manages which currencies your business can bill in, and their exchange rates. The base currency (e.g. VUV) is fixed; any currency already used on a document can only be deactivated, not deleted.
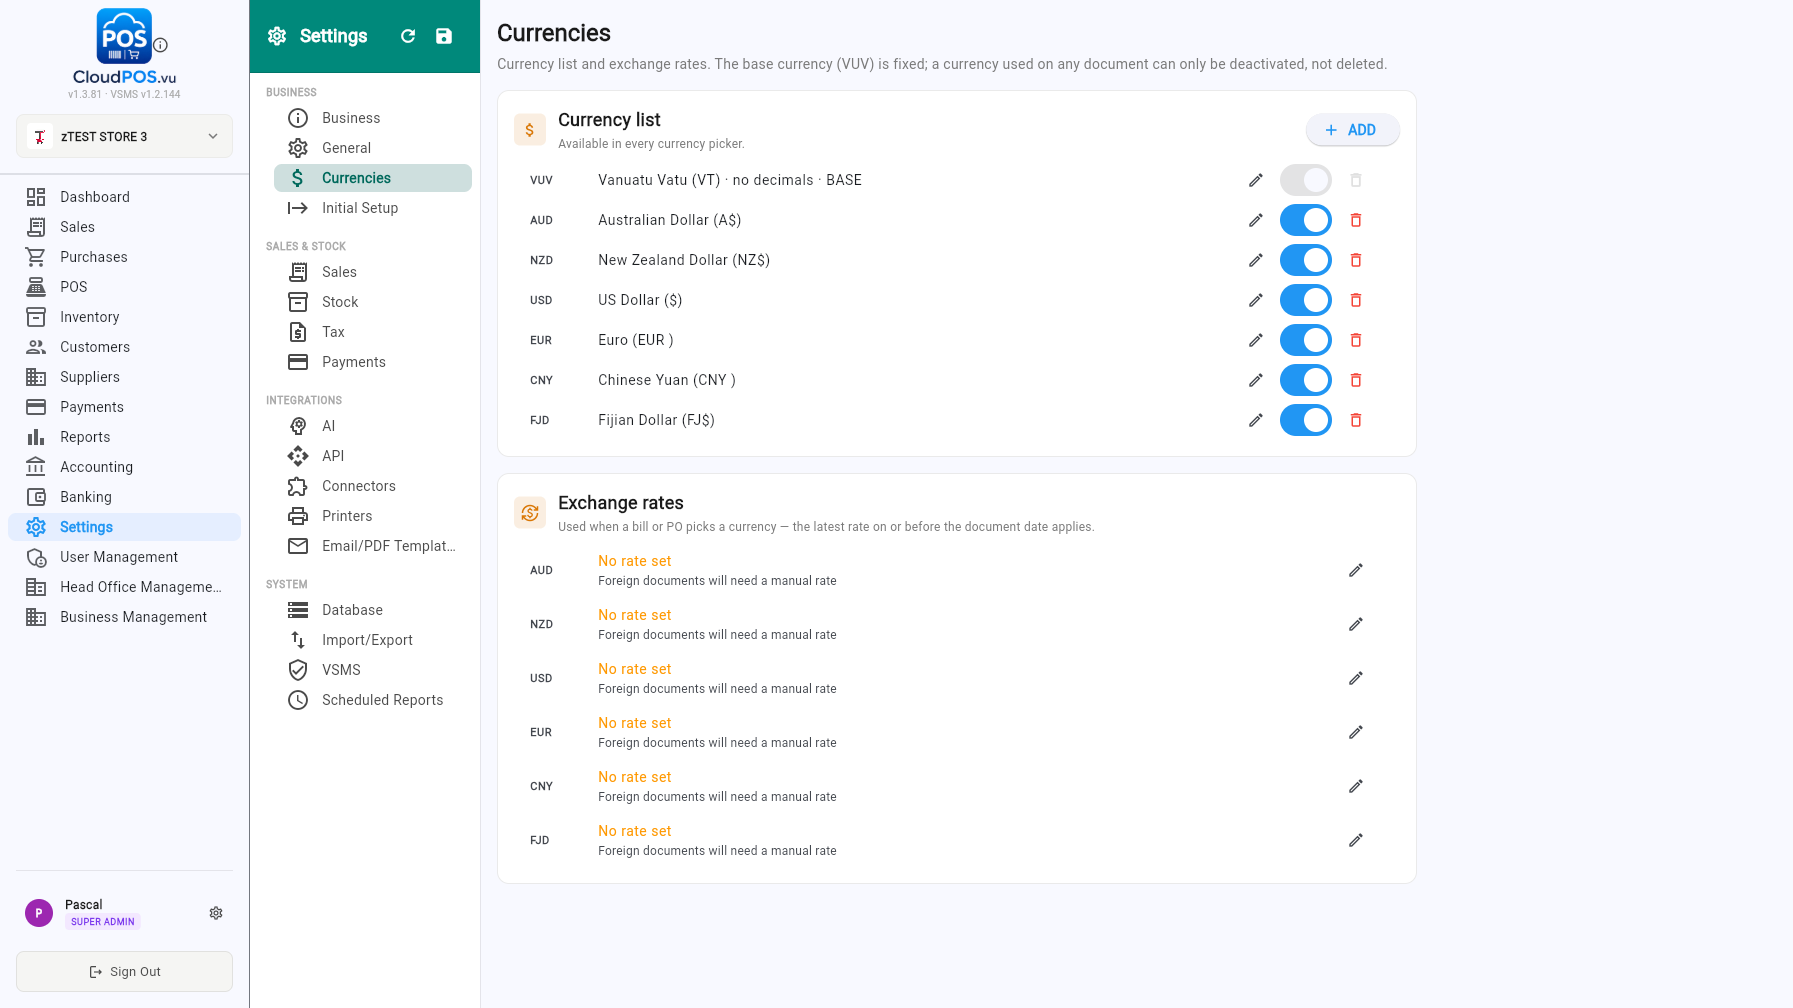
Add, rename, activate or deactivate currencies with the + Add button. Active currencies appear in every currency picker (invoices, bills, purchase orders, POS).
Set the rate used when a bill or PO picks a foreign currency — the latest rate on or before the document date applies. Without a rate, foreign documents need a manual rate.
The Sales tab configures how prices and stock warnings behave when creating invoices, quotations, and proforma invoices.
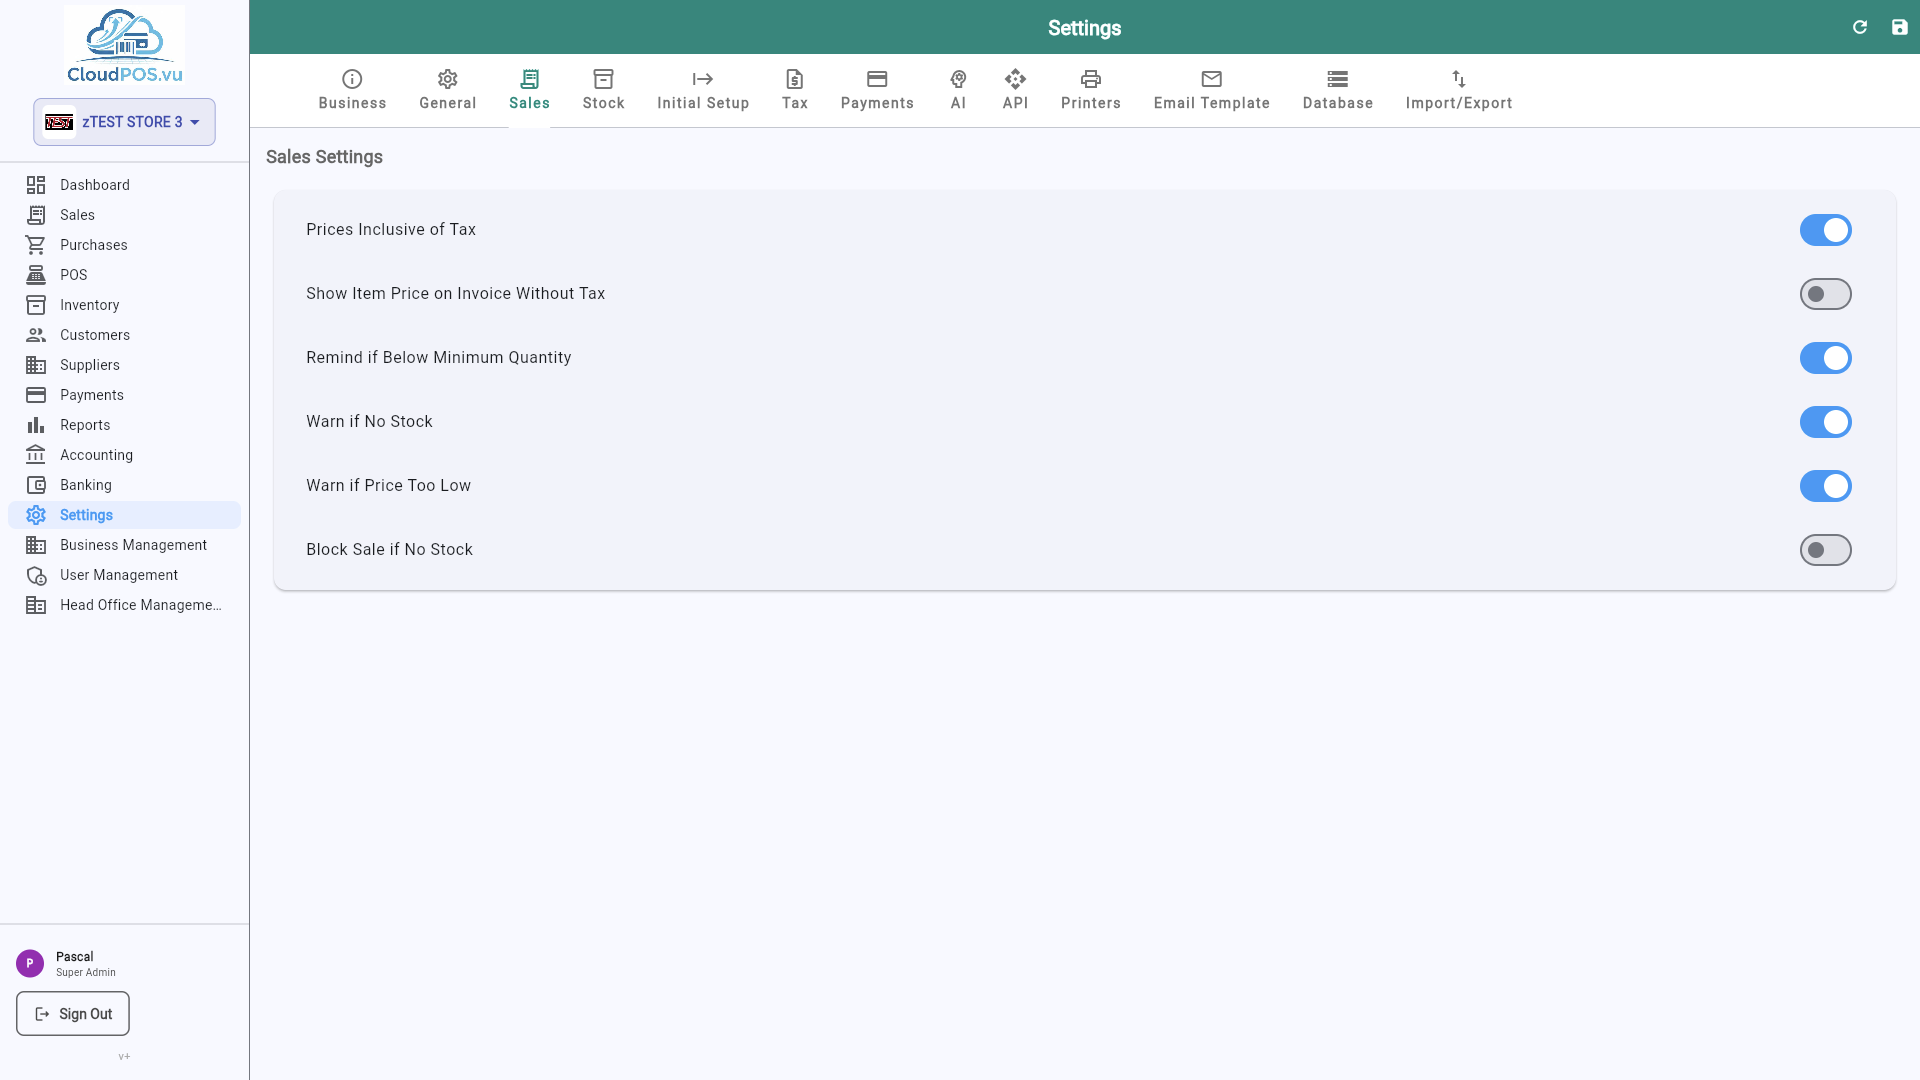
When enabled, the sell price you enter for products includes VAT. The system automatically calculates the net amount and tax split on invoices.
Shows a warning when adding a product to an invoice that has zero or negative available stock.
The Stock tab lets you choose how the cost of goods is calculated when inventory is sold.
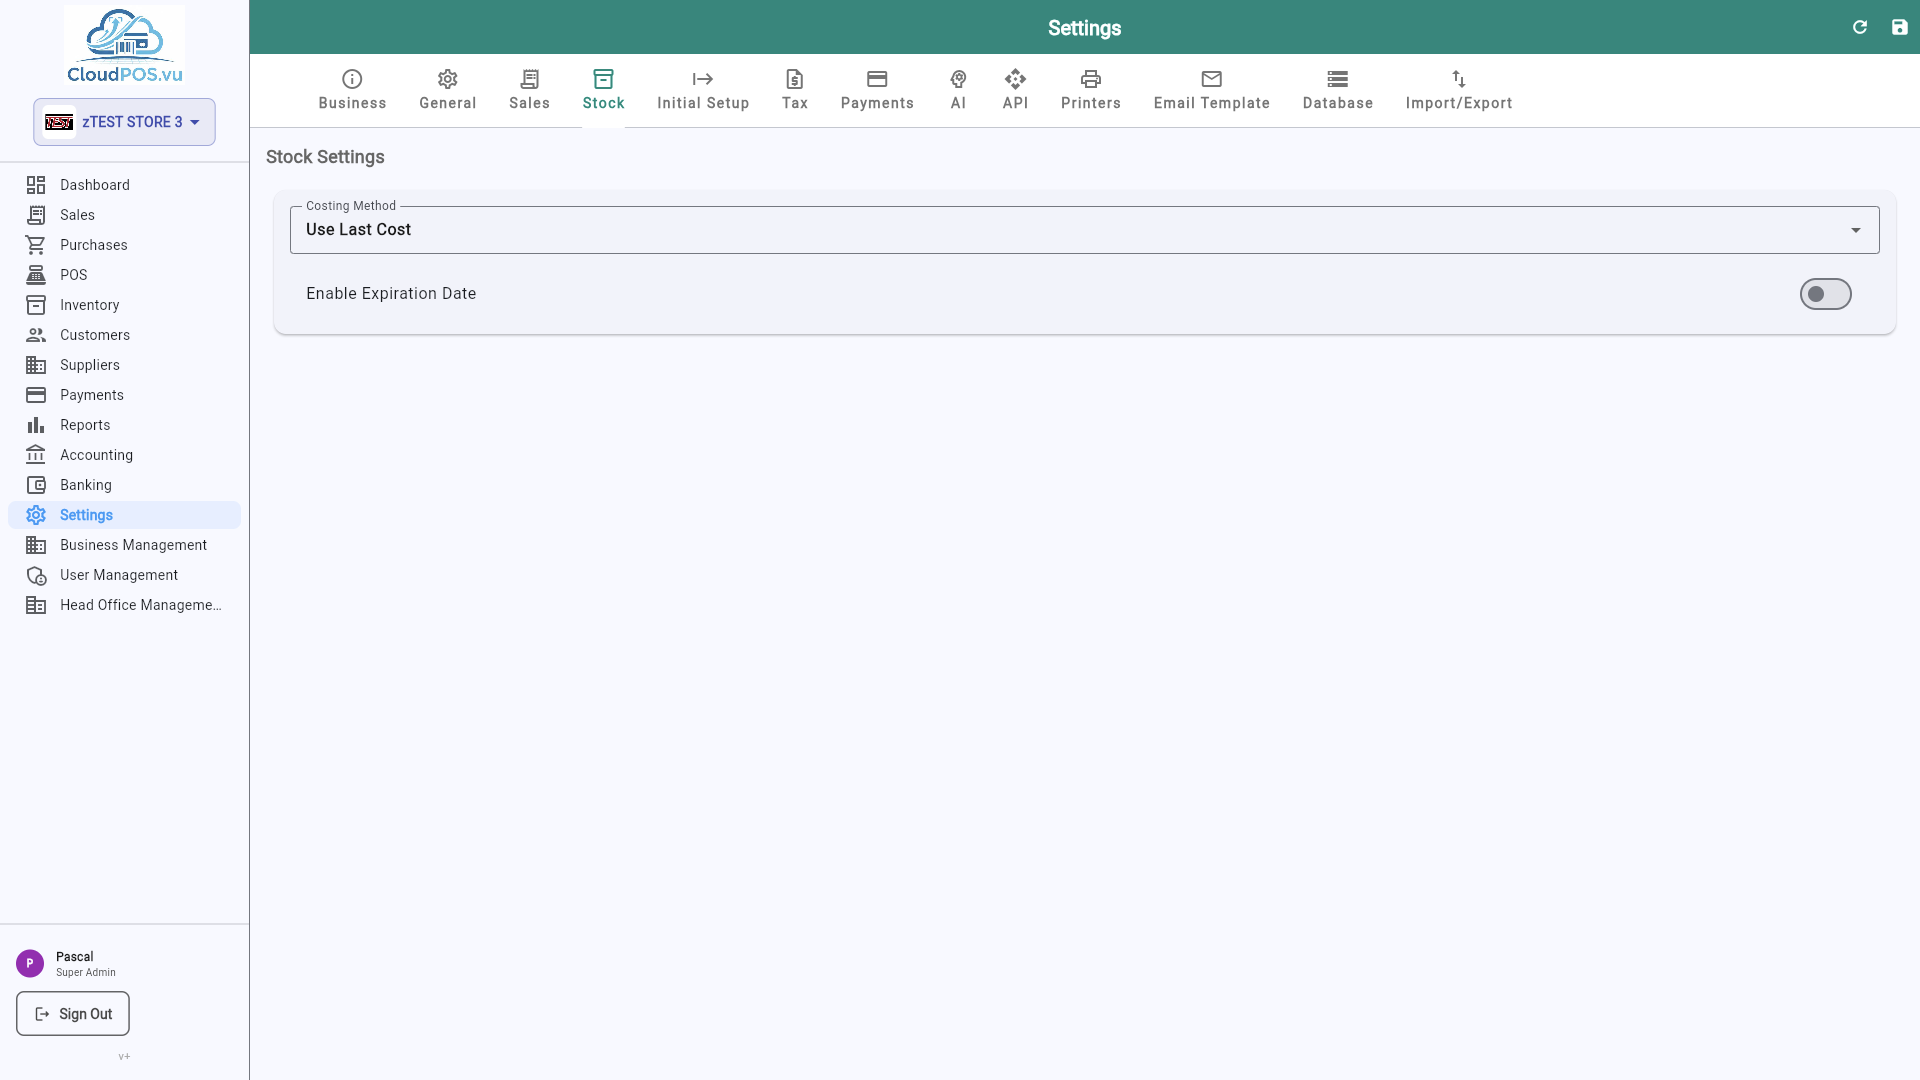
Last Cost — uses the most recent purchase price as the cost of goods sold.
Calculates a weighted average of all purchase costs. More accurate for volatile pricing.
The Initial Setup tab is used once when onboarding a new business. It lets you record opening stock quantities and opening accounting balances before you start trading.
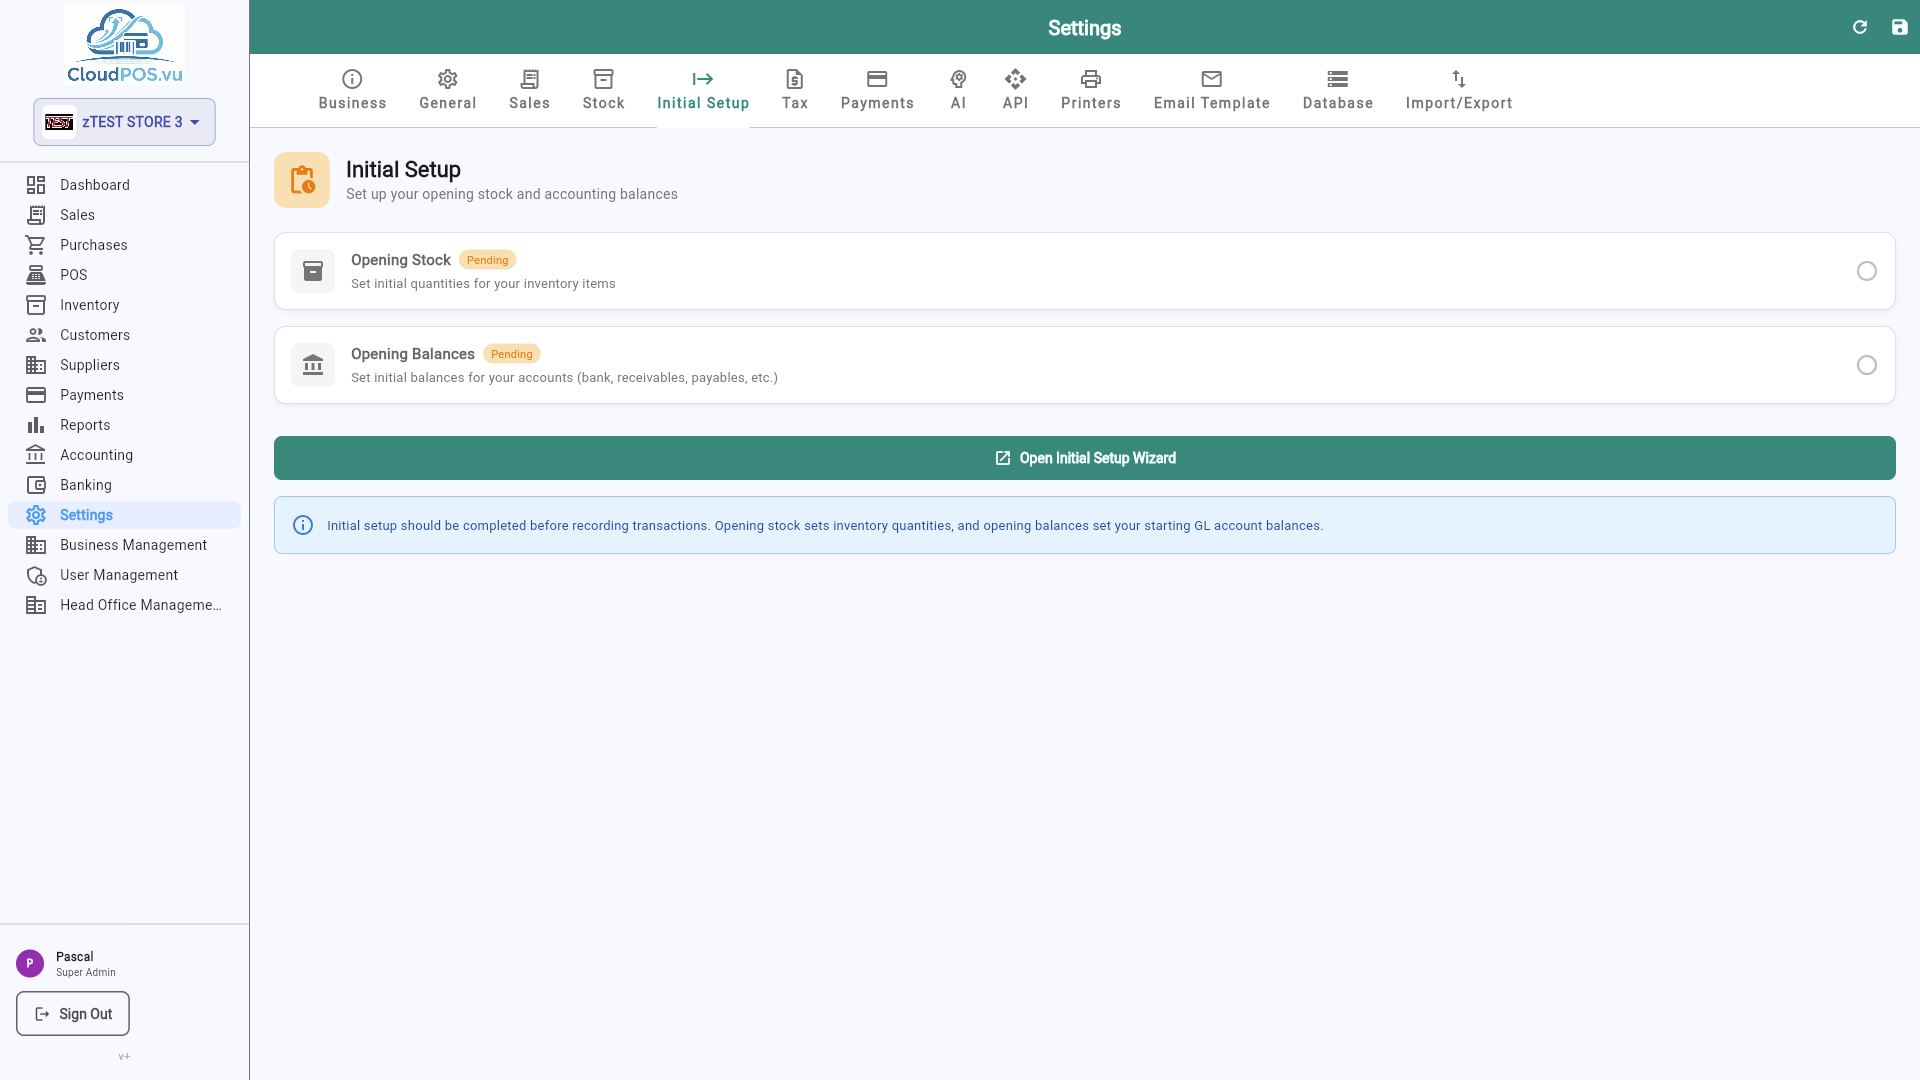
- Opening Stock — Enter the quantity and value of inventory you already have on hand. This creates the initial inventory journal entry.
- Opening Accounting — Enter opening balances for all accounts (bank, receivables, payables, etc.) to match your previous accounting system.
The Tax tab manages tax rates applied to products and services. Each product references a tax rate for invoice calculations.
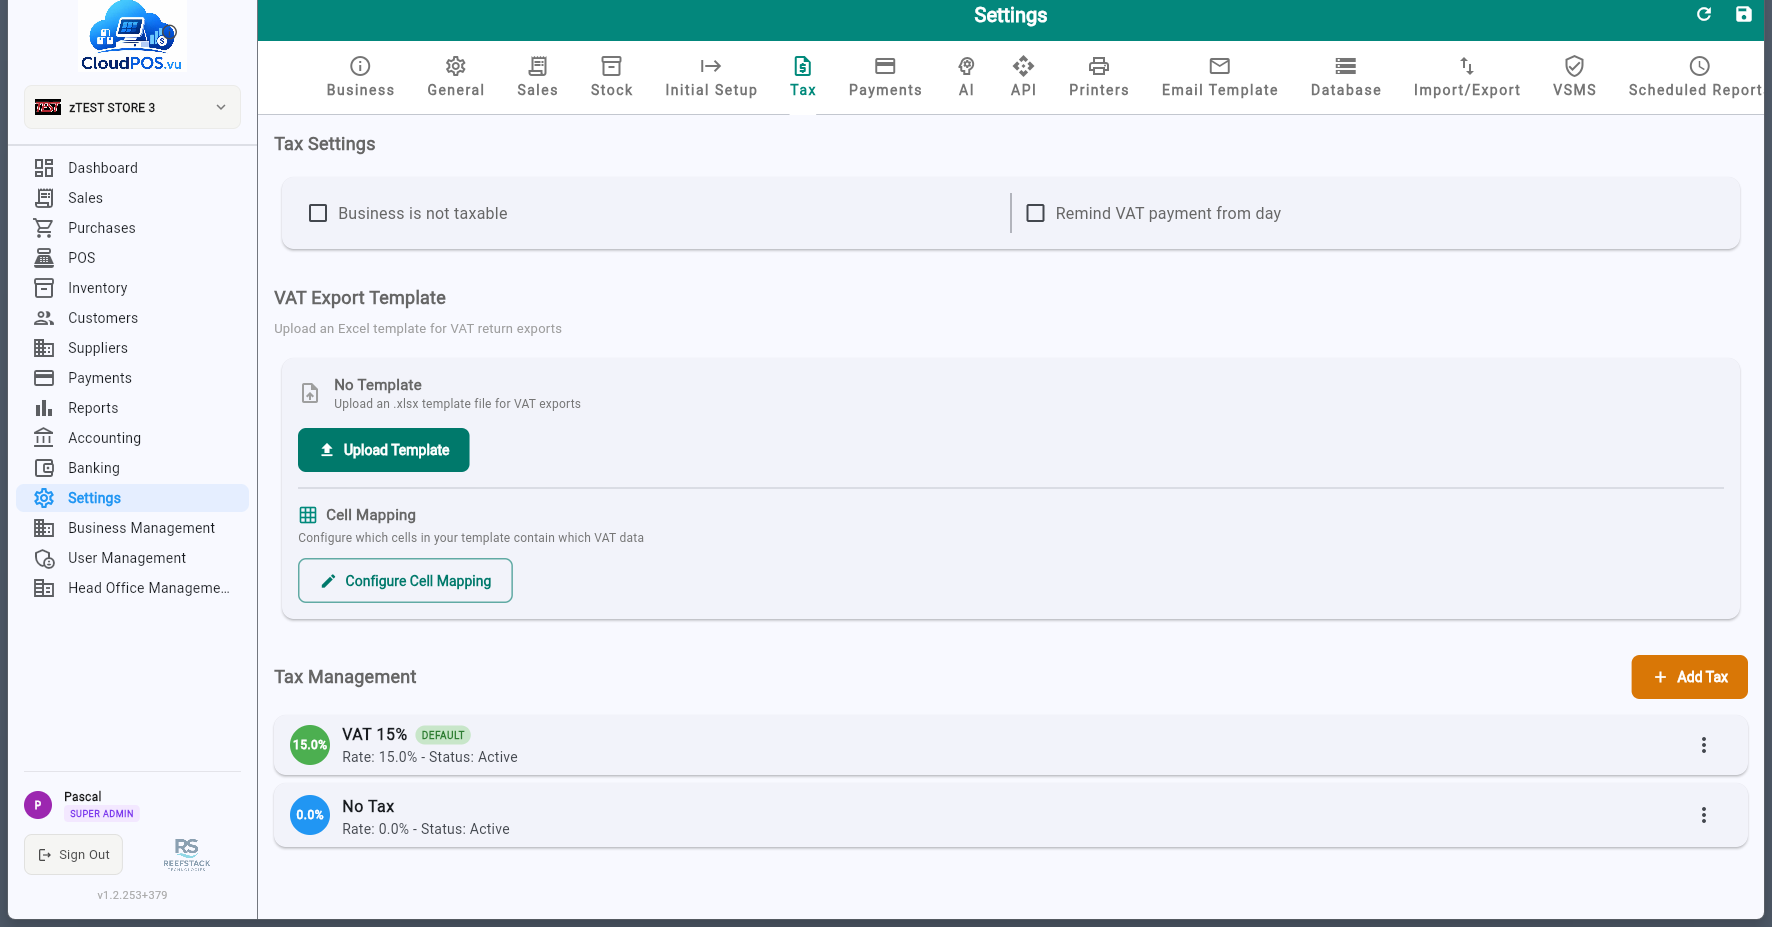
View all configured tax rates with name, percentage, SDC label, and default status.
One rate can be marked as default — new products automatically inherit this rate.
Each tax rate has a label (A, E, F, etc.) received from the SDC. Labels appear on fiscal receipts next to the tax value (e.g. A = 15%). New labels are added automatically when the SDC configuration changes.
The Payments tab manages the payment methods available when recording customer payments. All configured payment types are registered and sent to the SDC during fiscalization.
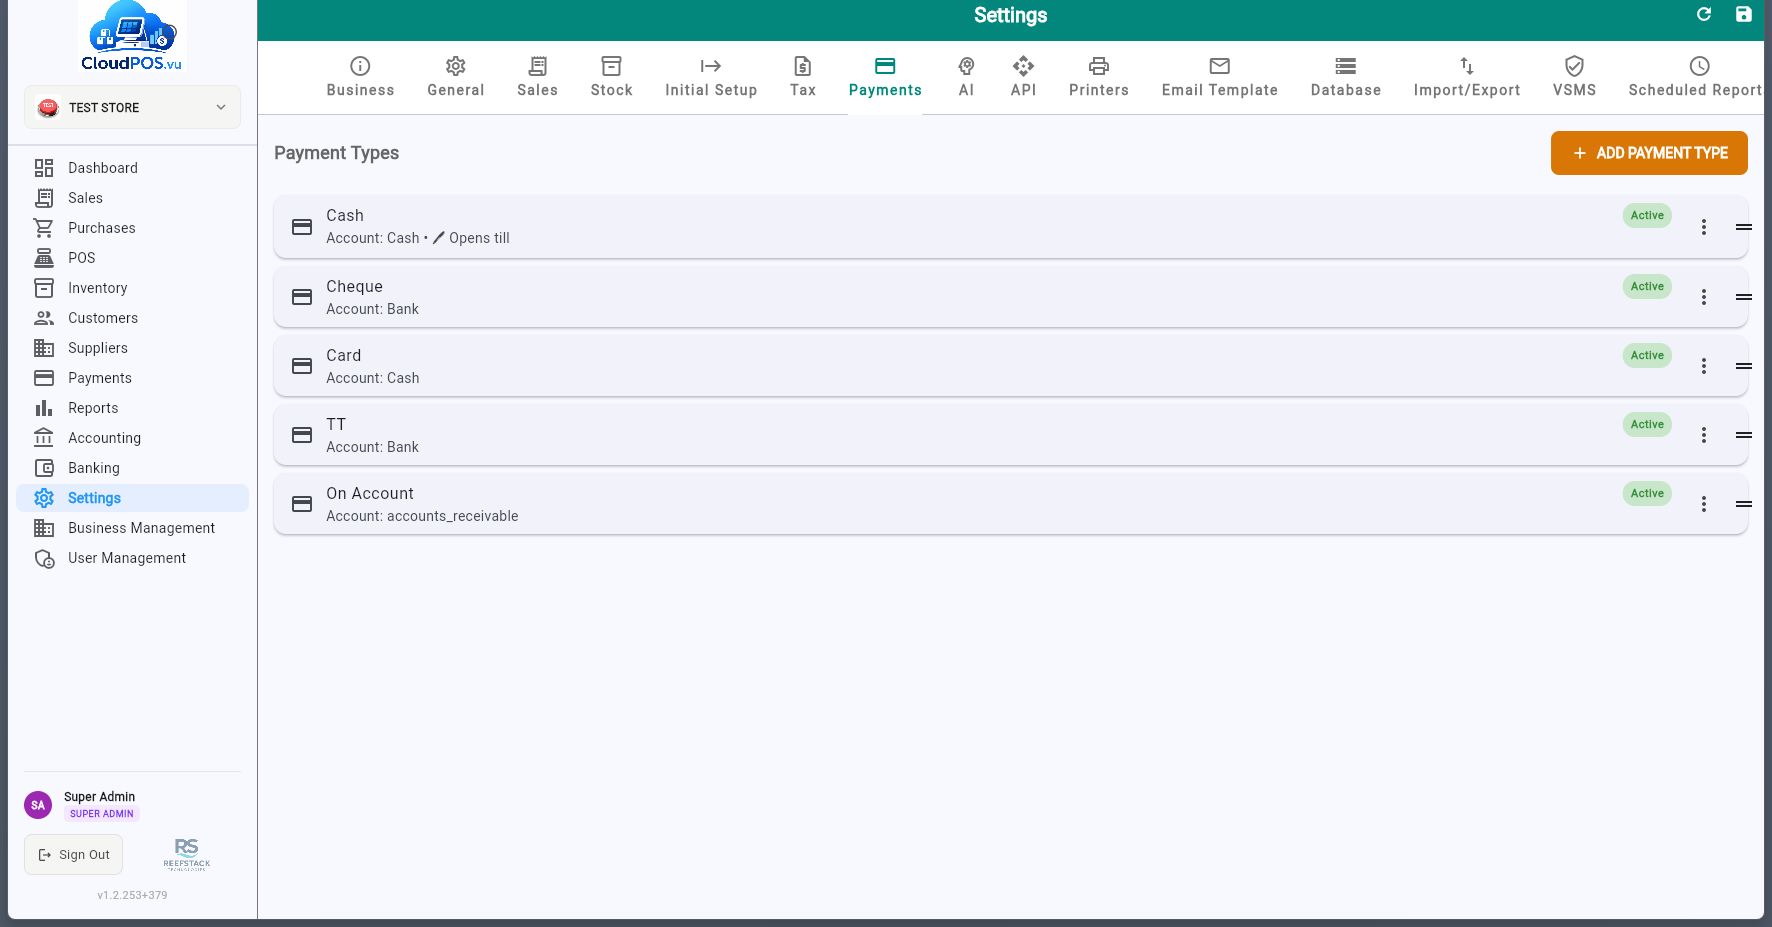
- Add payment types — Cash, Card, Bank Transfer, Cheque, Mobile Money, etc.
- Reorder — Drag payment types to change the order they appear in the payment dialog.
- Deactivate — Disable payment types you don't use instead of deleting them.
The VSMS tab configures the connection to the V-SDC (Virtual Sales Data Controller) or E-SDC for fiscal invoice verification as required by Vanuatu tax regulations.
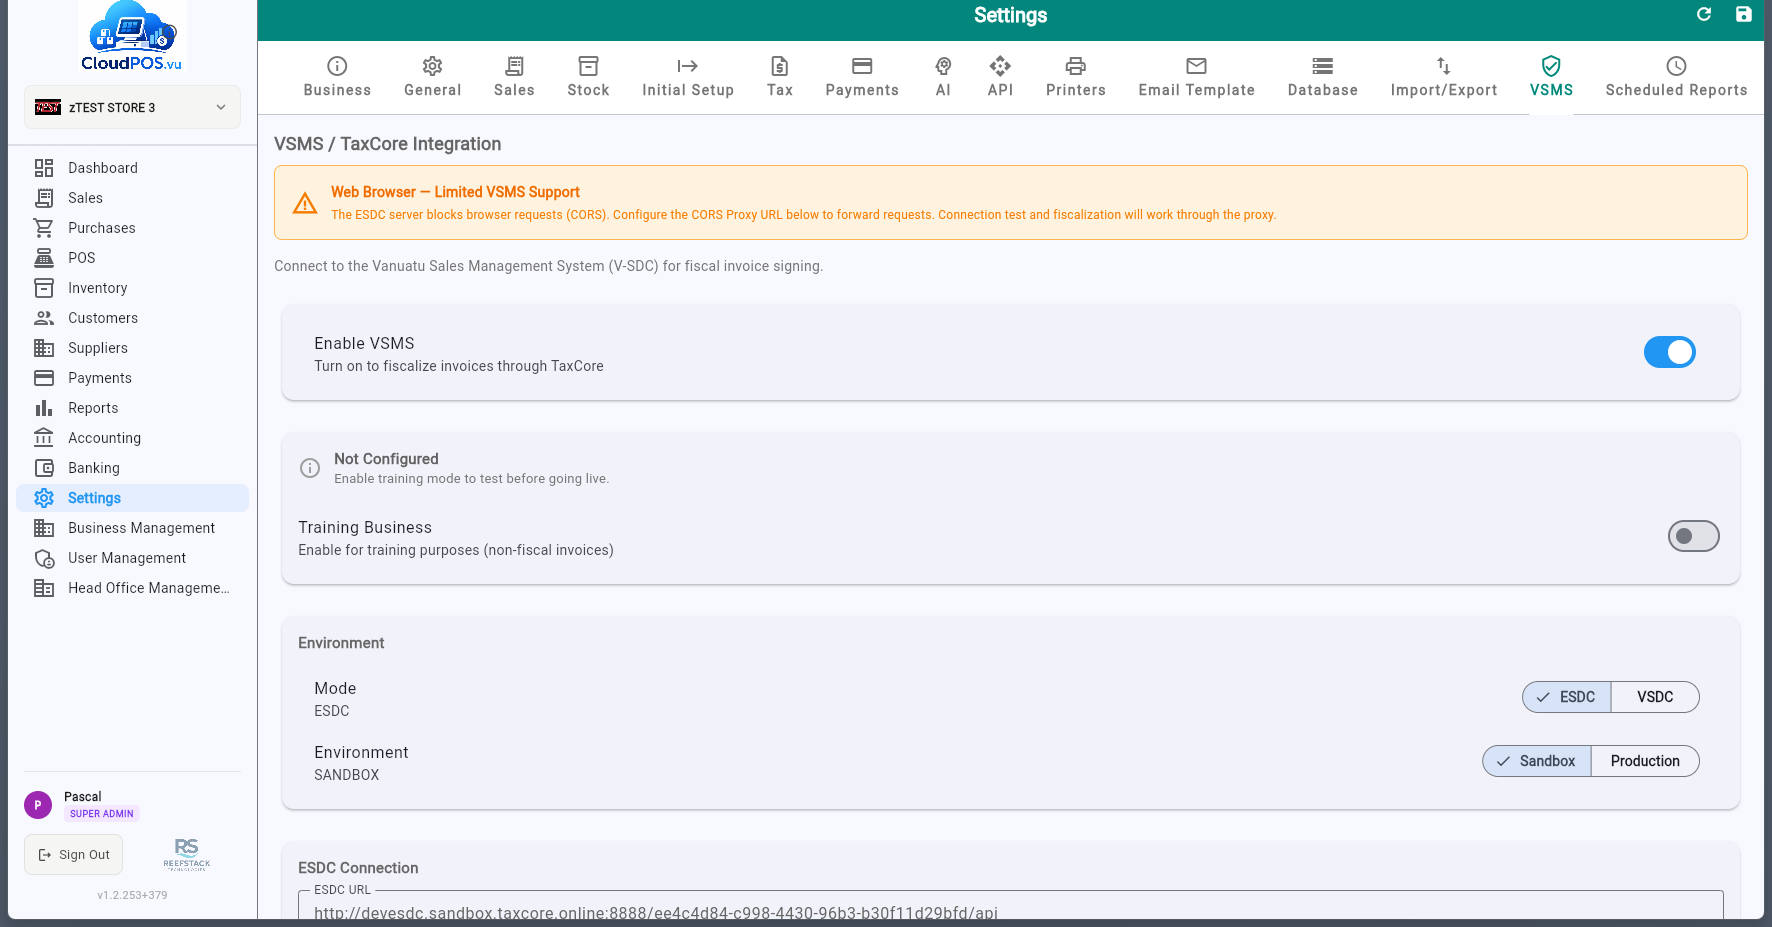
The URL of the E-SDC or V-SDC endpoint (found on the TaxCore control panel). The POS uses HTTP for E-SDC (local) and HTTPS for V-SDC (cloud).
The authentication token for the E-SDC, available on the TaxCore control panel.
The POS accreditation number assigned during the TaxCore accreditation process (also shown on the TaxCore control panel).
The smartcard access PIN used to identify against the SDC. Found on the TaxCore control panel. ⚠️ Maximum 5 attempts — entering the wrong PIN too many times will lock the smartcard. If locked, you can unlock it from the TaxCore control panel.
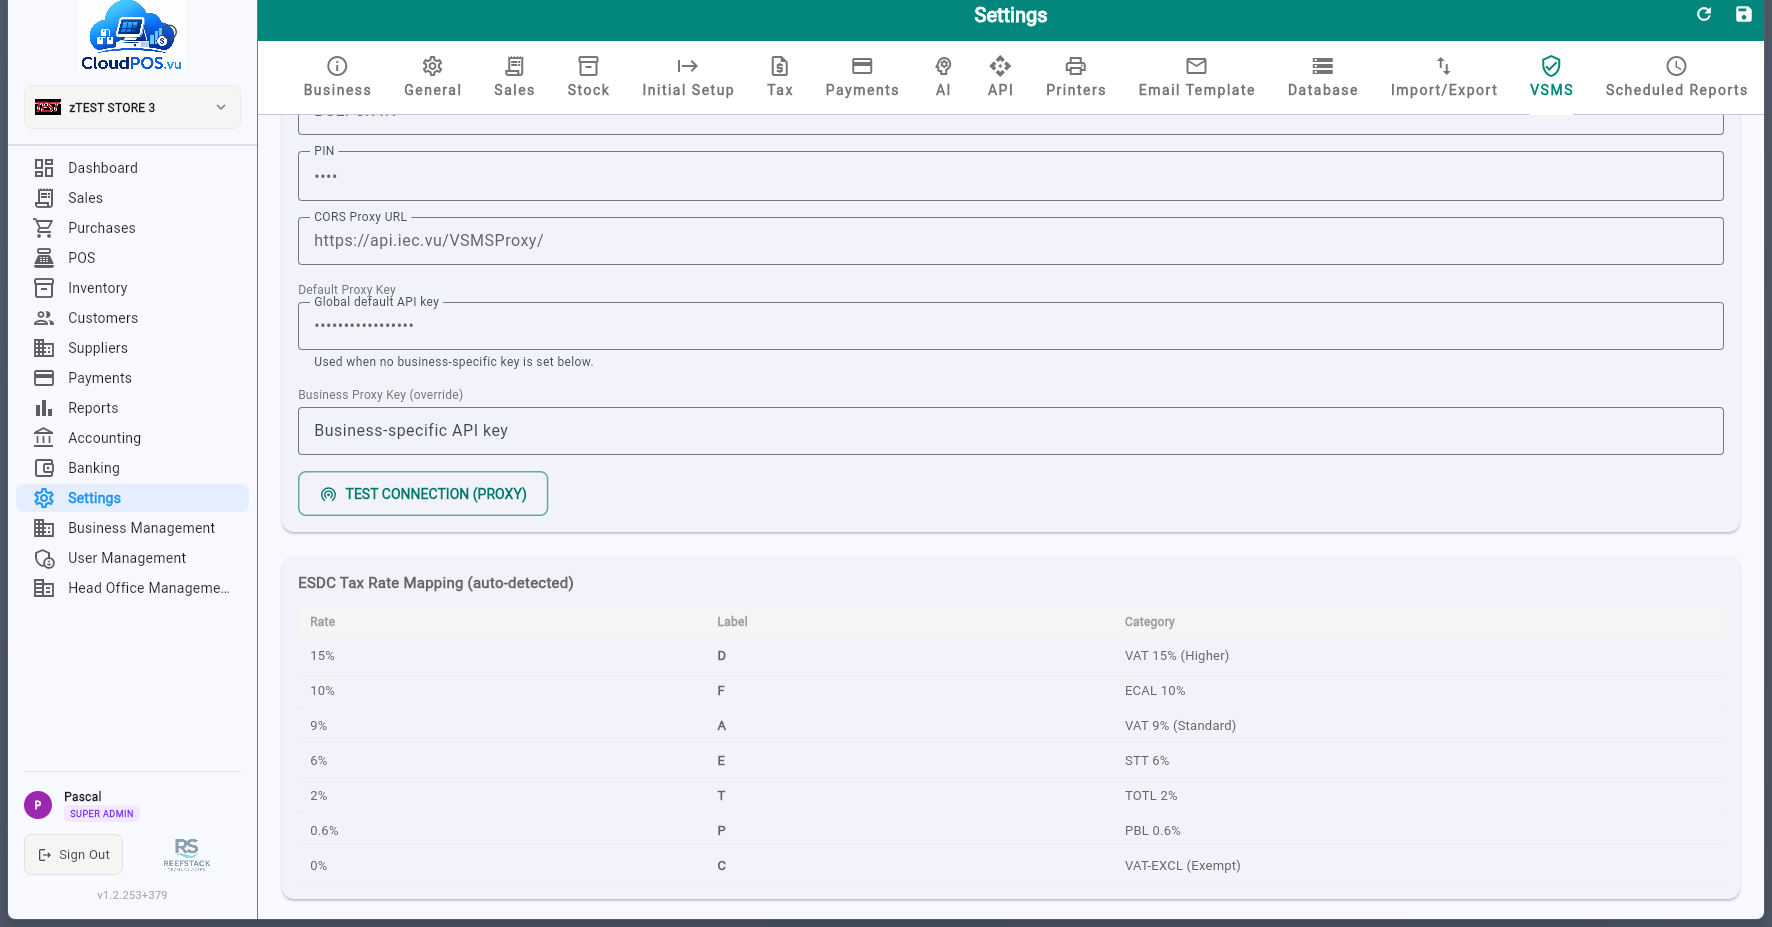
Verifies mutual authentication between the POS and the SDC using the PIN. On success, the POS receives configuration parameters including available tax rates and labels.
After a successful connection, the SDC tax rates are auto-detected and mapped to local tax configuration. Tax labels (A, E, F, etc.) come directly from the SDC.
Click the application logo in the sidebar to access System Information. This screen displays:
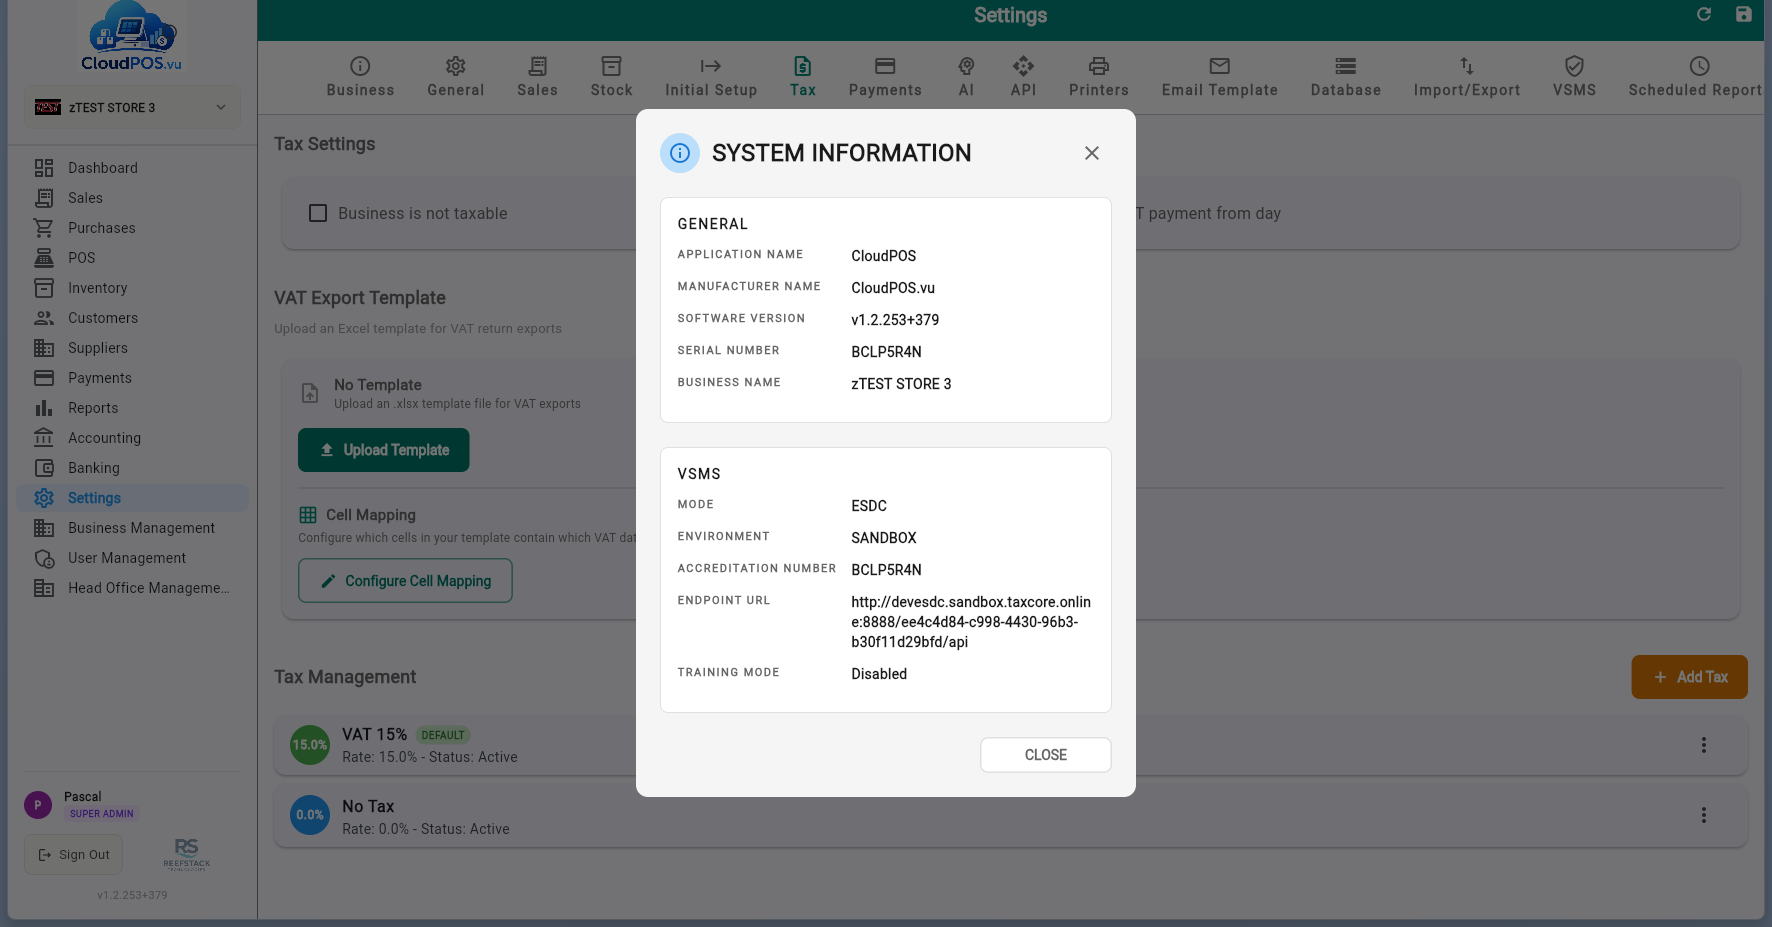
ReefStack Technologies — the software developer.
Application version and build number for support and audit purposes.
Unique device/installation identifier.
SDC connection status and registered TIN.
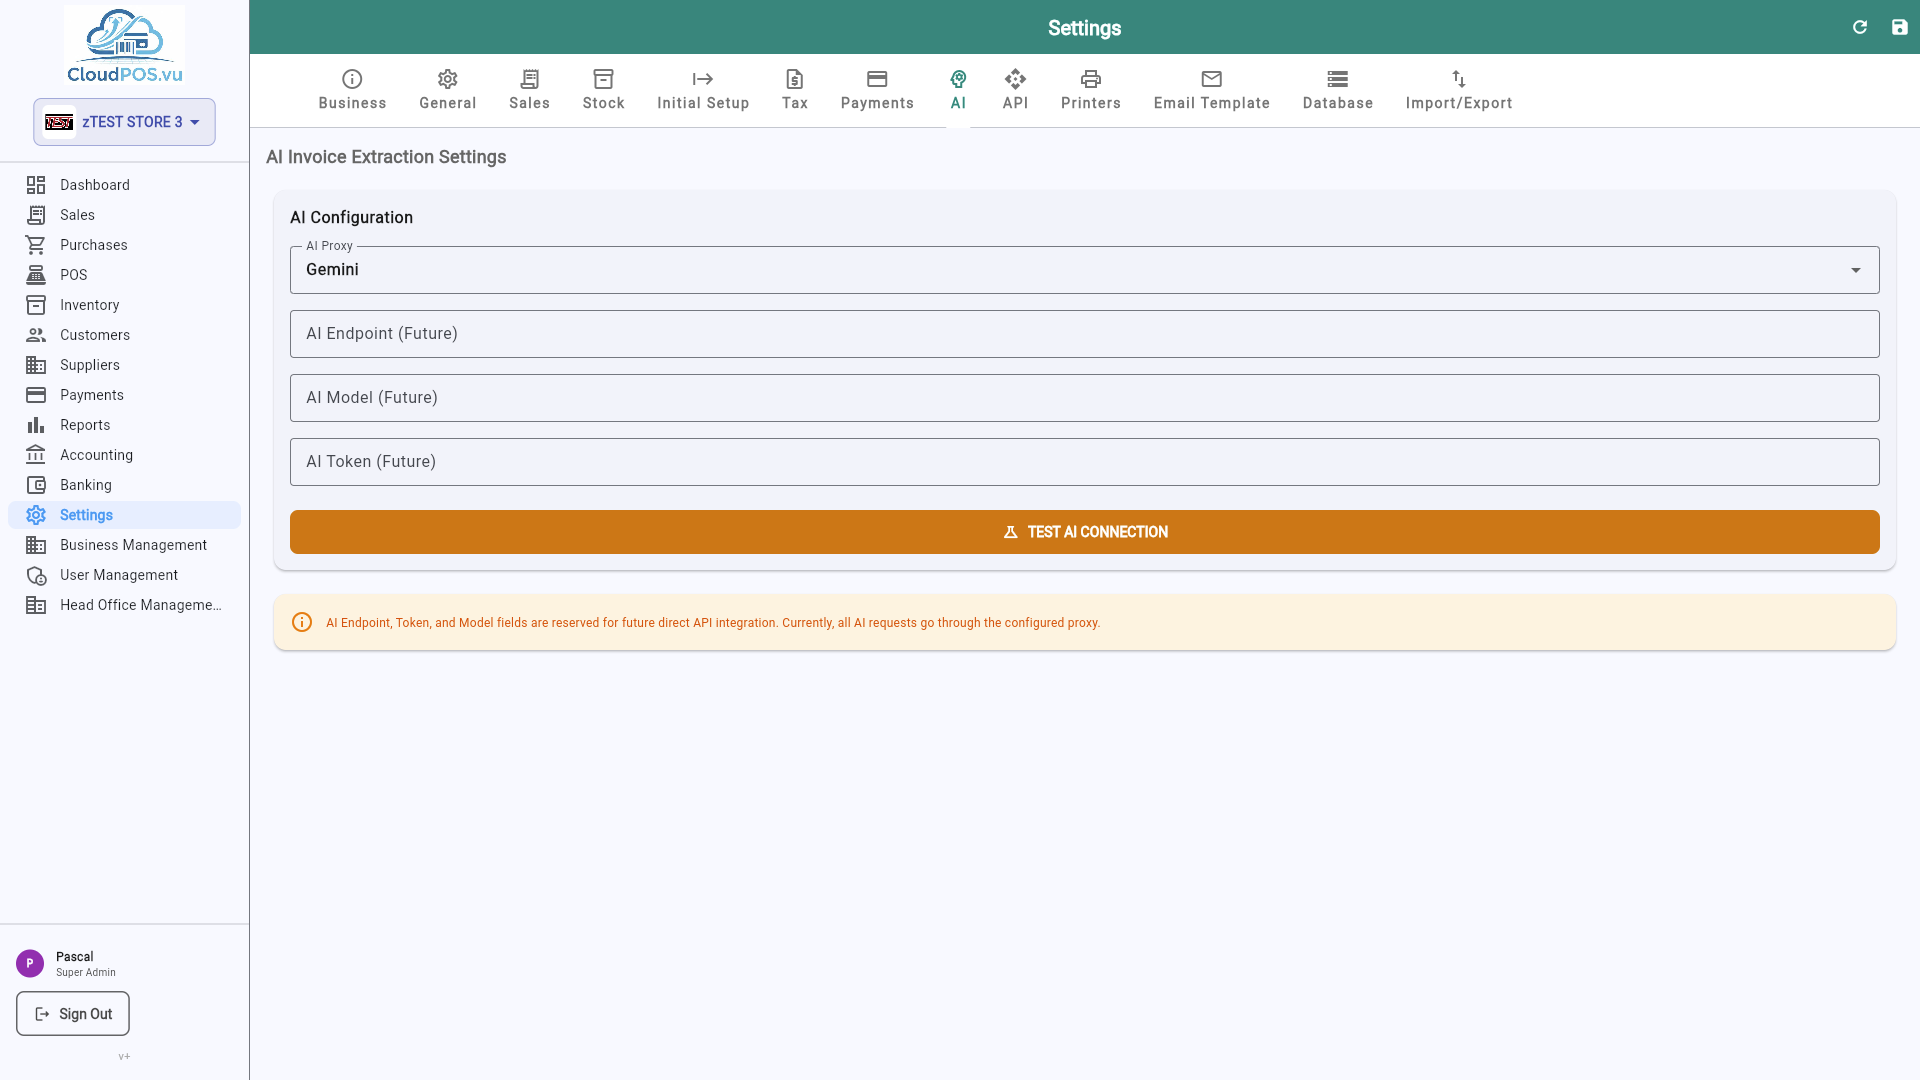
The AI tab configures integration with OpenAI for intelligent features like product descriptions, categorization, and smart suggestions.
The API tab manages API keys for programmatic access and webhook endpoints for real-time notifications.
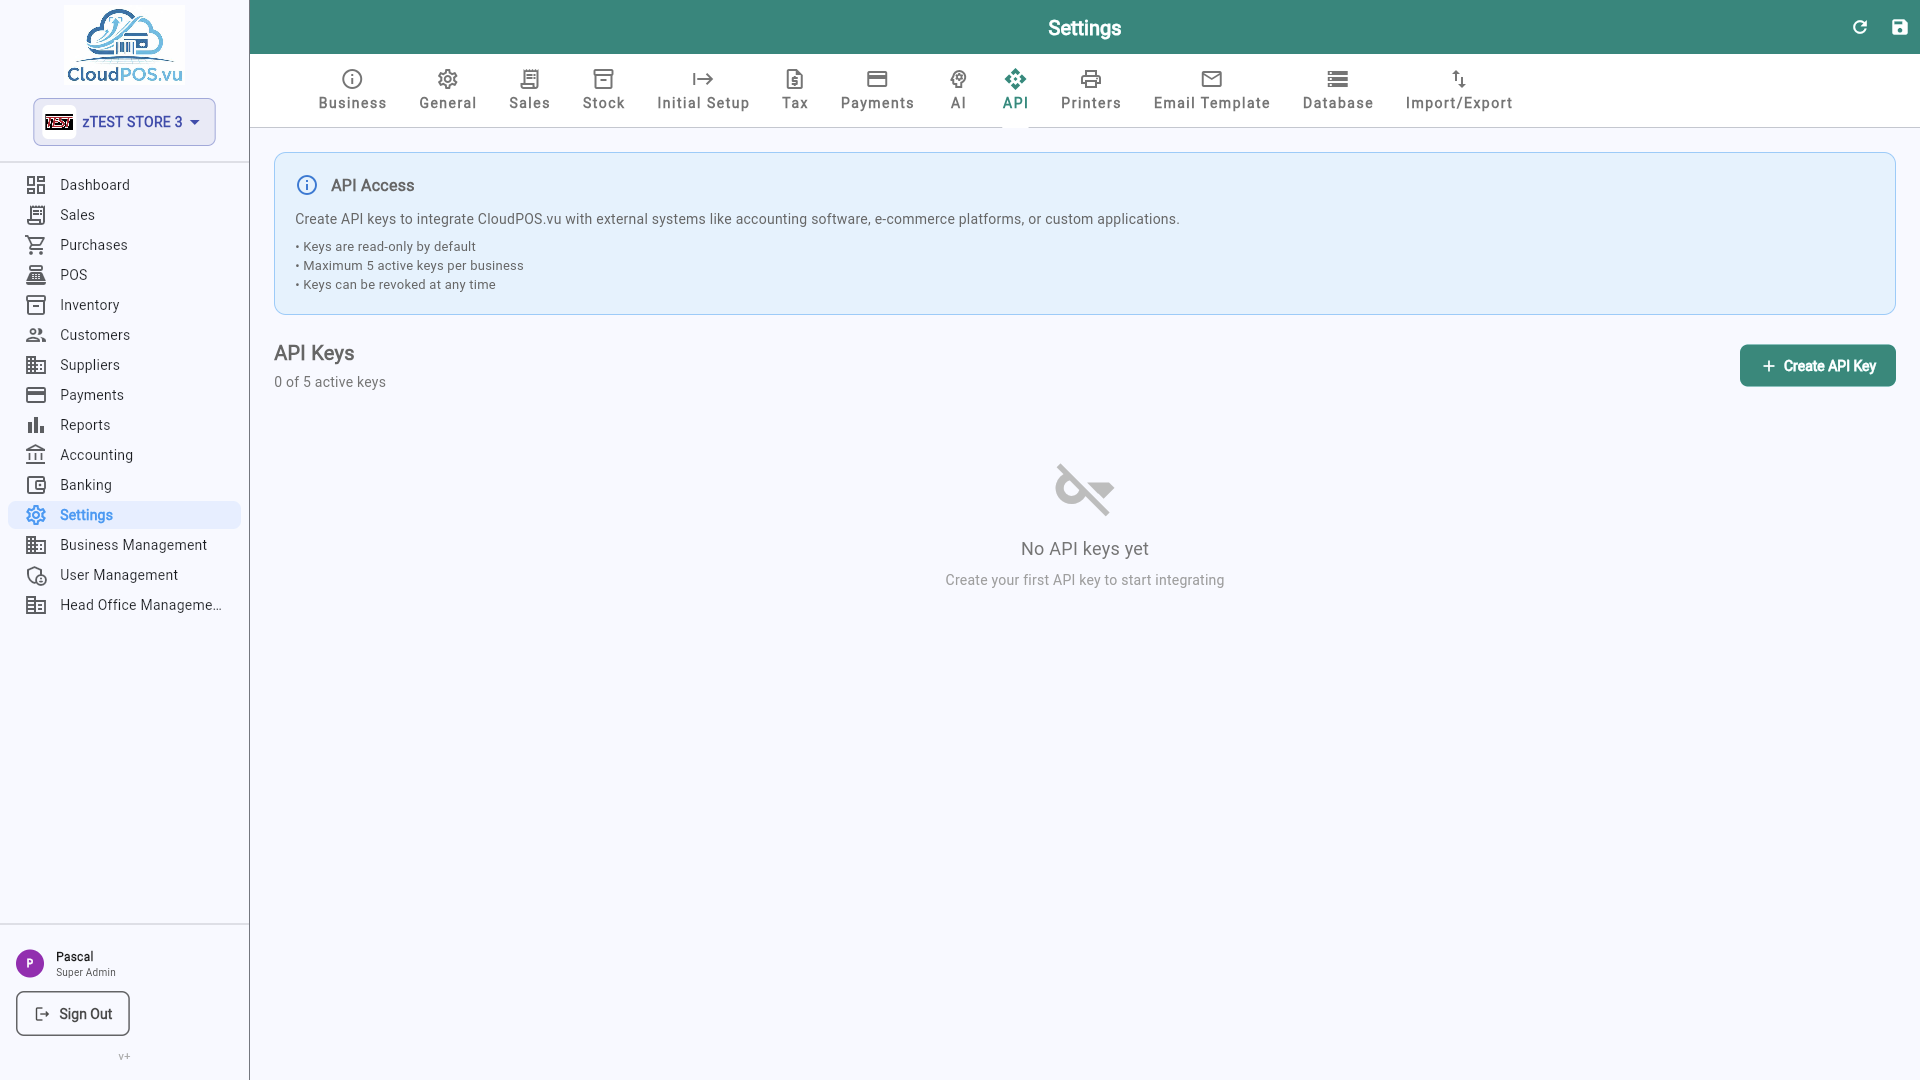
Generate and revoke API keys for external integrations. Keys are scoped to your business.
Configure webhook URLs to receive real-time notifications for events like new invoices or payments.
The Connectors tab links CloudPOS.vu to external systems. Importing data from a connector is done from the relevant module (e.g. Inventory); this tab stores the credentials and connection state.
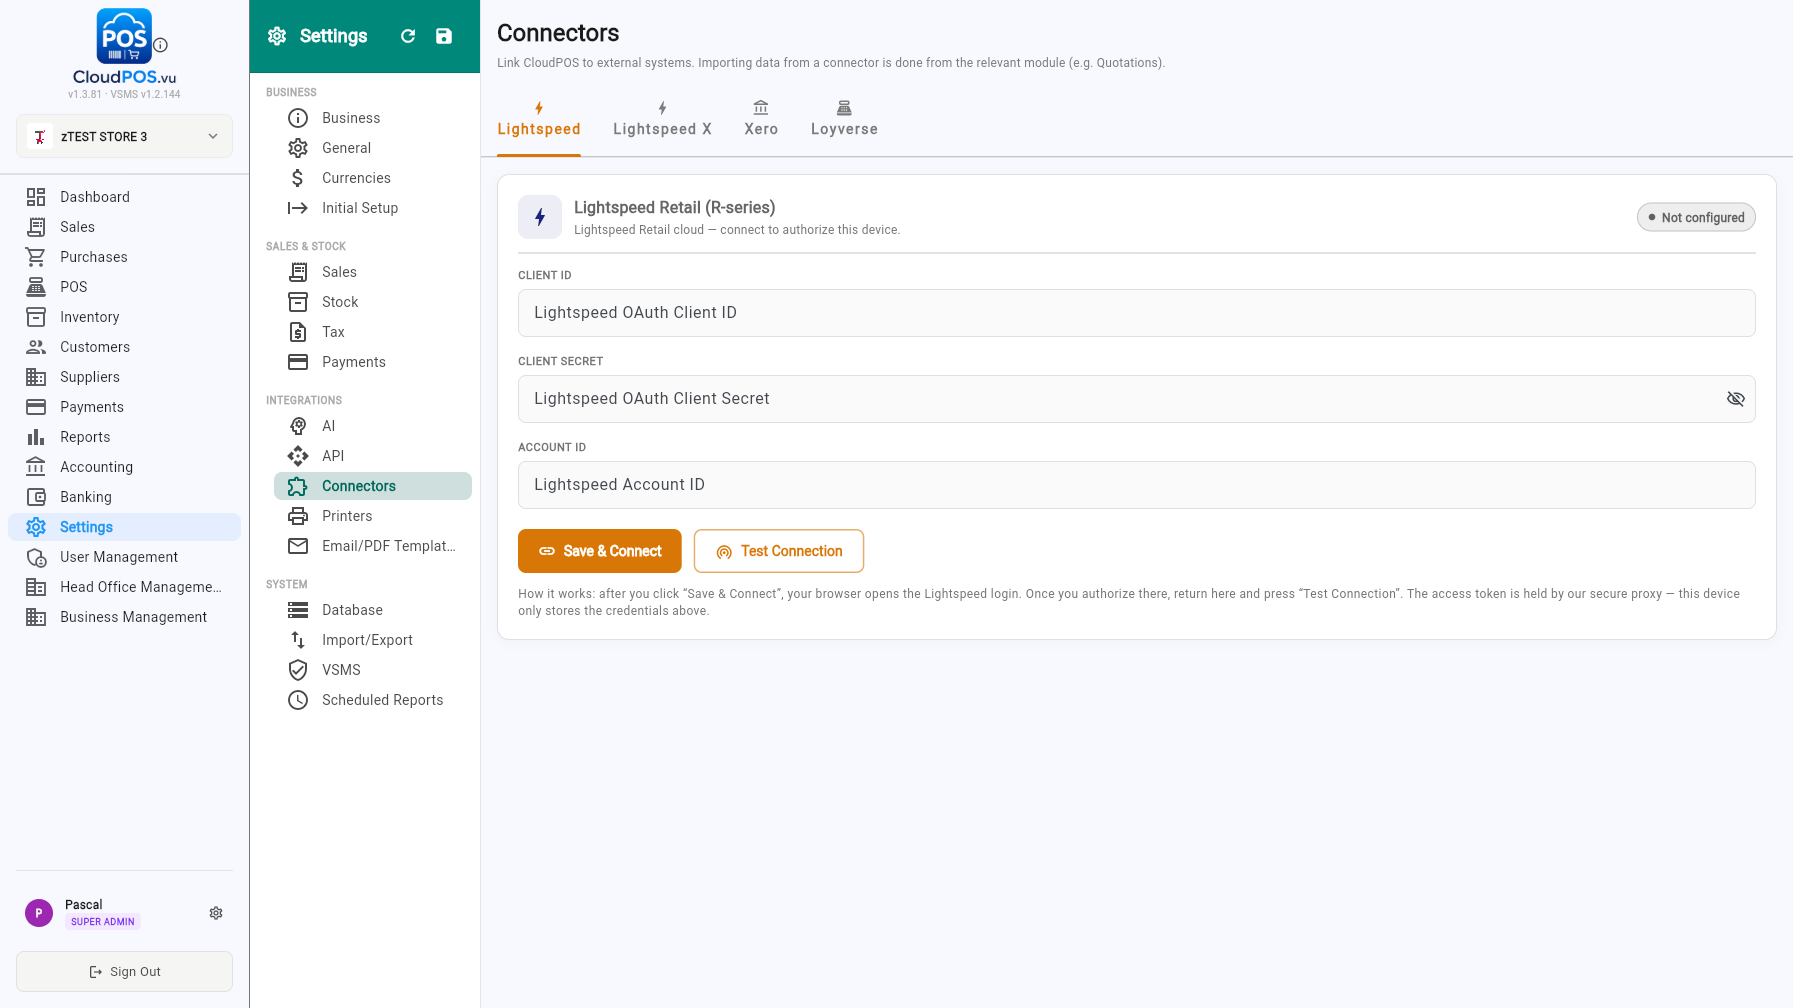
Enter the Client ID, Client Secret and Account ID, then Save & Connect and Test Connection. Once authorized, products and customers can be imported from LightSpeed.
Connect your Xero organisation, then map sales accounts, tax types and payment methods. Enable automatic posting and choose a daily posting time. The built-in schedule runs even when the app is closed.
Each closed POS Z-report posts as a separate Xero sales invoice. Backoffice B2B sales are grouped into one daily invoice. Recorded payments are applied through the mapped Xero bank accounts, with later B2B payments picked up on subsequent scheduled runs. Unpaid balances remain outstanding.
For separate revenue accounts, enable Post POS to different accounts and select an account for each POS and backoffice. Any source without an override keeps its existing sales mapping.
LightSpeed X (OnSite) and Loyverse connectors follow the same pattern — configure credentials, save, test.
The Printers tab configures POS receipt printers and label printers connected to your terminal.
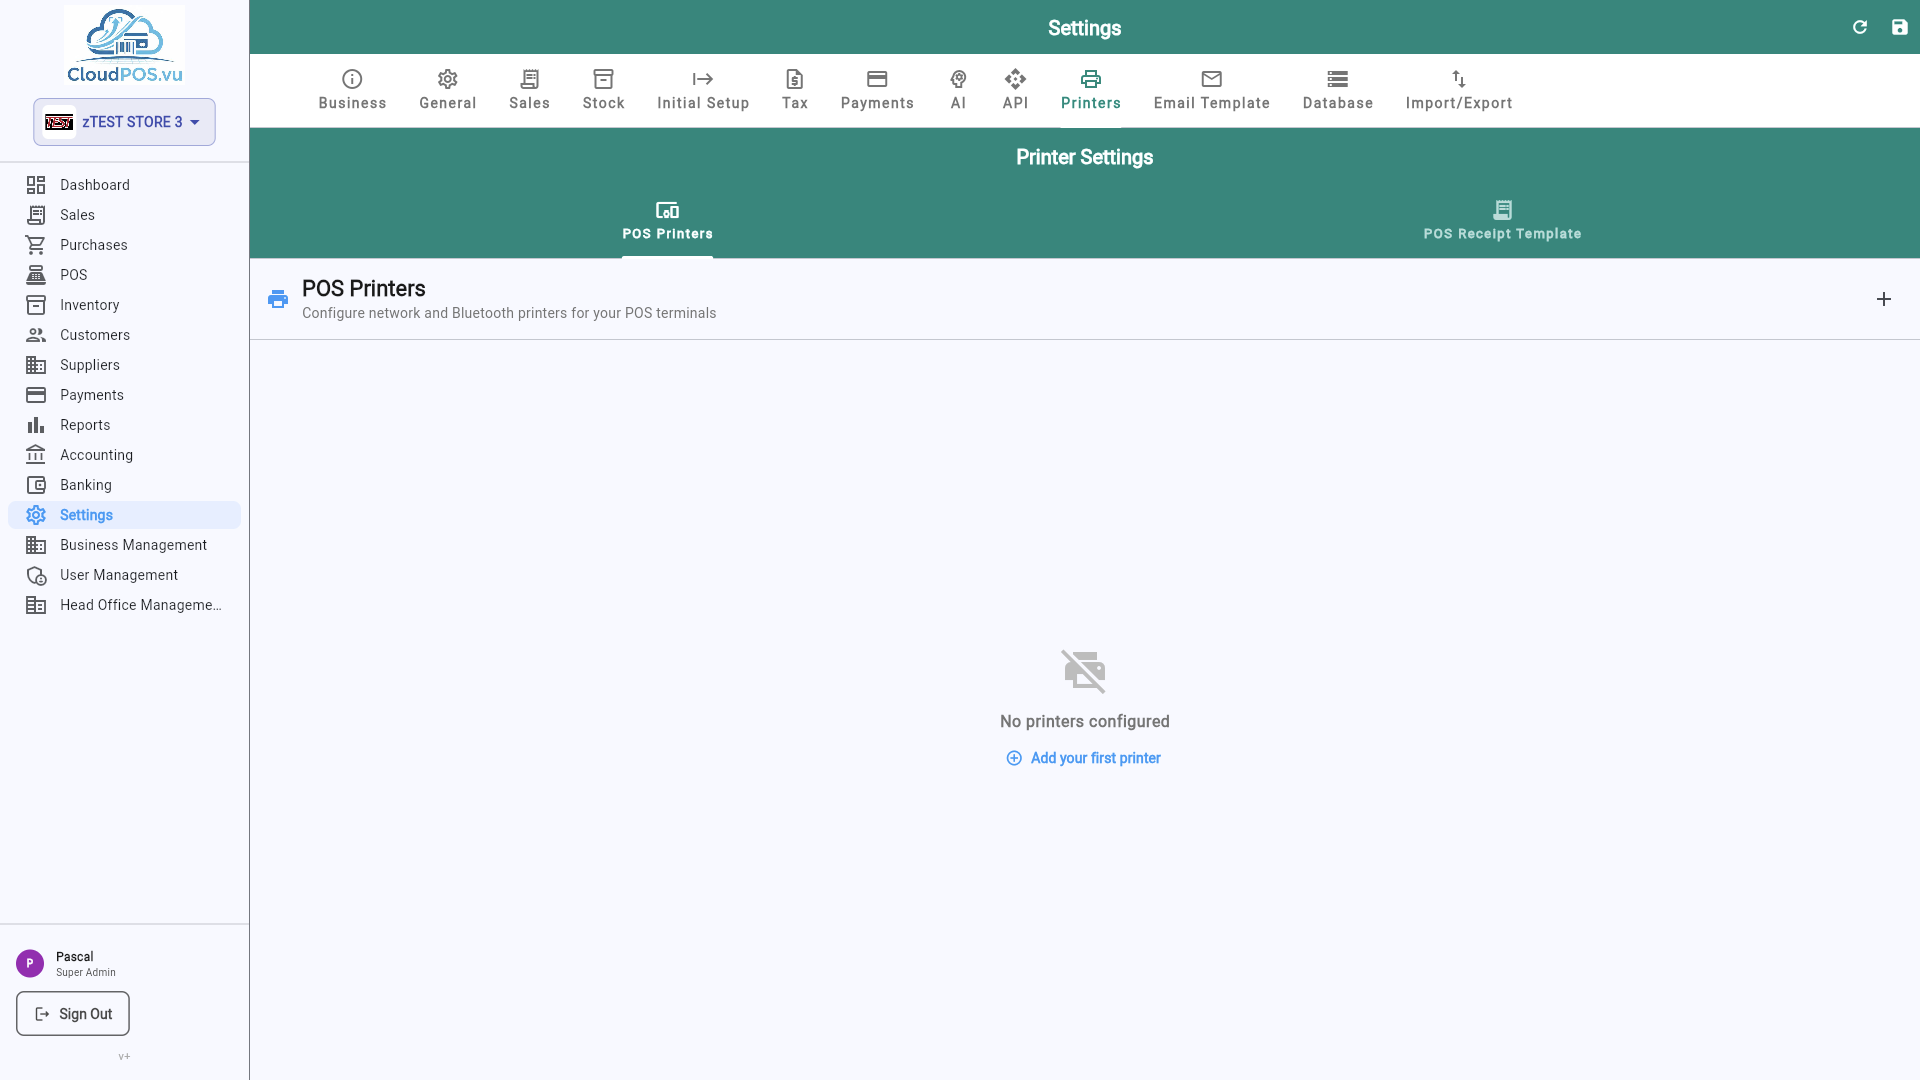
- Receipt Printer — Configure ESC/POS-compatible thermal printer (USB, Bluetooth, or network).
- Label Printer — Set up a barcode/price label printer for shelf labeling.
- Paper Size — Choose 58mm or 80mm receipt width.
The Email Template tab customizes the default email sent when you email invoices, quotations, or receipts to customers.
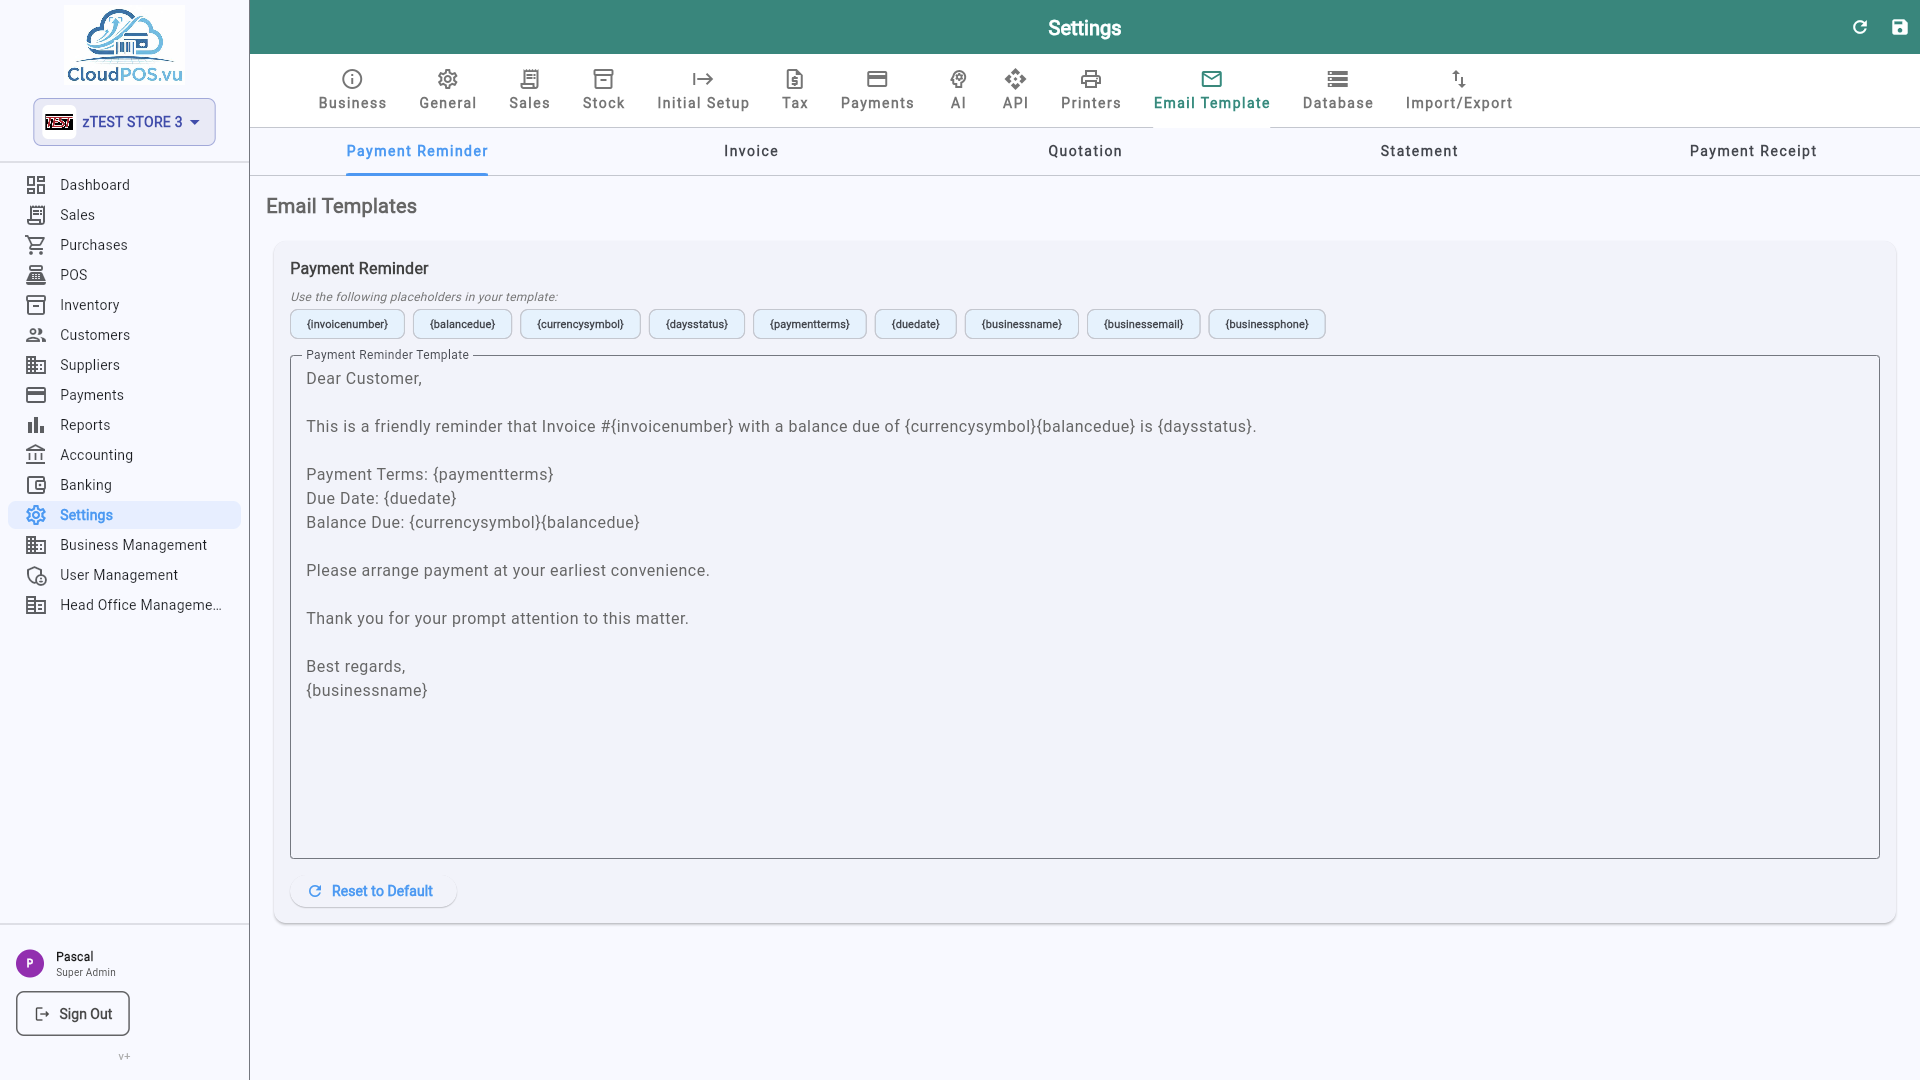
- Subject Line — Customizable with variables like {{invoice_number}}, {{customer_name}}, {{total}}.
- Email Body — Rich text editor with dynamic placeholders for personalized messages.
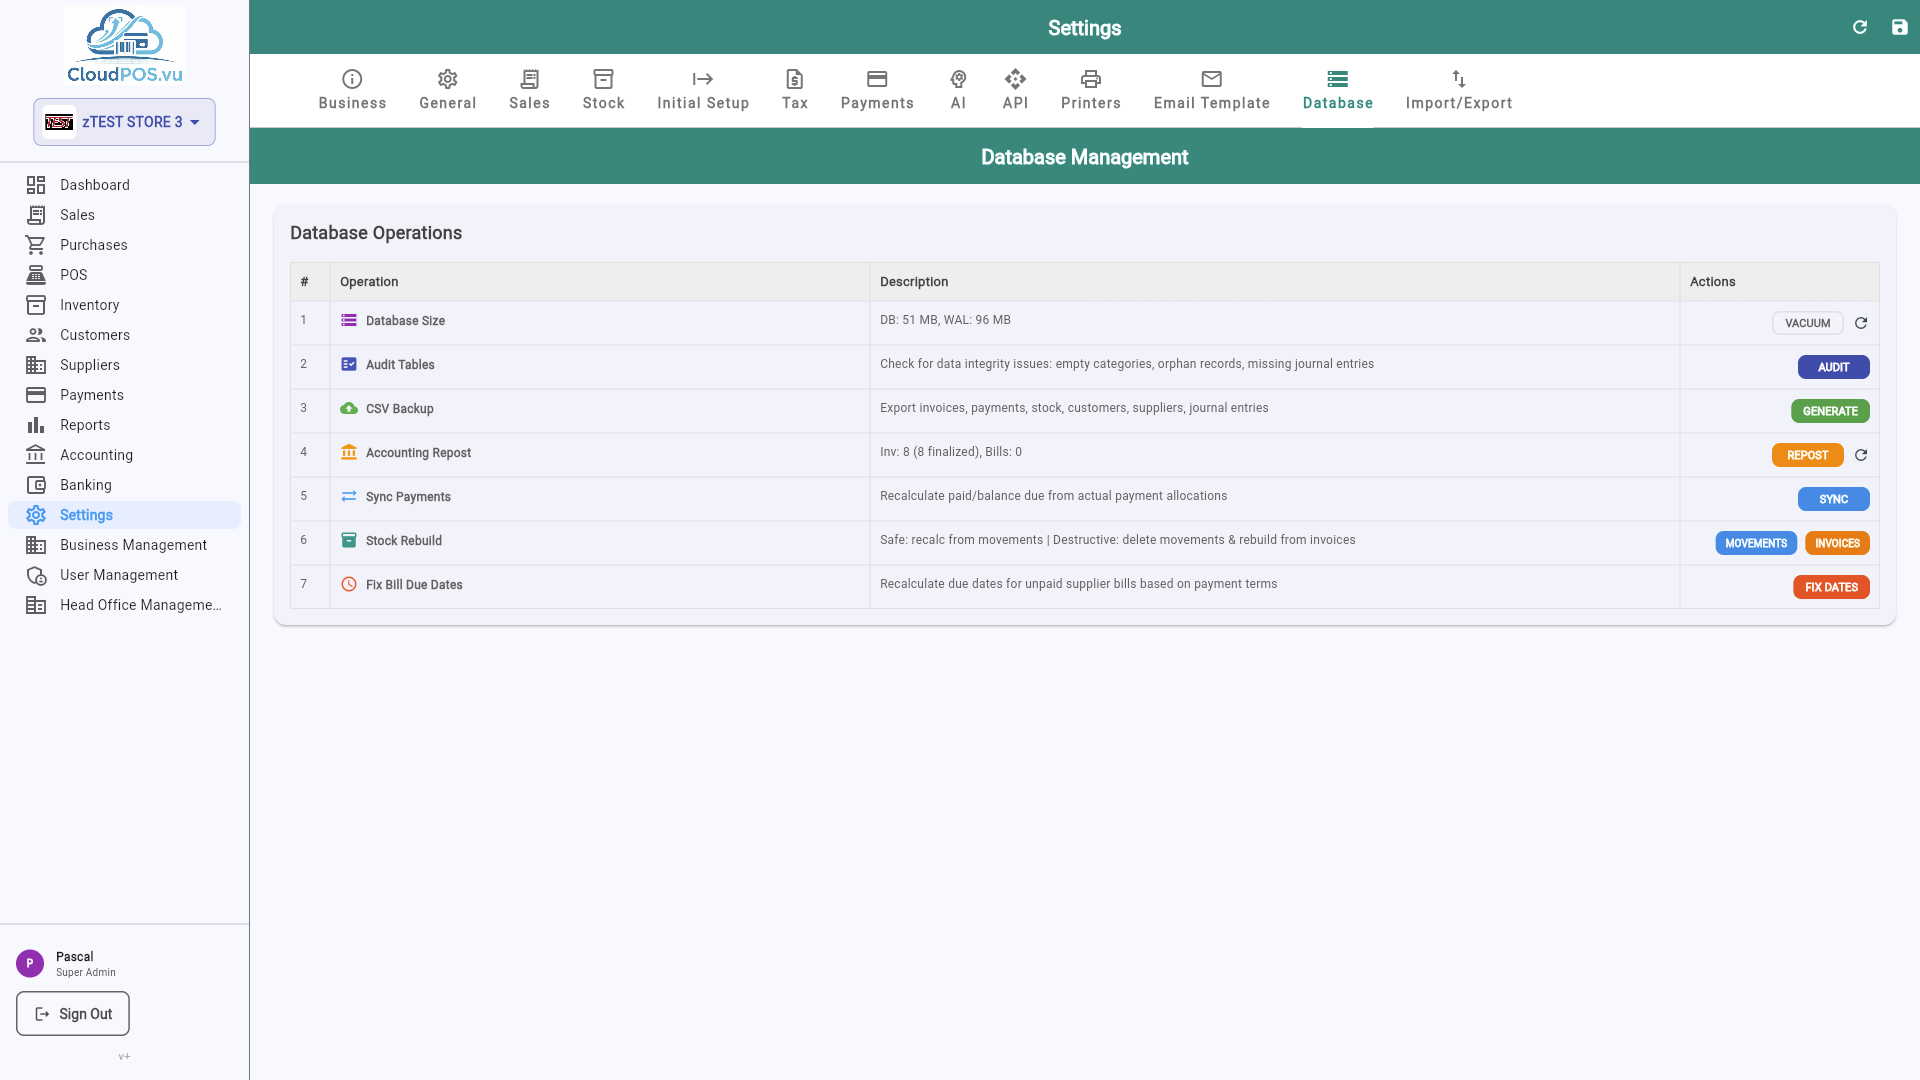
The Database tab provides low-level database management tools — migrations, backups, and maintenance.
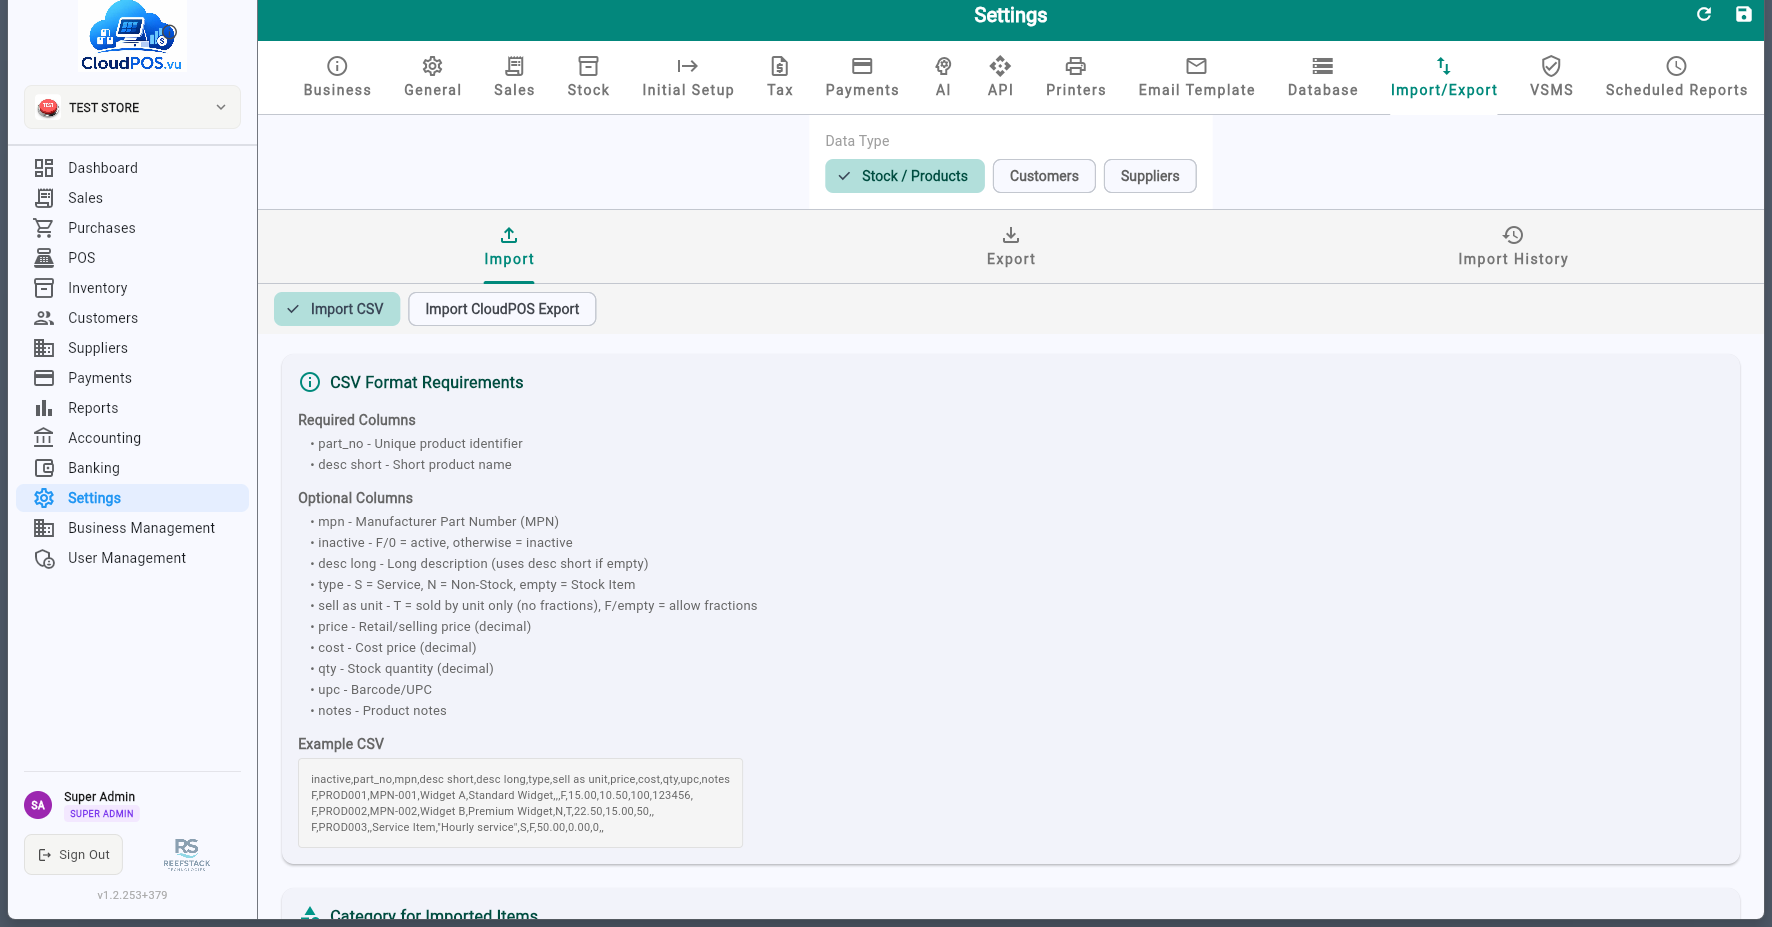
The Import / Export tab lets you bulk-import products, customers, and transaction data from CSV files, or export your catalog for backup or migration.
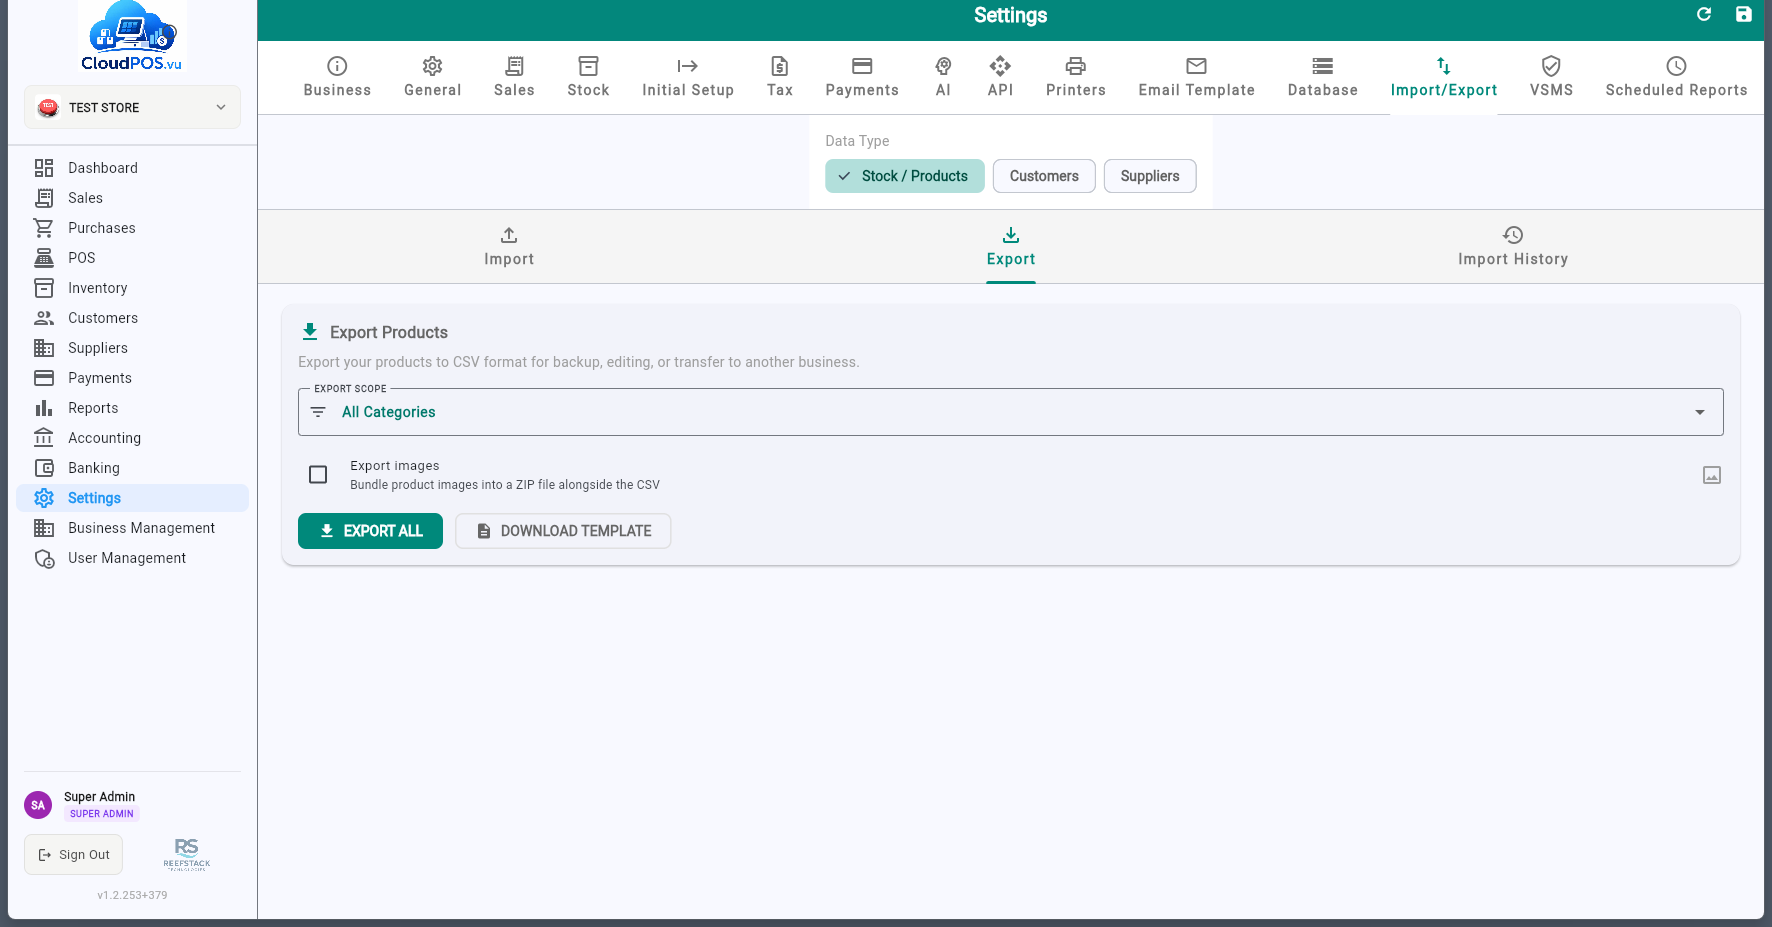
Download products, customers, invoices, or chart of accounts as CSV files.
Upload CSV files to bulk-create products, customers, or inventory. Includes preview and validation before committing.
Import transaction line items from CSV files containing article ID, price, quantity, and other necessary information. Items are matched to the product catalog automatically.
View all past imports with the option to undo. Ensures data integrity for bulk operations.
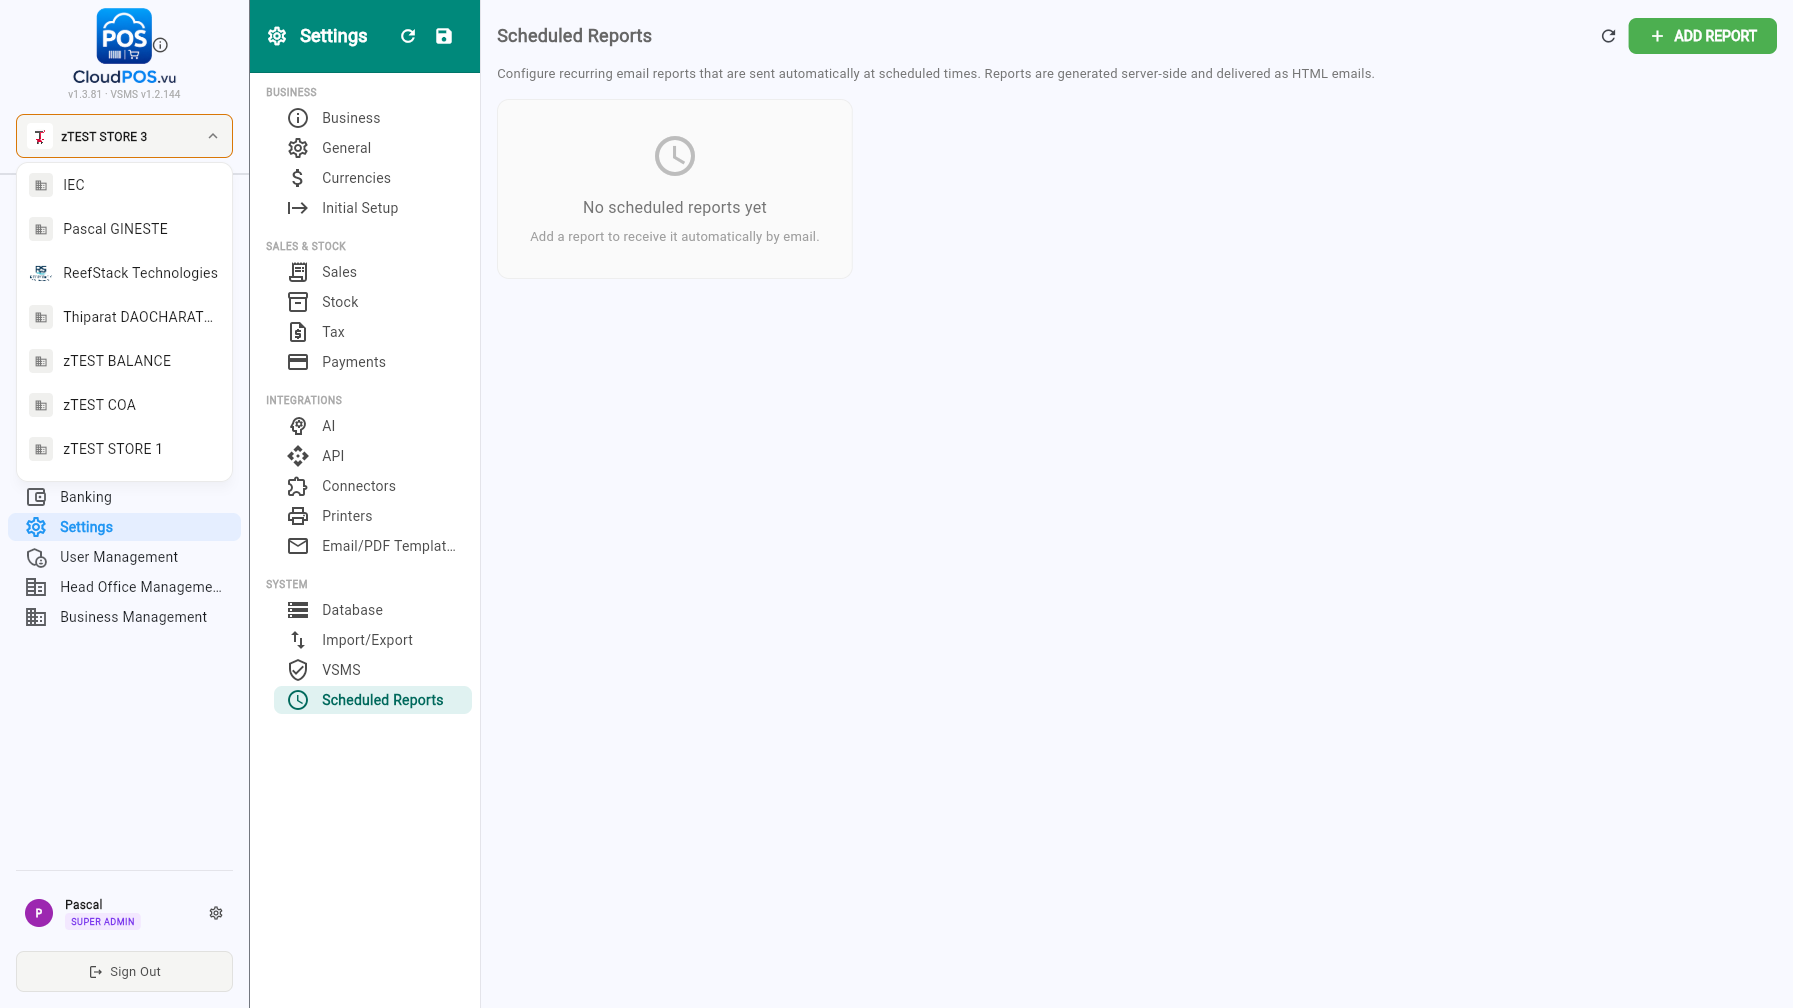
The Scheduled Reports tab lets you configure recurring reports that are automatically generated and sent by email at scheduled times.
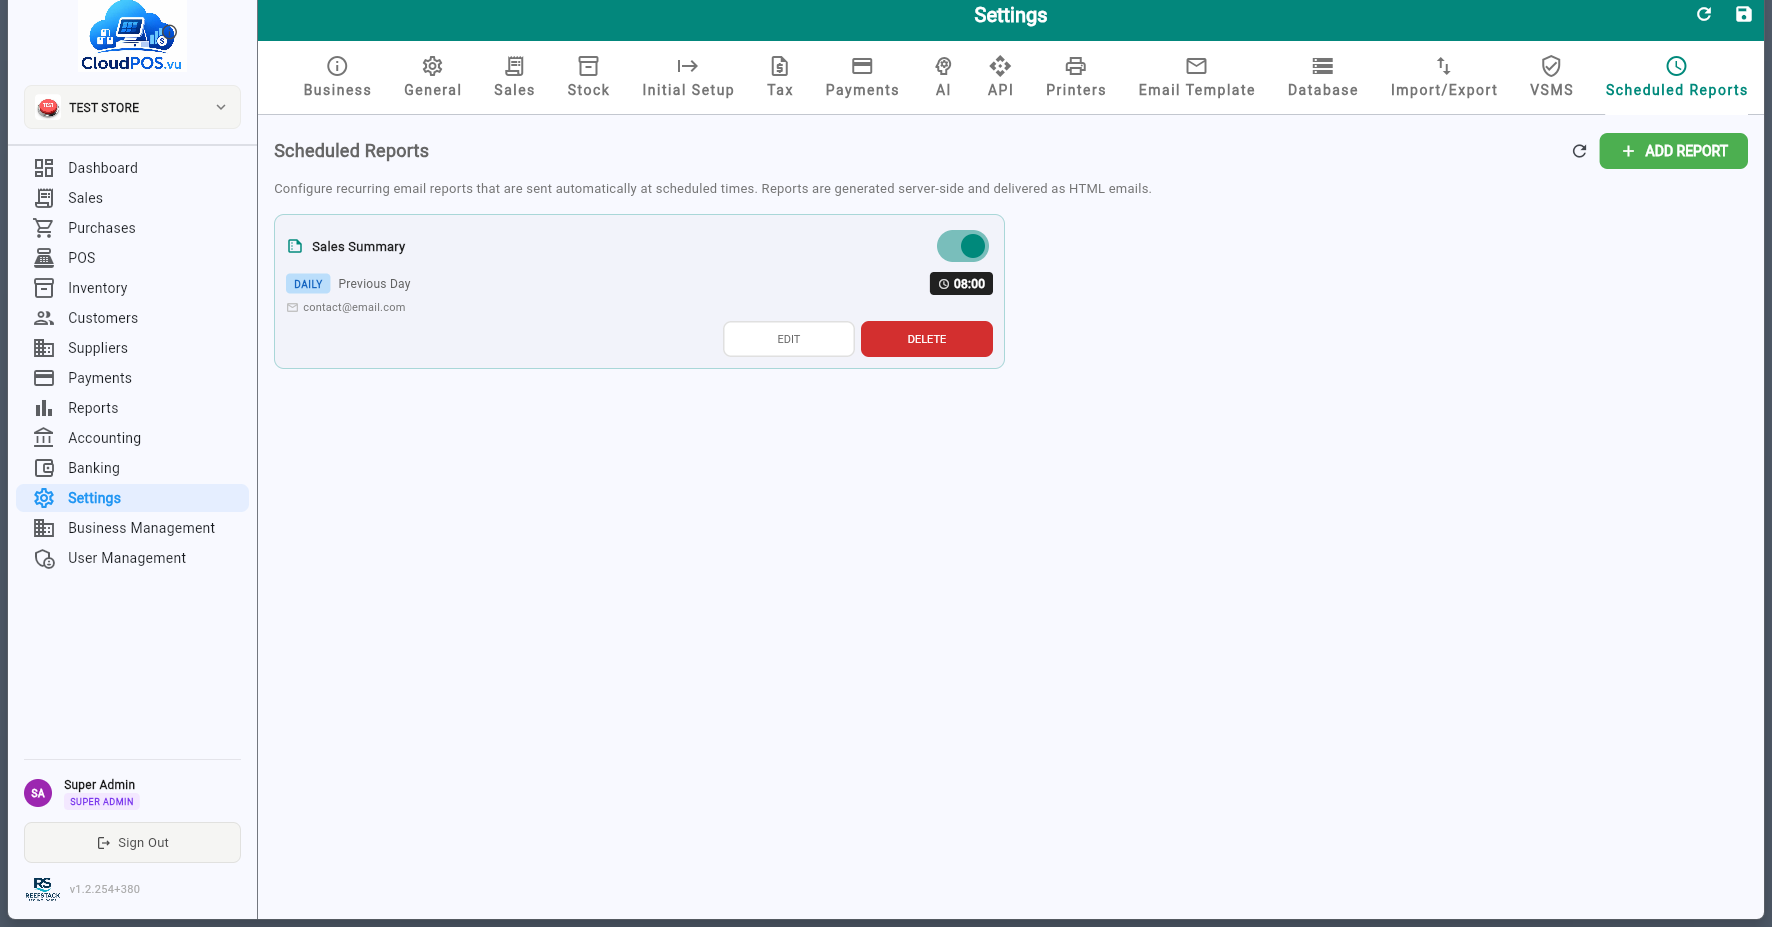
Each report card shows the report type, frequency, period, send time, and recipient emails. Use the toggle switch to enable or disable a report without deleting it.
Creating a Report
Click ADD REPORT to open the configuration dialog:
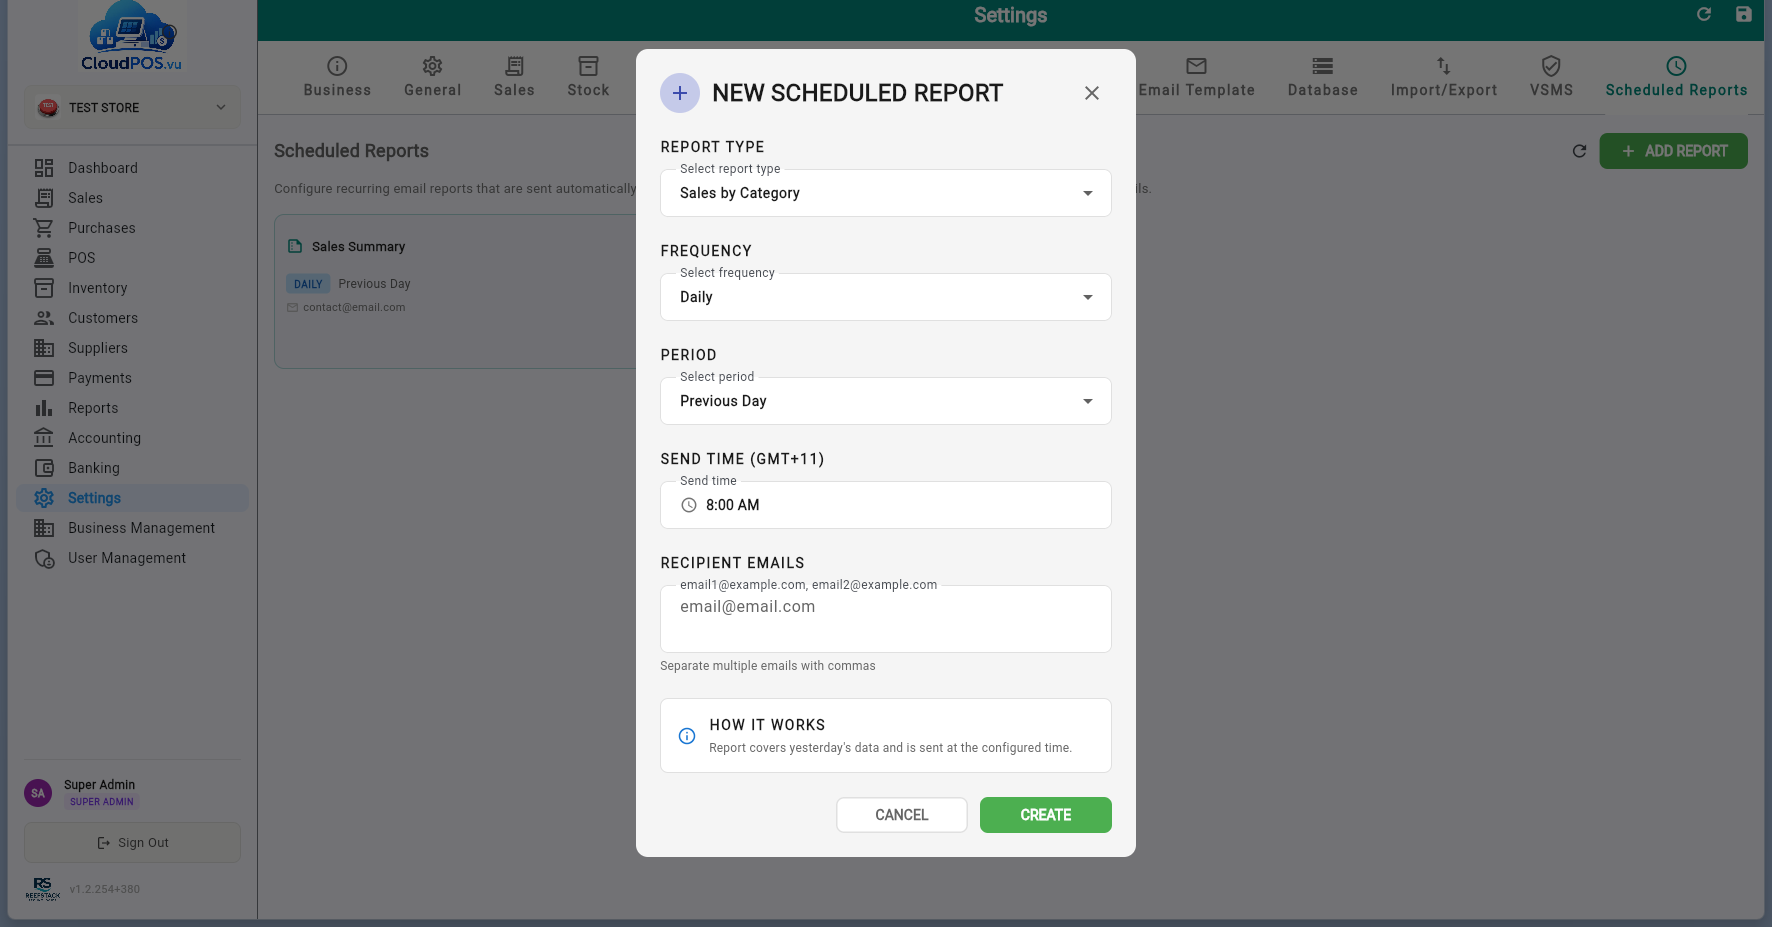
Sales Summary — total sales, tax, and payment breakdown.
Sales by Product — sales grouped by product.
Sales by Category — sales grouped by category.
Customer Balance — point-in-time snapshot of outstanding customer balances (no period selection).
Payment Received — all payments received in the period.
Daily — sent every day at the configured time.
Weekly — sent on the selected day of the week (Mon–Sun).
Monthly — sent on the selected day of the month (1–31).
Previous — covers the completed period (yesterday, last week, last month).
Current — covers the ongoing period so far (today, this week, this month).
The time the report is generated and emailed, in GMT+11 (Vanuatu time).
One or more email addresses separated by commas. Reports are sent as HTML emails.
Sales
Tax invoices, quotations, proforma invoices, layby advance sales, credit notes and the payment desk
CloudPOS.vu supports two main sales flows:
Create a quotation, then convert directly to a tax invoice. Or create the tax invoice directly.
Create a Proforma Invoice for the layby. Collect payments via Advance Sales. When fully paid, use Complete Sale — all advances are refunded via SDC and one final Tax Invoice is created.
Each document type has its own number prefix: Q- for quotations, PI- for proforma invoices, AS- for advance sales, INV- for tax invoices, and CCN- for credit notes.
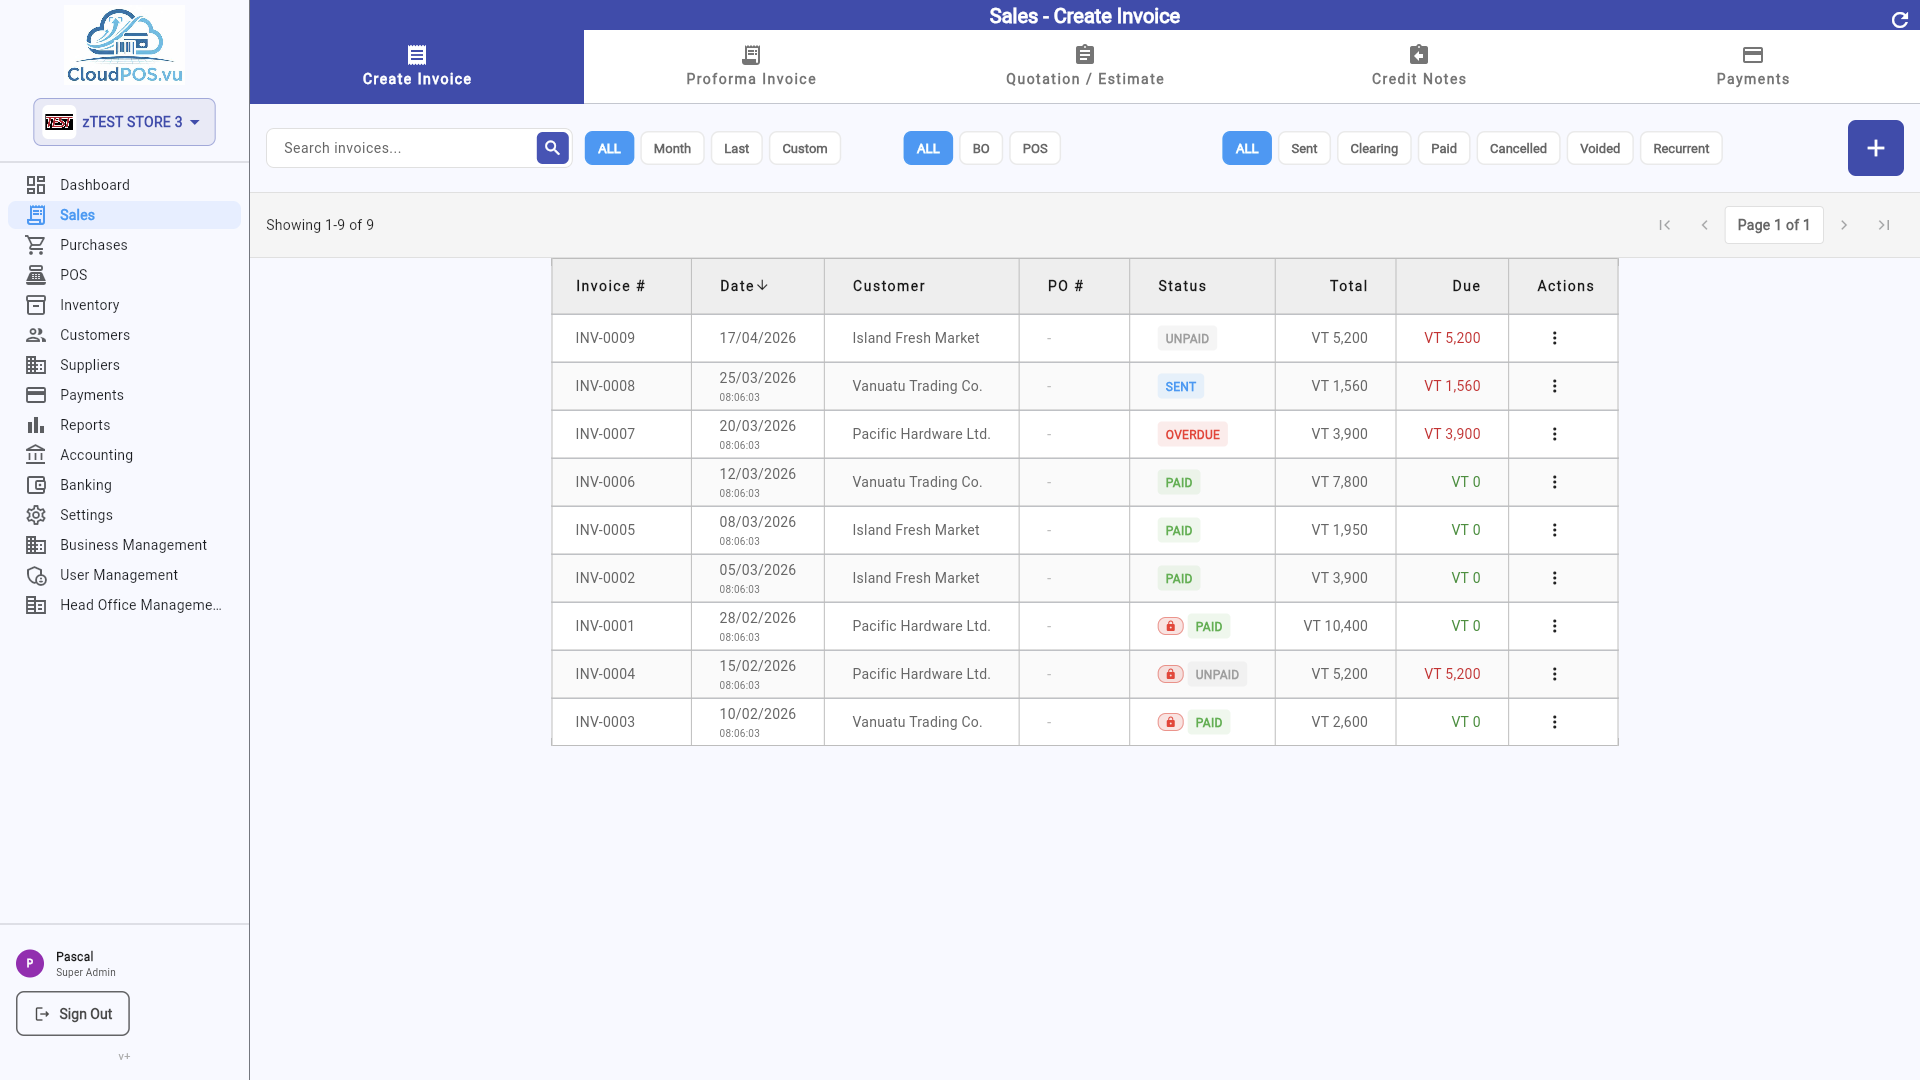
The Invoices tab shows all your tax invoices with their current status. This serves as the electronic journal — you can search and filter invoices on demand.
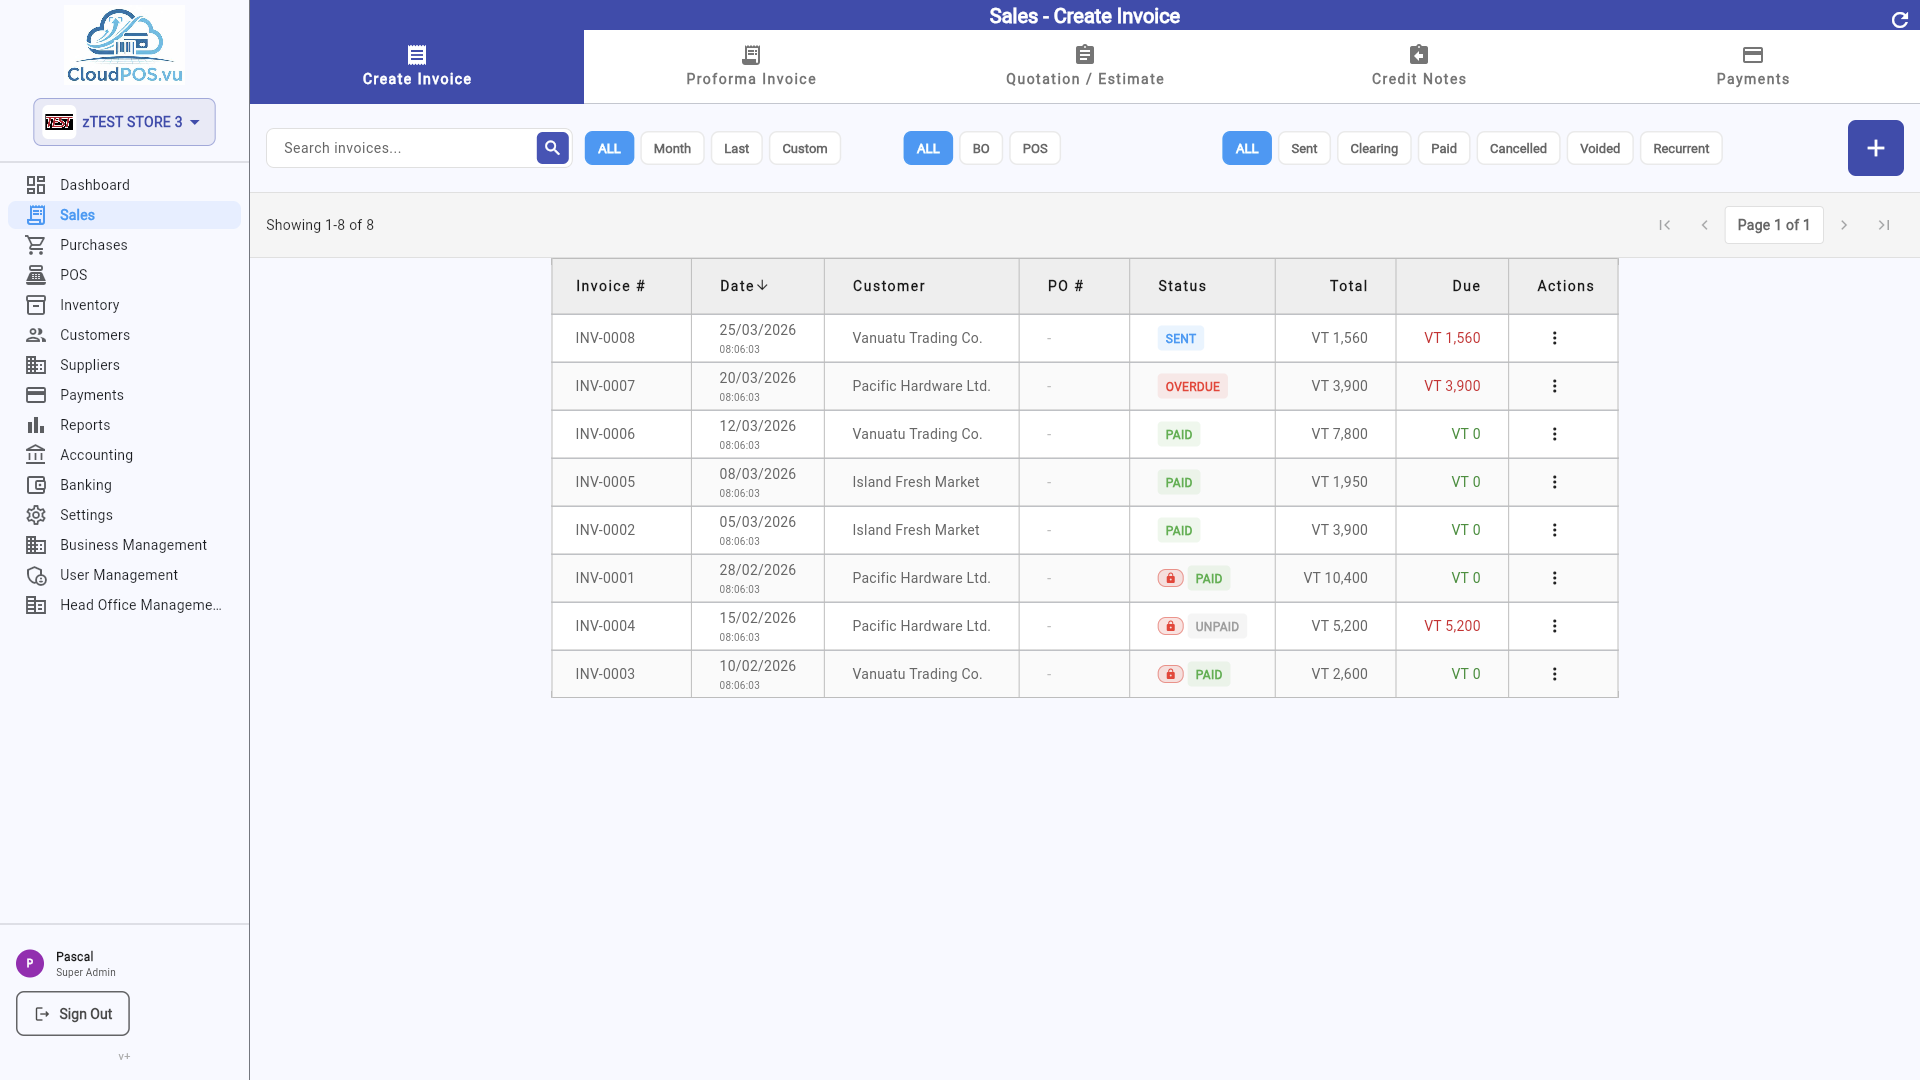
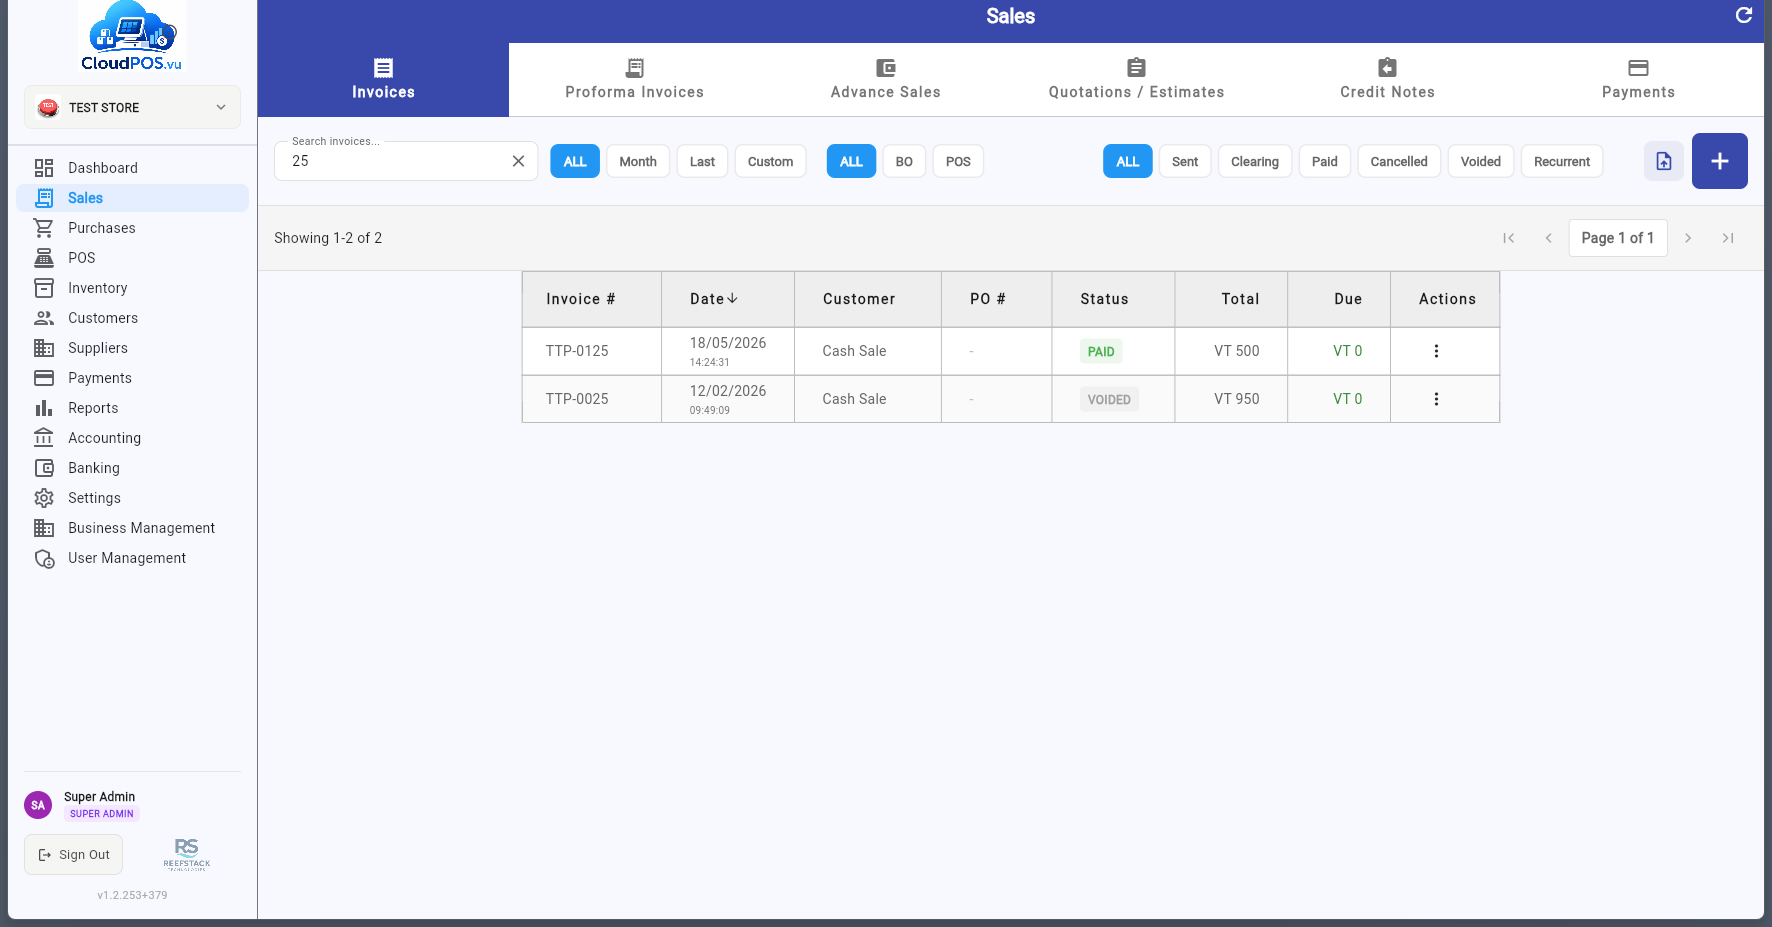
Each row displays the invoice number, SDC invoice number, customer name, date, total amount, amount paid, balance due, and status. Click any invoice to view its full details. Use the search bar to find specific invoices, or filter by:
- Date range — All, Month, Last, Custom.
- Source — BO (back office) or POS (terminal sales).
- Status — All, Paid, Recurrent, Part paid, Refunded, Unpaid, Clearing, Cancelled, Voided.
Use the ⋯ button on each row for the action menu (View, Edit content only, Print, Receipt PDF, Print Copy SDC, Email, Change comment, Add recurrence, Make Credit Note, Payment Information, Cancel Payment, Cancel Invoice), and the toolbar buttons to export the list to PDF/CSV or create a new tax invoice.
Statuses
Invoice issued but not yet paid — balance due equals total. Actions: Record Payment, Make Credit Note, Send, Print, Email, Cancel.
Invoice has been emailed to the customer — awaiting payment. Actions: Record Payment, Make Credit Note, Send, Print, Email, Cancel.
Payment received by cheque — clearing in progress. Automatically changes to Paid once cleared. Actions: Make Credit Note, Print, Email.
Invoice fully paid — balance is zero. Actions: Payment Information, Cancel Payment (admin only), Make Credit Note, Print, Email.
Computed automatically — a Sent invoice becomes Overdue after 30 days. Shown with a red badge in the list. Actions: Same as Sent.
Only for unpaid invoices (no payment received). Issues a Normal Refund via SDC, reverses accounting entries, and stores the refund receipt on the same invoice. Cancel is greyed out for paid invoices — create a Credit Note instead. Blocked when VAT period is locked.
Click the + button on the Invoices tab to open a new blank invoice form:
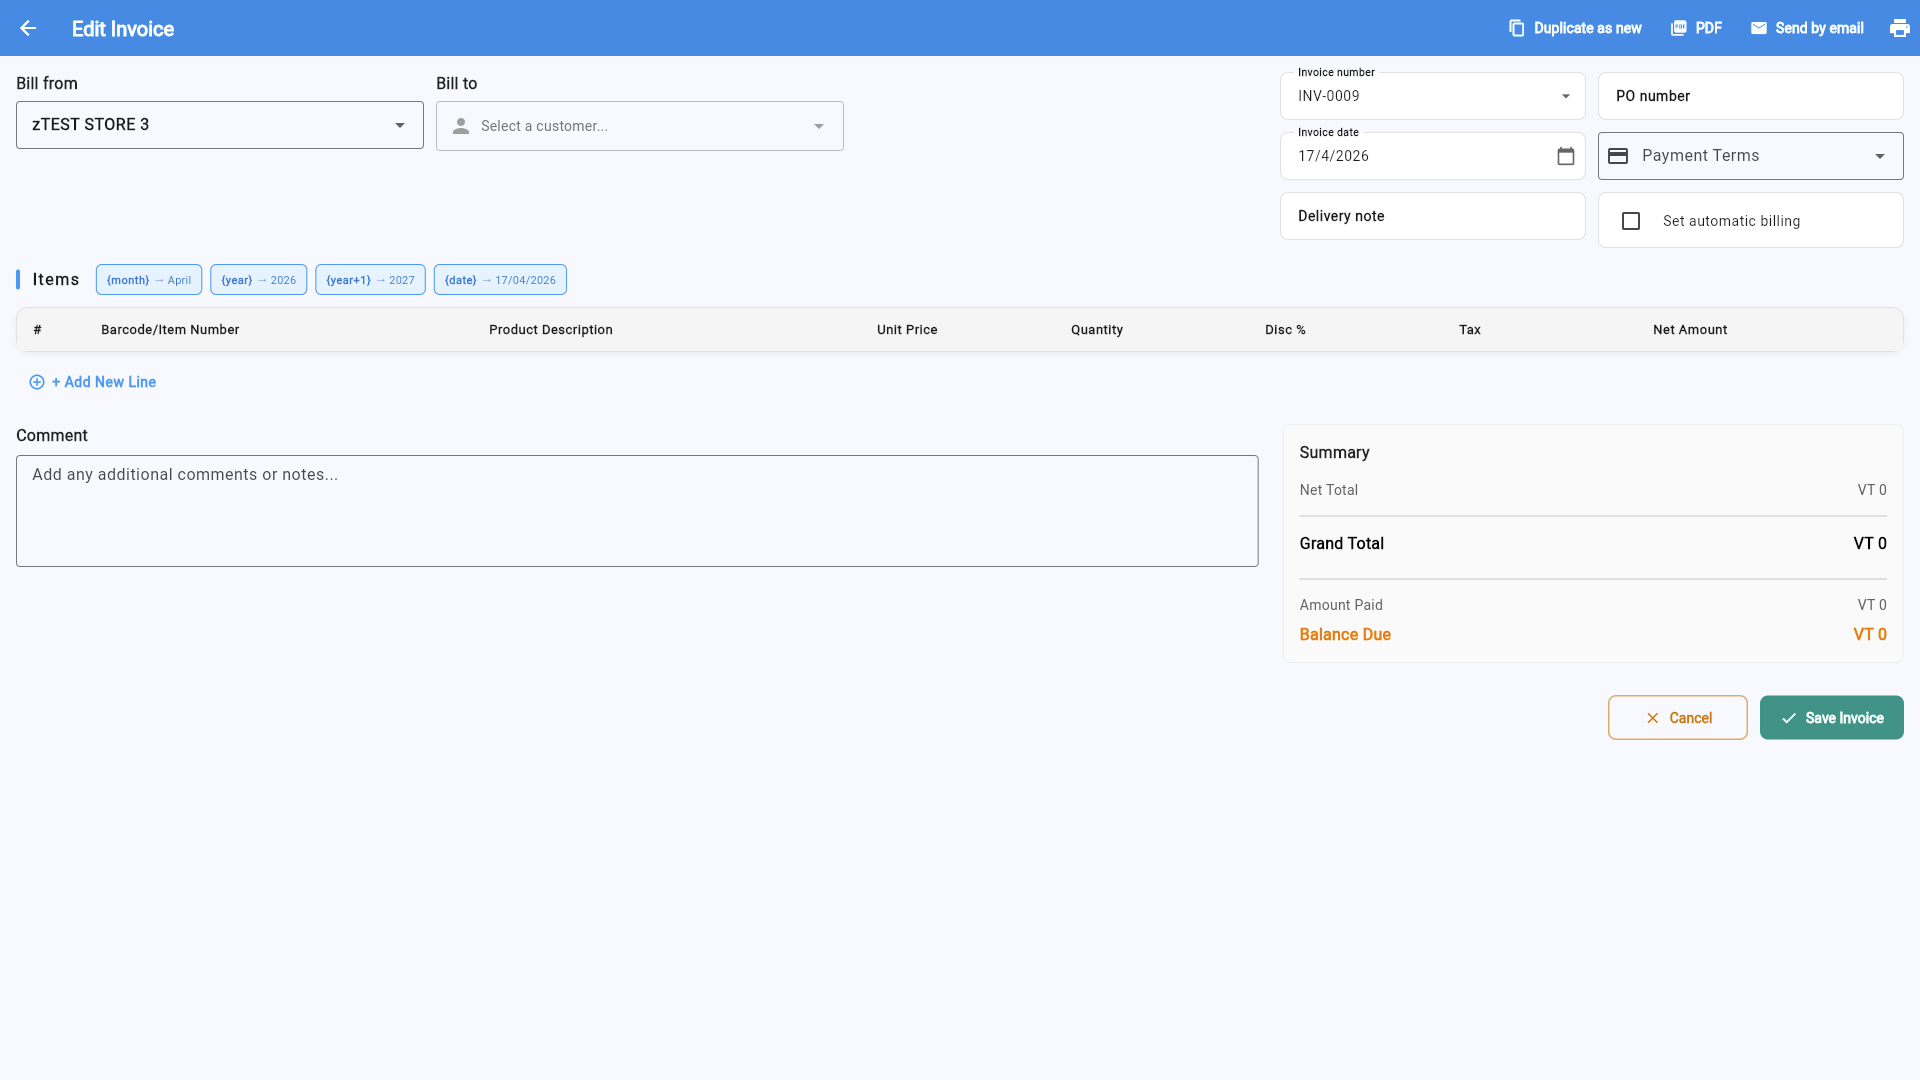
Fill in the invoice by selecting a customer, adding line items, and reviewing totals:
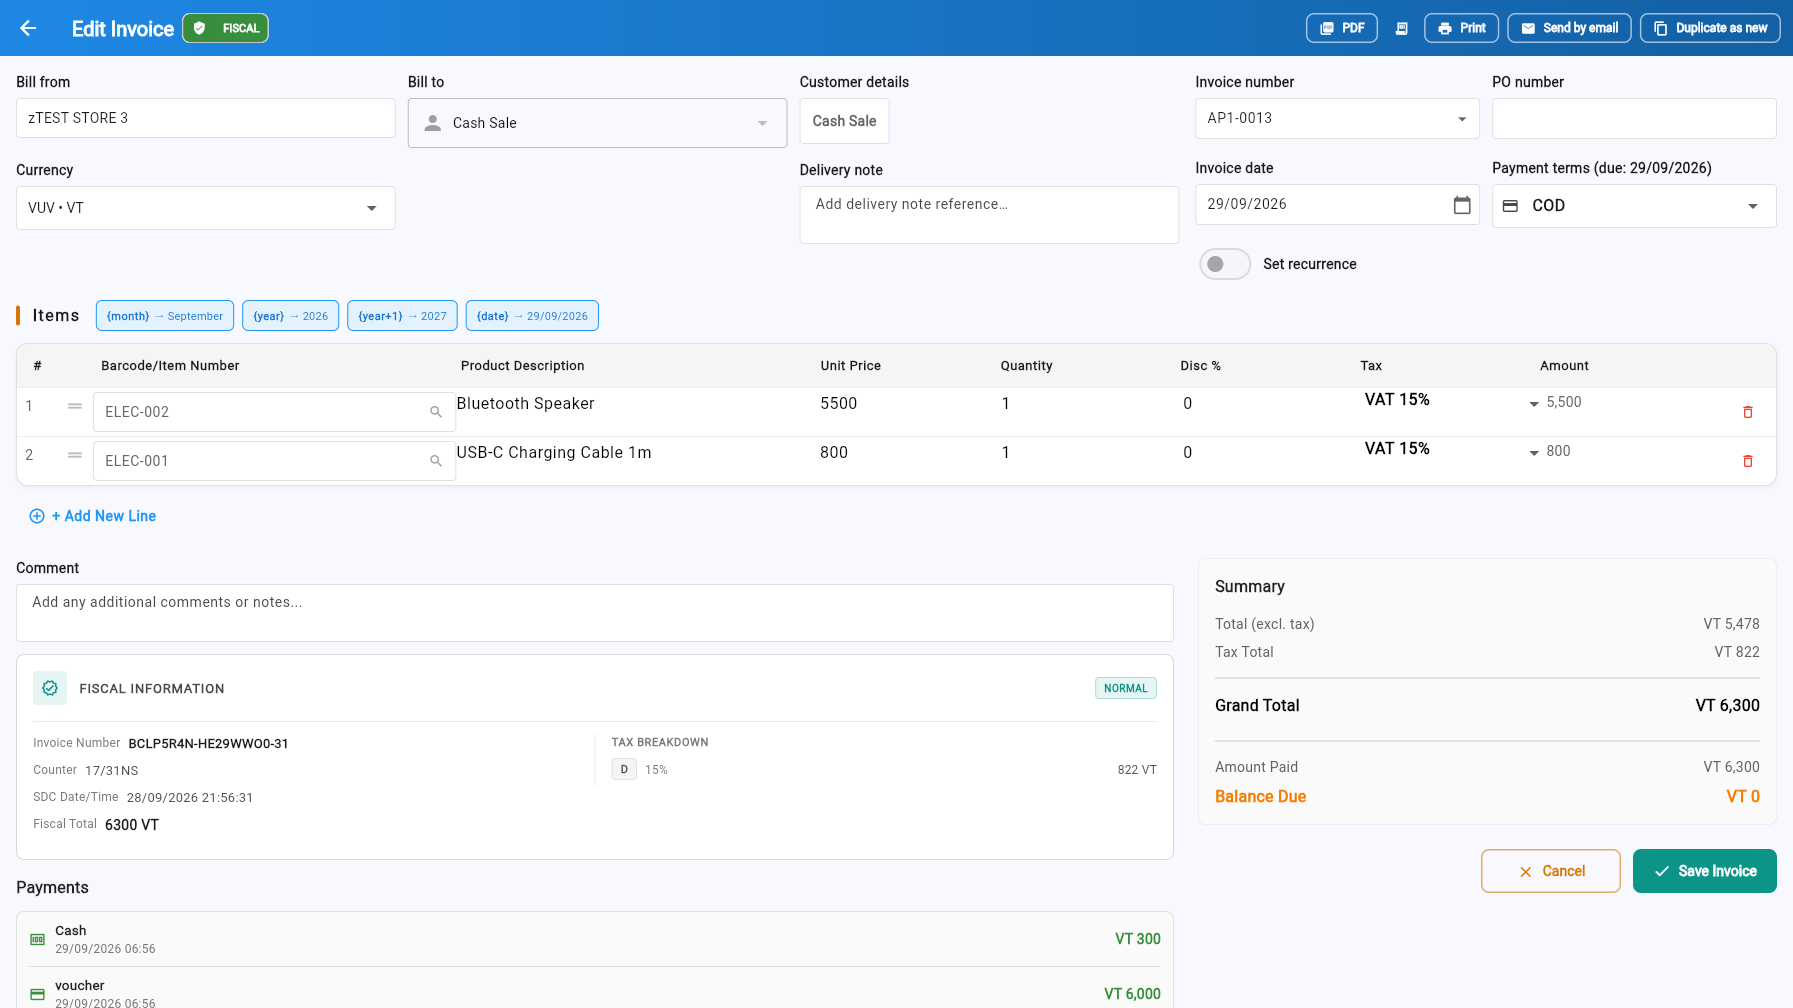
- Select a customer — Choose from your customer list or create a new one on the fly.
- Set the date — Defaults to today; adjust as needed.
- Add line items — Search products by name or SKU, or enter a manual line. Quantity, unit price, and tax are calculated automatically.
- Review totals — Subtotal, VAT, and total are computed in real time.
- Save — The invoice is posted with status Unpaid and the next invoice number is auto-generated (e.g. INV-0009).
Recurring Invoices
Turn on Set recurrence on the invoice form to make the invoice repeat automatically. Choose a frequency — Every week, Every month, Every year — and the invoice gets a Recurring badge; a Recurrent filter in the list shows all recurring invoices.
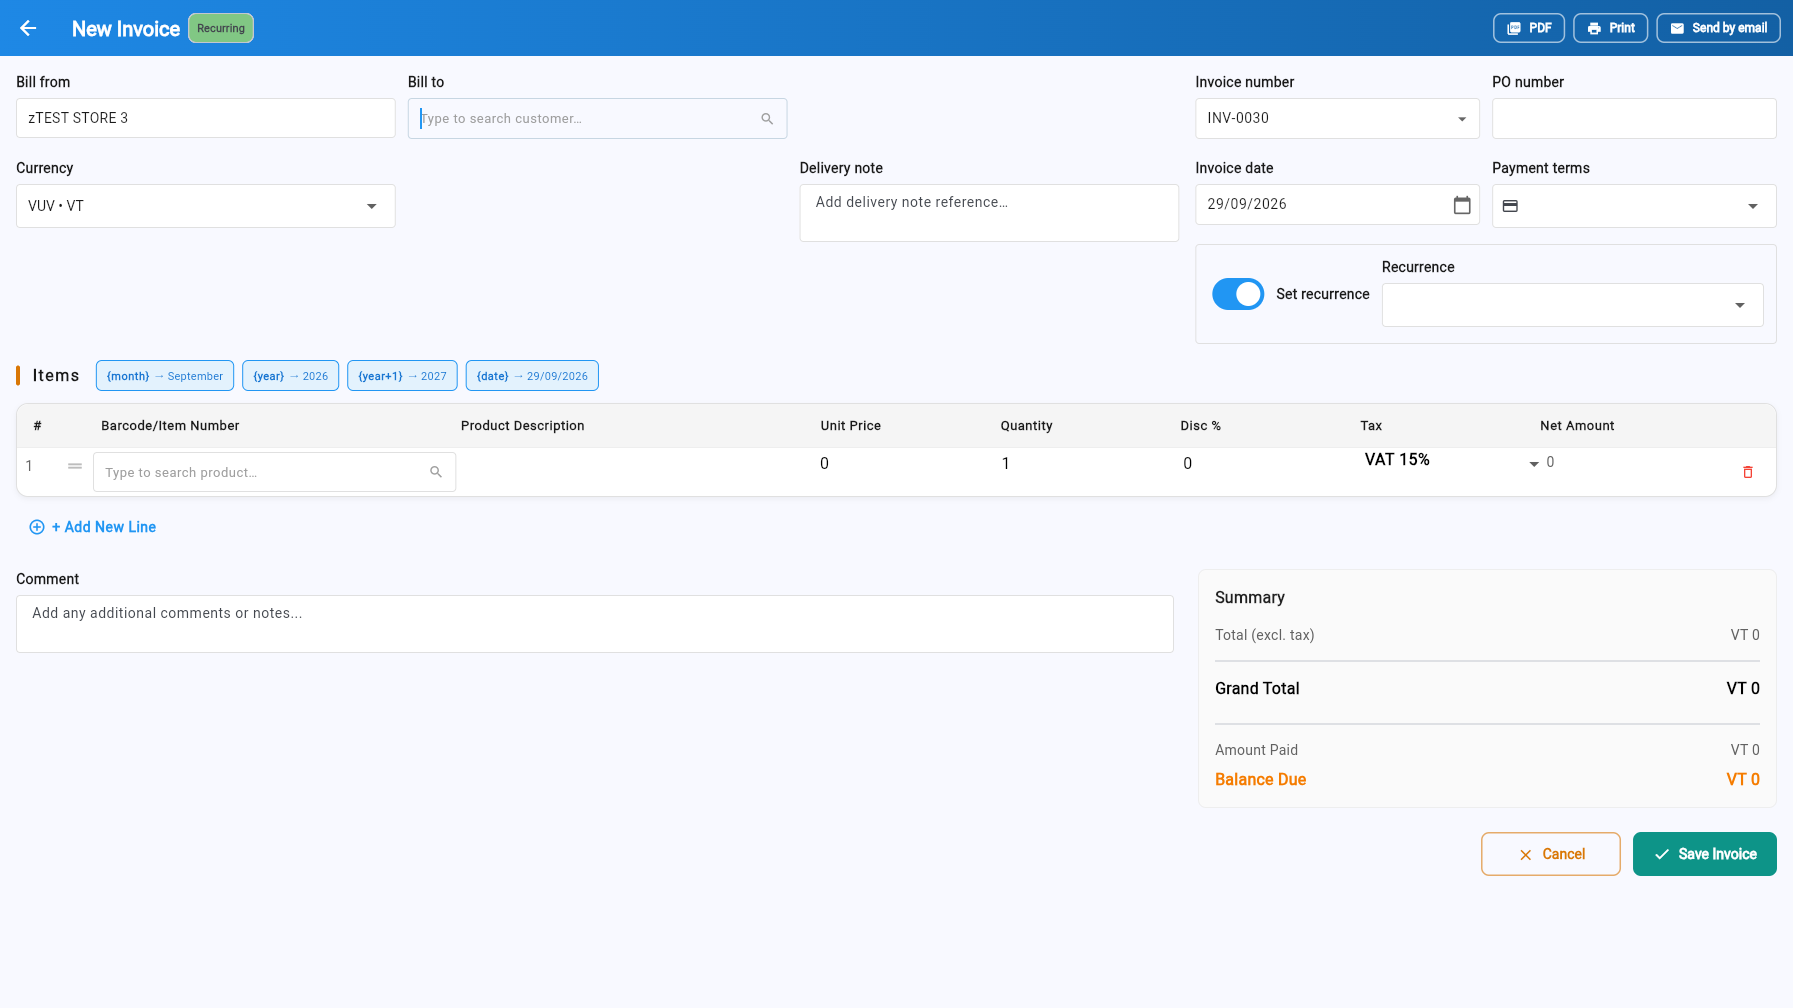
Line items support template variables that are replaced with the issue-date values each time the invoice recurs:
- {(month)} — month name (e.g. September)
- {(year)} — current year (e.g. 2026)
- {(year+1)} — next year (e.g. 2027)
- {(date)} — the invoice date
You can also add or change recurrence later from the invoice row's ⋯ → Add recurrence action.
Quotations let you provide a price estimate to a customer before confirming a sale. They have no accounting or inventory impact until converted.
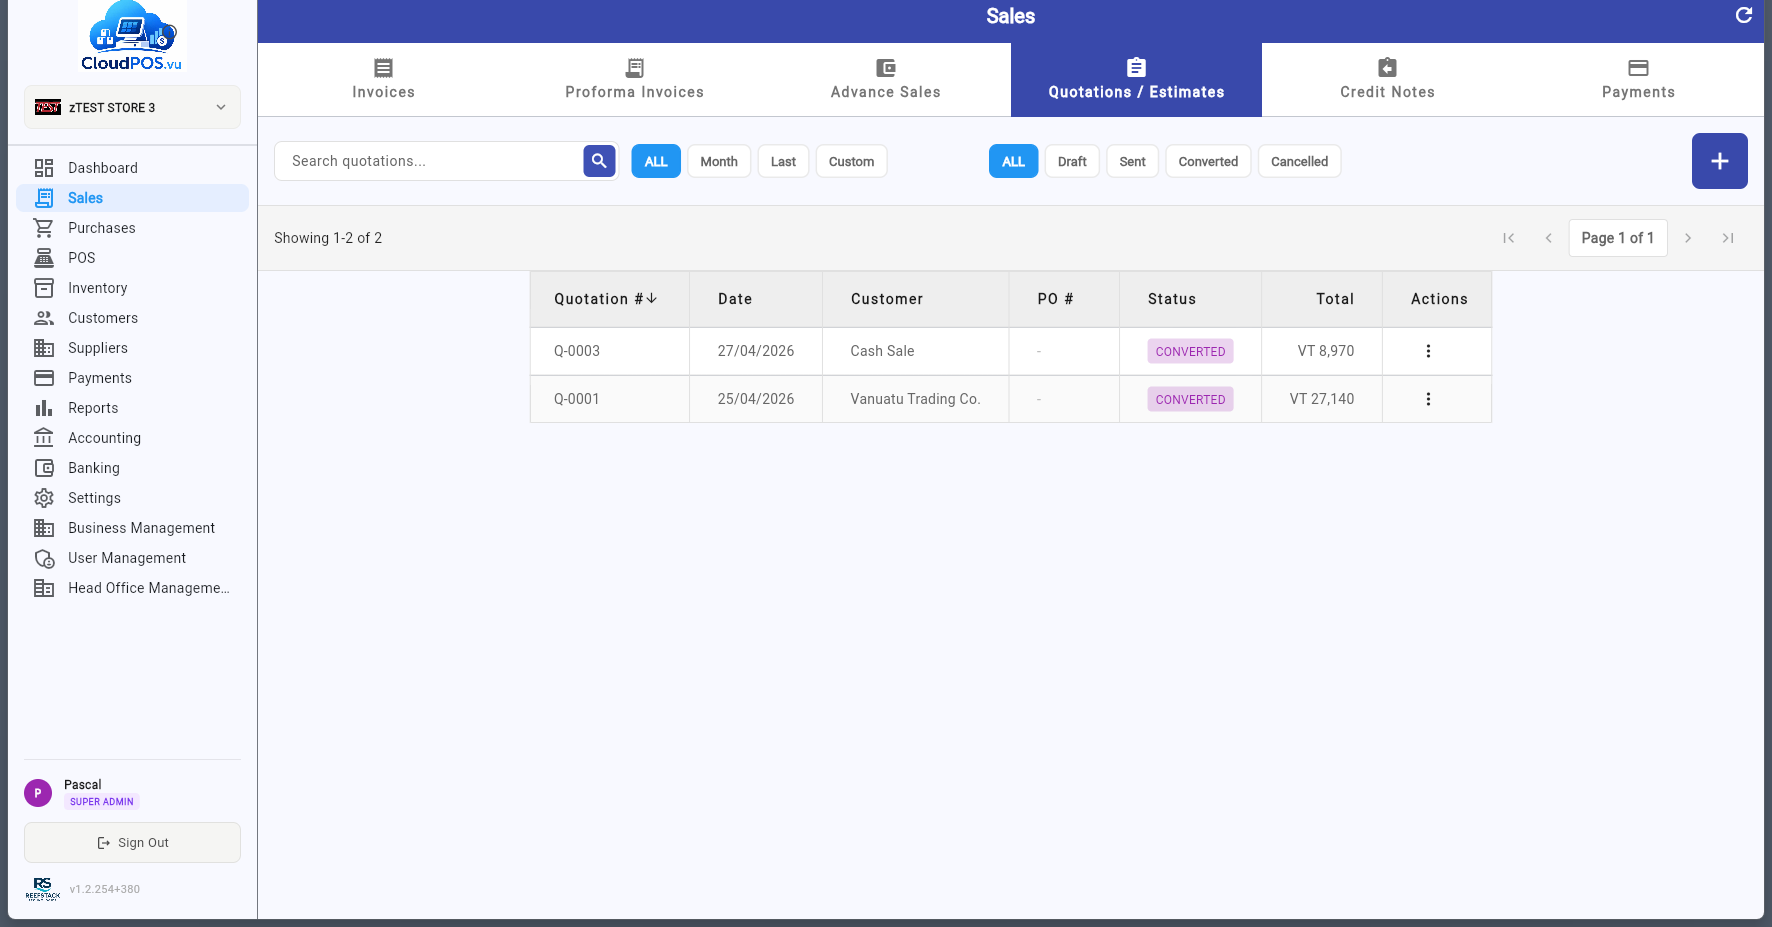
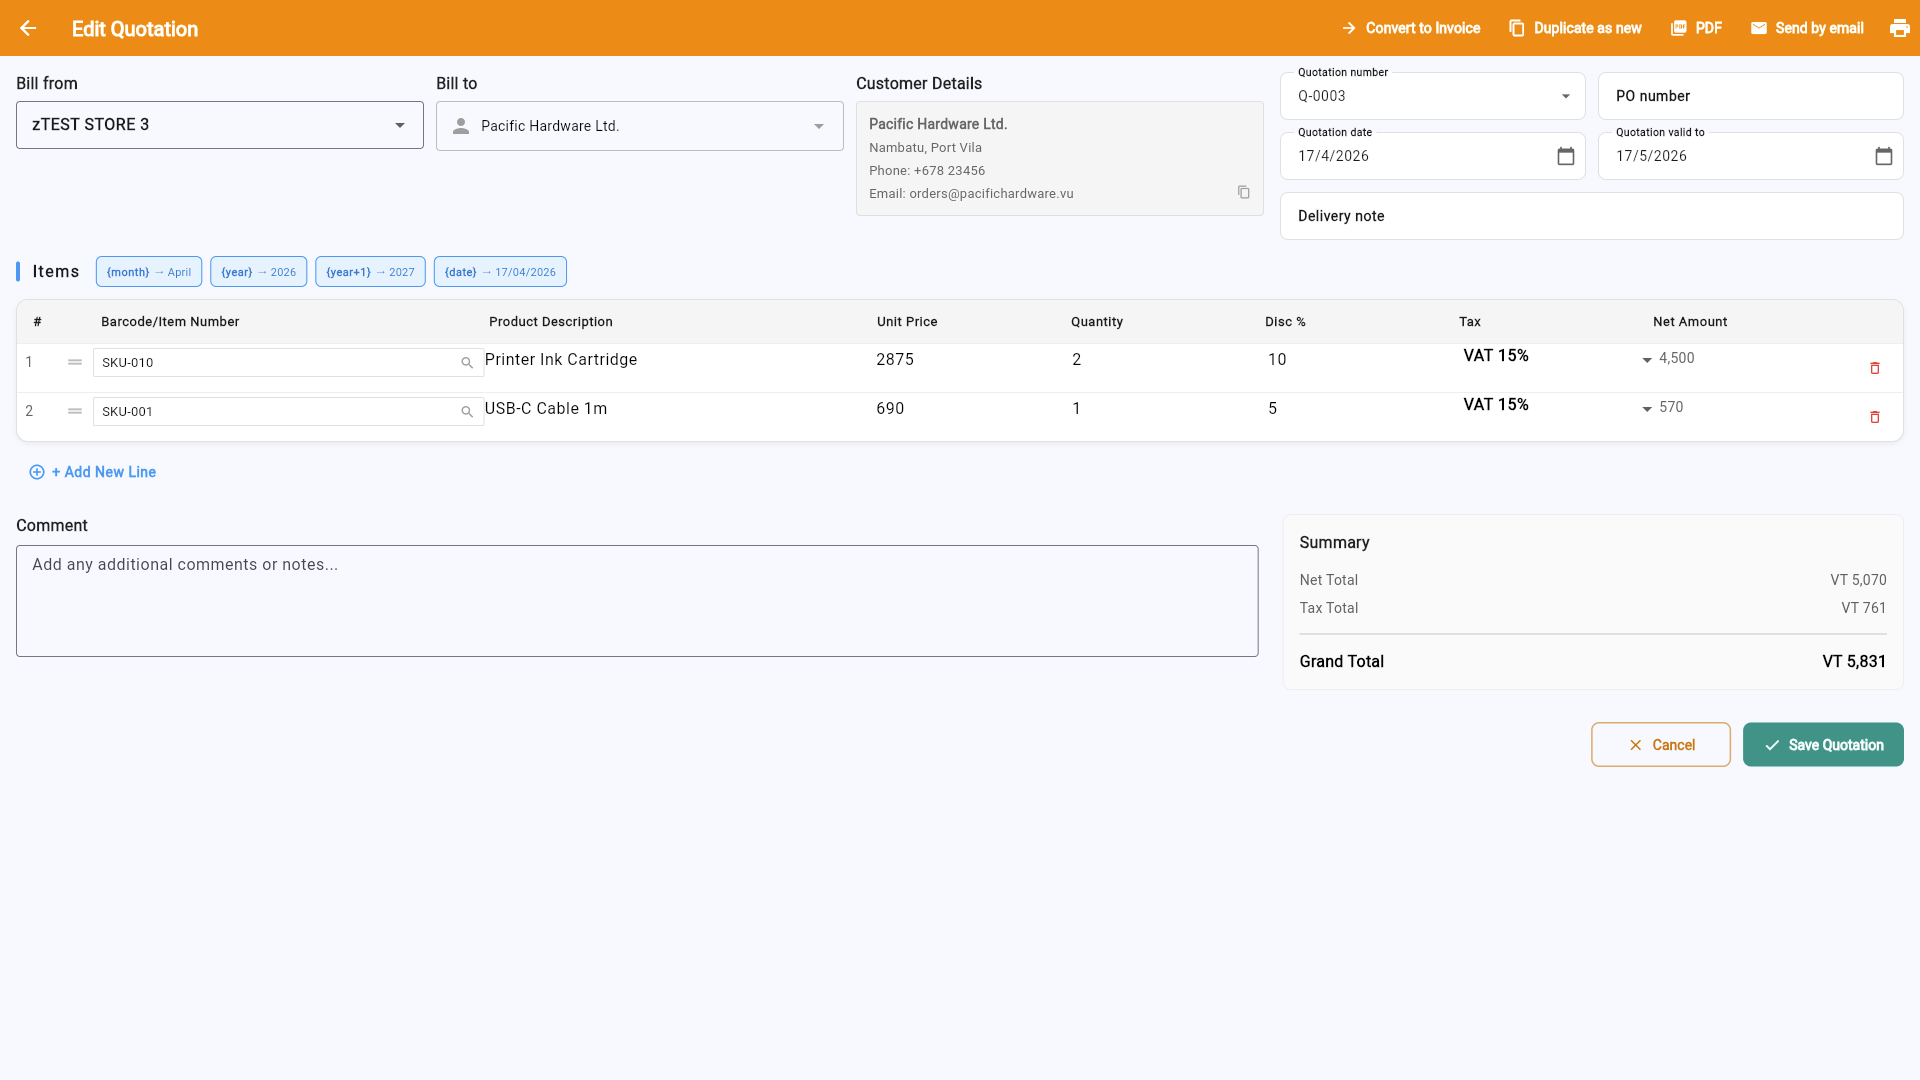
Click + to create a new quotation. The form is identical to an invoice but uses the Q- prefix:
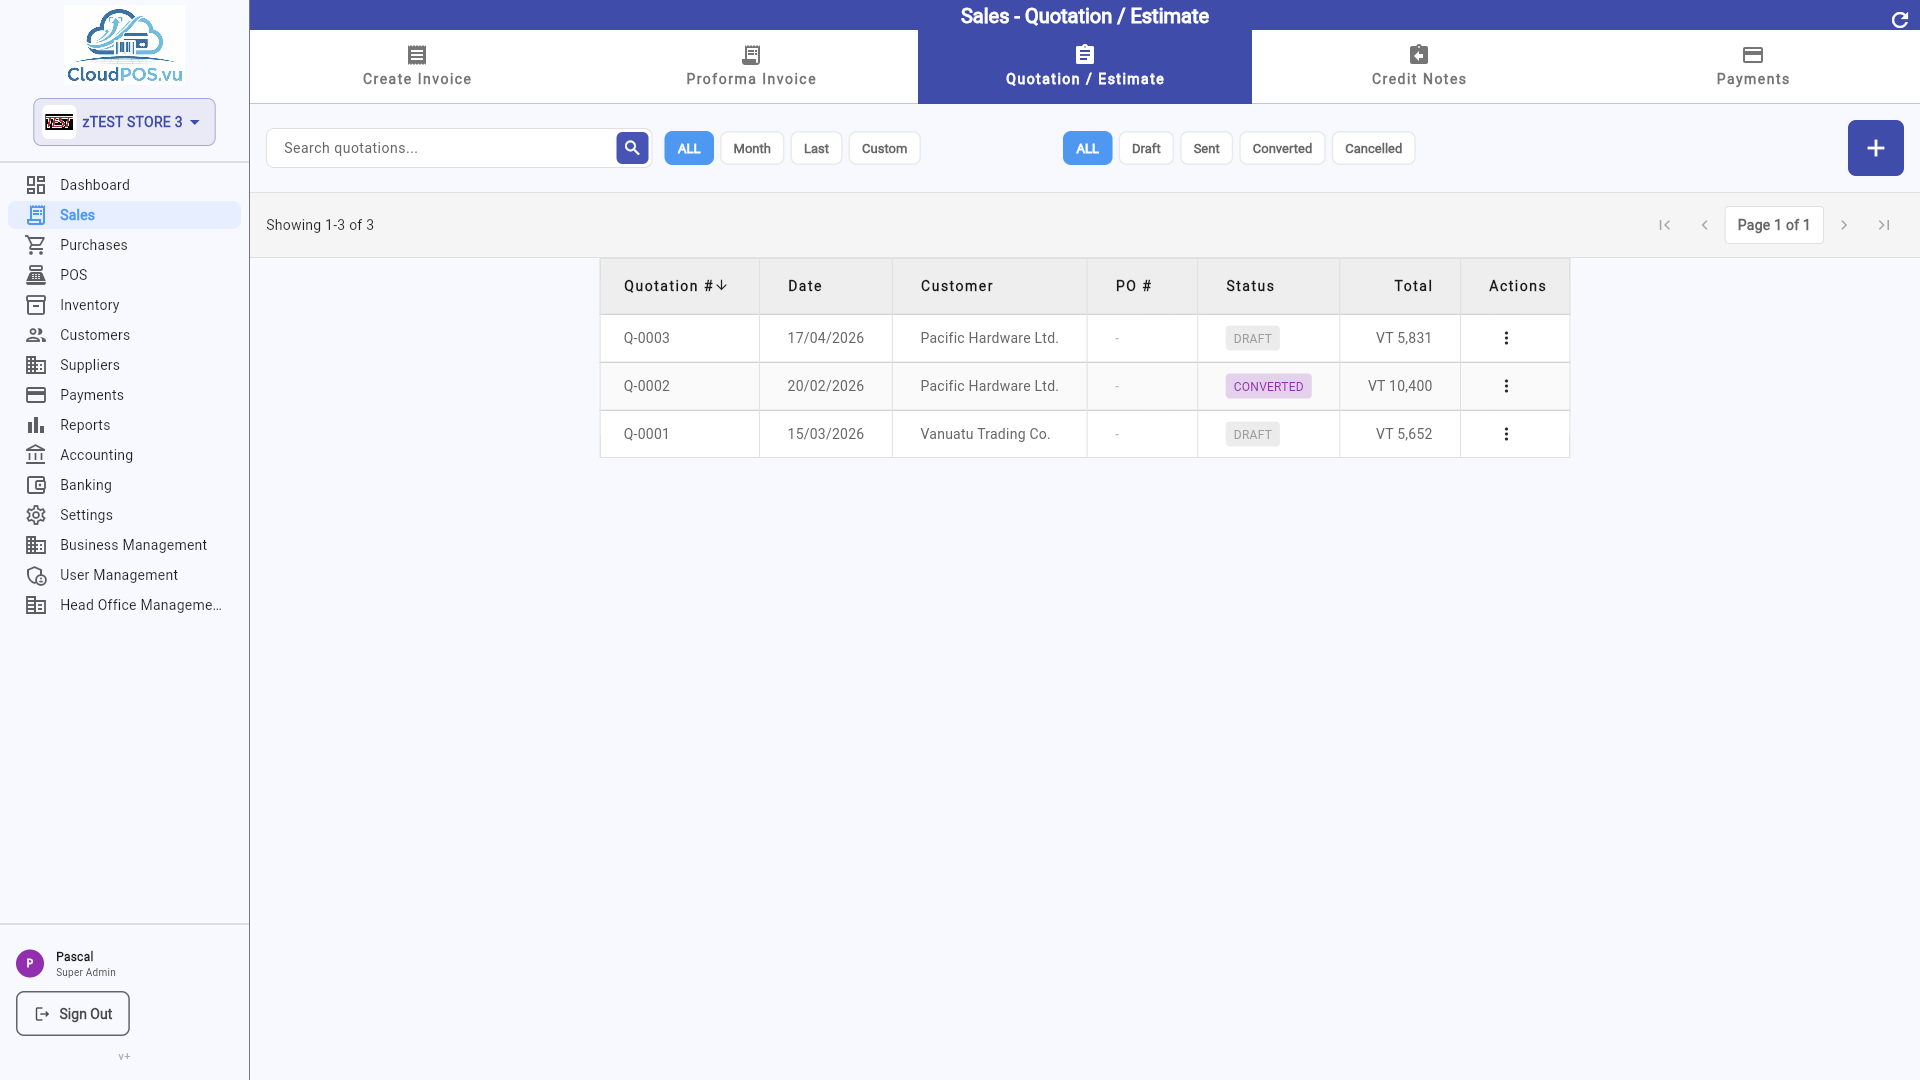
After saving, the quotation appears in the list:
Statuses
Quotation created but not yet sent. Actions: Edit, Mark as Sent, Convert to PI, Convert to Invoice, Print, Email, Void.
Quotation has been sent to the customer — awaiting response. Actions: Edit, Convert to PI, Convert to Invoice, Print, Email, Void.
Quotation has been converted to a Proforma Invoice or Tax Invoice — the original quotation is no longer editable.
Quotation has been voided — no longer valid. No accounting impact since quotations are not fiscal documents.
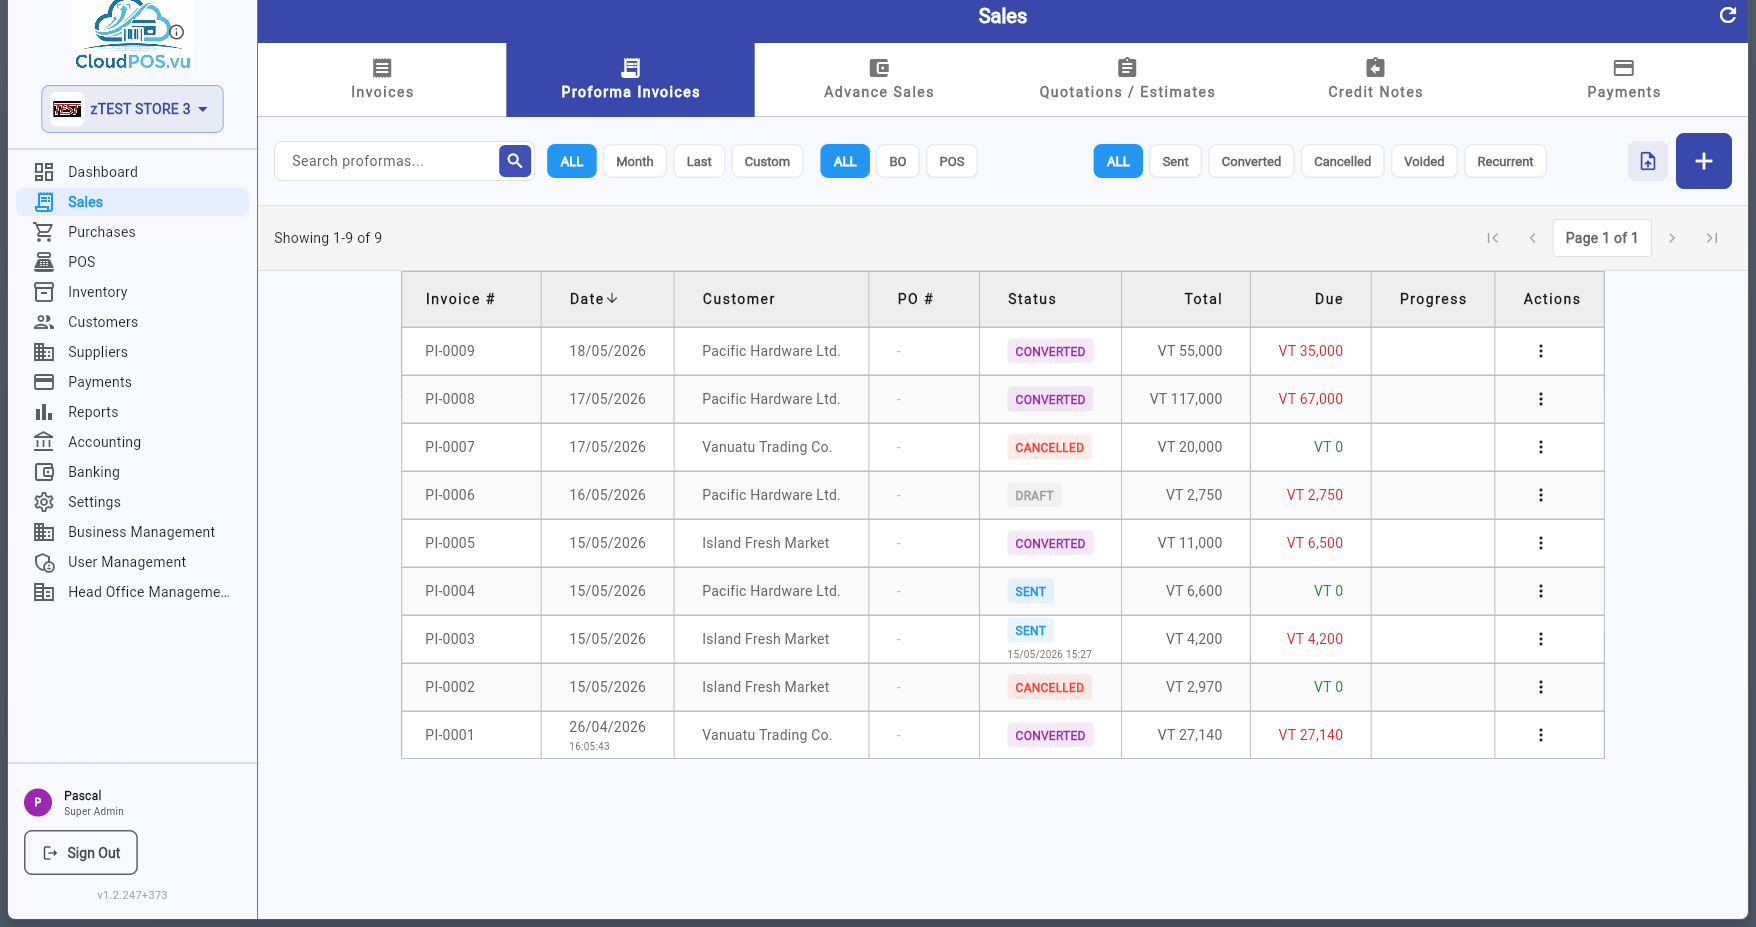
Proforma Invoices are formal price quotes often required for import/export or customs purposes. Like quotations, they have no accounting impact until converted. They are also the starting point for layby/installment sales (Advance Sales).
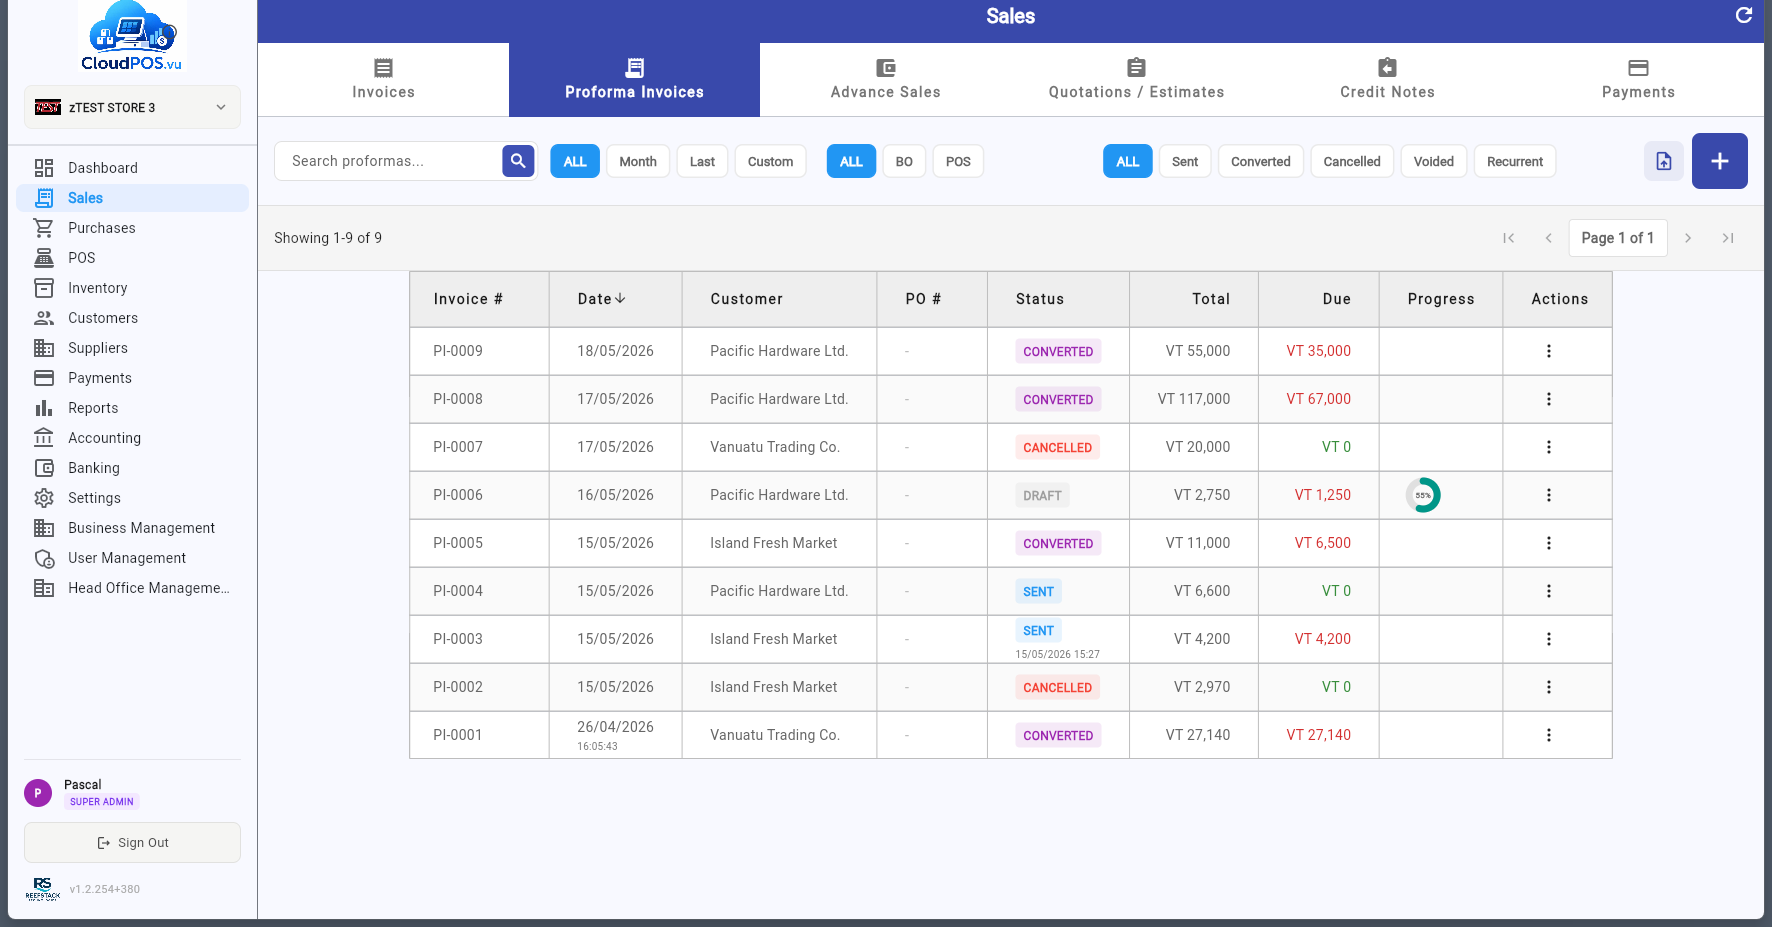
Create a new PI directly by clicking +:
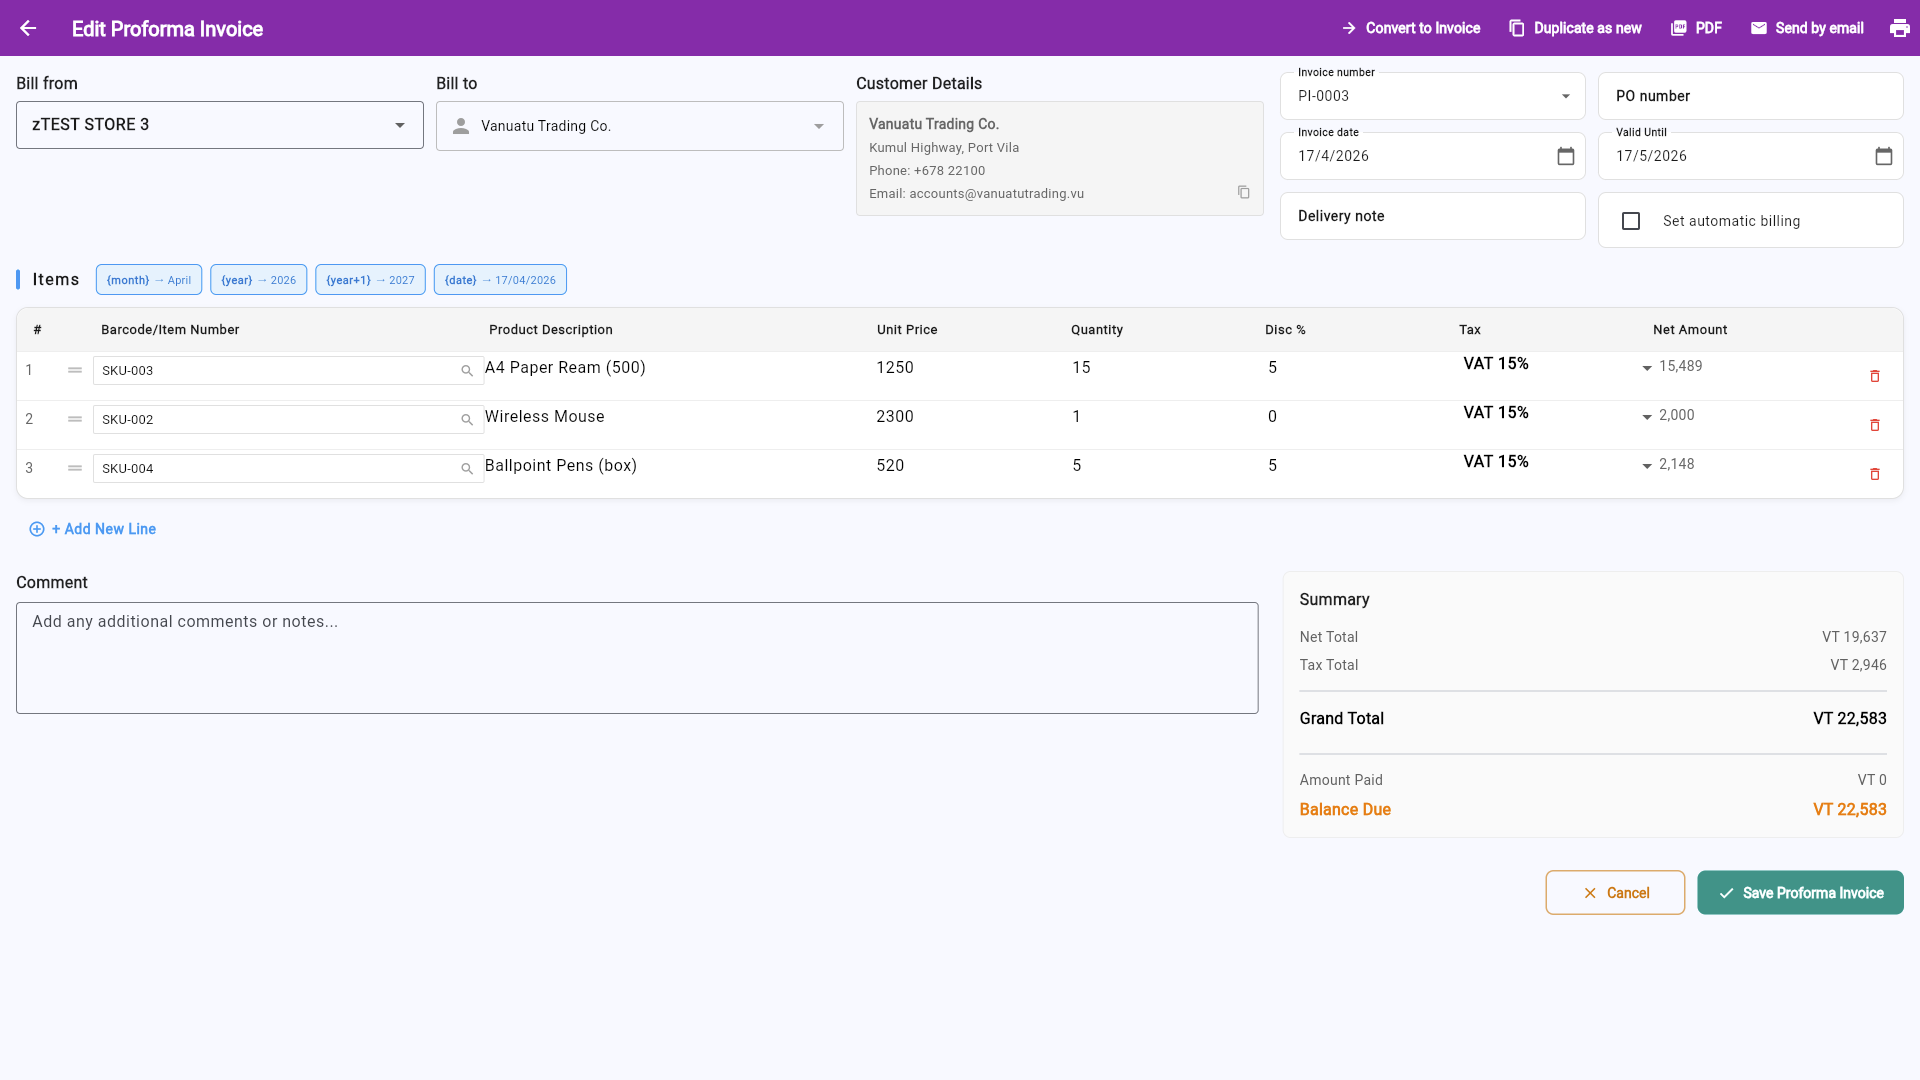
Statuses
PI created but not yet fiscalized or sent. Actions: Edit, Mark as Sent, Convert to Invoice, Print, Email, Void.
PI has been sent to the customer. If fiscalized, additional actions become available. Actions: Edit, Convert to Invoice, Create Advance Sale, Show Advance Sales, Complete Sale, Print, Email, Cancel Proforma.
PI has been converted to a Tax Invoice — either directly or via Complete Sale (all advances settled into final invoice).
PI has been cancelled via SDC. For fiscalized PIs, a Proforma Refund is issued. No accounting reversal needed.
PI has been voided — not a fiscal document, no SDC action required.
Advance Sales are fiscal invoices used for layaway or installment payments. A customer pays in multiple installments before receiving the goods. Each payment is recorded as a separate Advance Sale (AS) that is signed by the SDC.
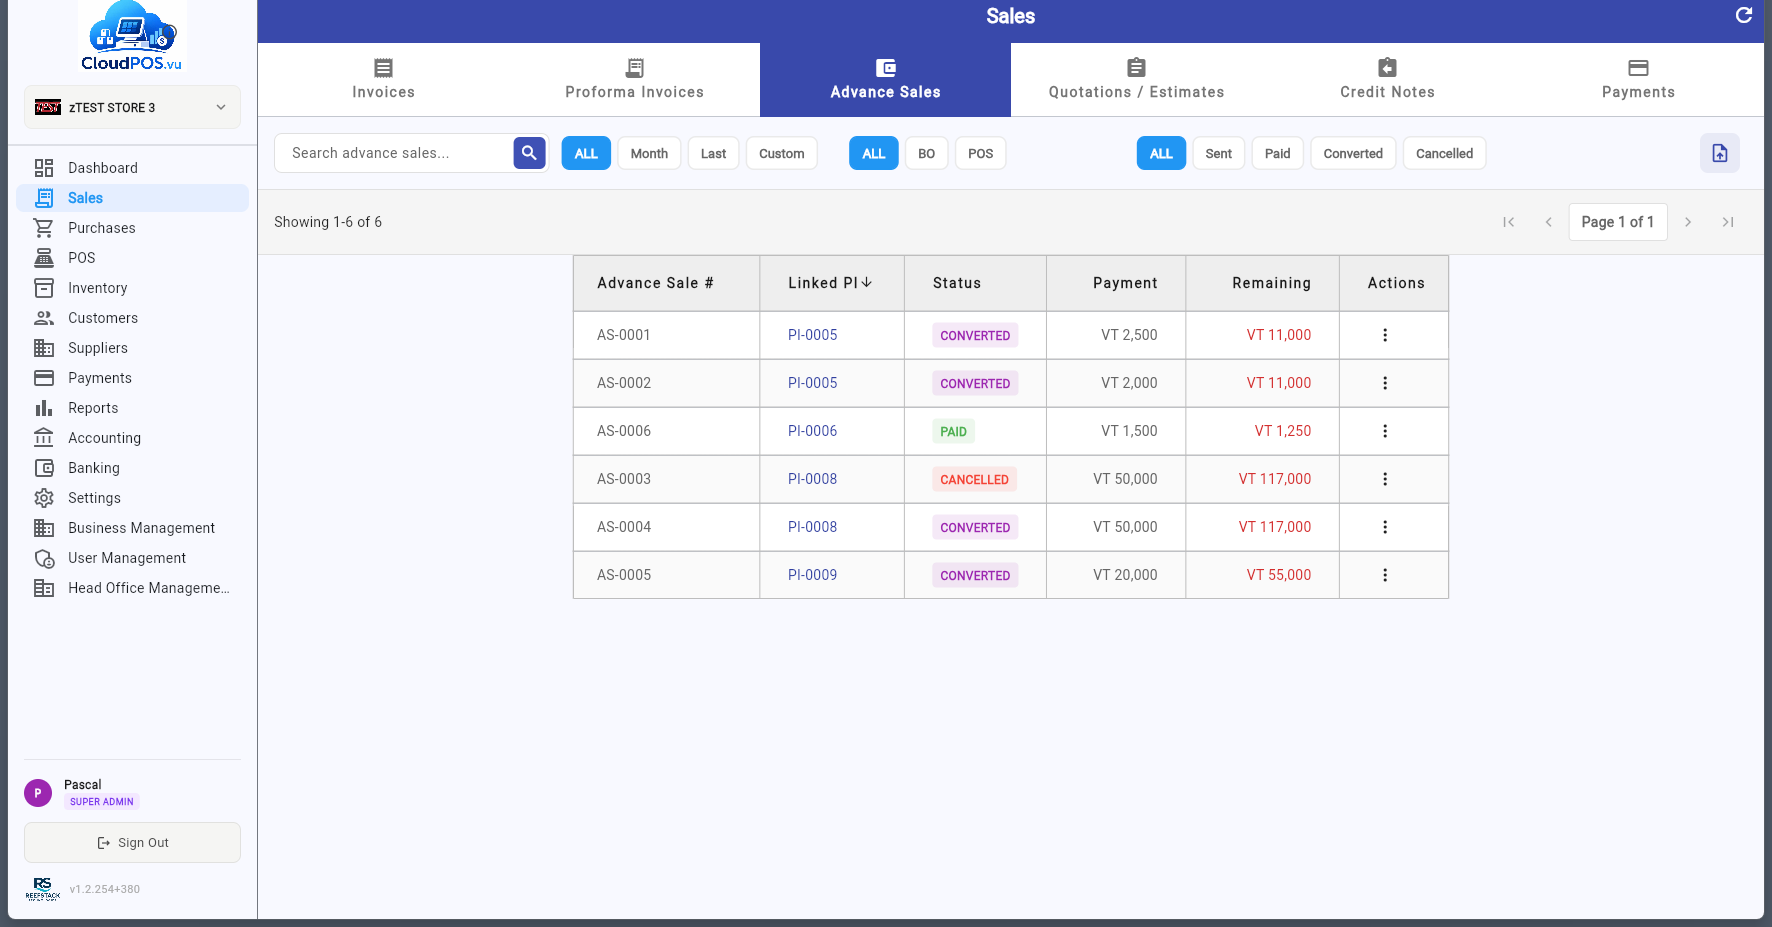
Each row displays the advance sale number (AS- prefix), customer name, date, amount, payment method, and status. The ⋯ menu provides actions depending on the status.
Advance payment received and signed by SDC — increases tax liability.
Advance has been refunded via SDC — an Advance Refund was issued.
Advance was moved to a Tax Invoice as part of the settlement flow.
💳 Advance Sale Actions (Paid)
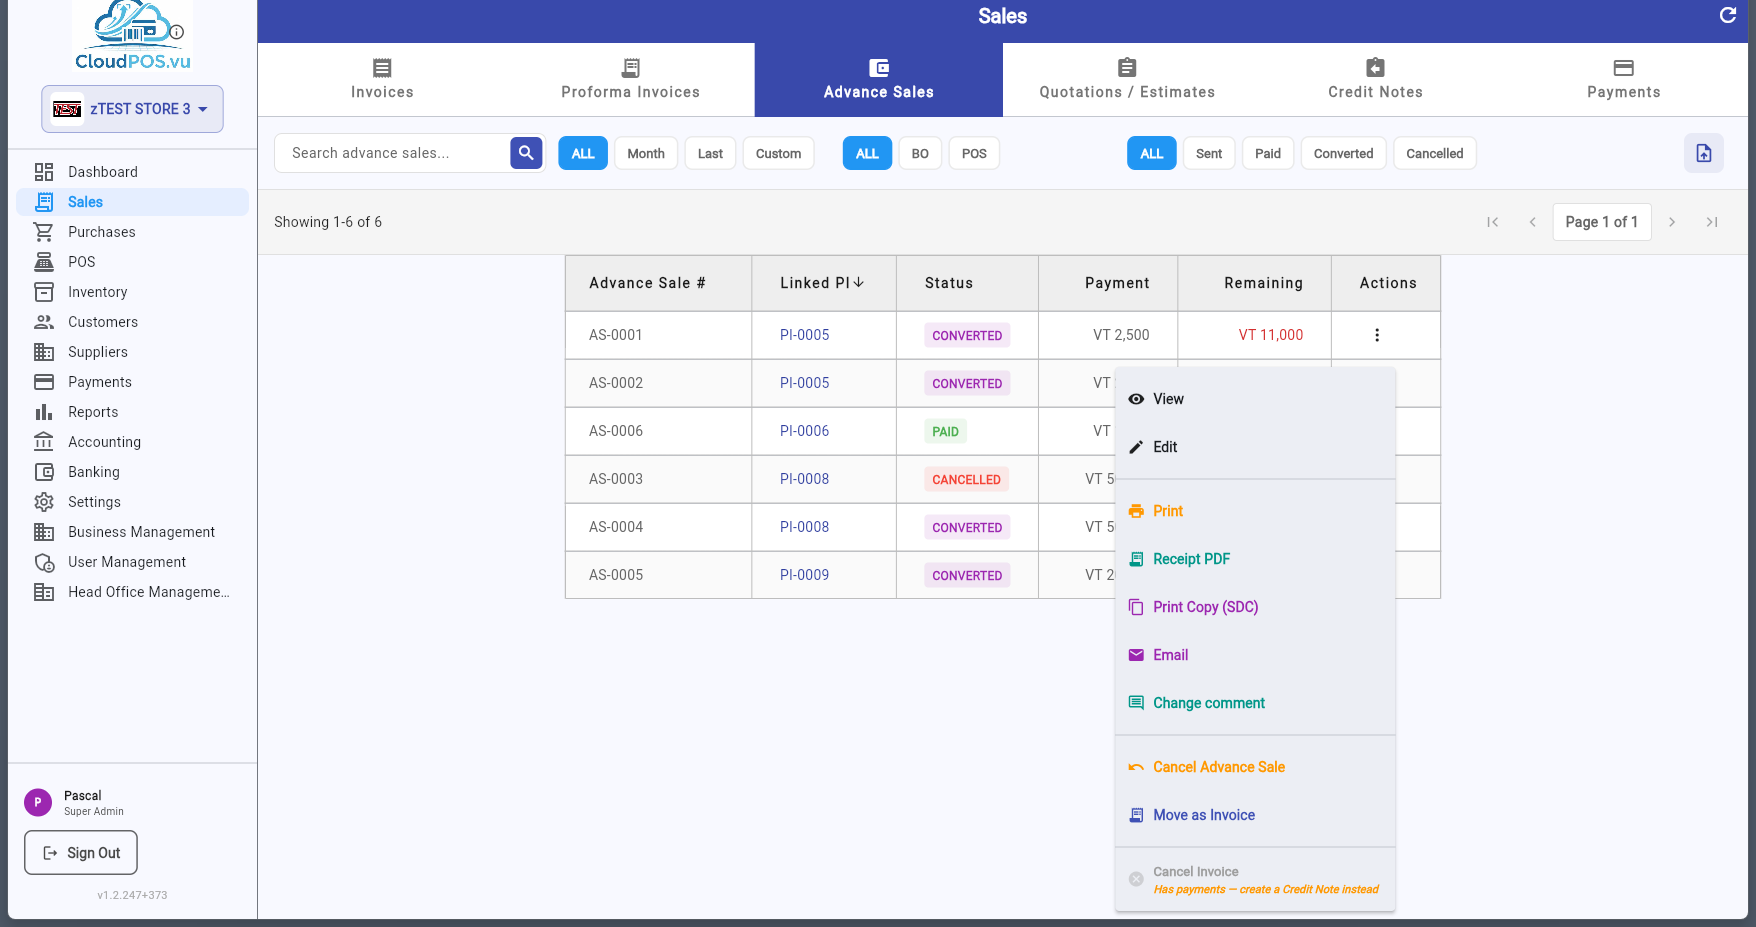
Open the advance sale in read-only mode.
Open the advance sale for editing.
Print the advance sale receipt or generate a PDF.
Print a verified copy with SDC data (QR code, SDC number).
Send the advance sale receipt to the customer by email.
Edit the comment or description on the advance sale.
Issue an Advance Refund via SDC. Reverses the deposit.
Create a Tax Invoice for the remaining balance. The advance is marked Converted.
💳 Advance Sale Actions (Cancelled)
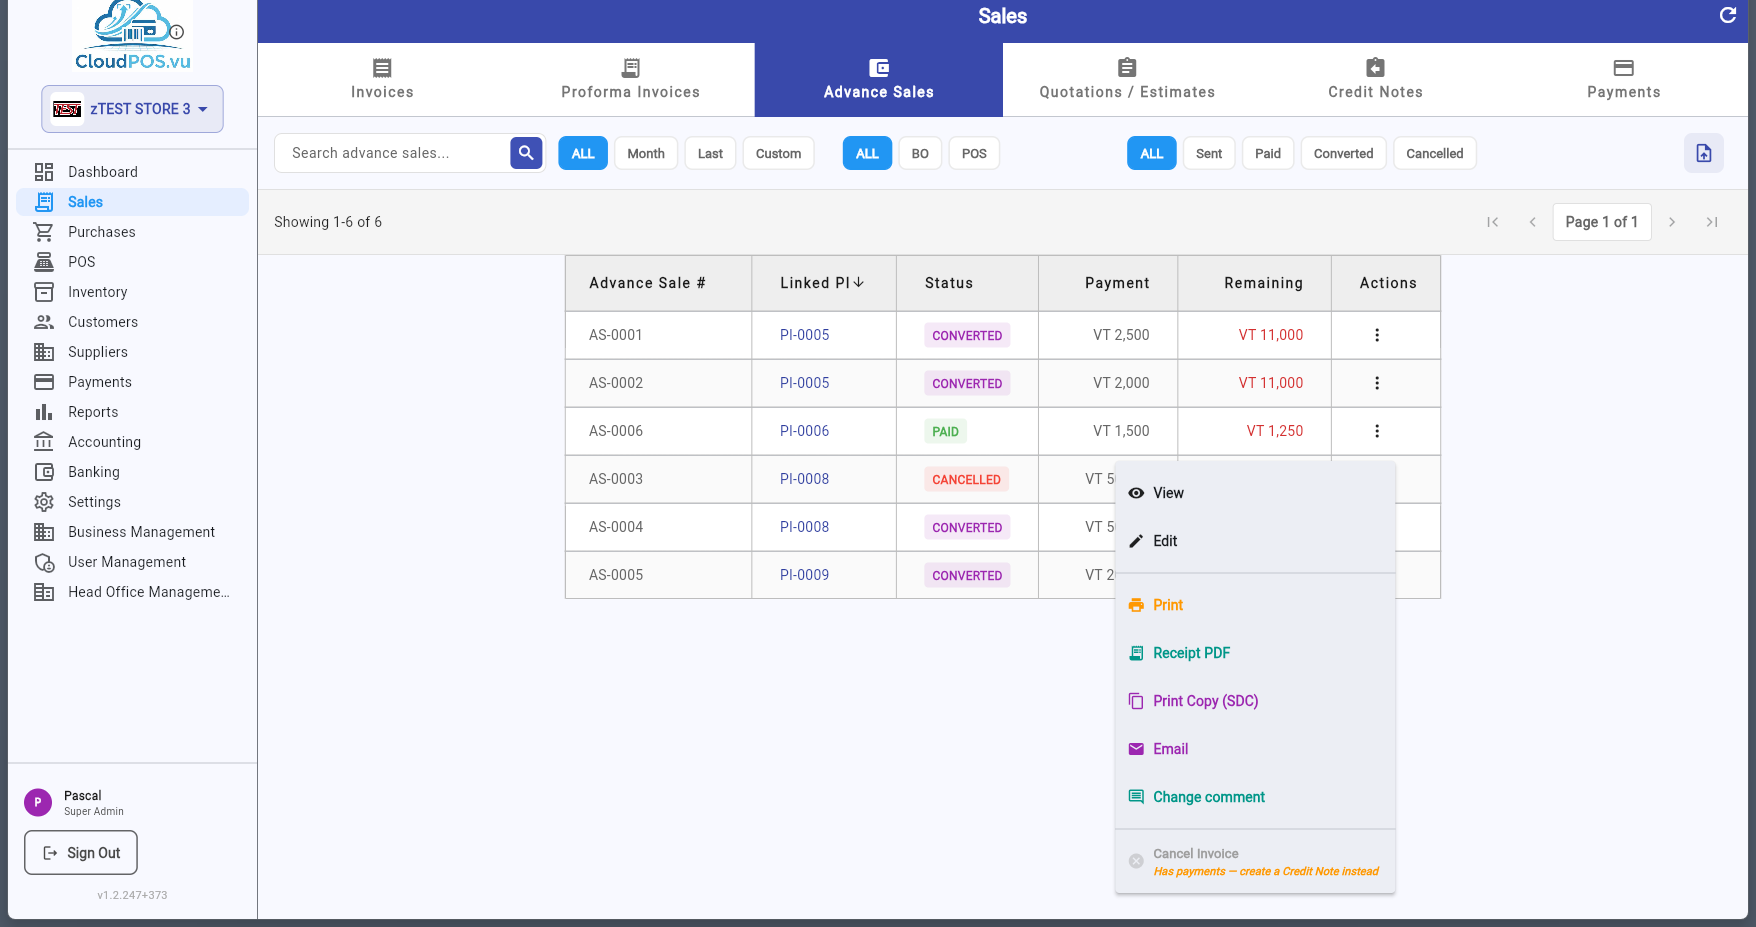
Cancelled advances can only be Viewed, Edited, Printed, Emailed — no further financial actions are available.
Advance Sales are created from a Proforma Invoice. Open the PI action menu and select Create Advance Sale:
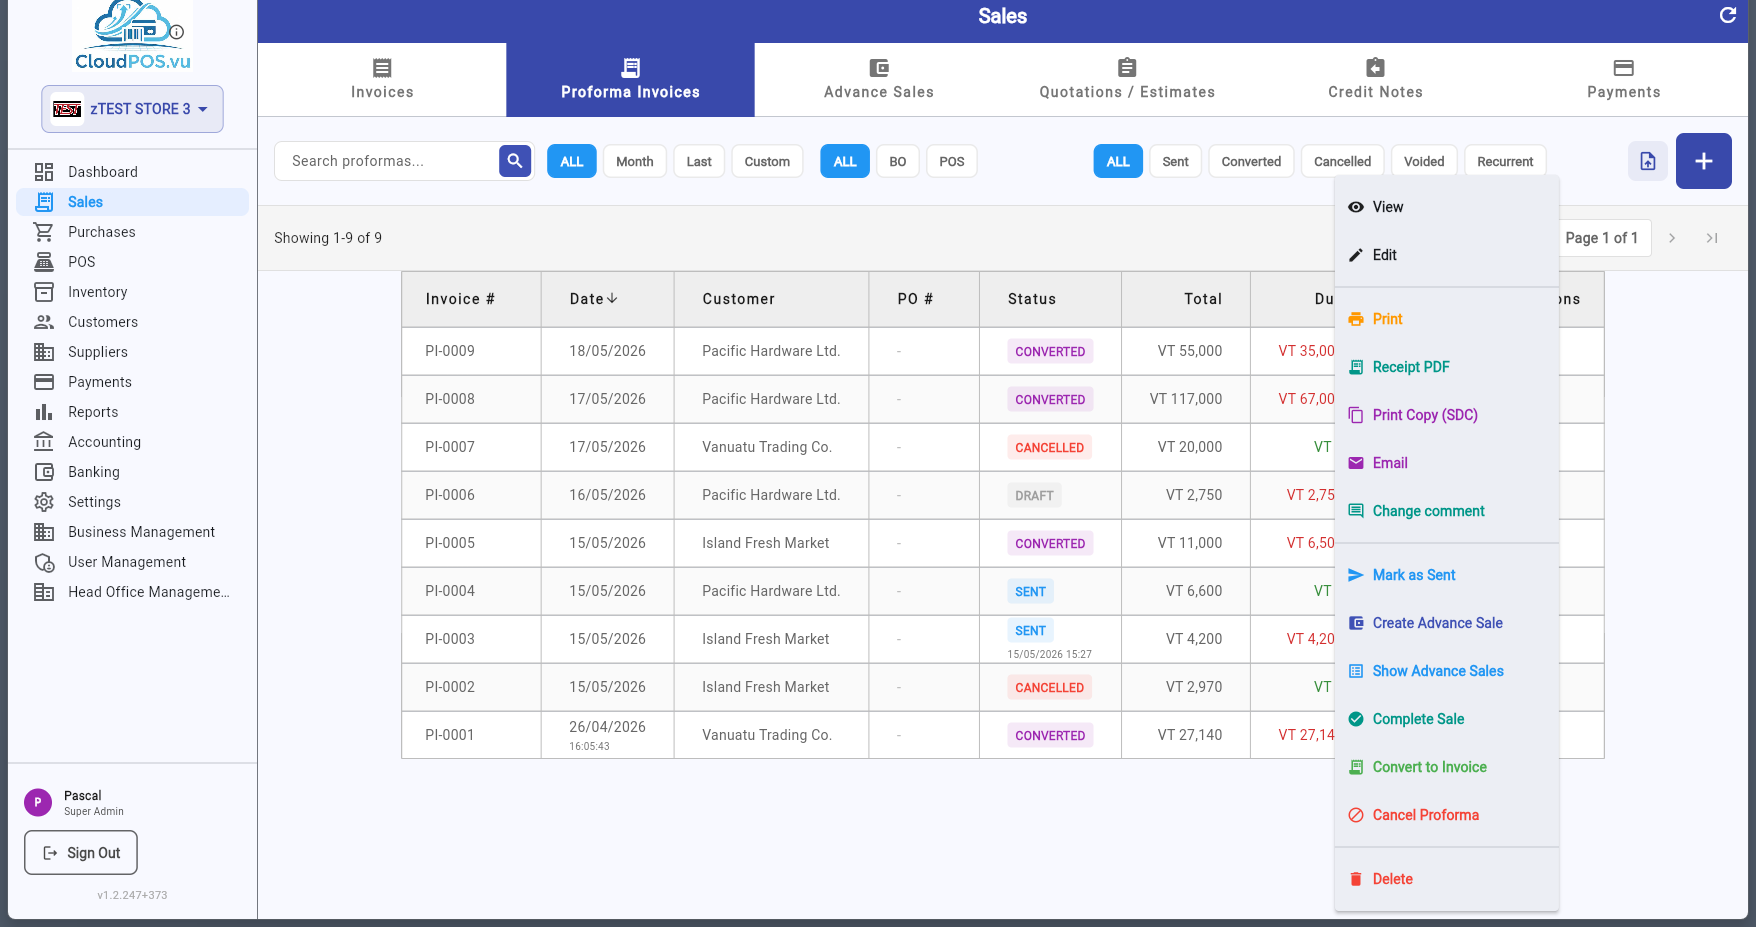
The Create Advance Sale dialog appears:
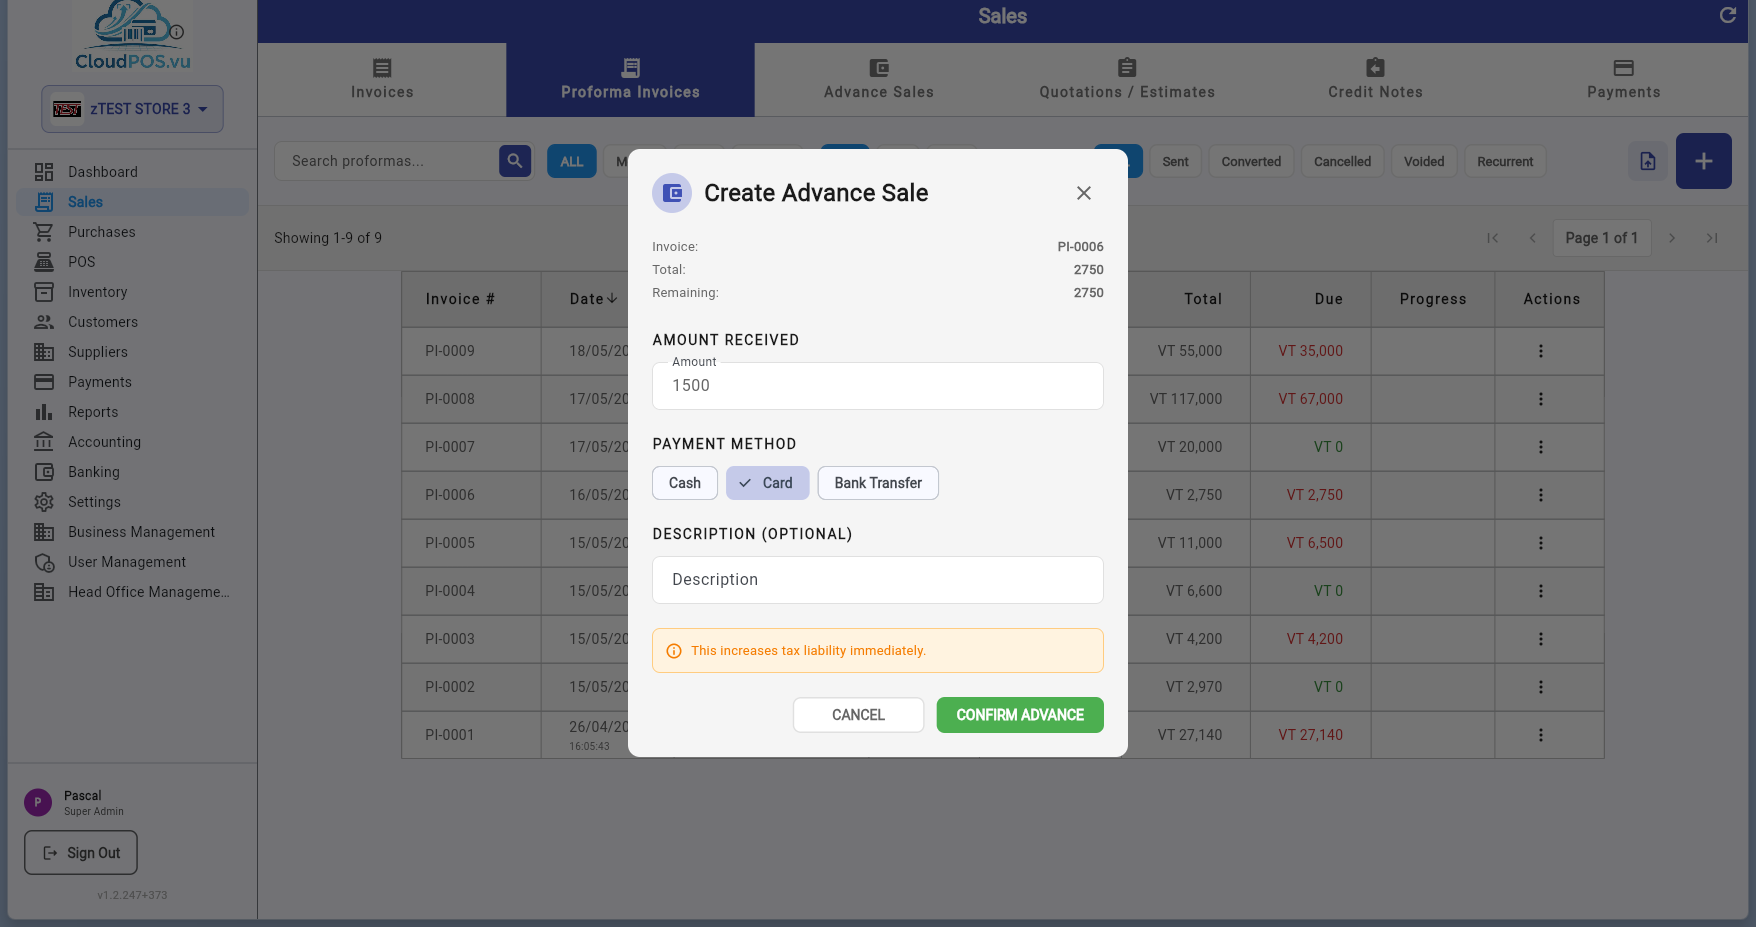
- Invoice — Shows the PI number this advance is linked to.
- Total — The full PI amount.
- Remaining — The unpaid balance (total minus previous advances).
- Amount Received — Enter the advance payment amount. Defaults to the remaining balance.
- Payment Method — Select Cash, Card, or Bank Transfer.
- Description (Optional) — Add a note, e.g. "50% deposit for Project X".
- Confirm — The advance is fiscalized via SDC and saved.
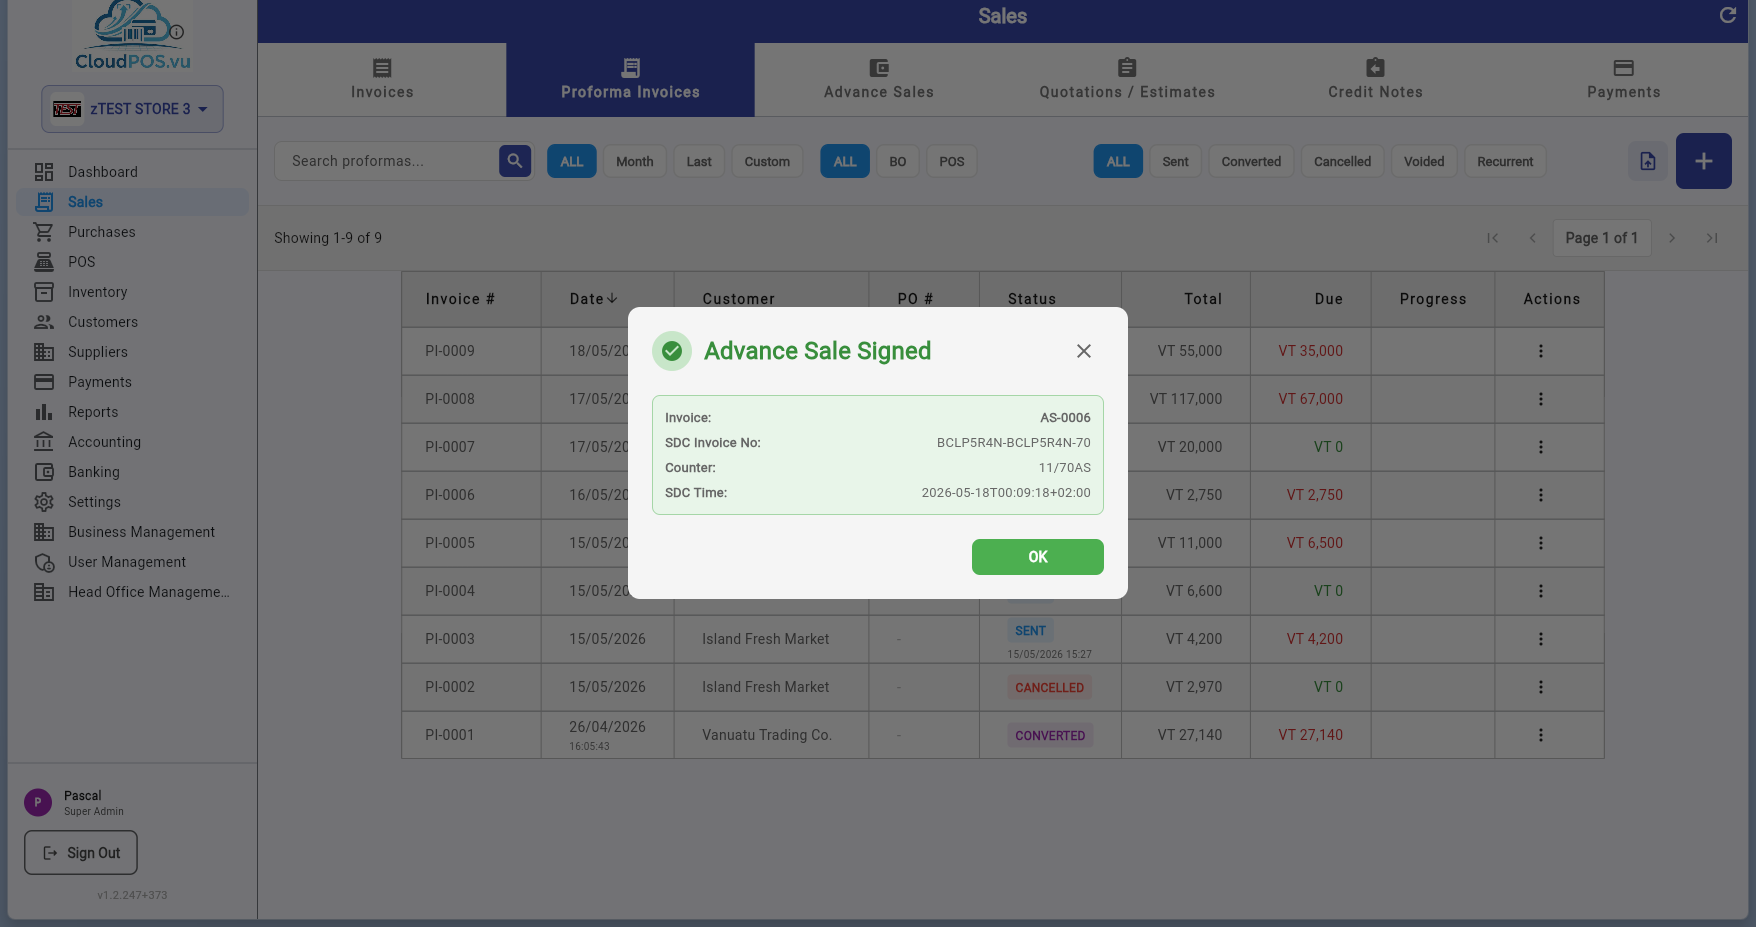
After confirmation, the SDC signs the advance and a "Advance Sale Signed" confirmation appears:
📋 Tracking Advance Sales on a PI
To see all advances for a PI, open the PI action menu and select Show Advance Sales:
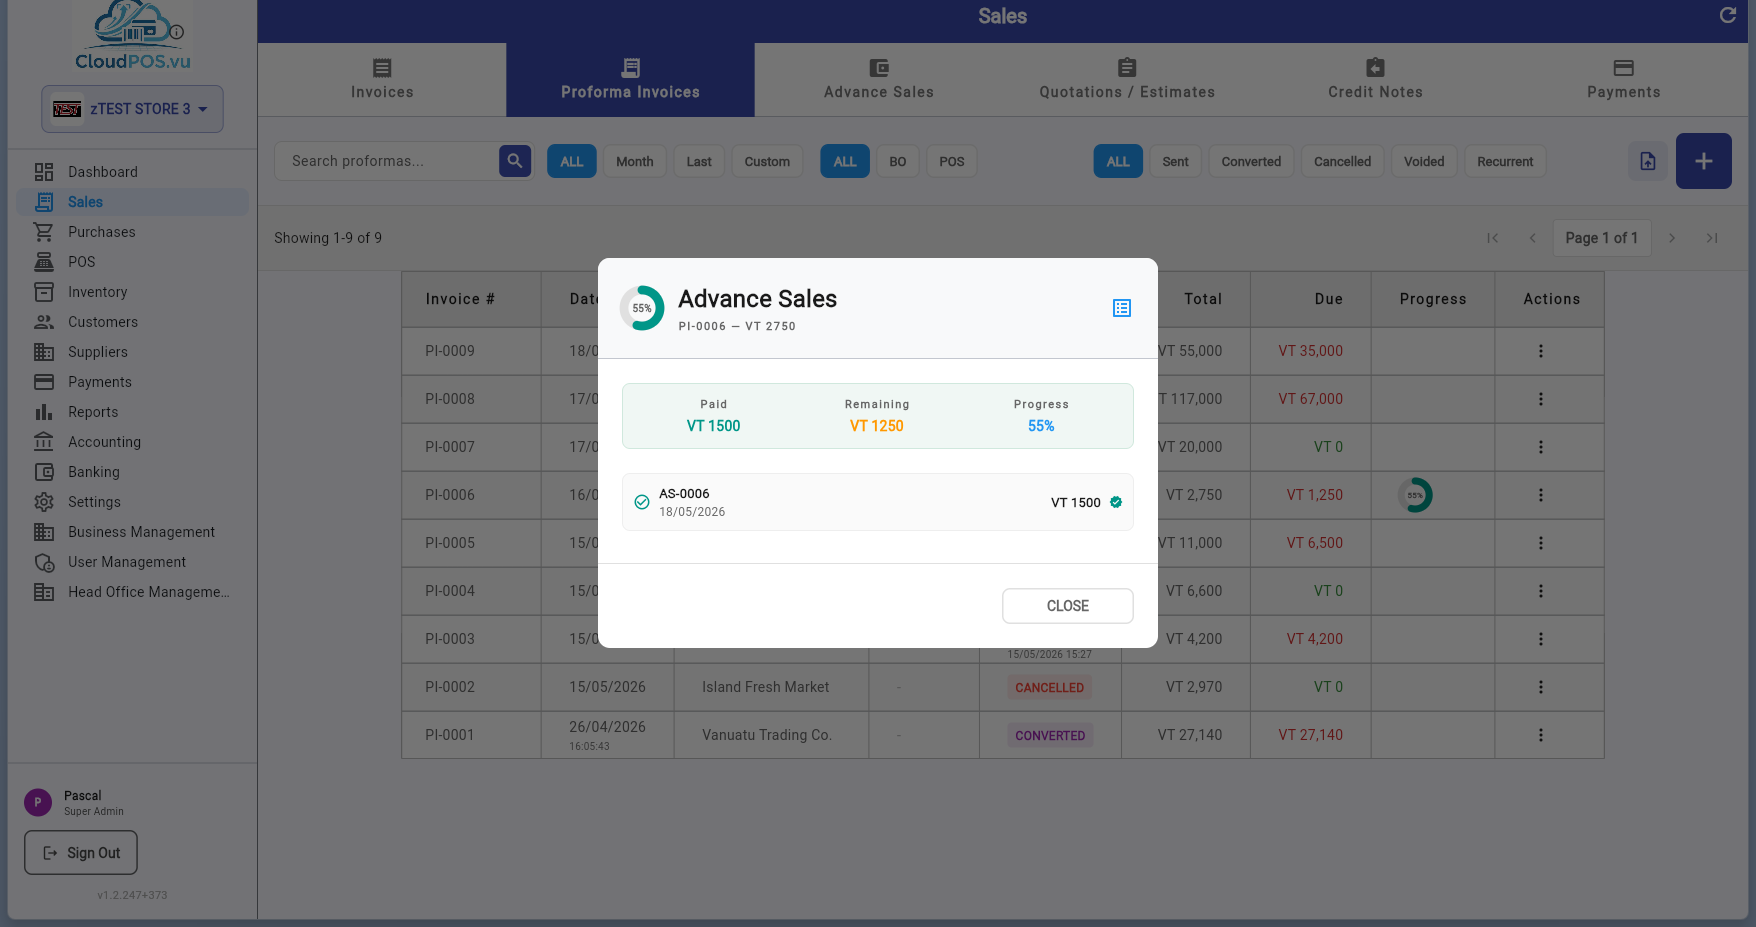
The dialog displays:
- Donut chart — Visual progress of payments toward the PI total.
- Summary — Total Paid, Remaining balance, and Progress percentage.
- Advance rows — Each advance with number, date, amount, status, and SDC verification badge.
- Cancelled advances — Shown in red with strikethrough.
- COMPLETE SALE button — Appears when 100% is reached.
When the customer has finished paying (or at any point during the advance process), you can convert the advance into a final Tax Invoice. This is called settlement or Move as Invoice.
How Settlement Works
- All advance sales are refunded via SDC as Advance Refunds — this reverses the tax liability.
- One final Normal Sale is created via SDC — this is the legal tax invoice with stock movement and revenue recognition.
- All advance sales are marked Converted.
- The original PI is marked Converted.
Triggering Settlement
There are two ways to trigger the settlement:
- From the Advance Sale action menu — Click Move as Invoice on any paid advance sale.
- From the Show Advance Sales dialog — Click COMPLETE SALE when 100% is reached.
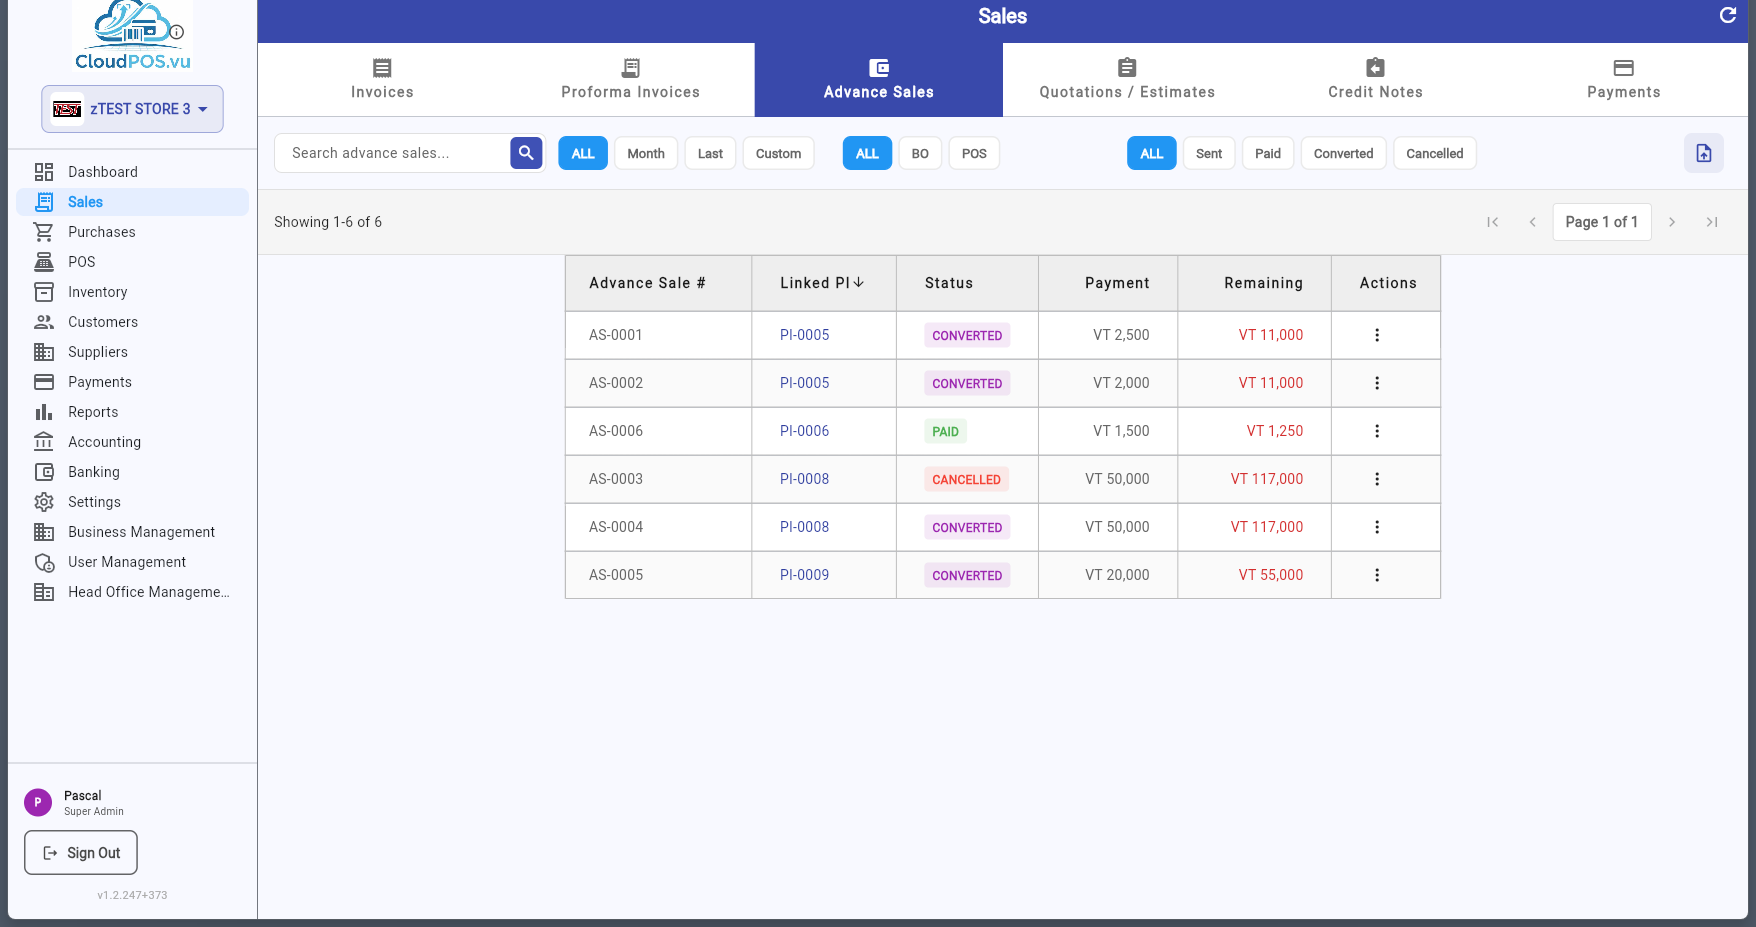
After the settlement is processed, a Normal Sale Signed confirmation confirms the final invoice was created and signed by SDC.
The advance sale list now shows the advance as Converted:
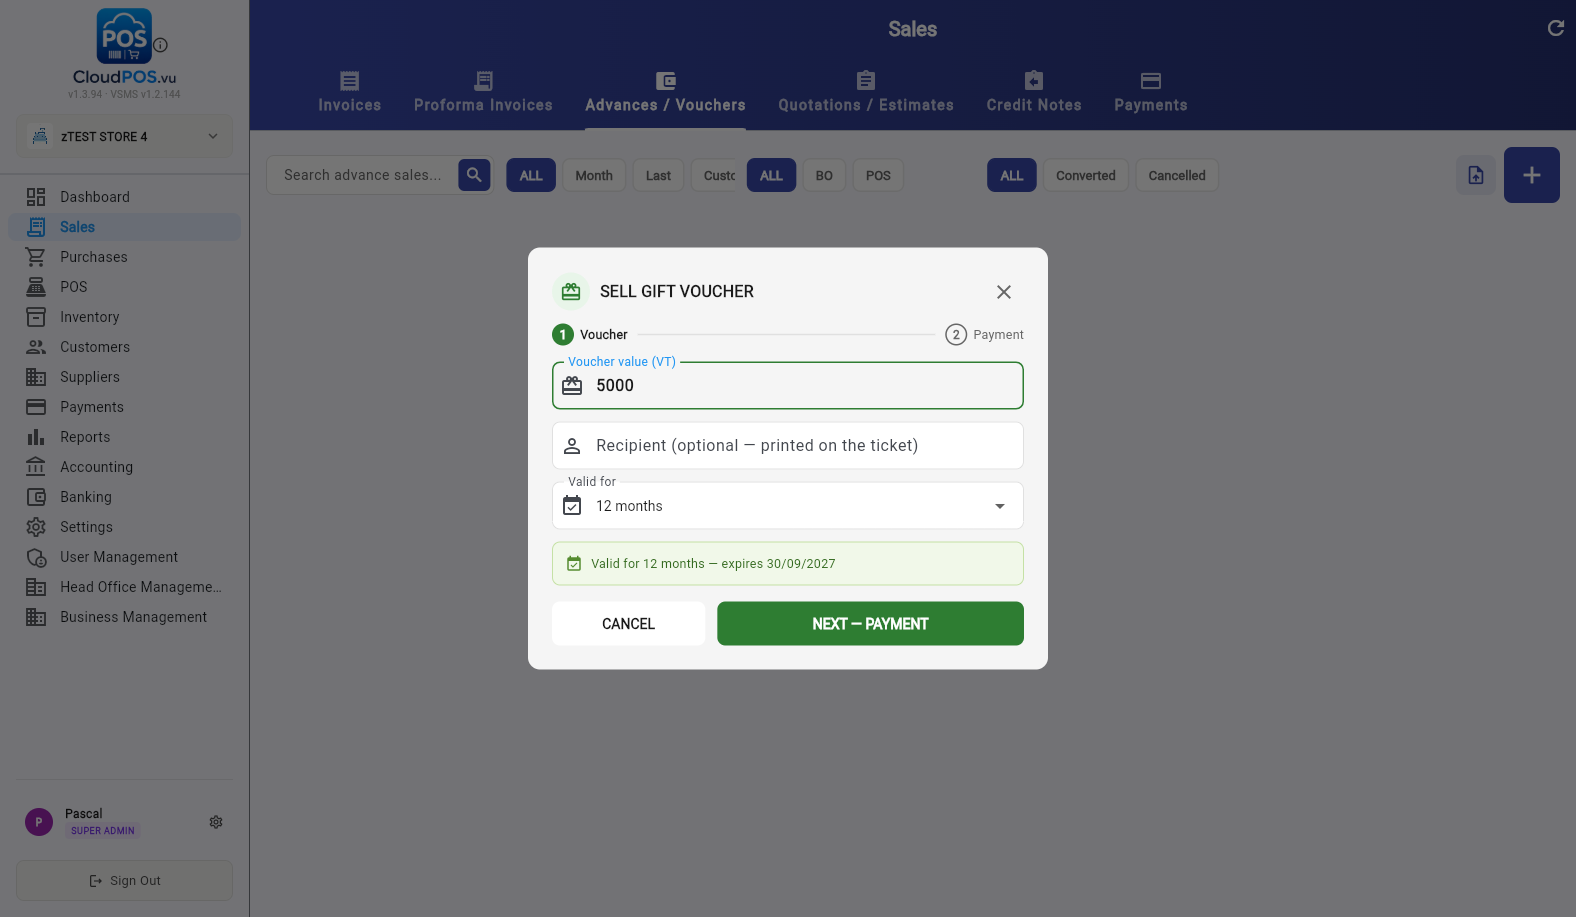
Gift vouchers are sold from the Advances / Vouchers tab: click + New Voucher, enter the value and optional recipient, choose the validity (12 months by default), take the payment, and hand over the printed ticket with its code (e.g. 74ZK5N). Selling a voucher is fiscal — it creates a signed advance sale (AS-) like a layby instalment.
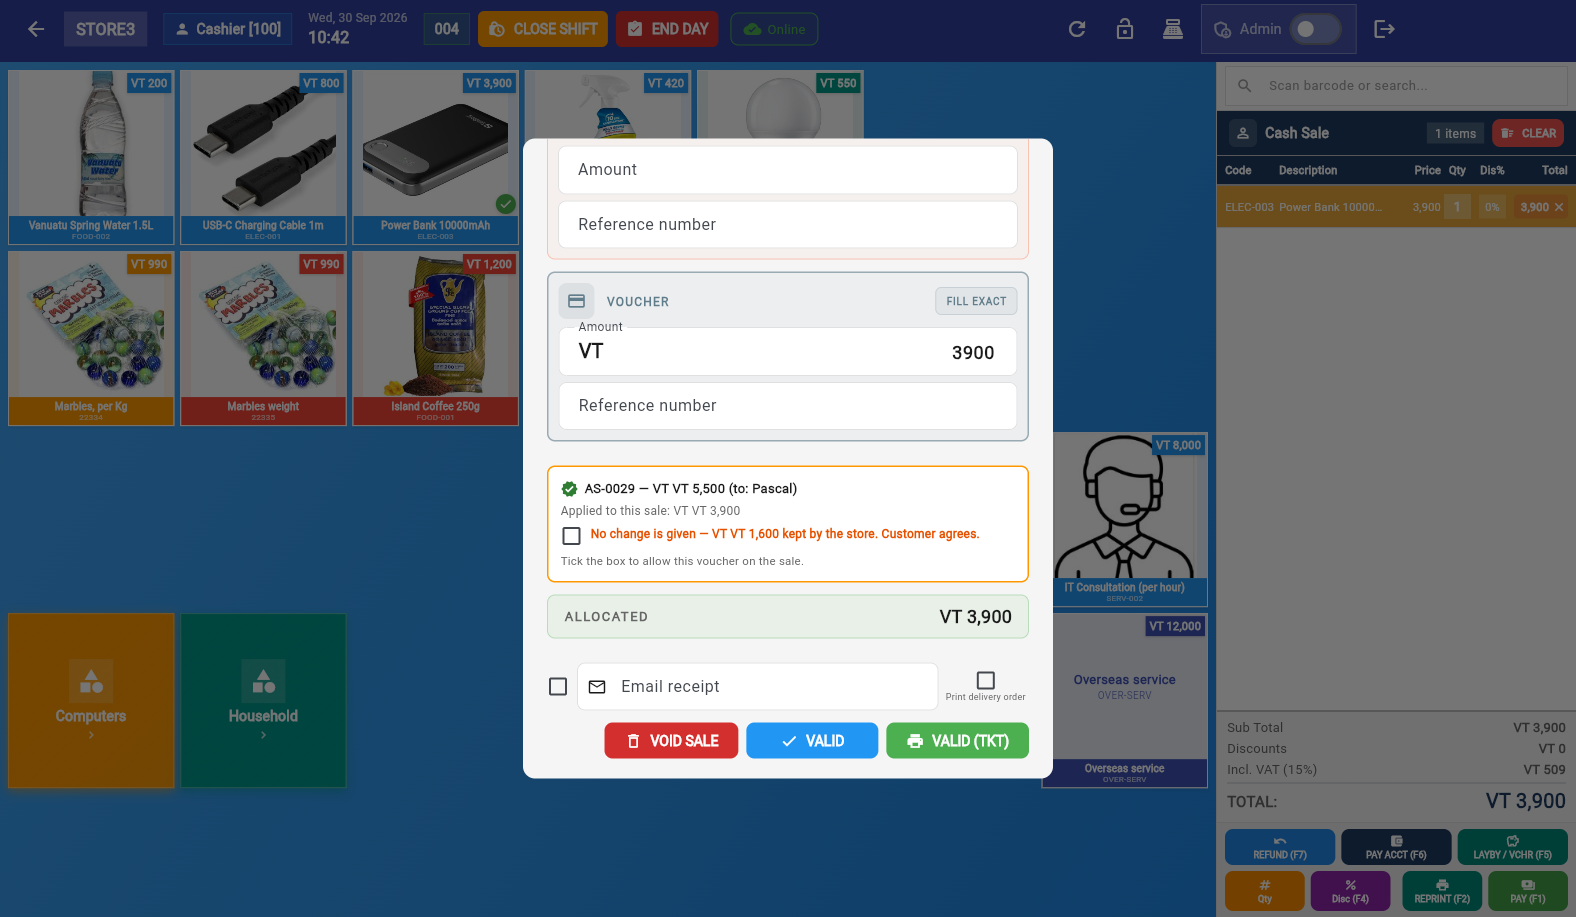
The customer redeems the code as payment on the POS: PAY → SPLIT / VOUCHER tab → REDEEM A VOUCHER → scan/type the code → CHECK. If the voucher is worth more than the sale, the POS requires agreement that no change is given for the remainder.
Full details — statuses, expiry, cancellation, the no-change rule and FAQ — are in the Gift Vouchers Guide (vouchers-guide.html).
Credit Notes are used to refund or credit a customer — for returned goods, pricing corrections, or partial refunds. They are required when a paid invoice needs to be reversed (Cancel is not available for paid invoices).
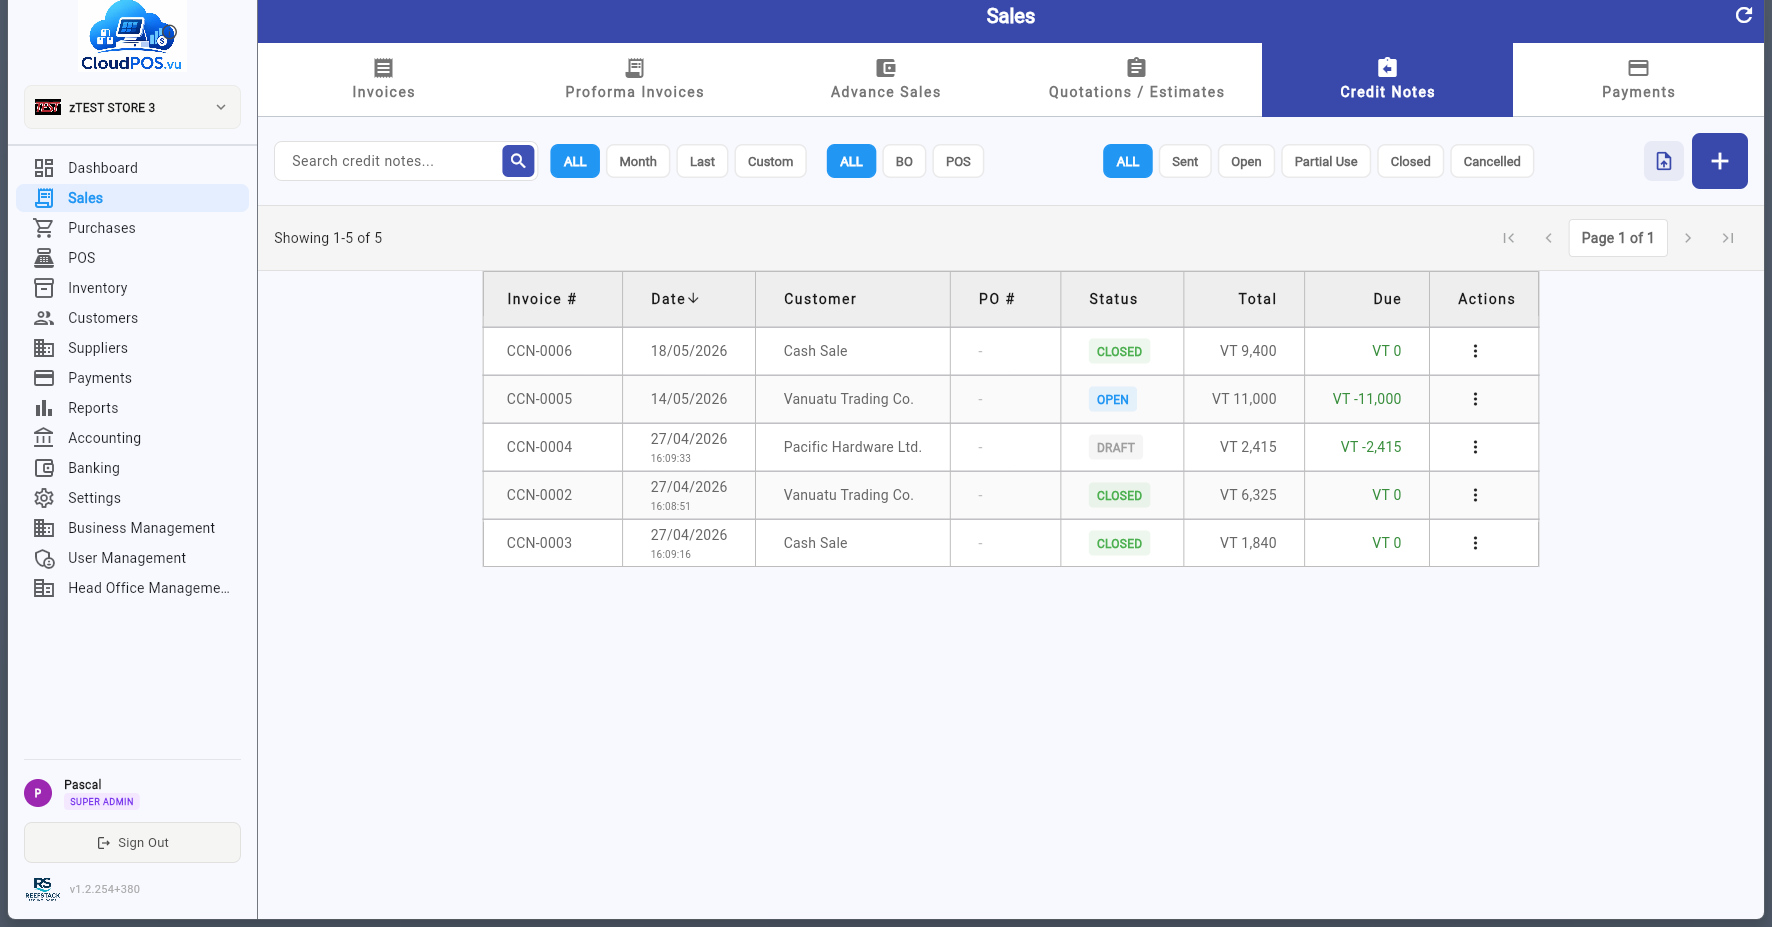
Click + to create a new credit note, or use Make Credit Note from a paid Tax Invoice action menu:
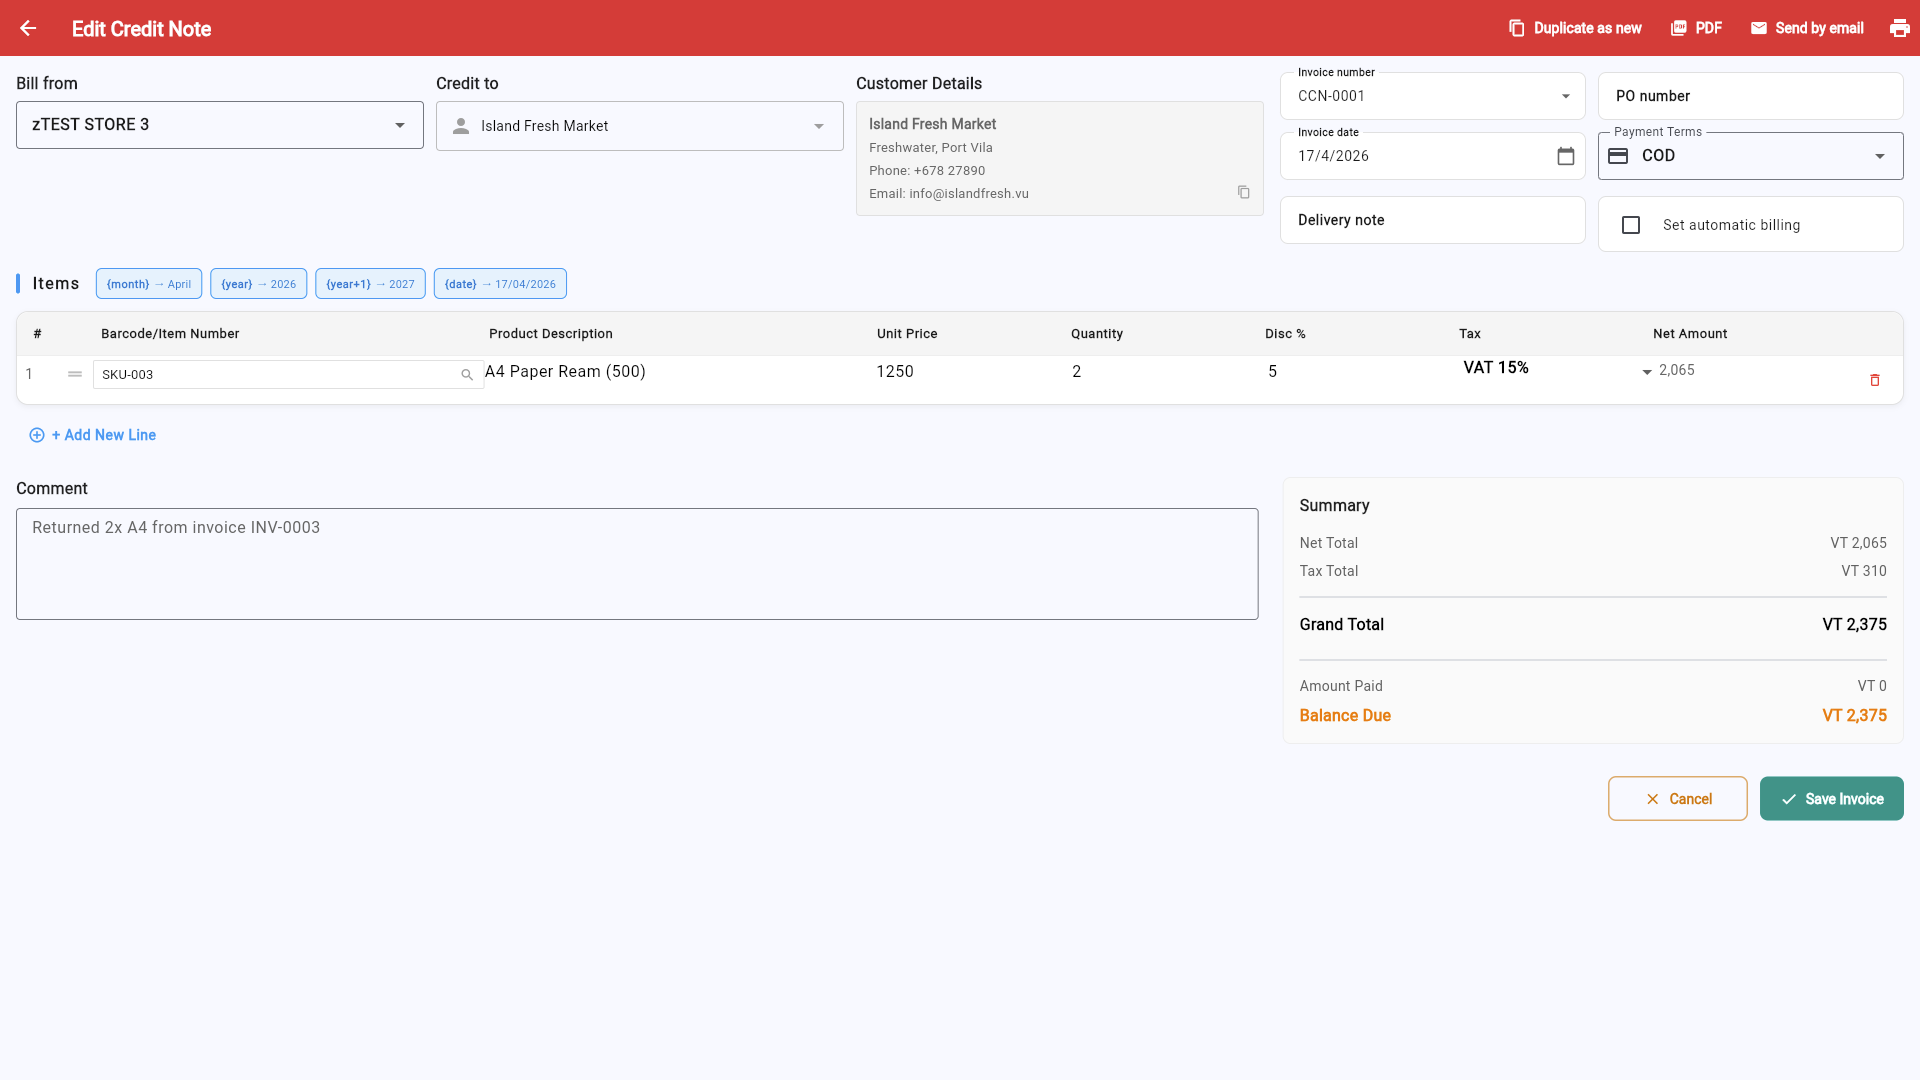
- Select the customer — Must match the original invoice customer.
- Add credit lines — Enter the items or amounts being credited back.
- Reference the original invoice — Link the credit note to the invoice it relates to.
- Save — The credit note is fiscalized via SDC and reduces the customer's outstanding balance.
Statuses
Credit note created but not yet posted. Actions: Edit, Mark as Sent, Print, Email, Cancel.
Posted and fiscalized via SDC — full credit available. Actions: Apply to Invoice, Refund Customer, Print, Email.
Partially applied to invoices — some credit remains. Actions: Apply to Invoice, Refund Customer, Print, Email.
Fully applied — balance is zero, no further action needed.
Cancelled — only if no refund has been issued. If the credit note has been partially or fully applied, it cannot be cancelled.
referentDocumentNumber, and the transaction type is automatically set to Refund. If SDC signing fails, the credit note cannot be saved — it must be signed successfully.To record a customer payment, open the invoice action menu and select Pay Invoice:
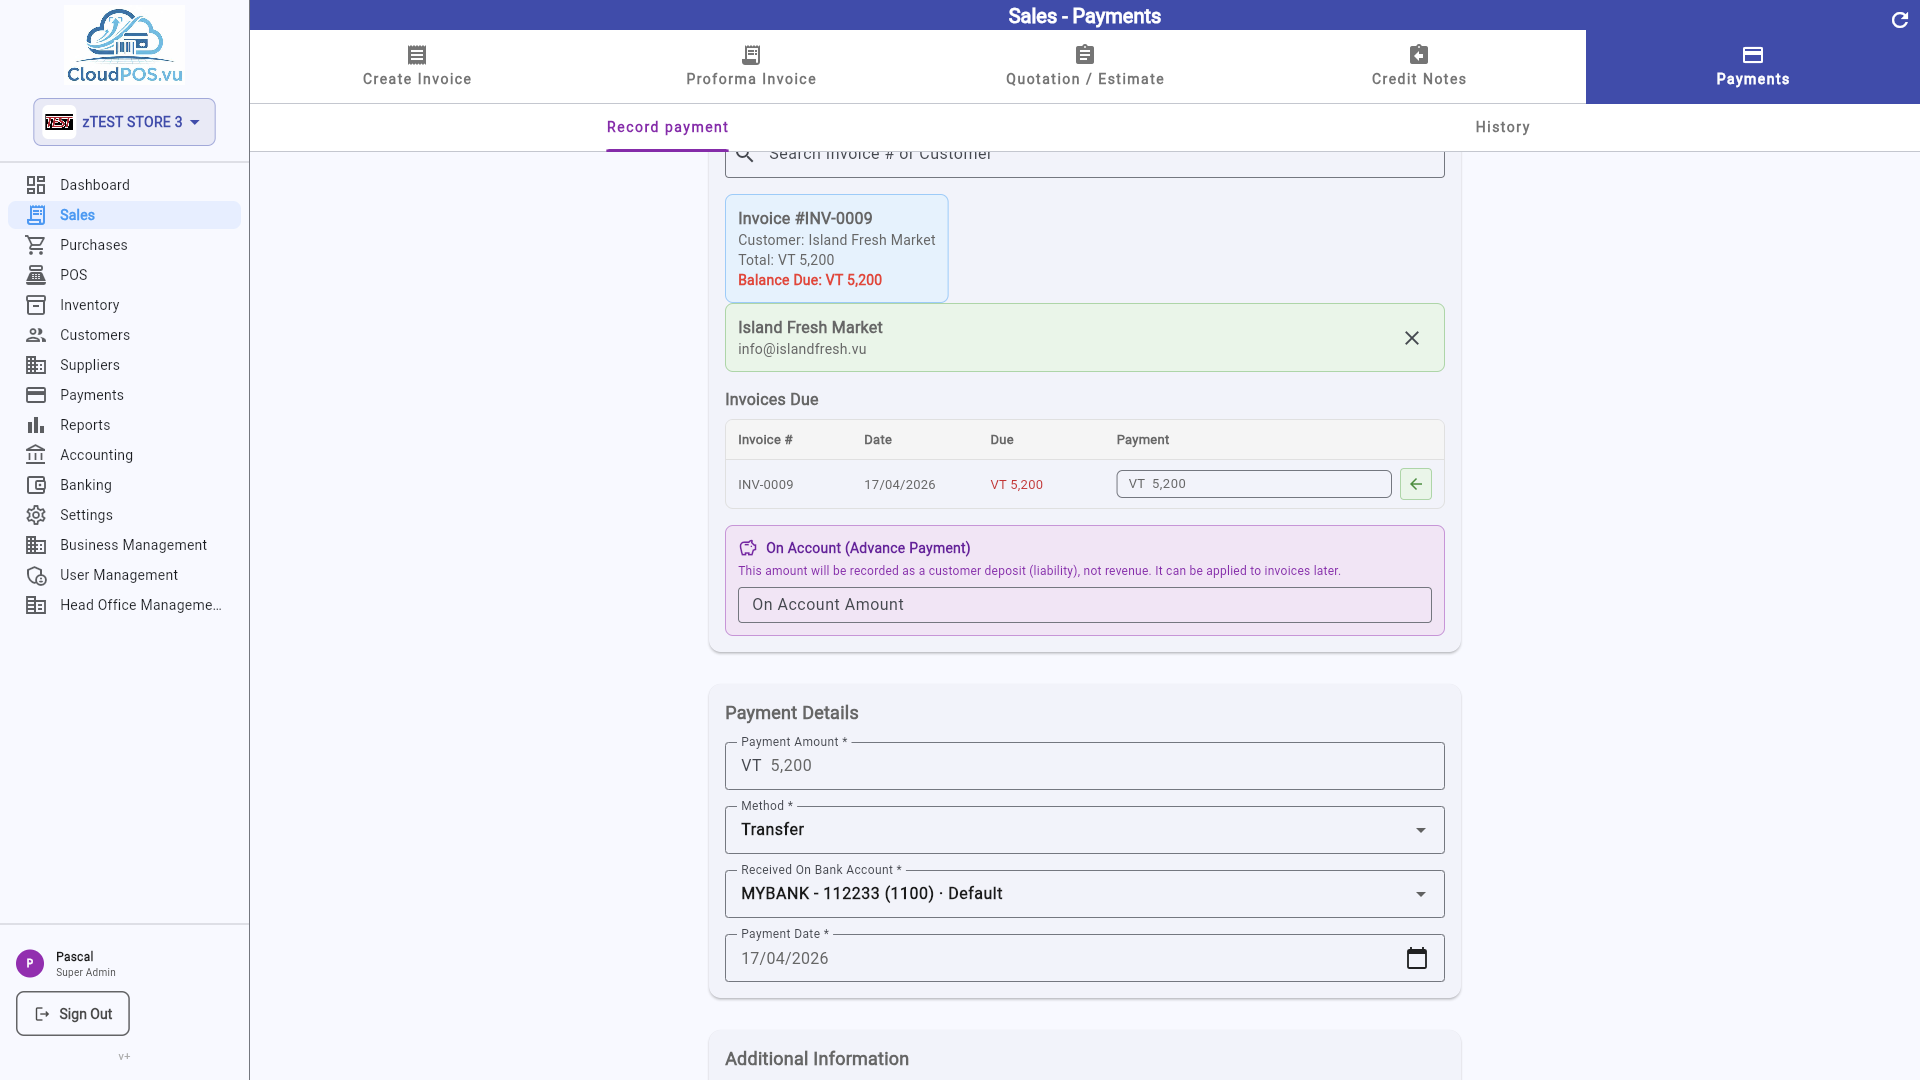
- Amount — Defaults to the full balance due. Partial payments are supported.
- Payment Method — Cash, Card, Bank Transfer, or Cheque (configured in Settings → Payments).
- Payment Date — When the payment was received.
- Reference — Optional transaction reference or cheque number.
- Receipt Number — Auto-generated for your records.
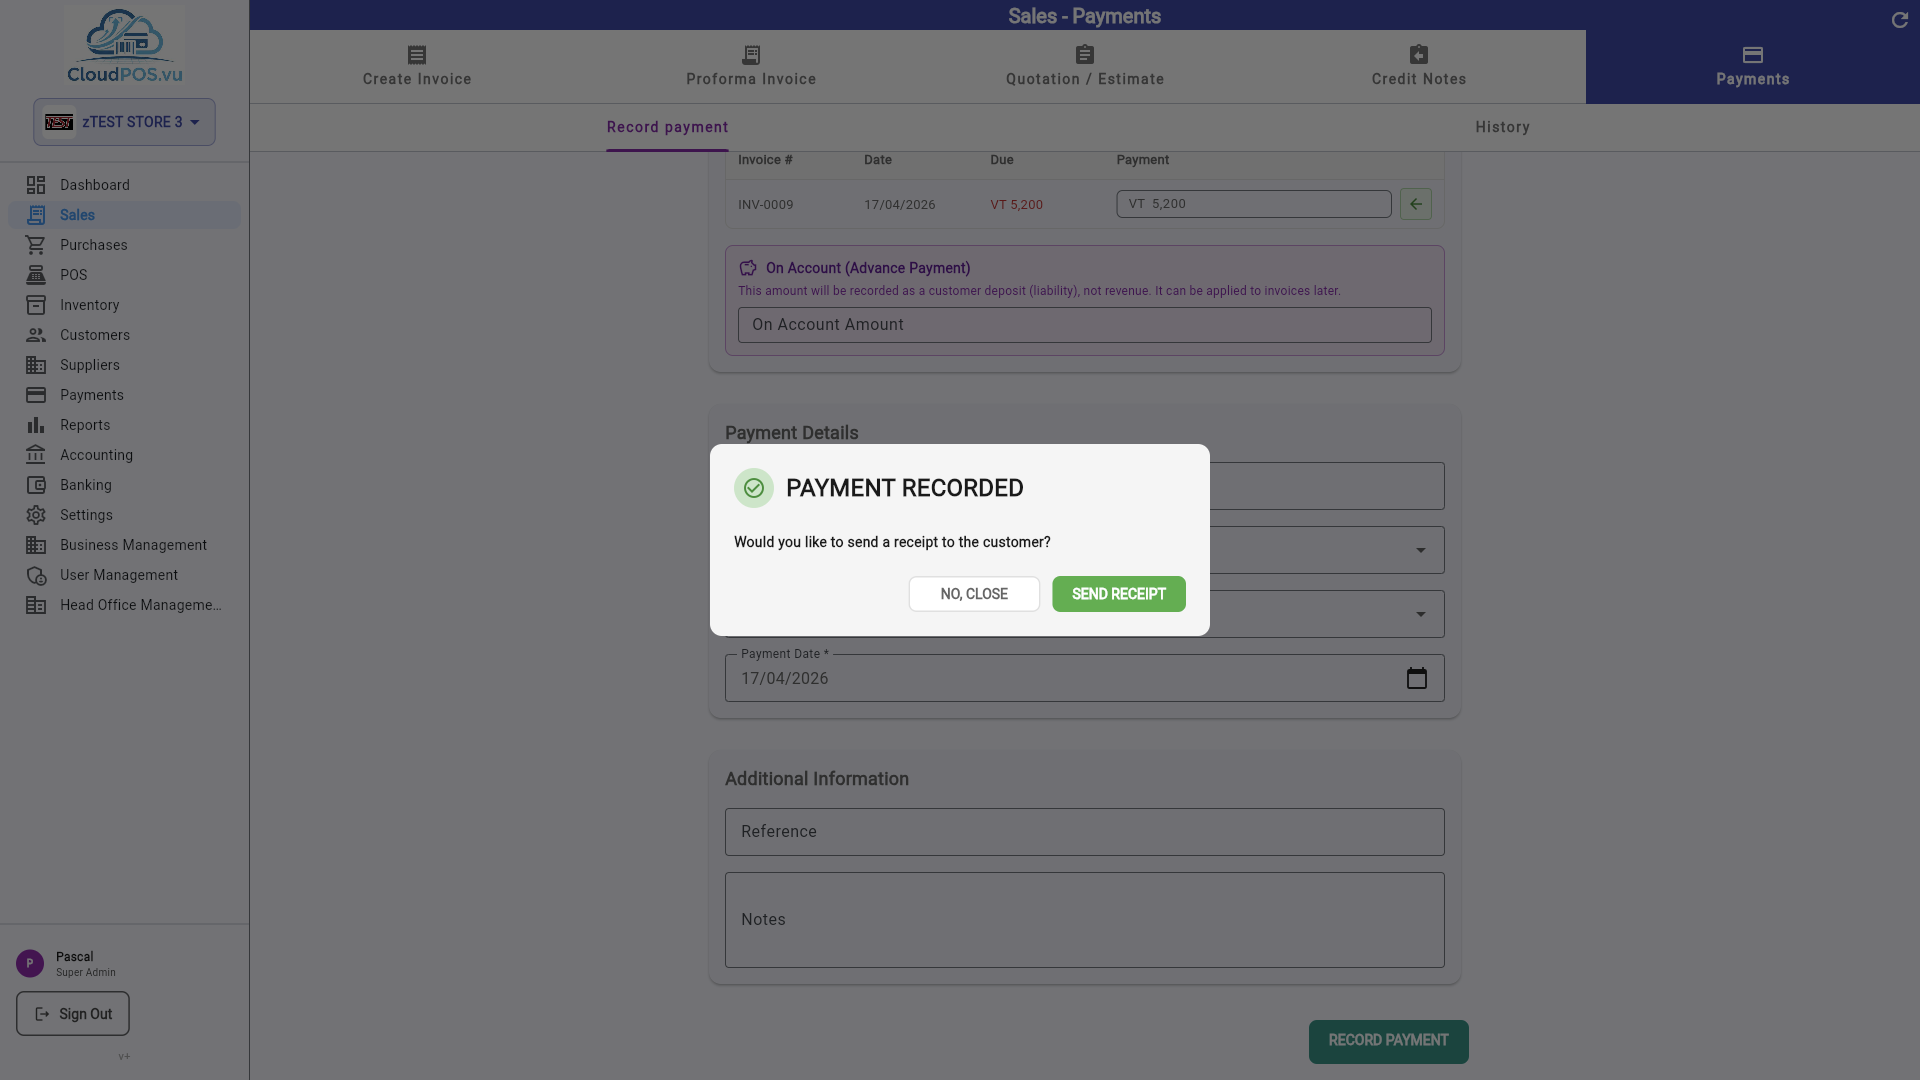
After recording the payment, you can optionally send a receipt to the customer:
Payments Tab
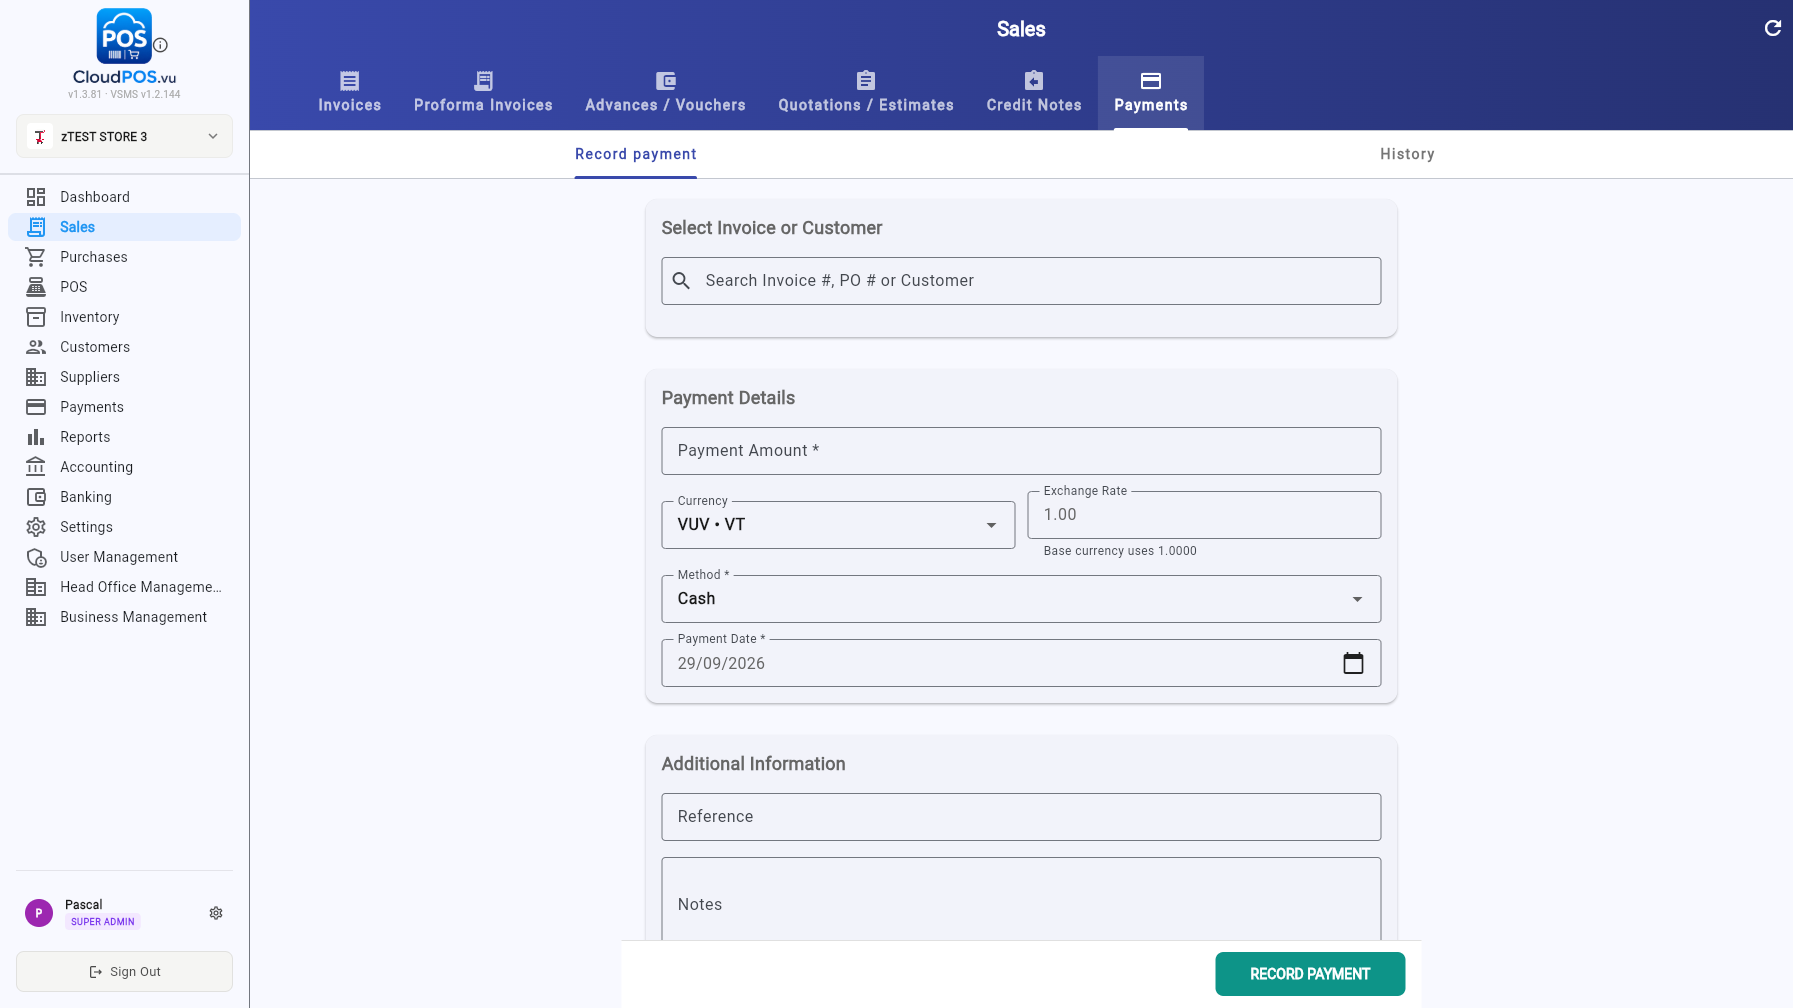
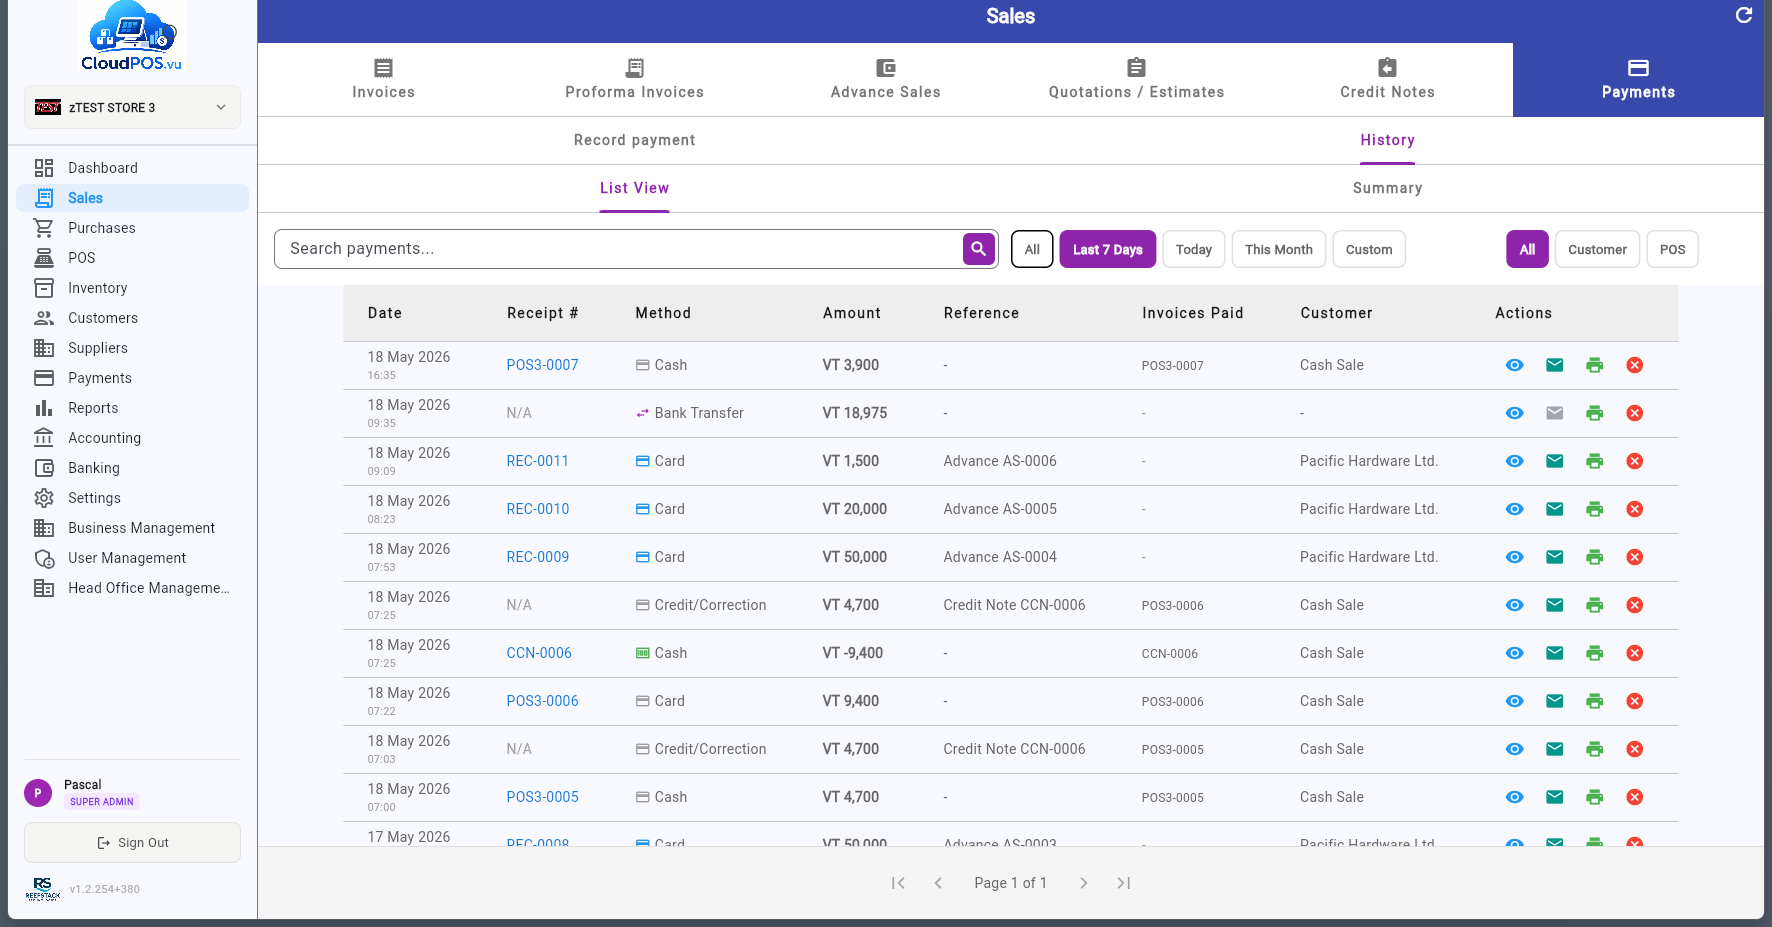
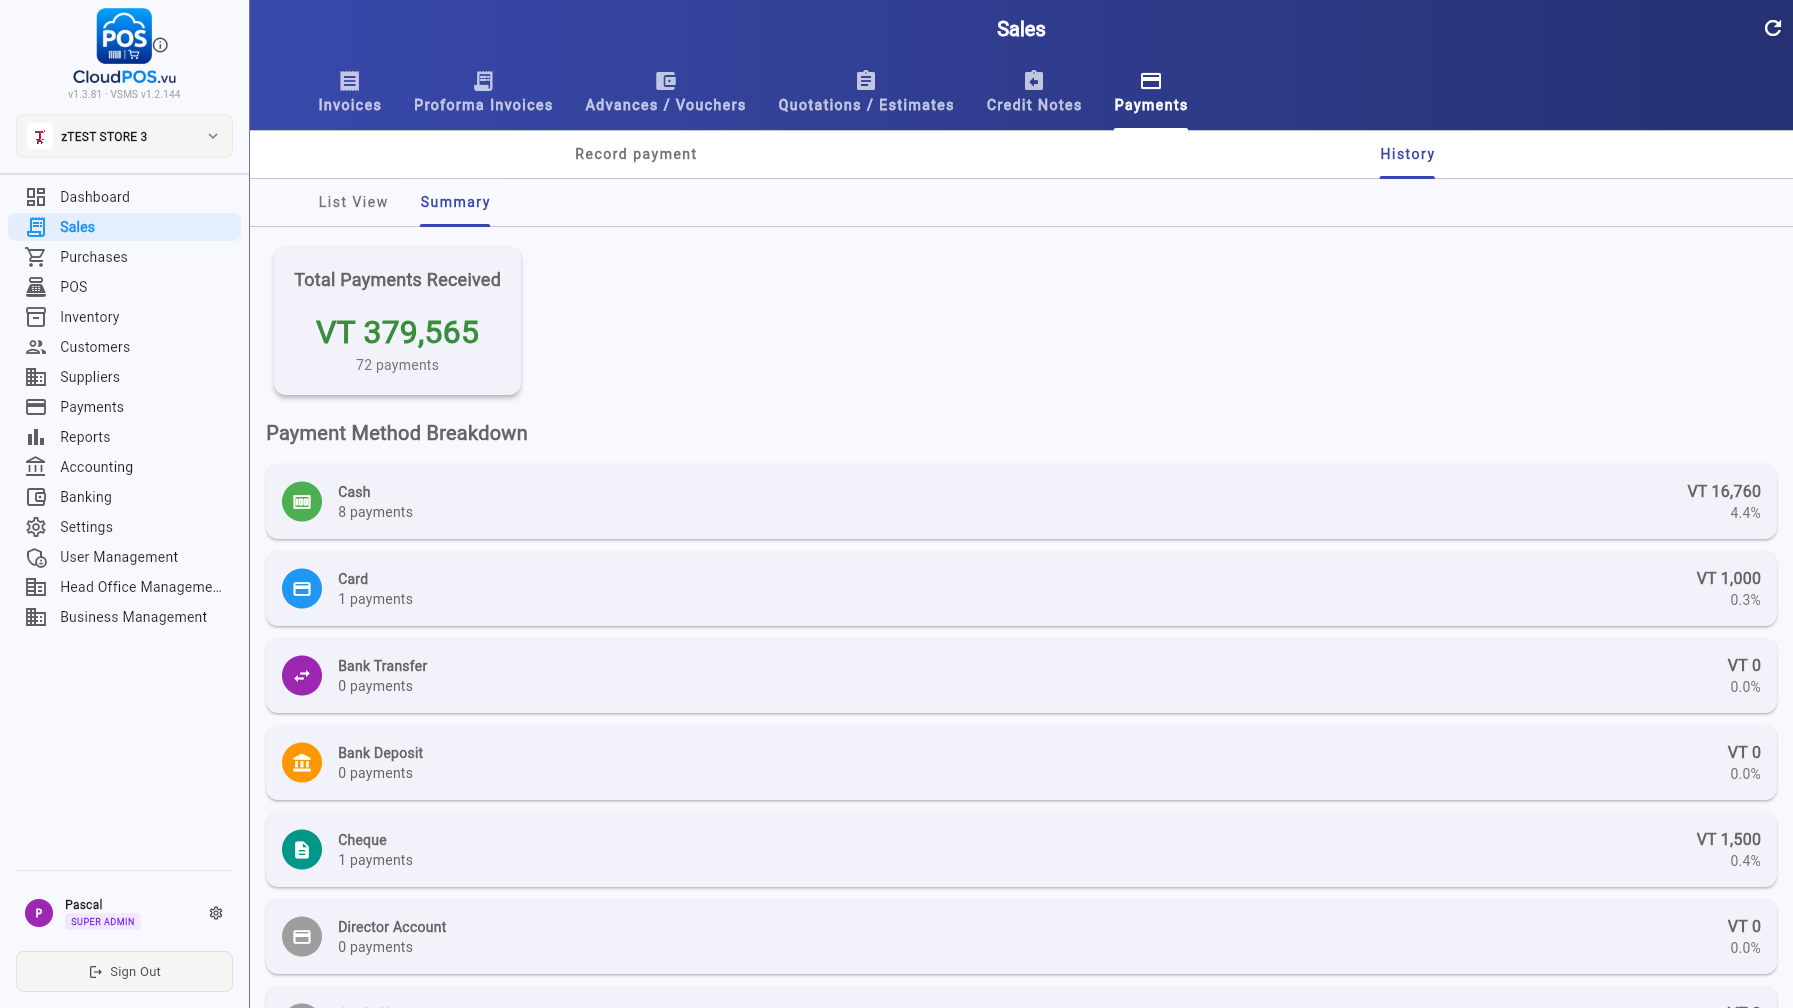
The Payments tab in the Sales module is a standalone payment desk with two views:
- Record payment — record a payment without opening an invoice: search by invoice #, PO # or customer, then enter amount, currency + exchange rate, method and date, plus optional reference and notes.
- History — every payment received, filterable by period (All, Last 7 Days, Today, This Month, Custom) and source (All / Customer / POS). Summary shows the total received with a per-method breakdown.
Every document type has a ⋯ action menu with context-sensitive options. Here's what's available for each type:
🧾 Invoice Actions
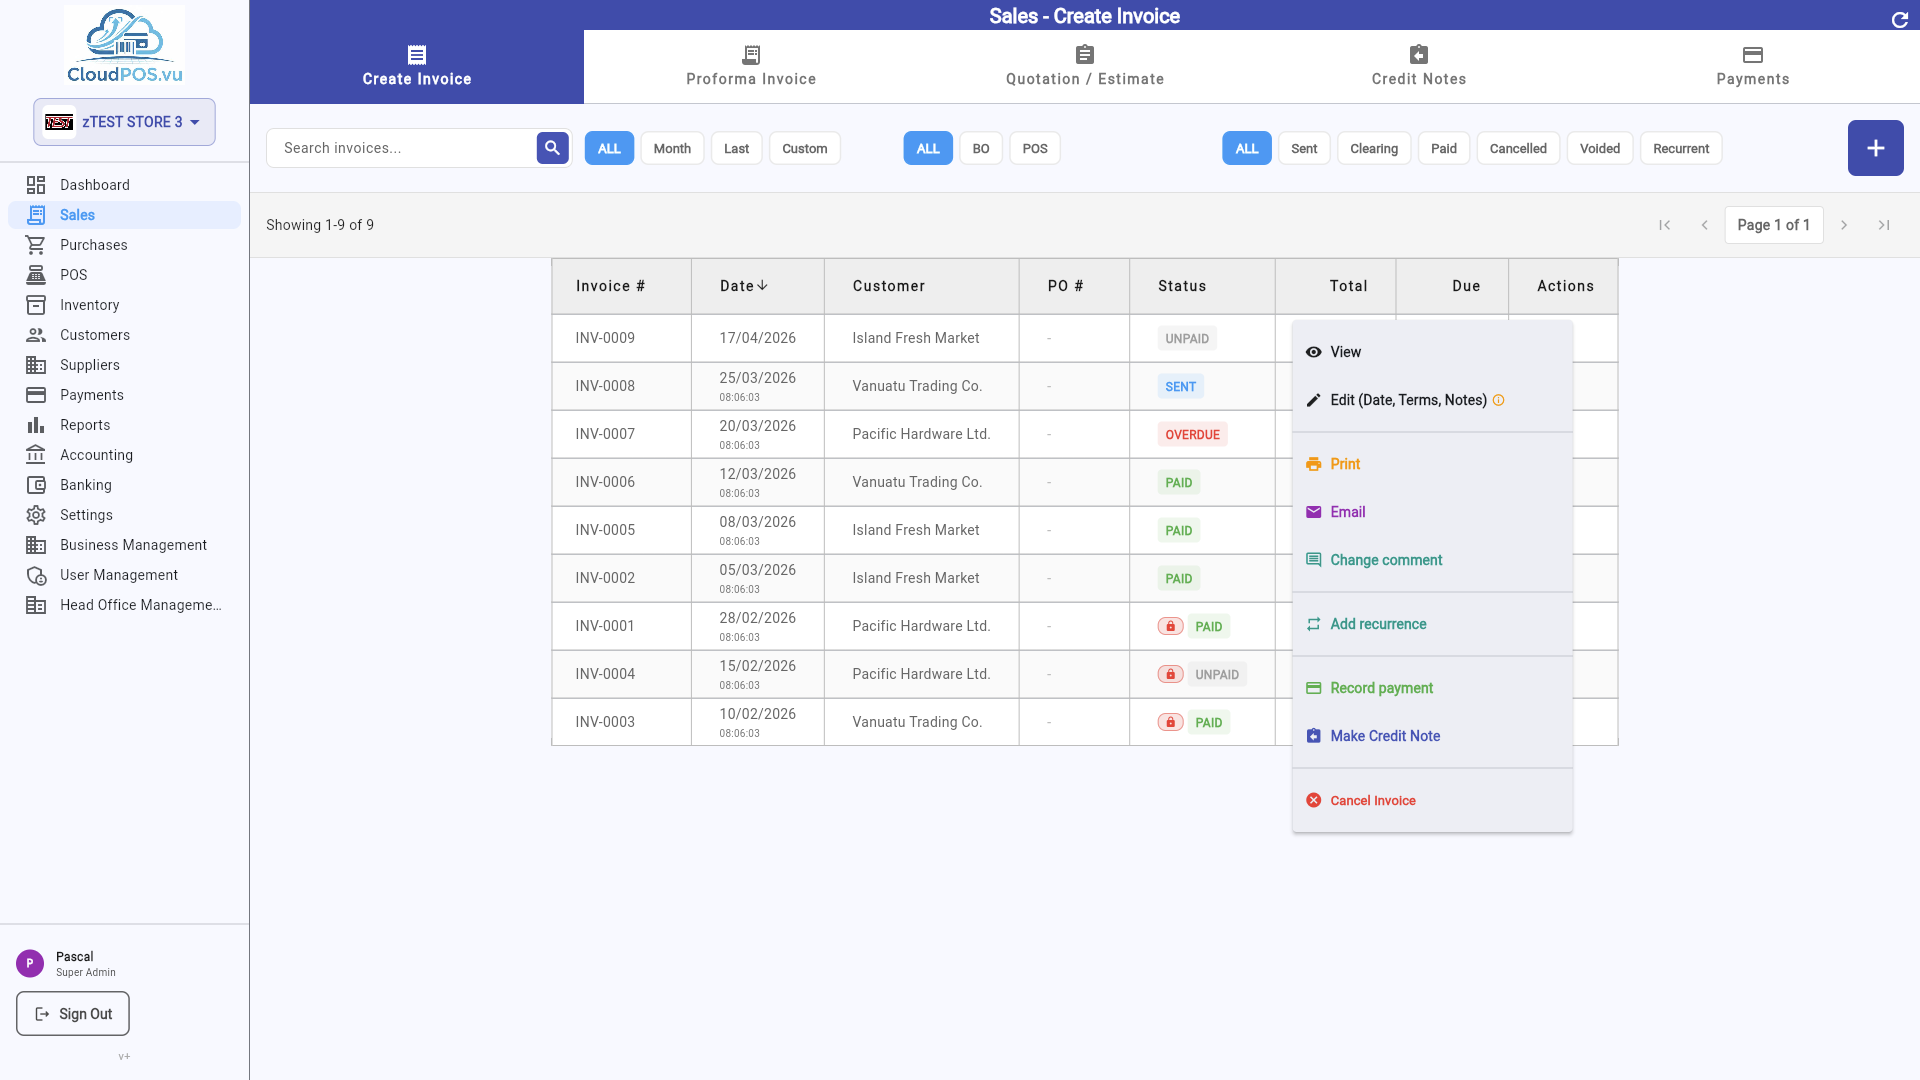
Record a payment against this invoice. Opens the payment dialog.
Email the invoice to the customer as a PDF attachment.
Generate a printable PDF of the invoice.
Create a copy of this invoice with new line items and number.
Only available for unpaid invoices — issues a Normal Refund via SDC. For paid invoices, Cancel is greyed out and you must create a Credit Note (separate CCN document) to refund the customer instead.
📝 Quotation Actions
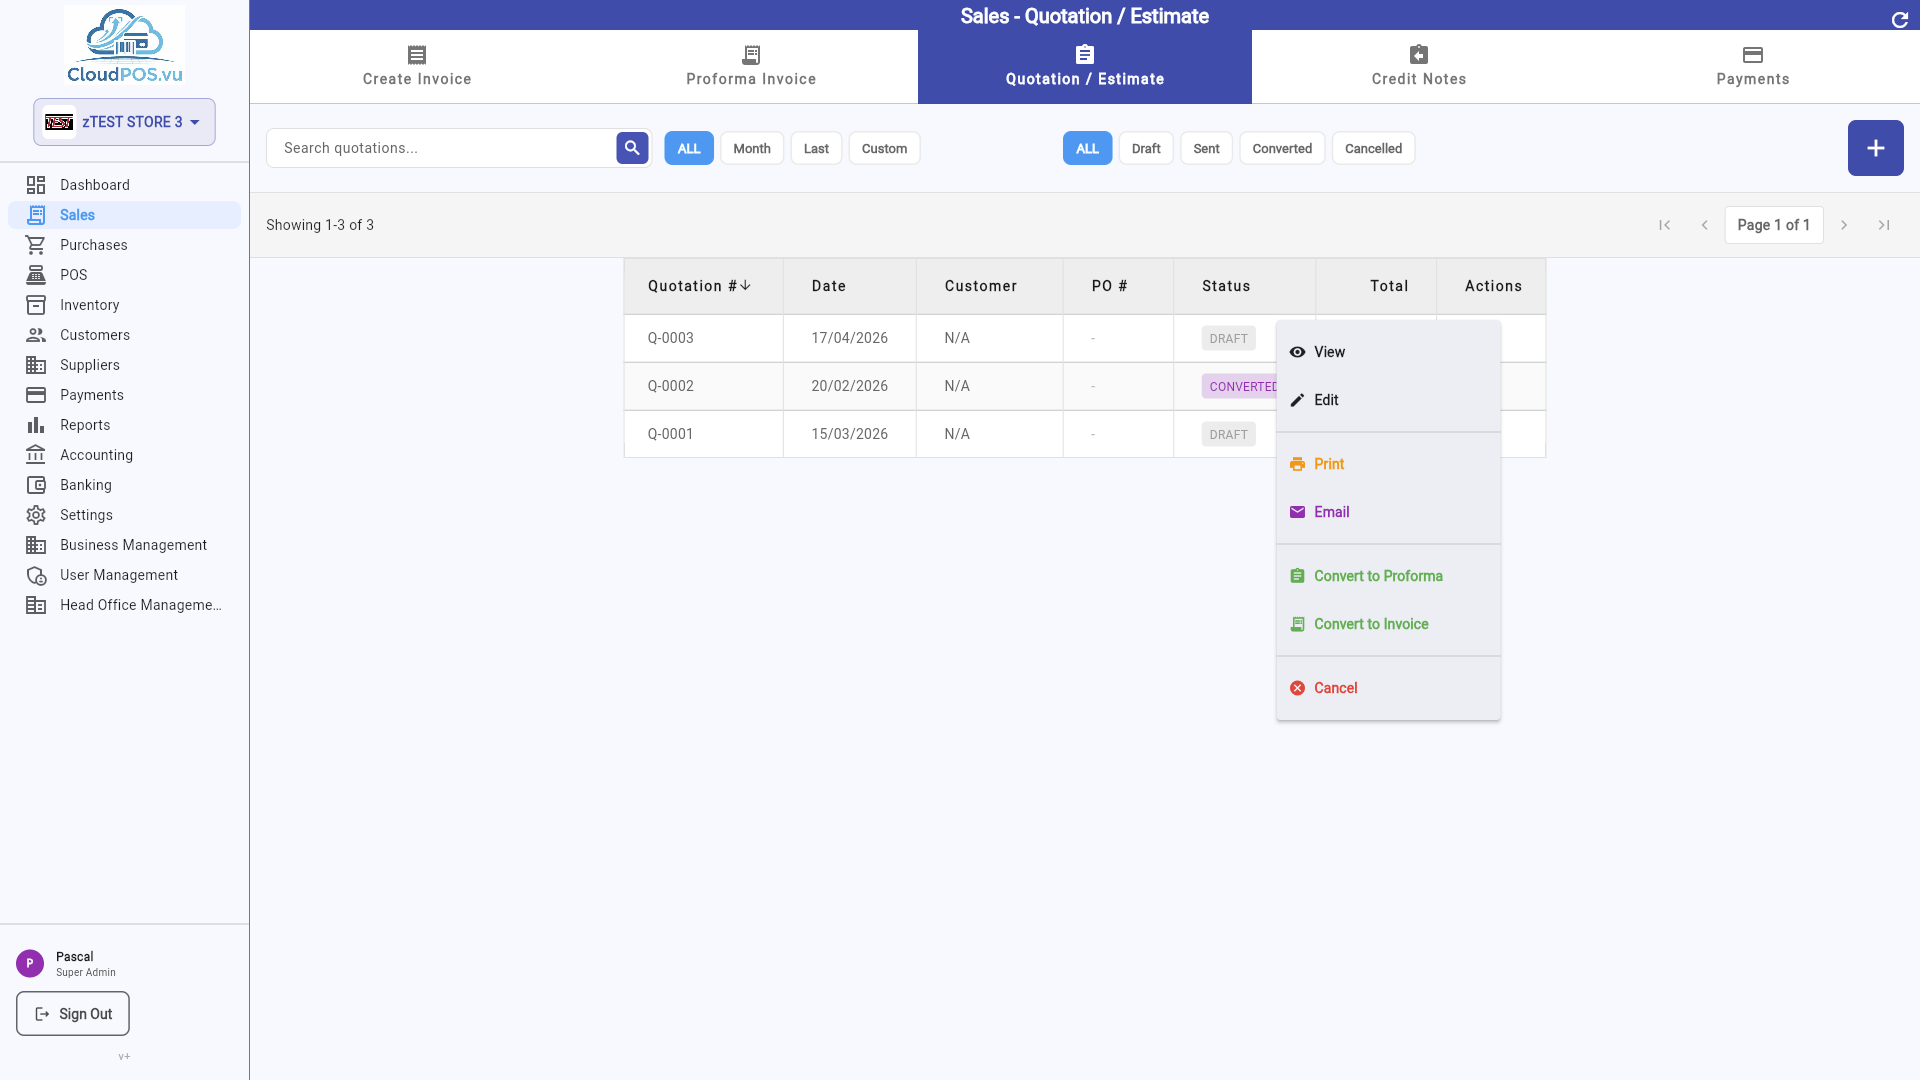
Create a Proforma Invoice from this quotation. The quotation is marked Converted.
Create a Tax Invoice directly from this quotation, skipping the PI step.
📋 Proforma Invoice Actions
Open the PI in read-only or edit mode.
Print or export the PI. Print Copy includes SDC verification data.
Send the PI to the customer by email.
Edit the comment or internal notes on the PI.
Change the PI status to Sent, indicating it has been delivered to the customer.
Create a fiscal advance payment linked to this PI. Opens the advance sale dialog.
View all advance sales for this PI with payment progress and settlement button.
Settle all advances and create the final Tax Invoice. Available when advances exist.
Create a Tax Invoice directly. Blocked when the PI has active advance sales.
Cancel the PI. If signed by SDC, a Proforma Refund is issued.
Delete the PI. Only available for unsigned/draft PIs.
Gift Vouchers
Sell vouchers with codes and expiry — and redeem them as payment on the POS
A gift voucher is a prepaid amount a customer buys (usually as a gift). The customer receives a printed or emailed ticket with a short code (e.g. 74ZK5N). The code can later be used as payment for any sale.
Selling a voucher creates a signed Advance Sale (AS-) — tax liability is recorded immediately, exactly like a layby instalment. The amount is real money received.
Vouchers belong to the business that issued them — a code only redeems in the same business.
Choose the validity when selling (default 12 months). The ticket and the system both show the expiry date. Expired vouchers can no longer be redeemed.
A voucher can cover a whole sale or be tendered as part of a split payment. The system tracks redemption on the voucher record.
Go to Sales → Advances / Vouchers and click + New Voucher (or the + button). Selling works as a two-step wizard:
Step 1 — Voucher details
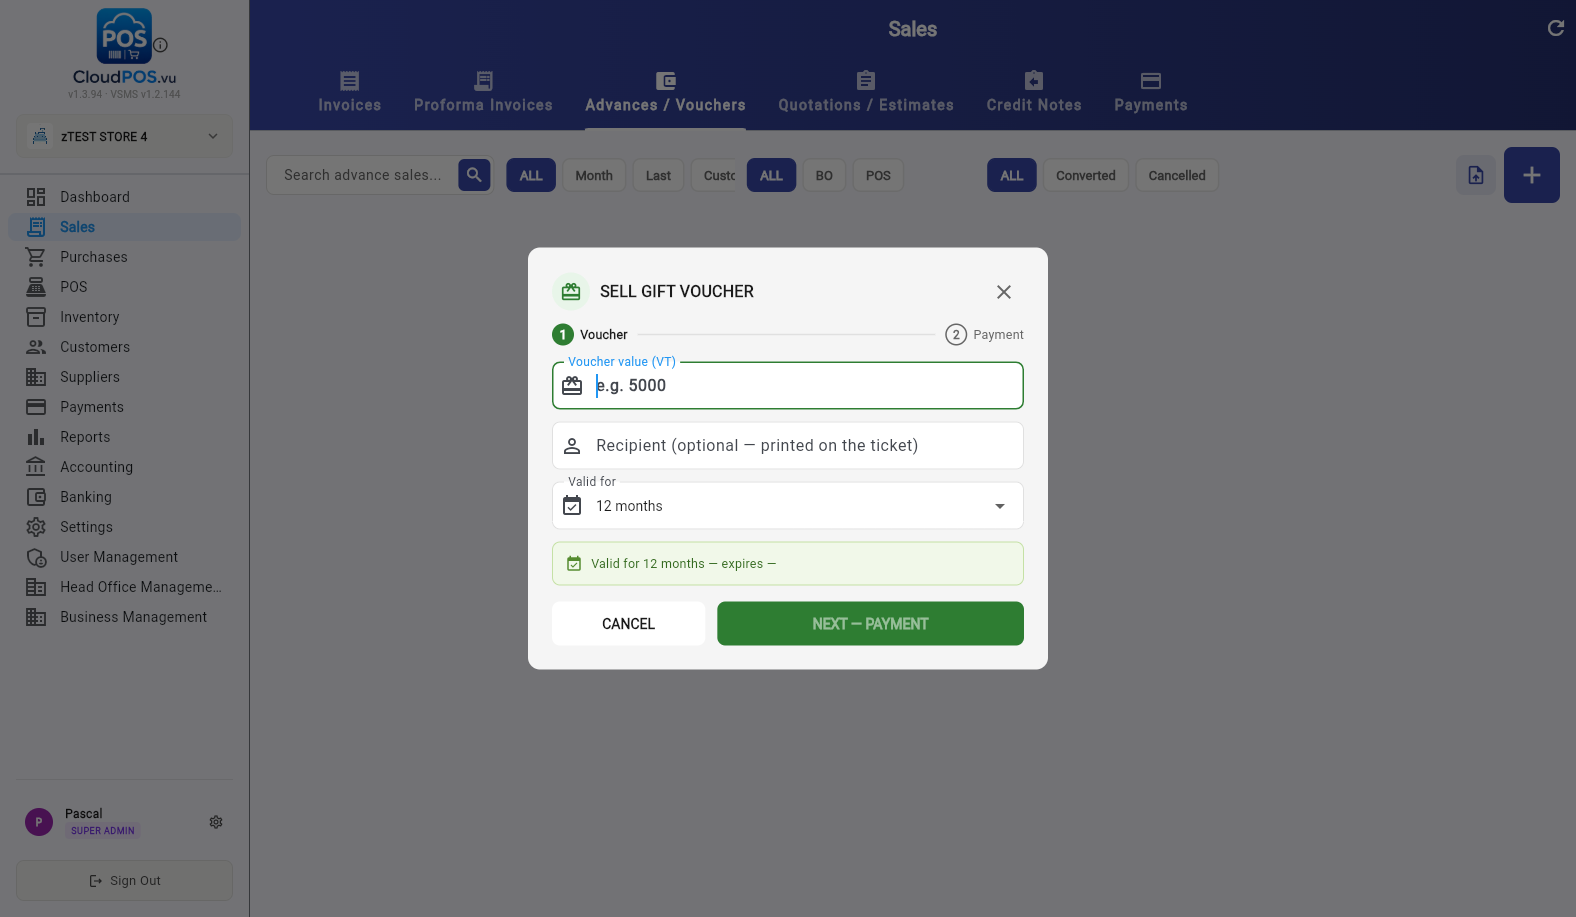
- Voucher value (VT) — the amount the customer pays, e.g. 5000.
- Recipient (optional) — a name printed on the ticket, e.g. the gift recipient.
- Valid for — 12 months by default; the expiry date is shown before you continue.
Step 2 — Payment
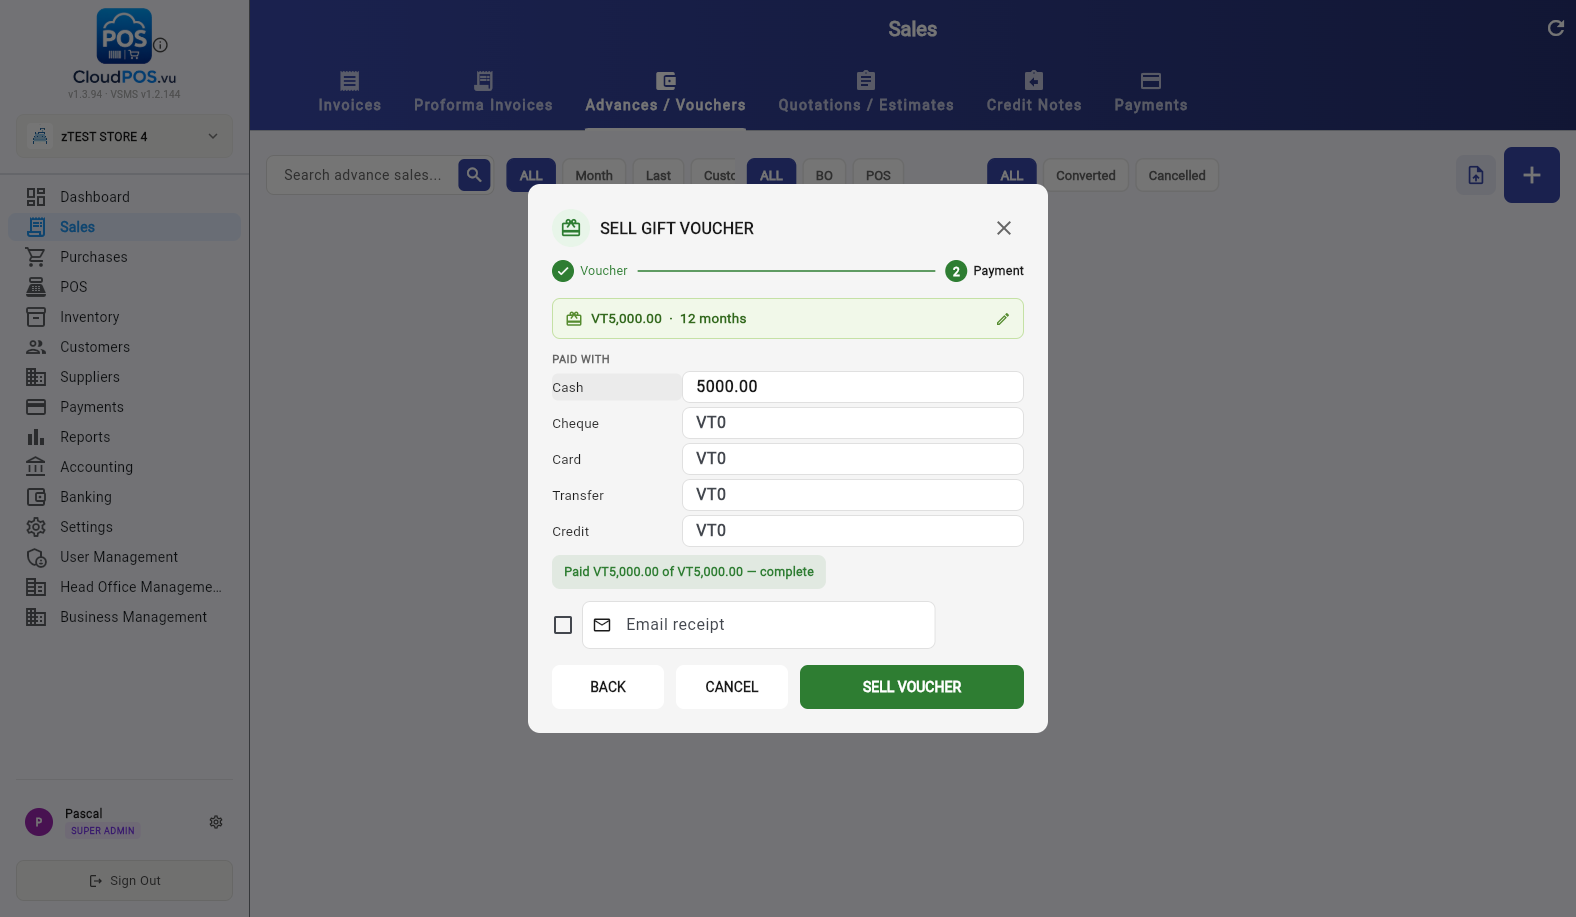
Enter how the customer pays — one method or a split (e.g. VT 3,000 cash + VT 2,000 card). When the paid total matches the voucher value, click SELL VOUCHER.
Vouchers can also be sold at the POS the same way — the ticket prints with the code for the customer.
Vouchers live in the Advances / Vouchers tab next to layby advance sales. Gift vouchers show Gift voucher in the Linked PI column, with the payment received and the remaining balance per row.
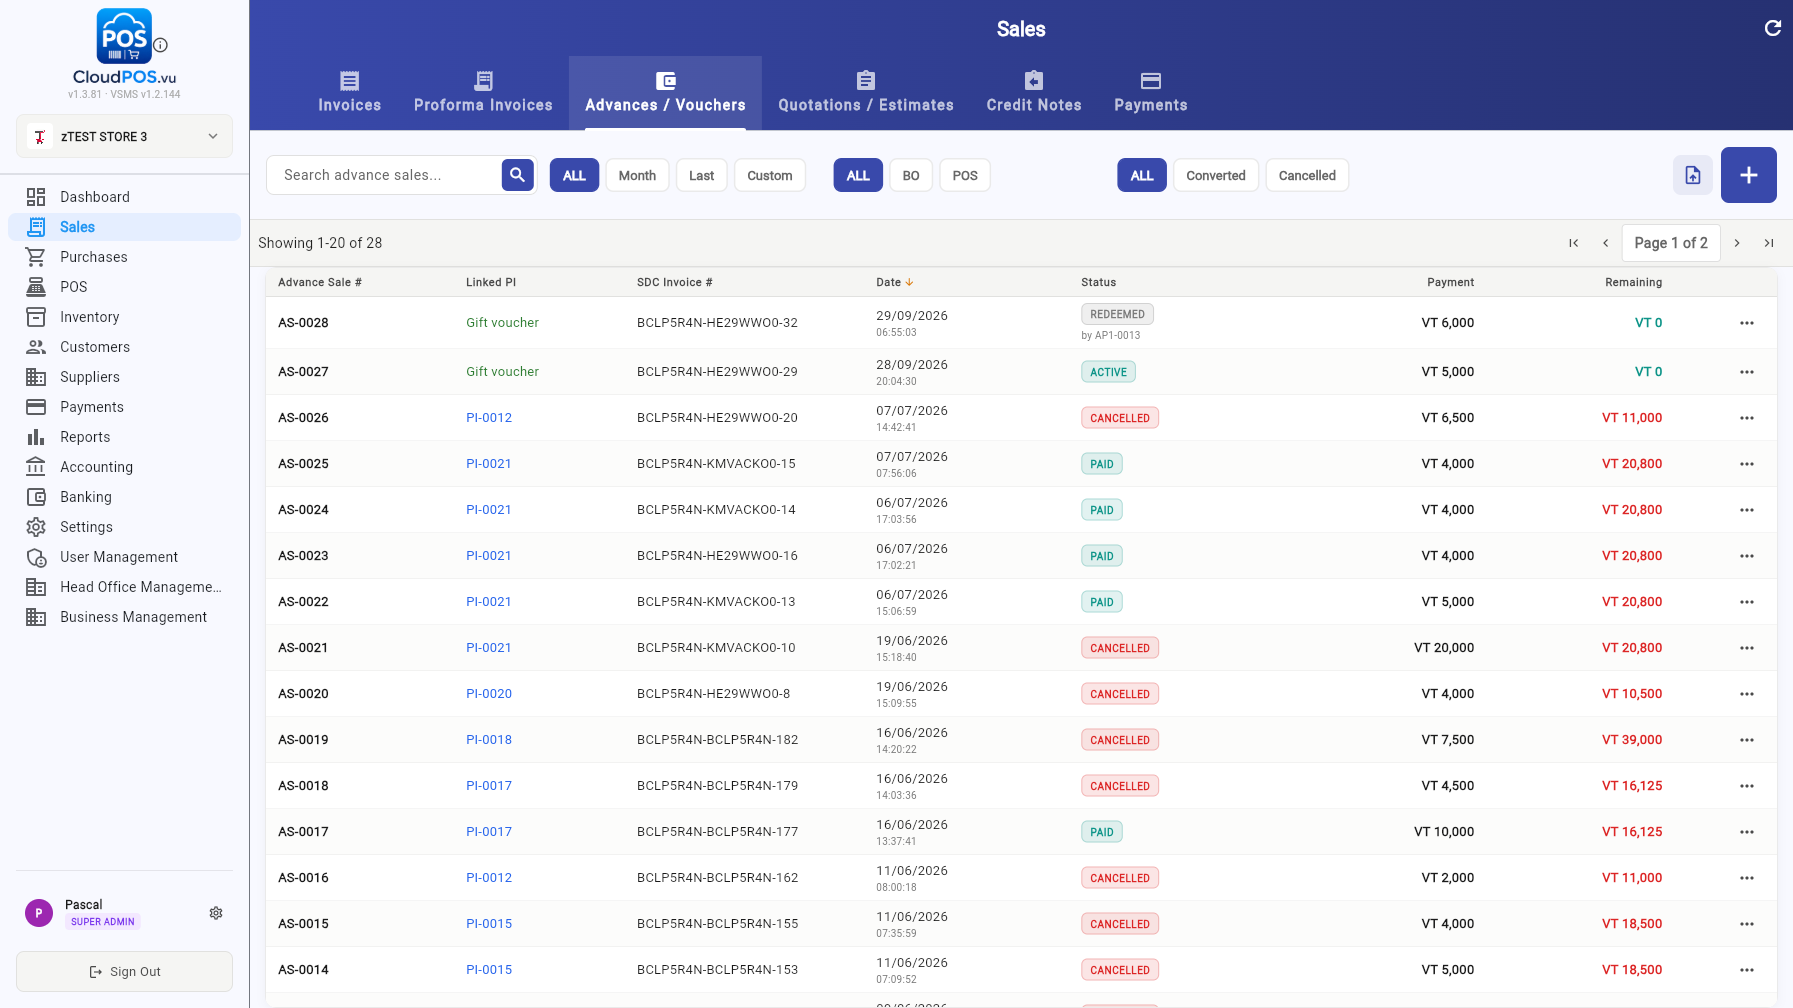
Voucher paid and signed — ready to redeem until it expires.
Fully used as payment — the invoice that used it is referenced on the voucher.
Cancelled before use (see Cancelling a Voucher).
Use the row's ⋯ menu for View, Print Ticket, Receipt PDF, Print Copy (SDC), Email, Change comment and Cancel Voucher.
Vouchers are redeemed as payment during a sale:
- Ring up the items, then tap PAY (F1).
- Switch to the SPLIT / VOUCHER tab.
- Scroll to REDEEM A VOUCHER — scan or type its code, enter or scan the code (e.g. 74ZK5N) and tap CHECK.
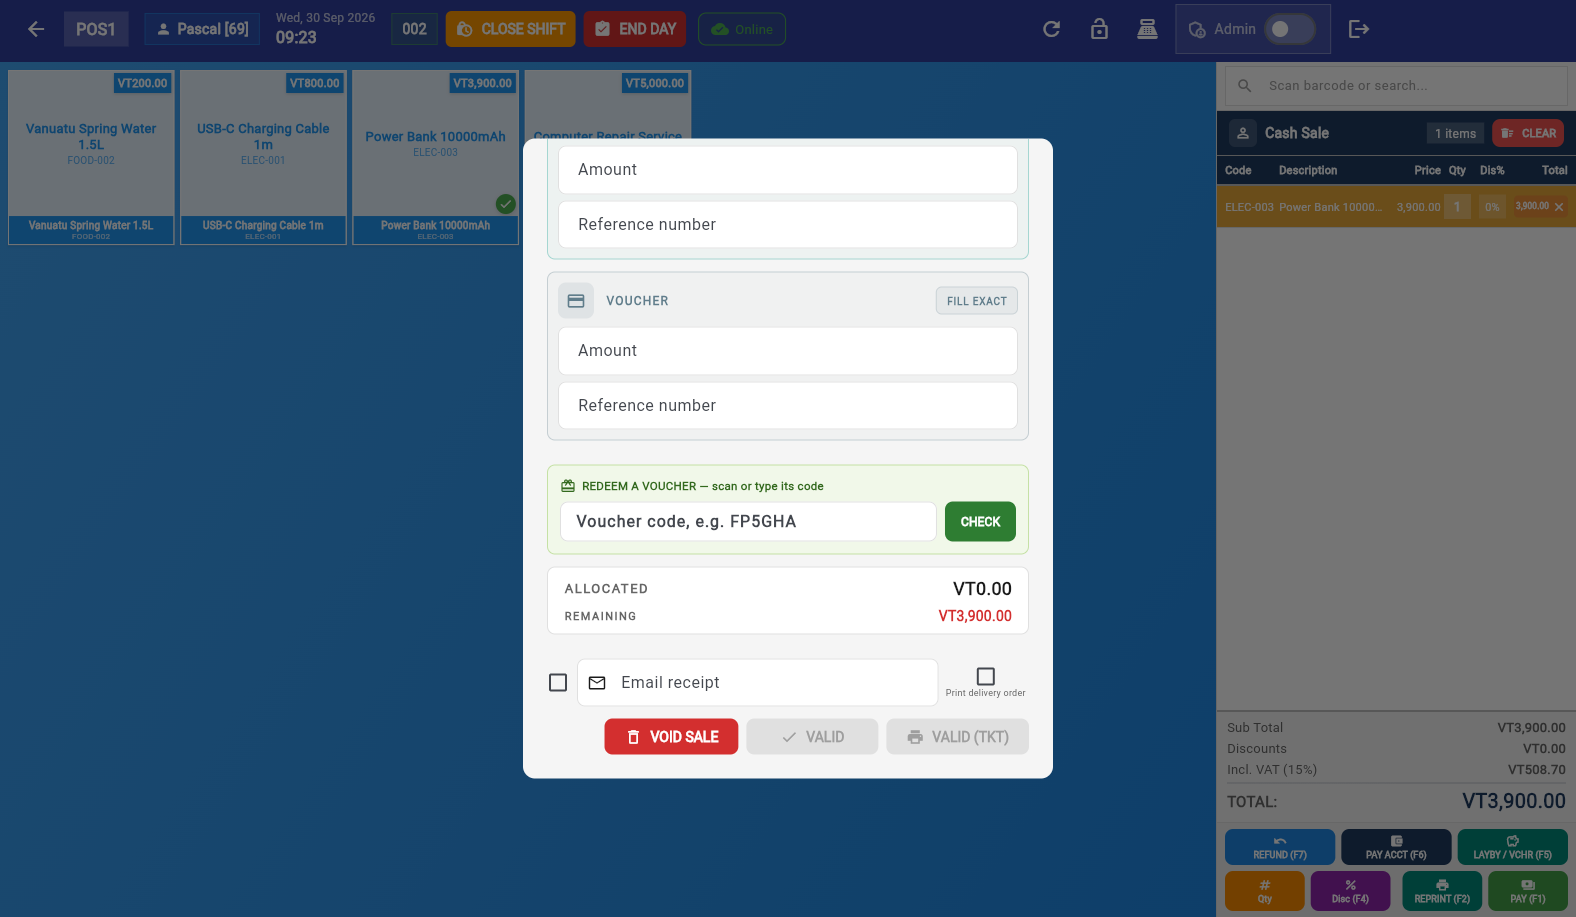
The voucher is looked up and applied automatically — the section shows the voucher number, value and recipient, how much was applied to this sale, and the ALLOCATED total updates:
Complete the sale with VALID (or VALID (TKT) for a ticket-style receipt). The receipt shows the voucher as a payment line, exactly like cash or card.
A voucher is not cash: no change is given when the voucher is worth more than the sale. If the voucher covers more than the total, the POS asks for explicit agreement:
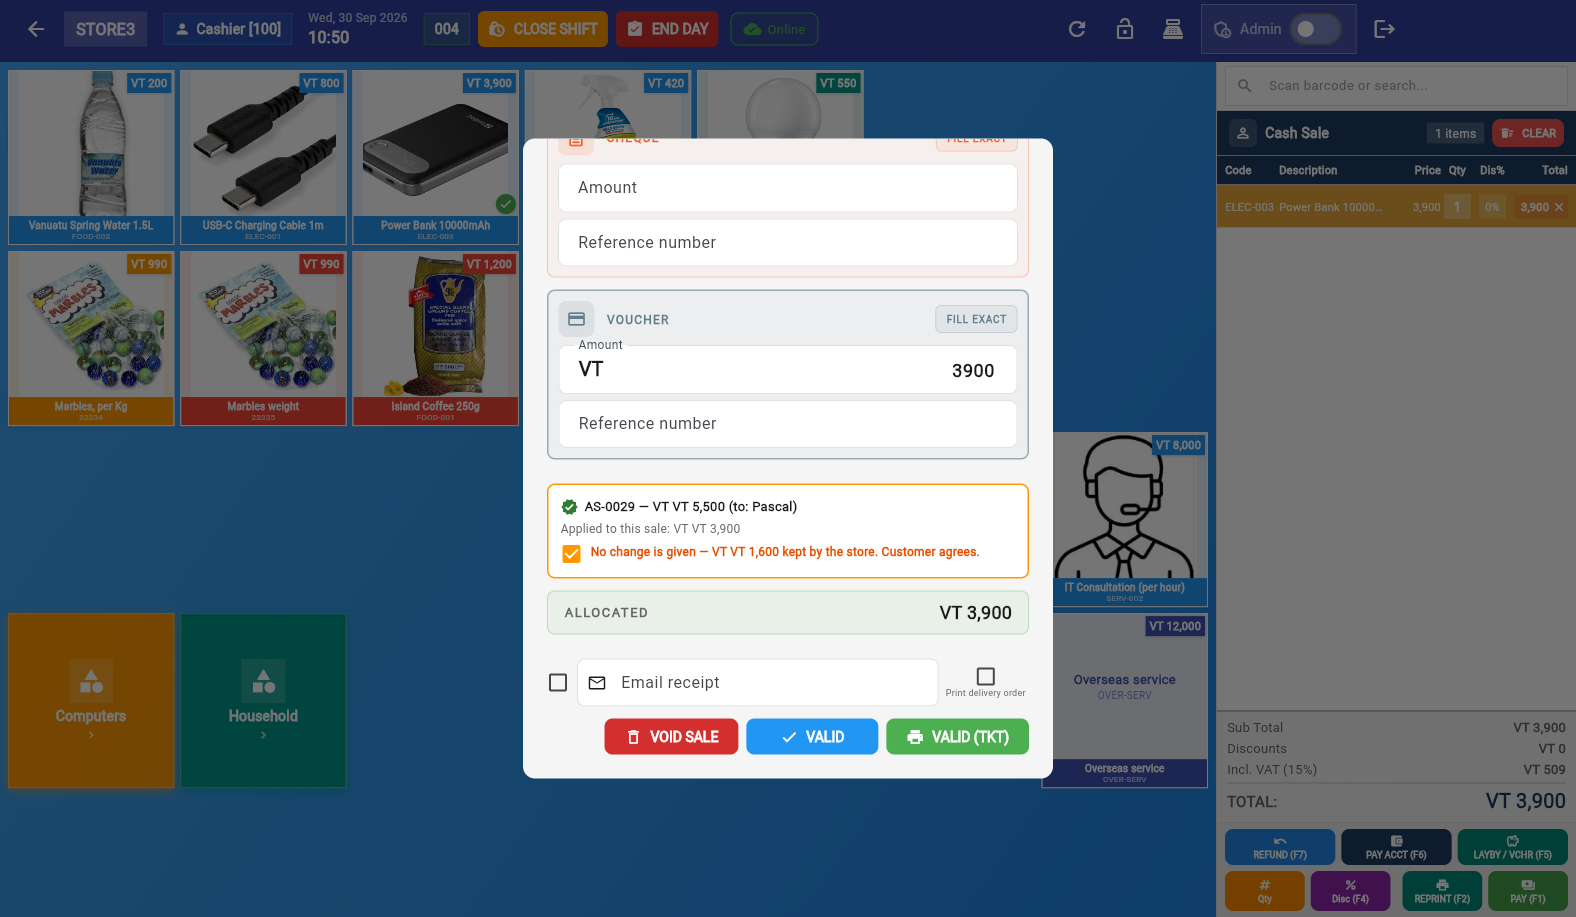
- Tick the box — the sale is paid entirely by the voucher; the unused remainder (VT 1,600 above) is kept by the store and the voucher is fully used.
- Don't tick — the voucher is not accepted; pay the sale with another method and keep the voucher for a bigger purchase.
Beside the code lookup, the SPLIT / VOUCHER tab has a plain VOUCHER payment row (Amount + Reference number). Use it for paper vouchers or third-party vouchers that are not in the system: enter the amount tendered and the reference — it counts towards the sale like any other method. System voucher codes should always go through REDEEM A VOUCHER so balances are tracked automatically.
An unused voucher can be cancelled from the list: Advances / Vouchers → row ⋯ → Cancel Voucher. Cancellation reverses the advance sale via the SDC (like any advance-sale cancellation), so it should be done by a manager. Once a voucher has been redeemed it can no longer be cancelled — use a Credit Note on the sale that used it instead.
Can a voucher be used partly and keep the rest for later?
No — a voucher redeems in one go: it covers the sale up to its value, and any leftover is forfeited under the no-change rule (or the voucher isn't accepted). Plan the sale to use the full value.
Can a voucher be redeemed in another shop (business)?
No — vouchers are per business. The POS only finds codes issued by the business you are logged into.
What if the customer lost the code?
Find the voucher in Advances / Vouchers (search by value or date), open it with View and re-print or re-email the ticket from the ⋯ menu.
Do vouchers appear in reports and accounting?
Yes. Selling the voucher is an advance sale (shows in Sales → Advances / Vouchers, the Payment Received report, and VAT figures at issue). The redemption is a payment line on the invoice where it was used.
Can a voucher be paid partly with cash and partly on credit?
The payment step accepts a split across Cash, Cheque, Card, Transfer and Credit — but the voucher is only issued once it is fully paid.
Purchases
Supplier bills, purchase orders, import costing, expenses, credit notes, payments and fixed assets
CloudPOS.vu supports the full purchase lifecycle. The Purchases page contains 8 tabs for managing all aspects of your procurement:
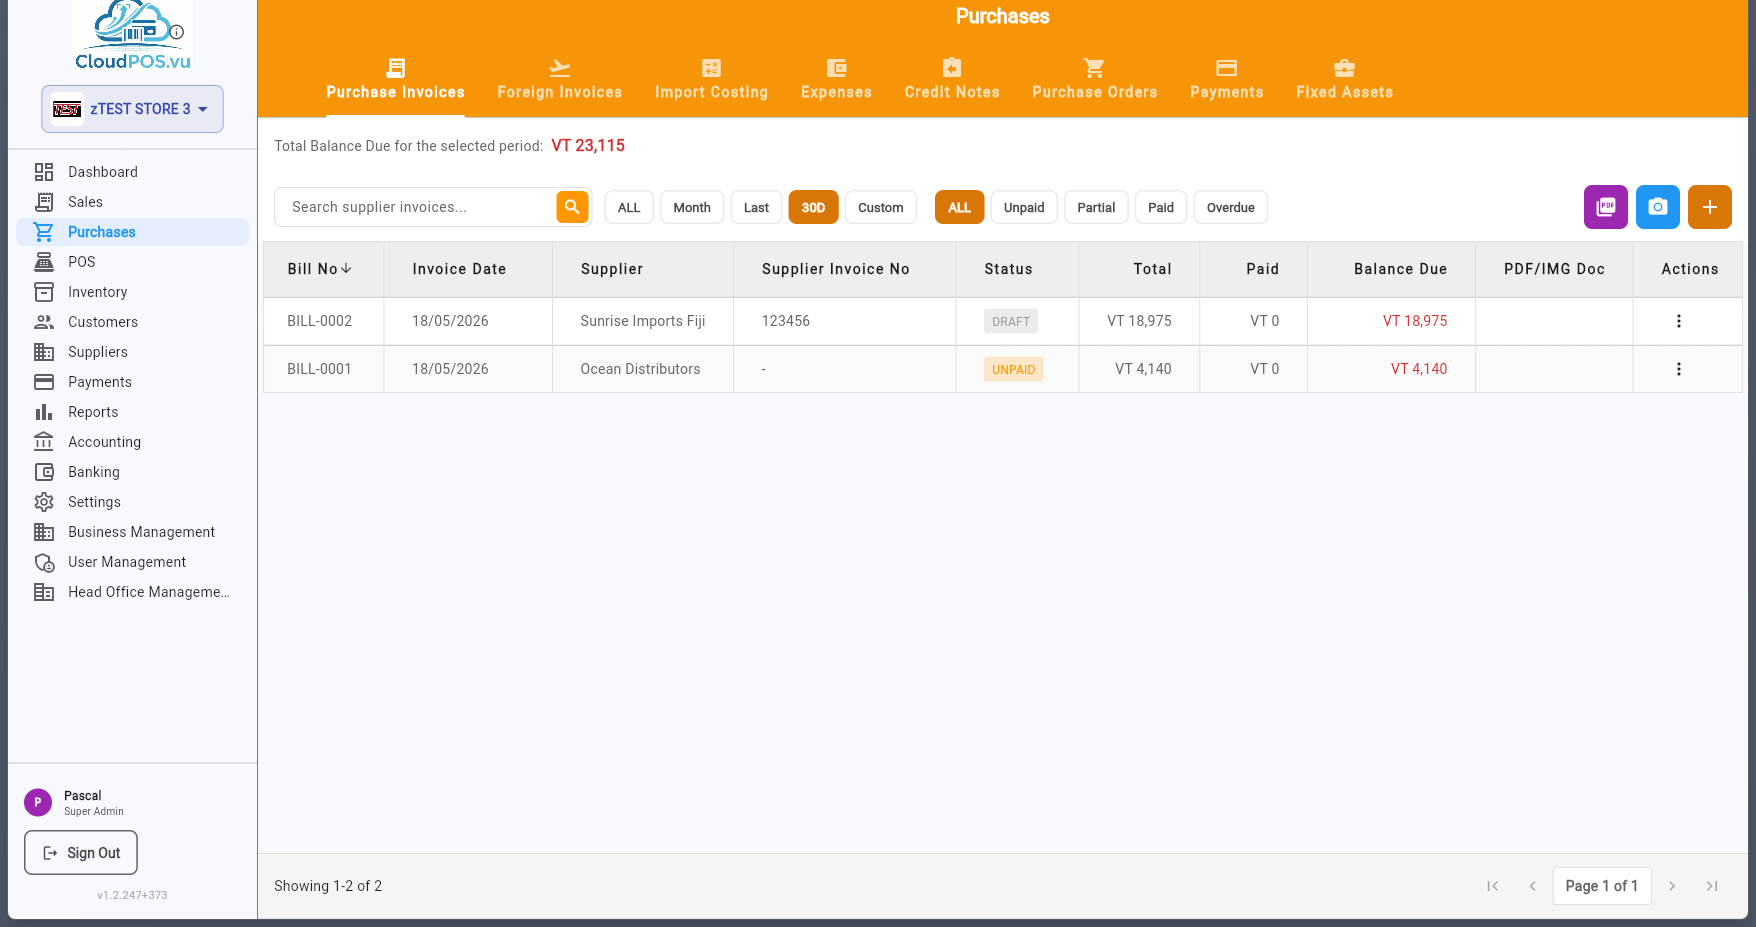
Purchase invoices start as Draft — no accounting impact. Once reviewed, you Post to Accounts to create journal entries and change the status to Unpaid. Then record payments to mark them as Paid.
The Purchase Invoices tab shows all your local supplier bills with their current status — Draft, Unpaid, Partially Paid, Paid, Overdue, or Cancelled.
Each row displays the bill number, supplier name, supplier invoice number, PO number, dates, total amount, paid amount, balance due, and status. Click any invoice to view its full details.
Newly created invoice — no accounting entries yet. Can be freely edited or deleted.
Posted to accounts — journal entries created. Awaiting payment.
Part of the invoice has been paid — remaining balance is still due.
Invoice fully paid — balance due is zero.
Payment is past the due date — follow up with the supplier.
Invoice has been cancelled — journal entries reversed.
Click the + button on the Purchase Invoices tab to open a new blank invoice form:
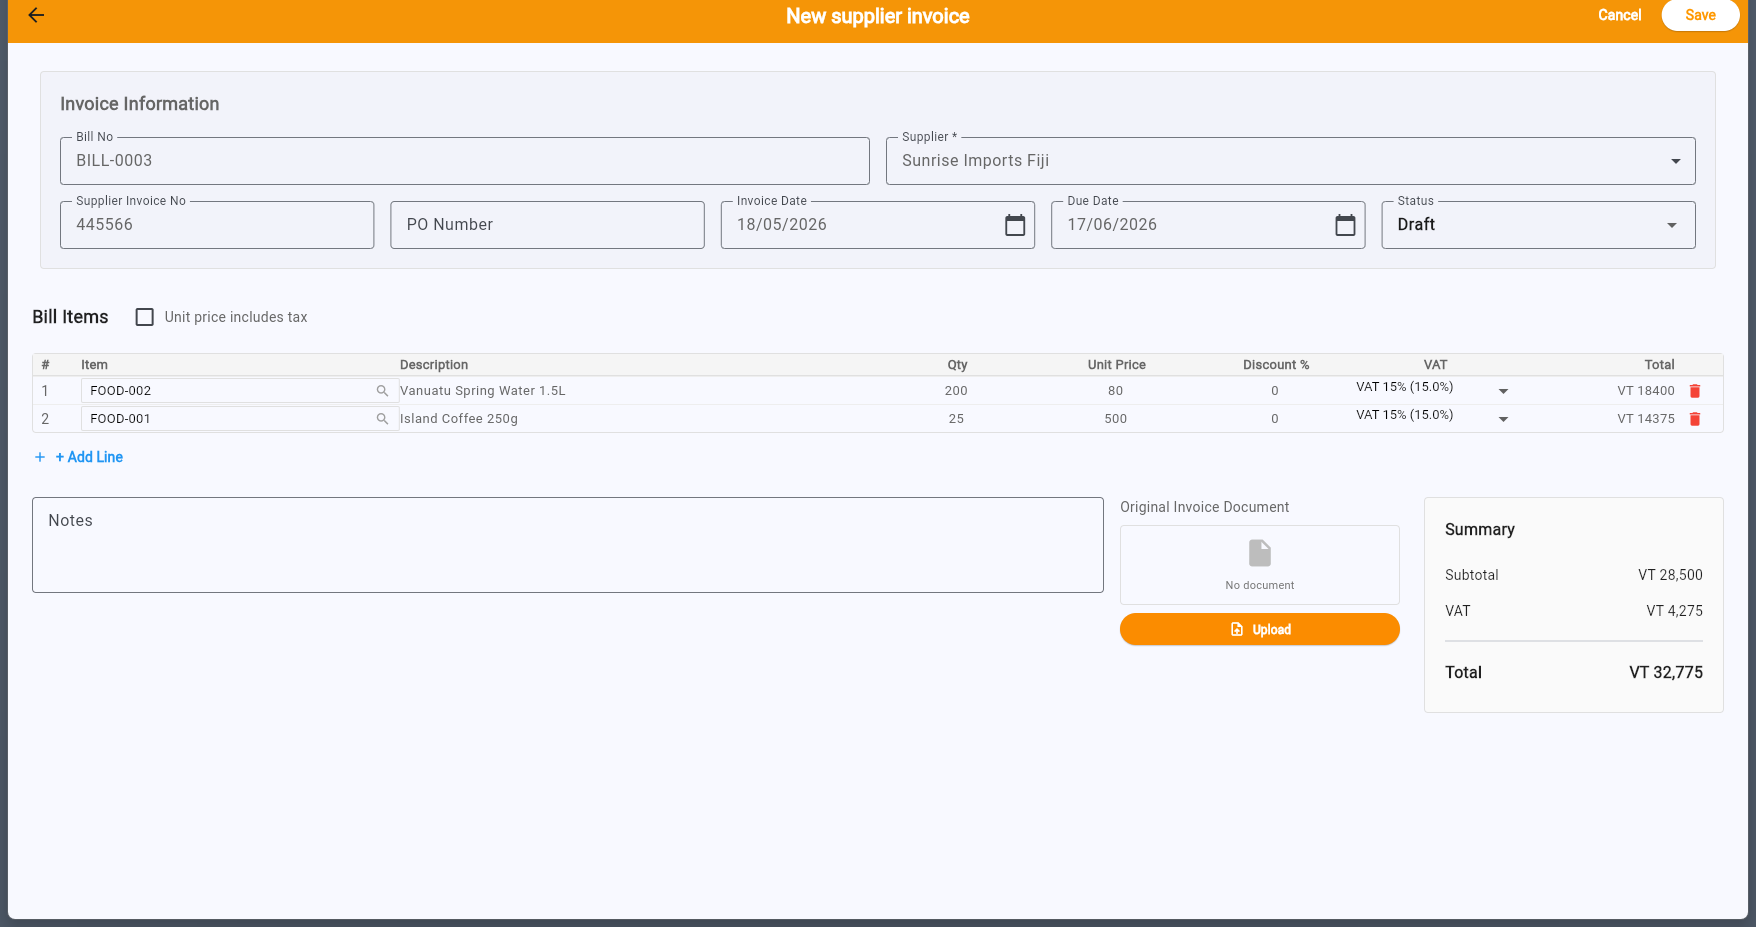
- Bill No — Auto-generated (read-only). Each bill gets a sequential number.
- Supplier — Select from your supplier list. Required field.
- Supplier Invoice No — Enter the supplier's own invoice number for cross-referencing. This is the reference number printed on the supplier's document.
- PO Number — Link to an existing Purchase Order (e.g. PO-0001). Optional — for tracking which PO this invoice relates to.
- Invoice Date — The date on the supplier's invoice. Defaults to today.
- Due Date — When payment is due to the supplier. Used for overdue tracking.
- Status — New invoices default to Draft. You can also set to Unpaid to post immediately.
Add line items by selecting products from your stock catalog or entering manual lines. Subtotal, VAT, and total are computed in real time. Save when ready — the invoice starts as Draft.
New purchase invoices start as Draft. In this state, you can freely edit items, change amounts, or even delete the invoice — nothing has been posted to accounting yet.
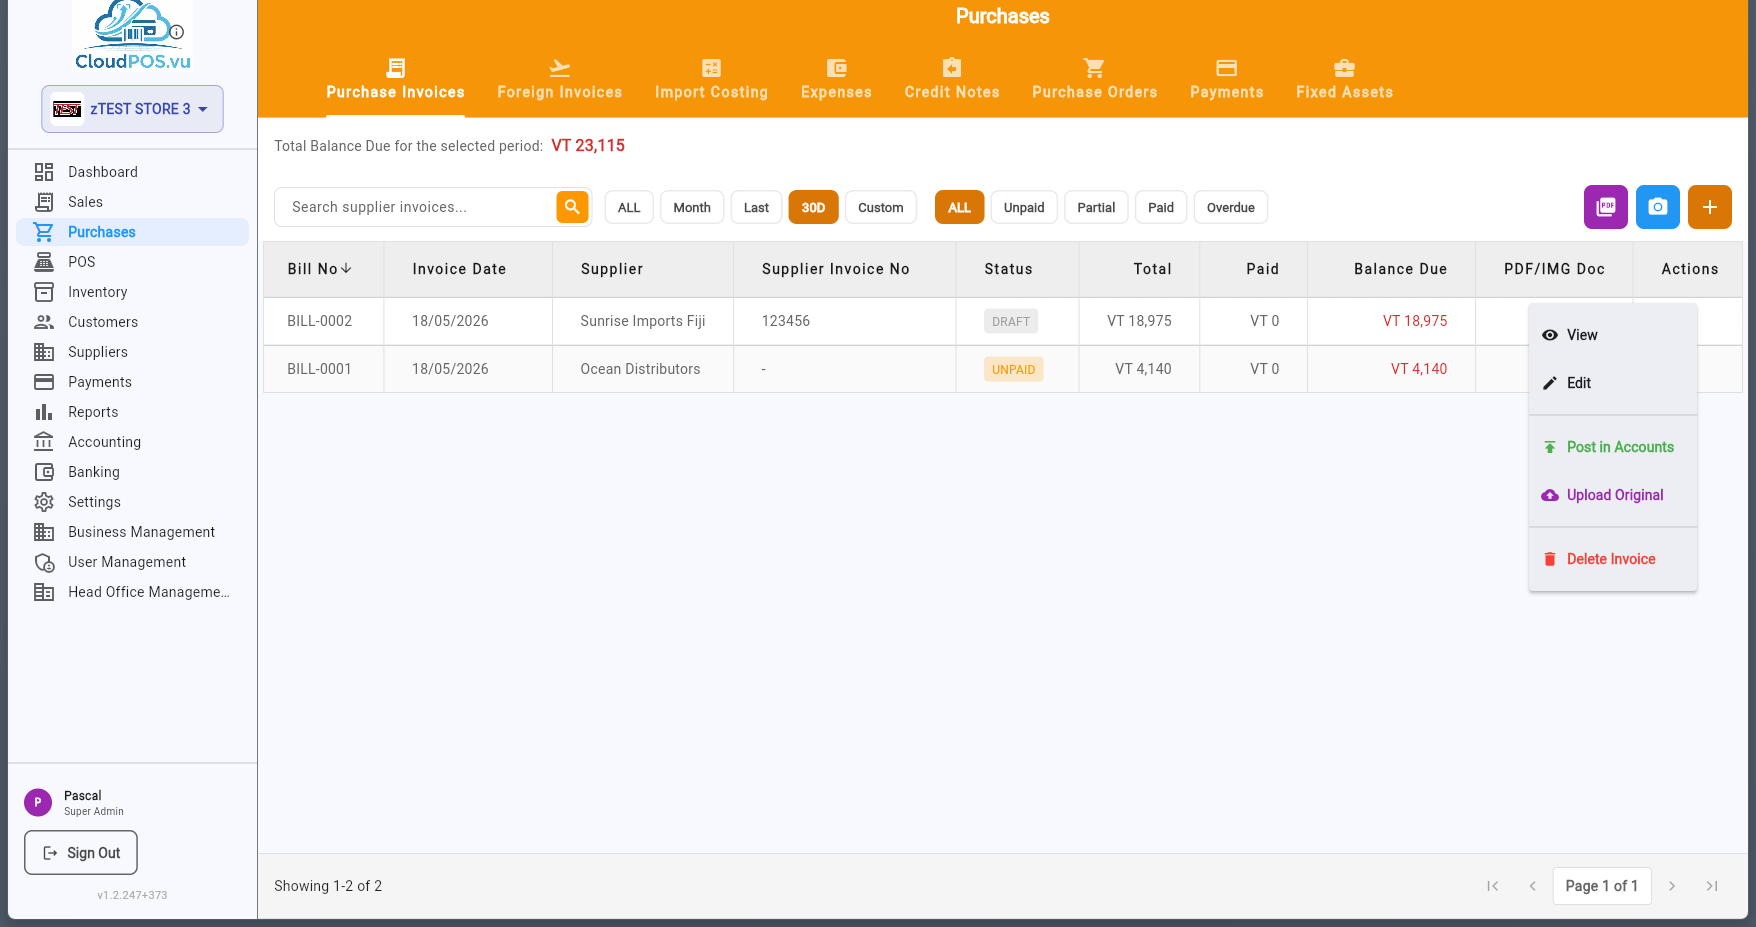
Once you've verified the invoice is correct, click Post in Accounts to create the journal entries:
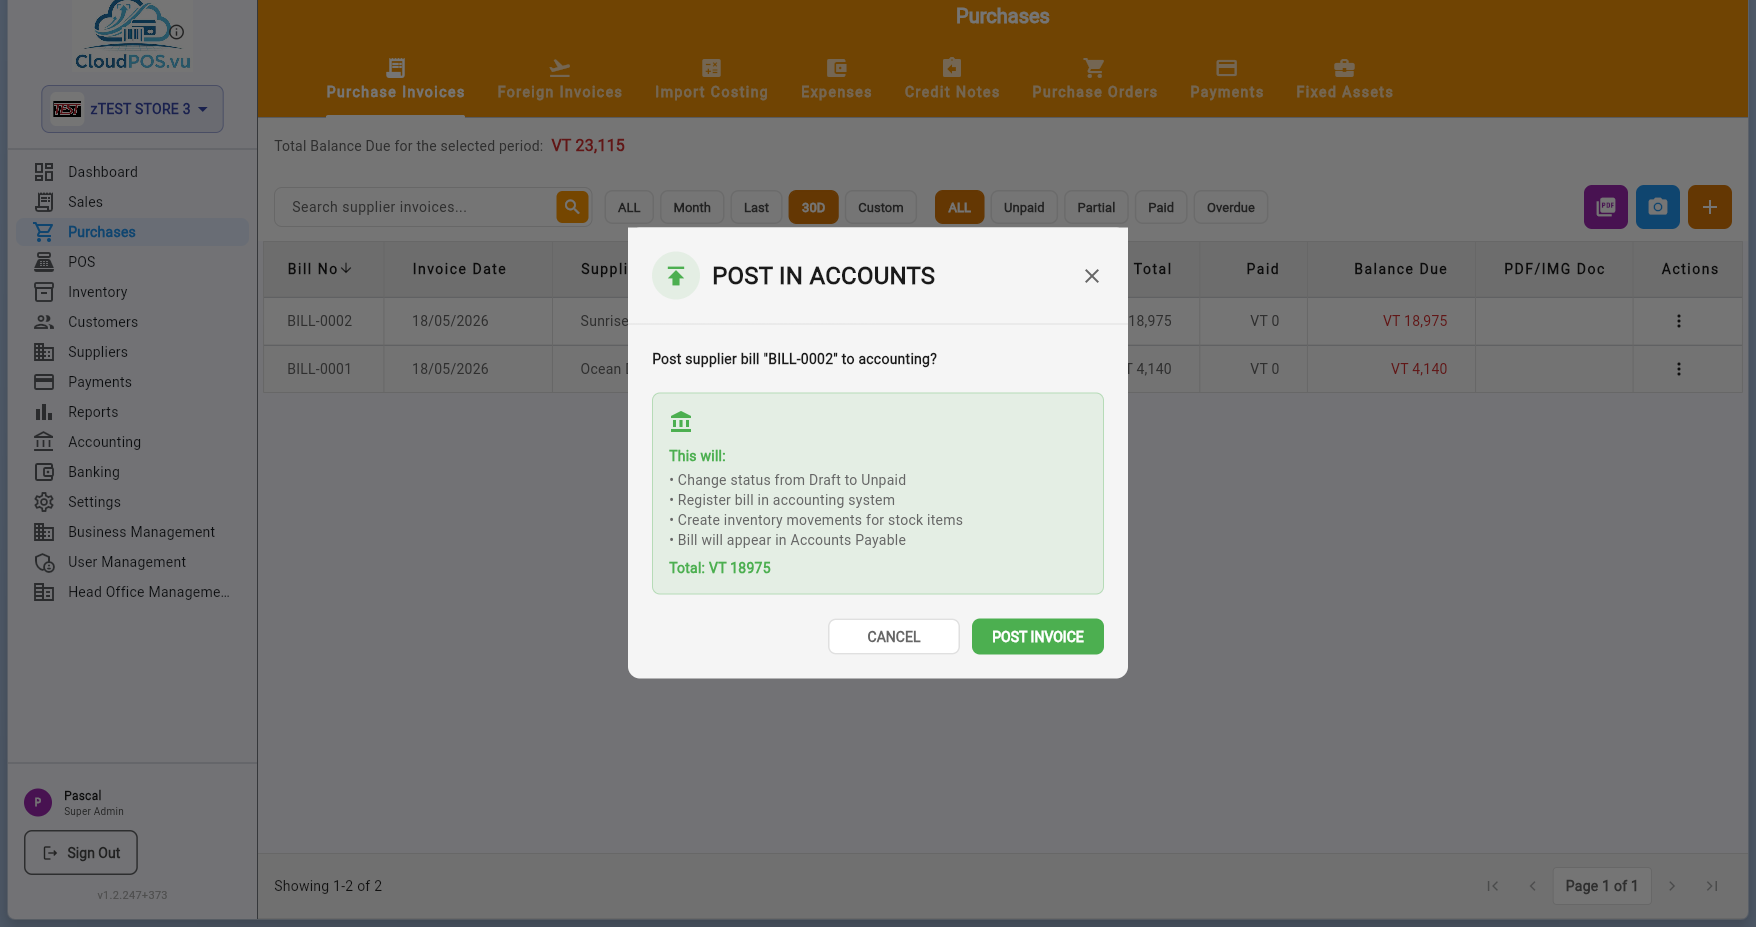
- Validate — The system checks that all items are linked to stock products.
- Confirm — Click "Create Invoice" to post.
- Journal entries created — DR Purchases/Expenses + DR VAT Input → CR Accounts Payable.
- Status changes — From Draft to Unpaid.
After posting, the invoice appears in the list as Unpaid:
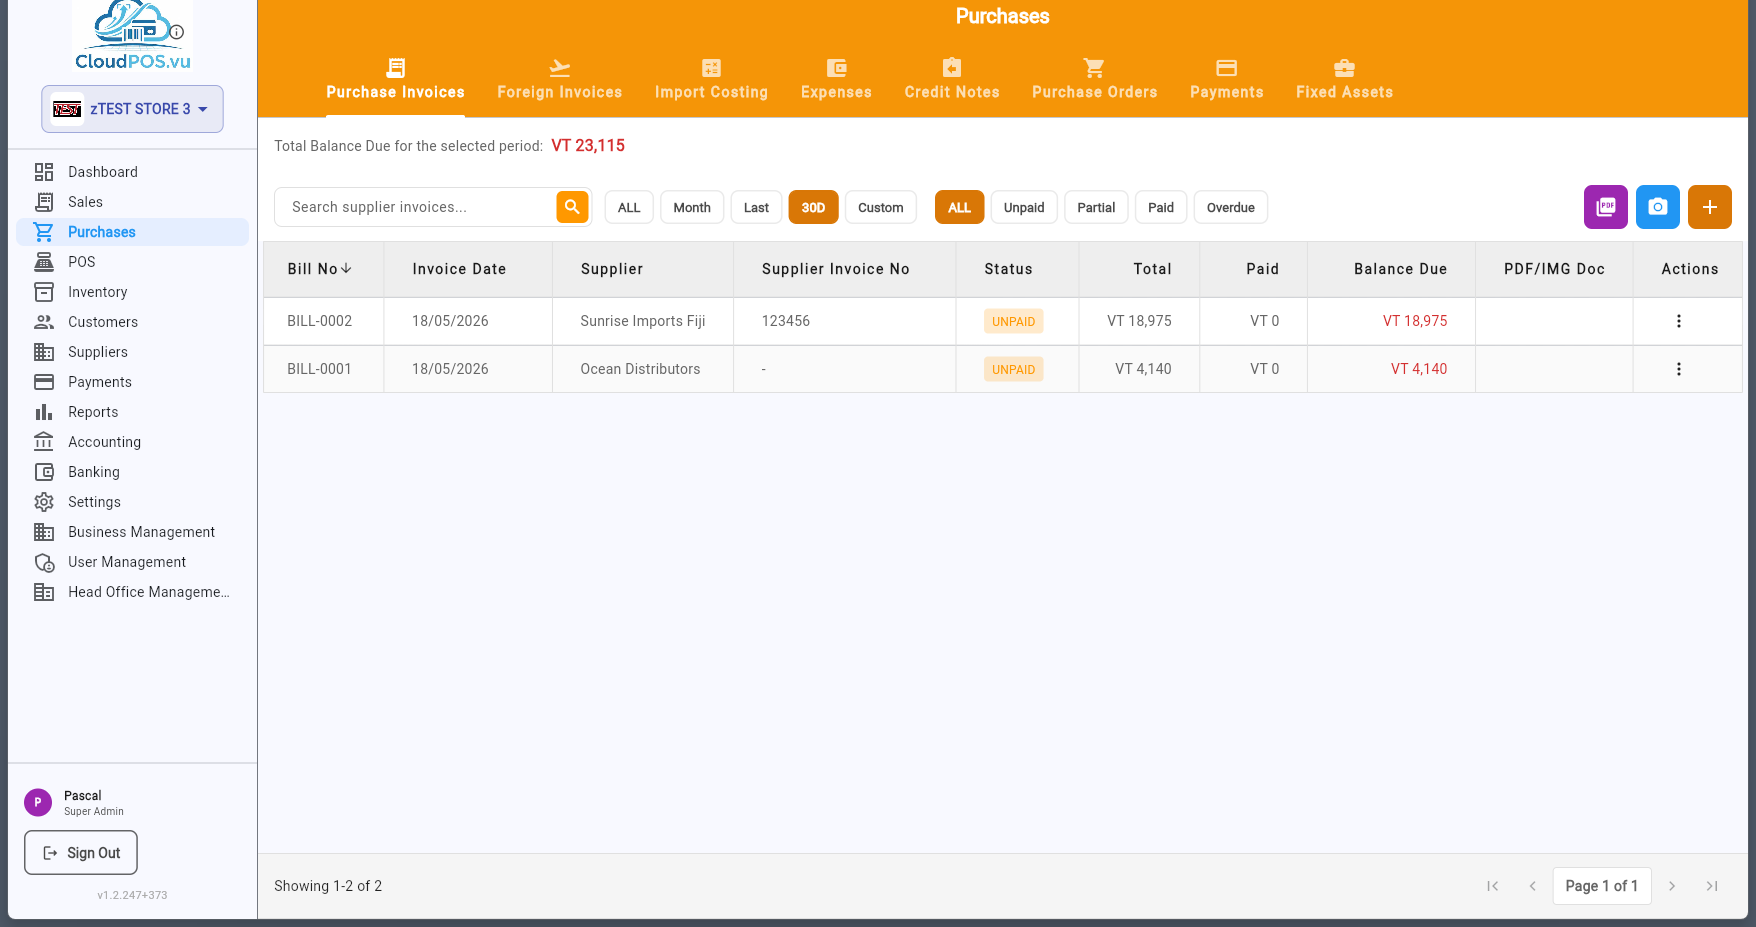
To pay a supplier invoice, open the action menu on an Unpaid invoice and select Make Payment:
The payment dialog appears:
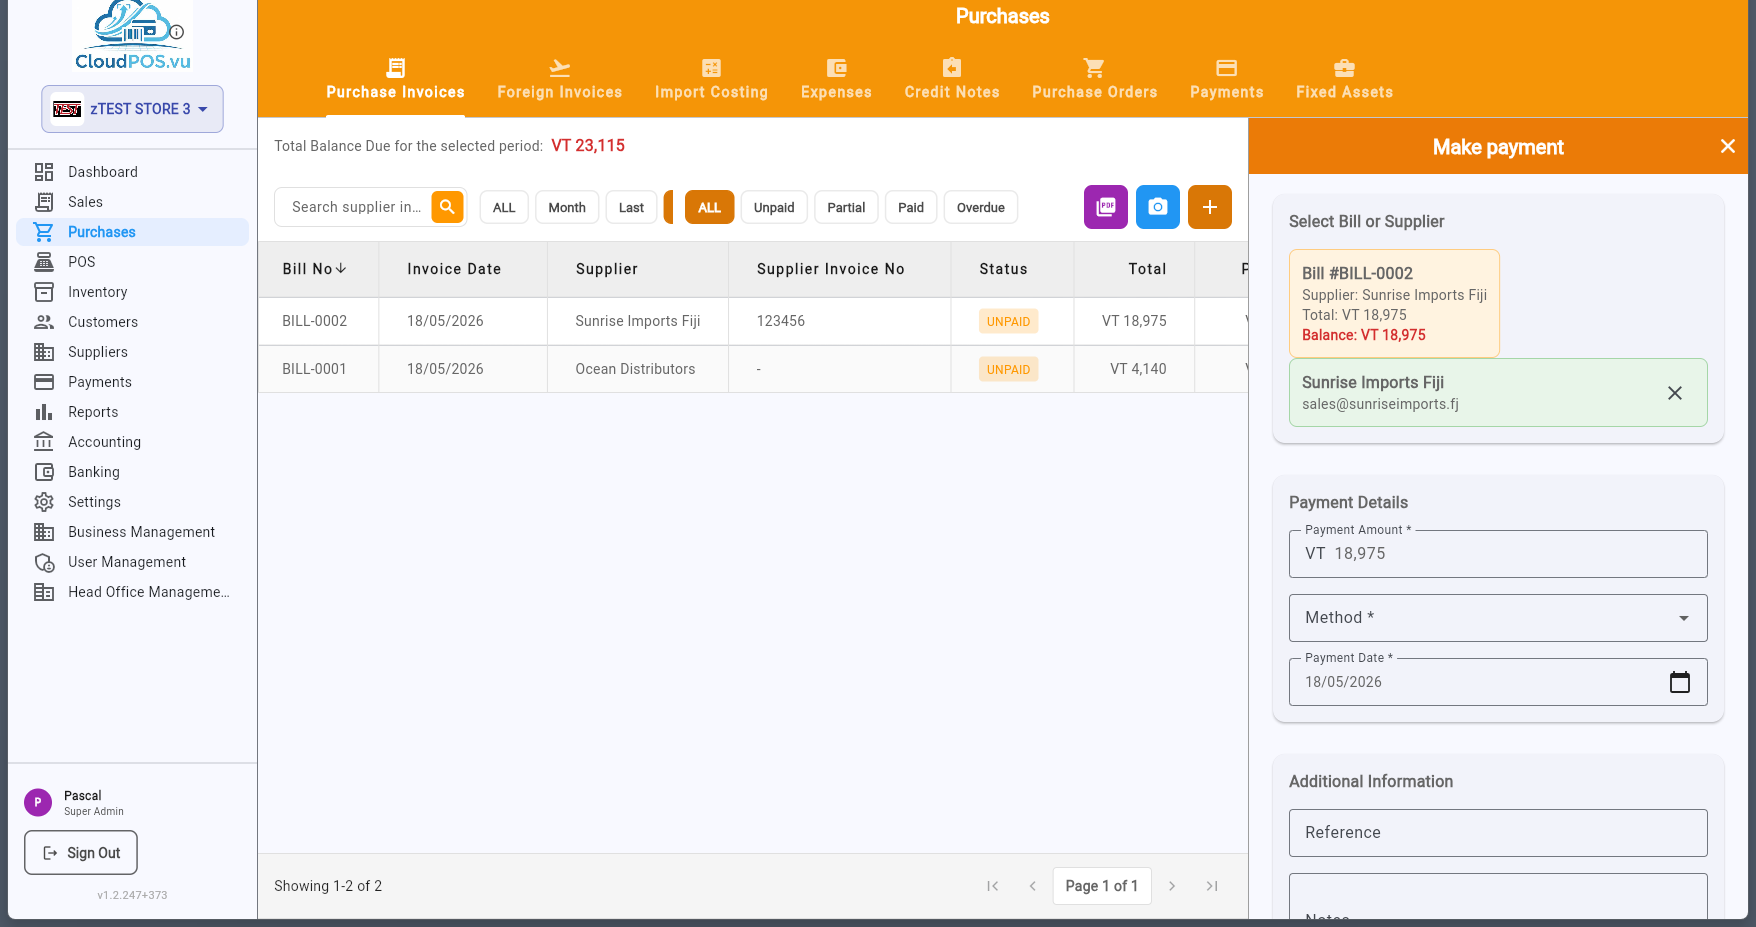
- Amount — Defaults to the full balance due. Partial payments are supported.
- Payment Method — Cash, Card, Bank Transfer, or Cheque.
- Payment Date — When the payment was made.
- Reference — Optional transaction reference or cheque number.
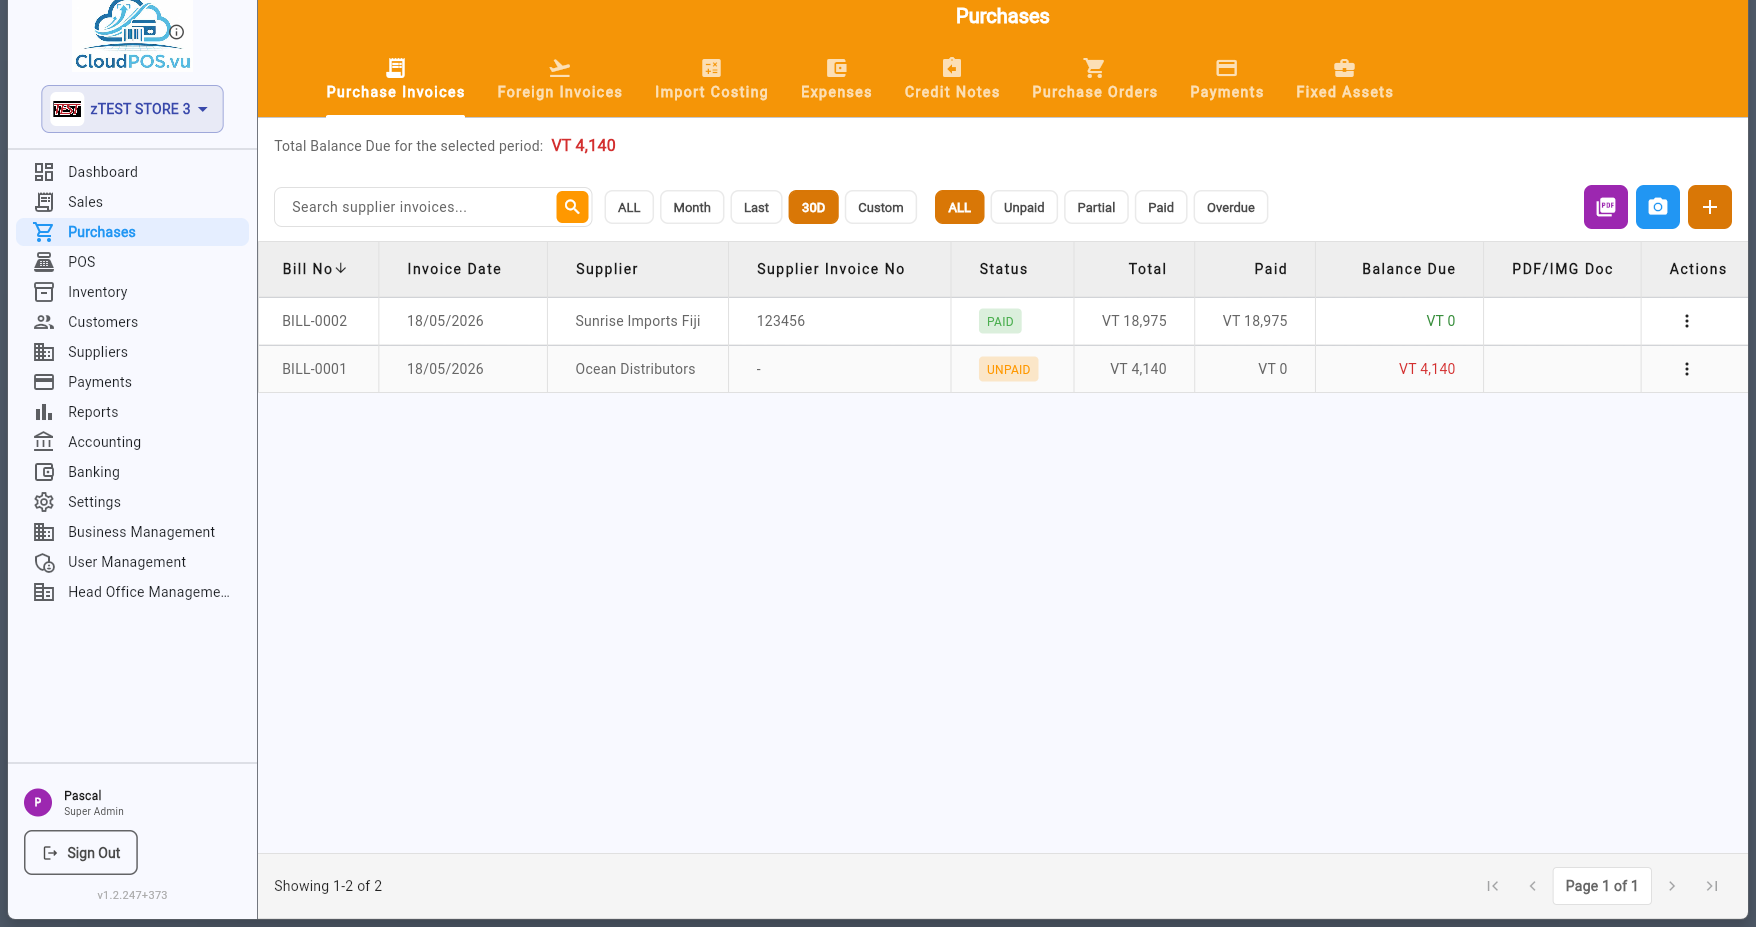
After recording the payment, the invoice status changes to Paid:
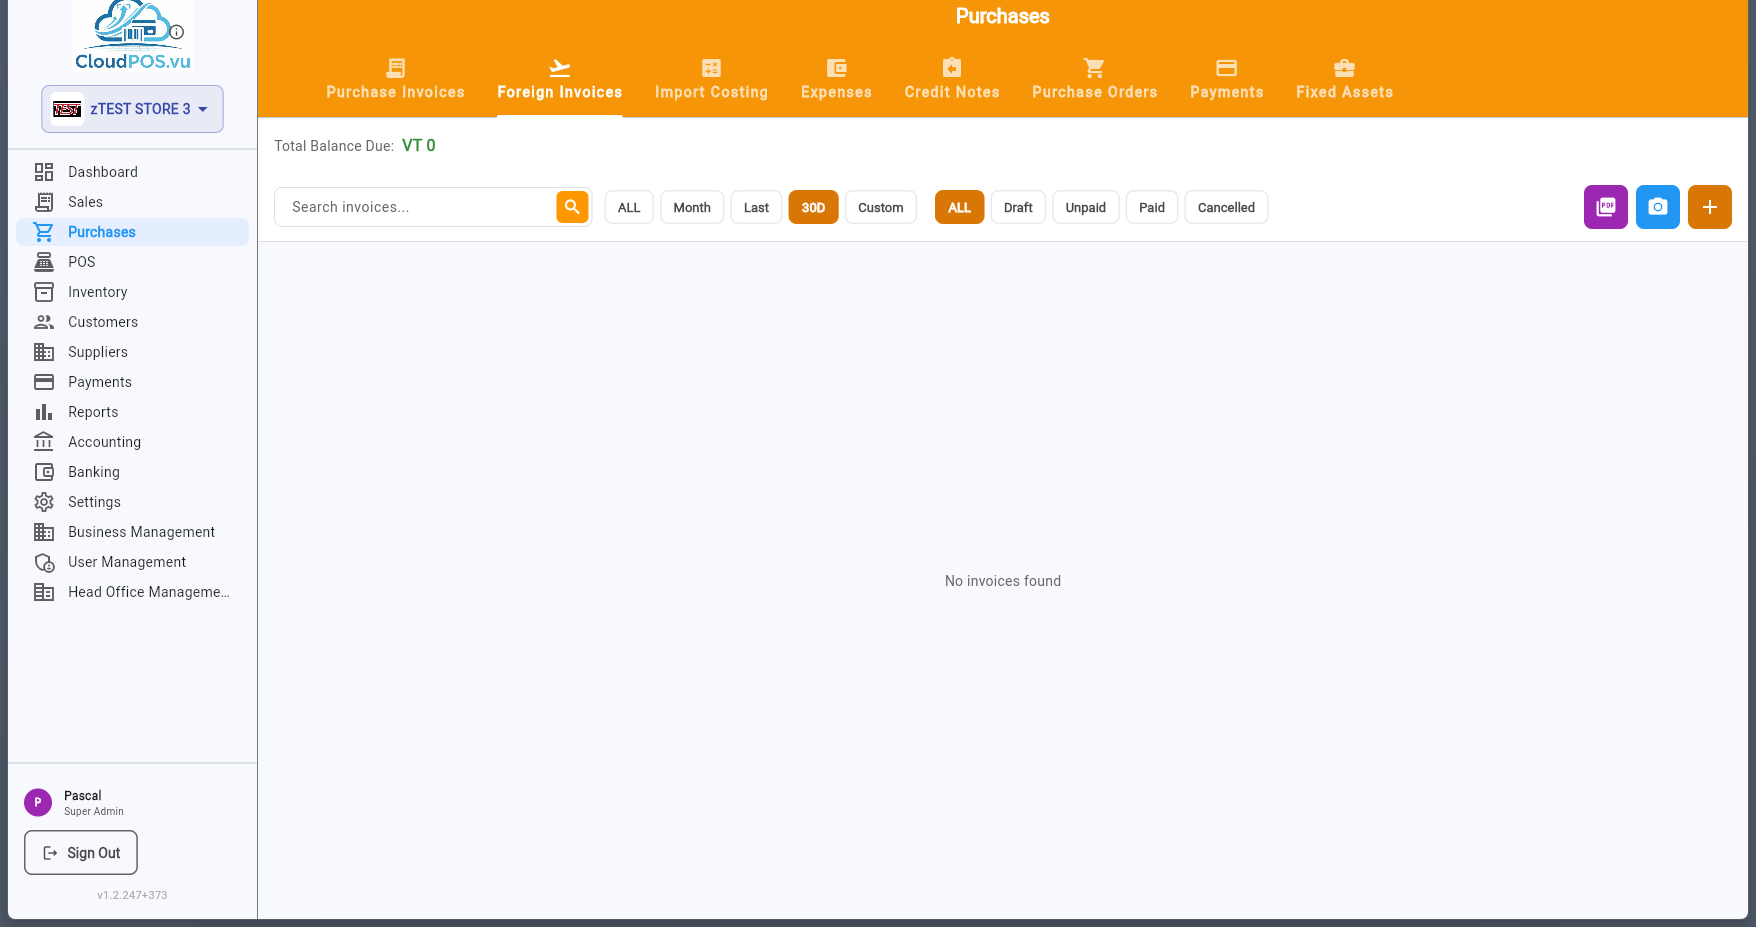
The Foreign Invoices tab manages import purchases from overseas suppliers. These invoices may involve foreign currency, shipping costs, and customs duties.
Import Costing calculates the full landed cost of imported goods, including the purchase price, freight, insurance, customs duties, and other charges.
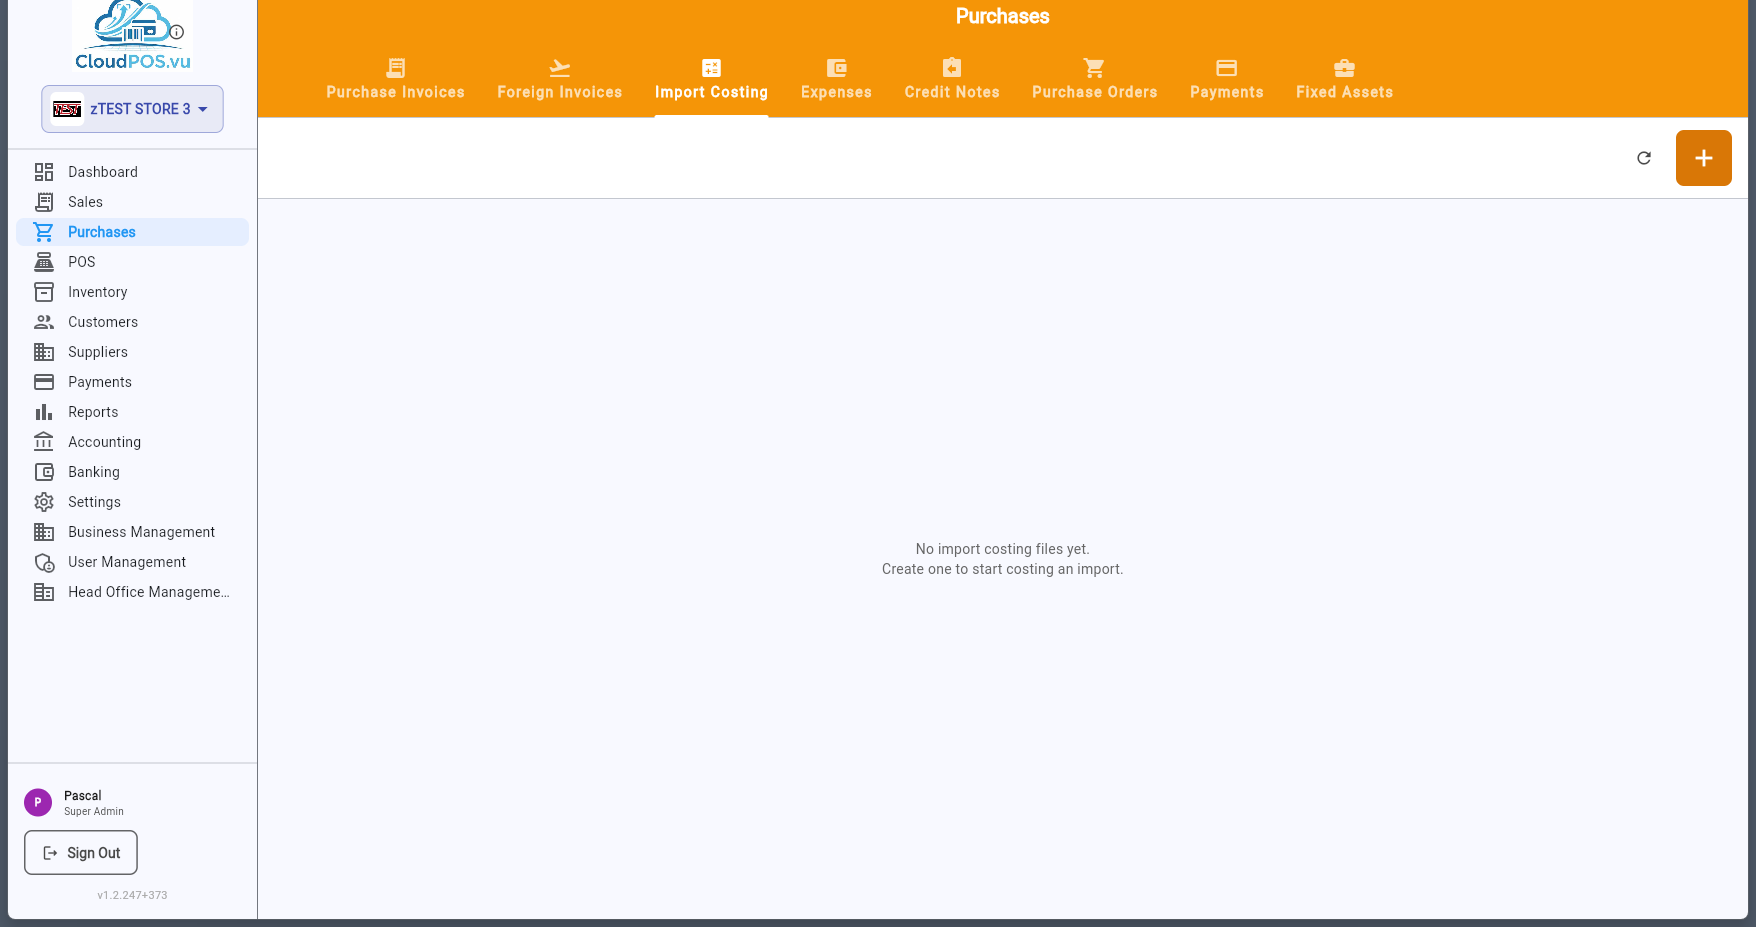
Import costing links to a Foreign Invoice and allocates all additional costs across the imported items, giving you an accurate unit cost for inventory valuation.
The Expenses tab records operational expenses such as rent, utilities, office supplies, and other non-inventory purchases.
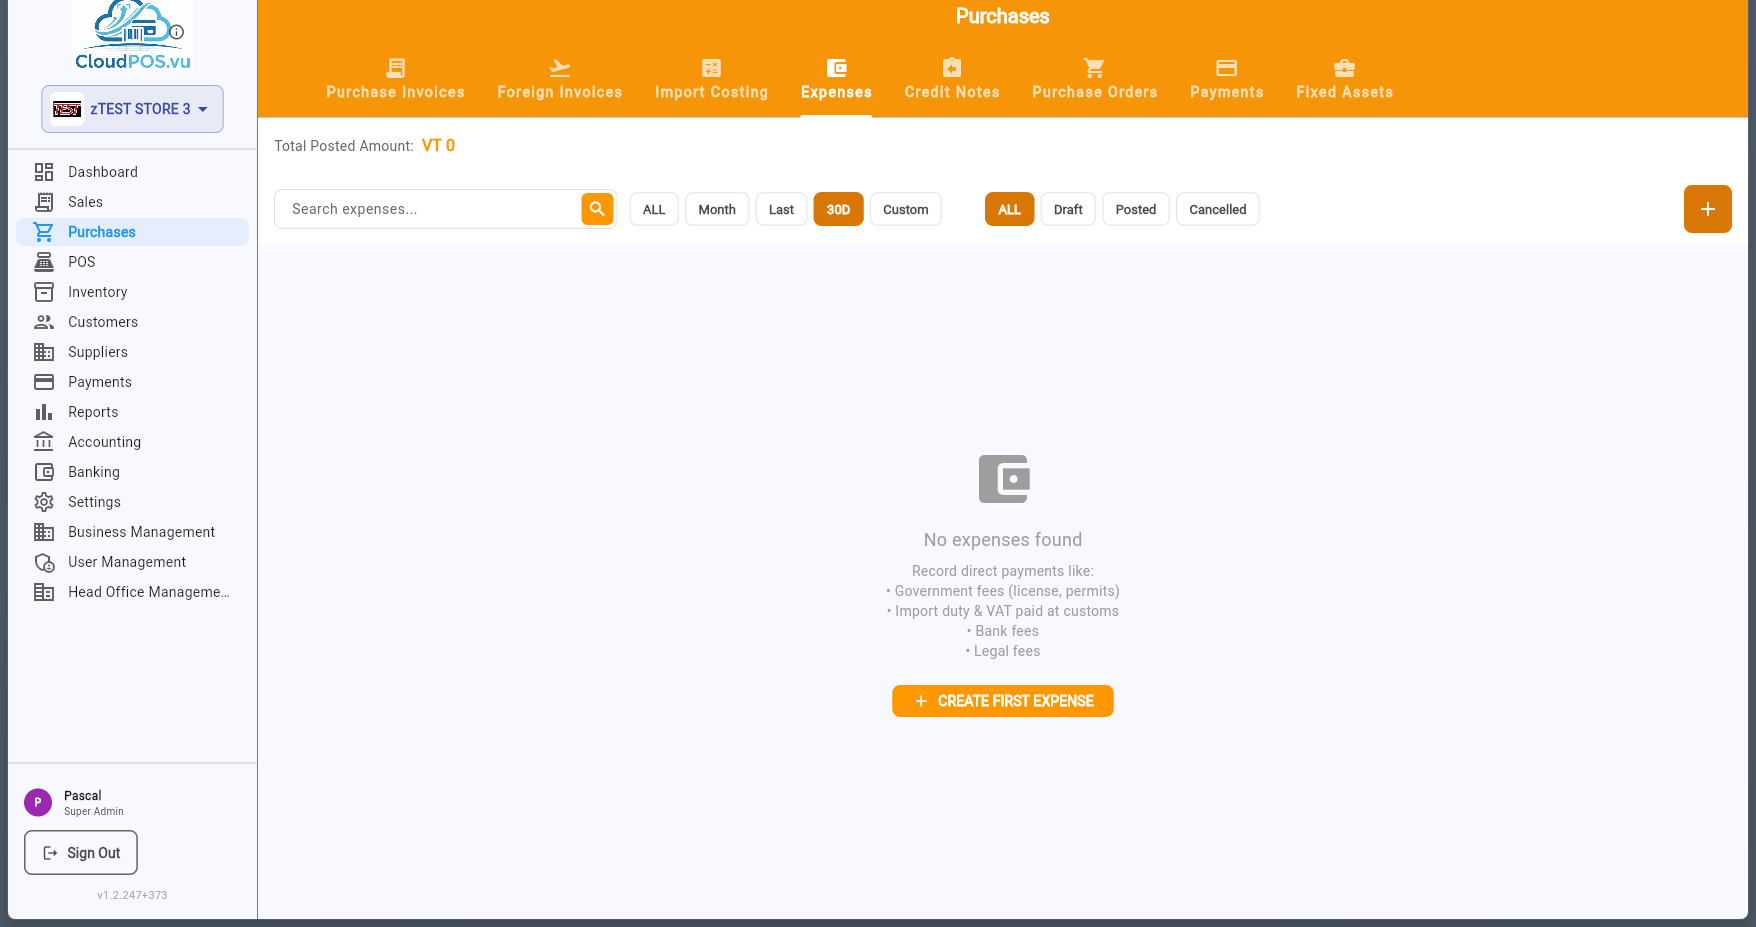
Each expense can be categorized, linked to an expense account, and posted to accounting. Expenses follow the same draft → post → pay workflow as purchase invoices.
Credit Notes are used when a supplier issues a refund or credit — for returned goods, pricing corrections, or overpayments.
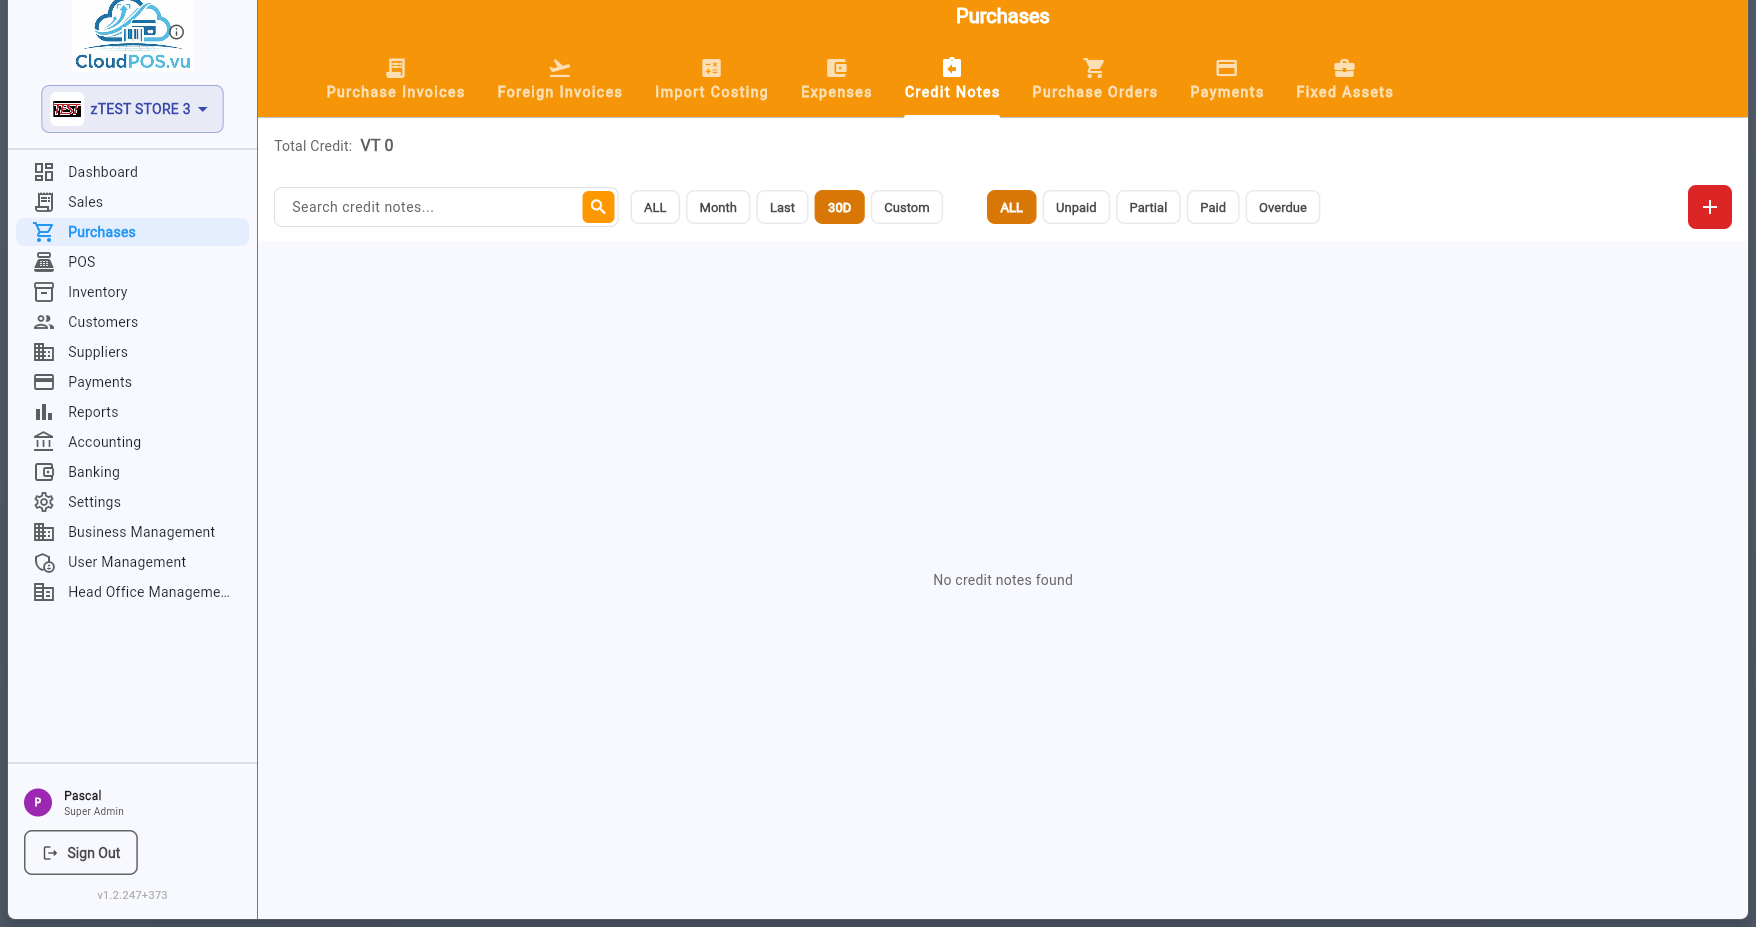
Credit notes can be created from an existing purchase invoice (via the action menu) or independently. They reduce the amount owed to the supplier and create reversing journal entries.
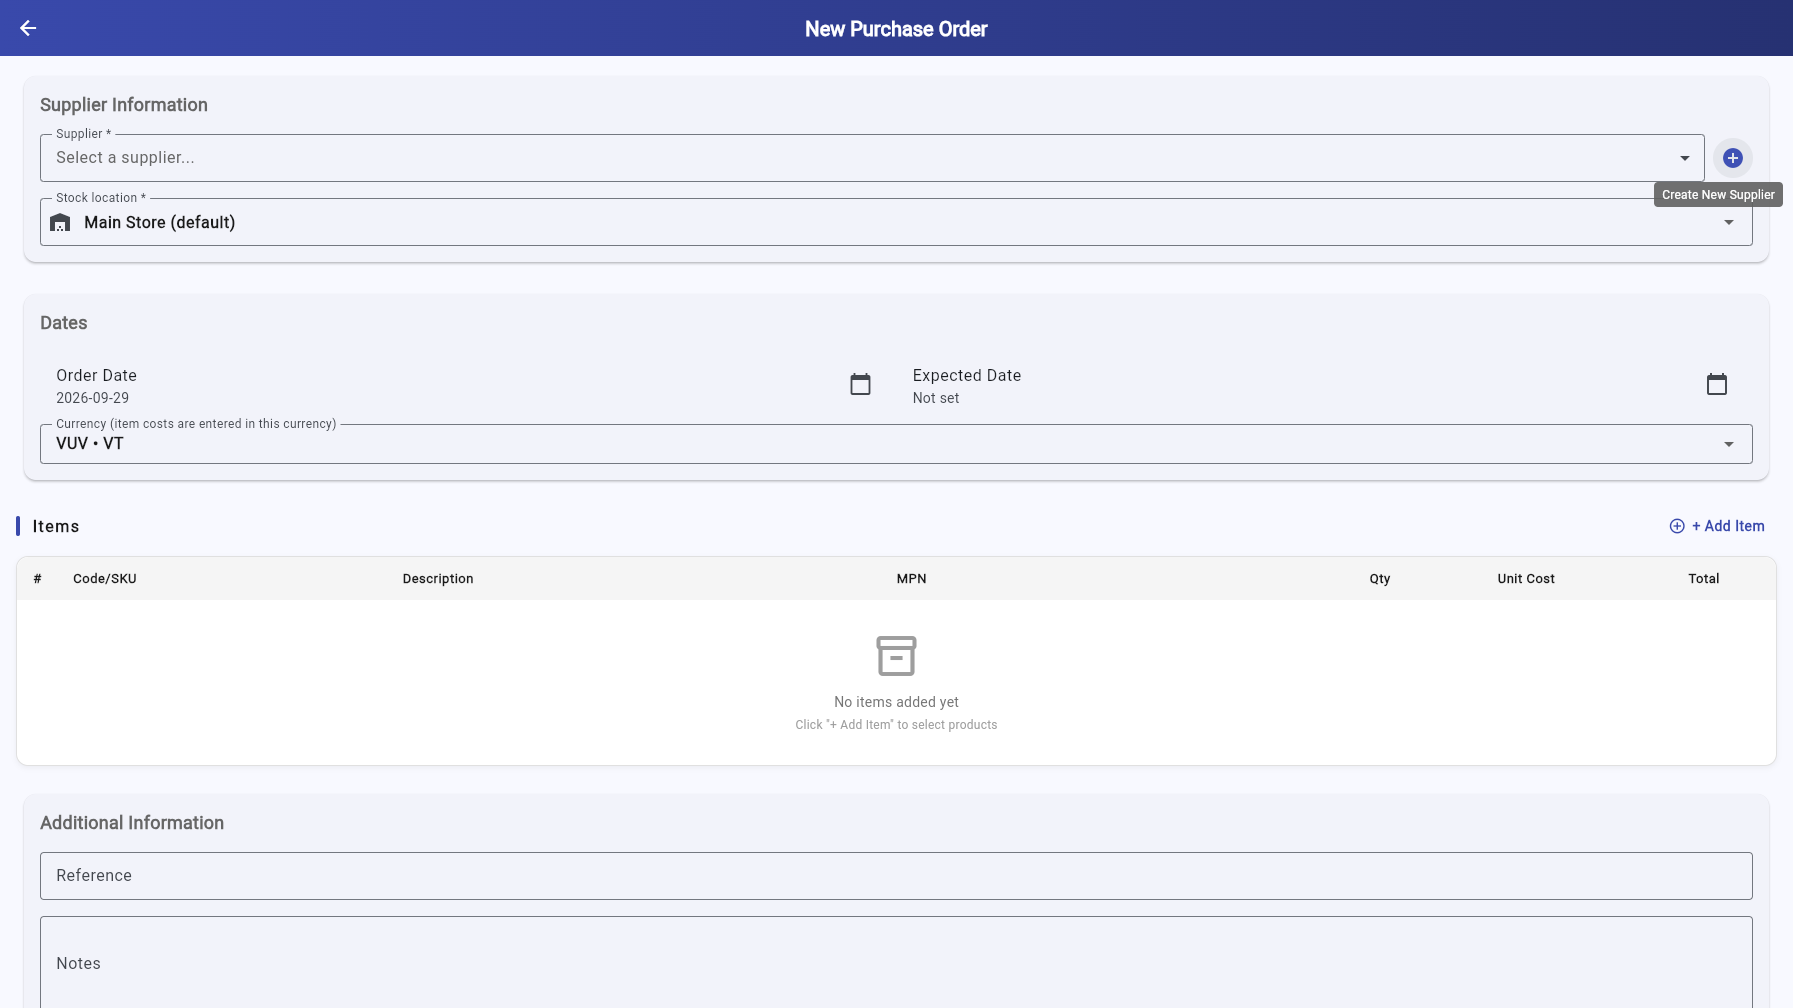
Purchase Orders are documents sent to suppliers to request goods or services. They are non-financial until converted to a purchase invoice.
Create a PO to:
- Request a quote or formalize an order with a supplier
- Track expected deliveries
- Link purchase invoices back to the original order via the PO Number field
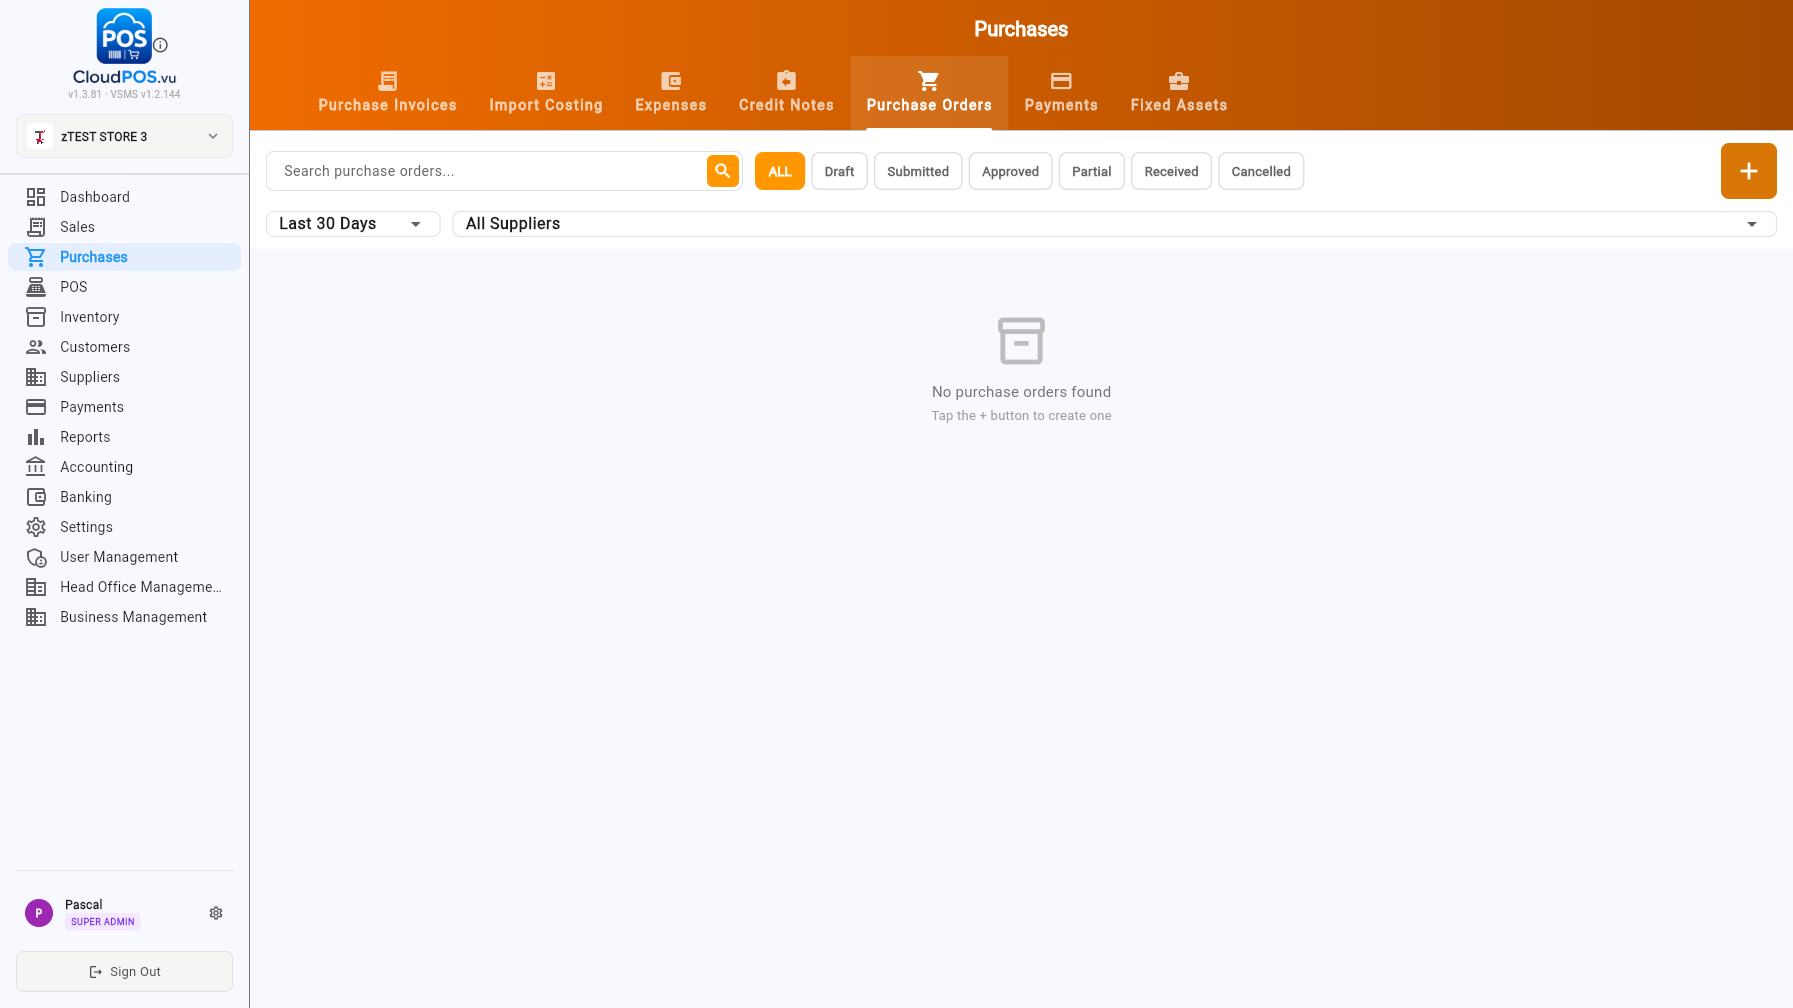
The Payments tab provides two sub-tabs: Make Payment and History.
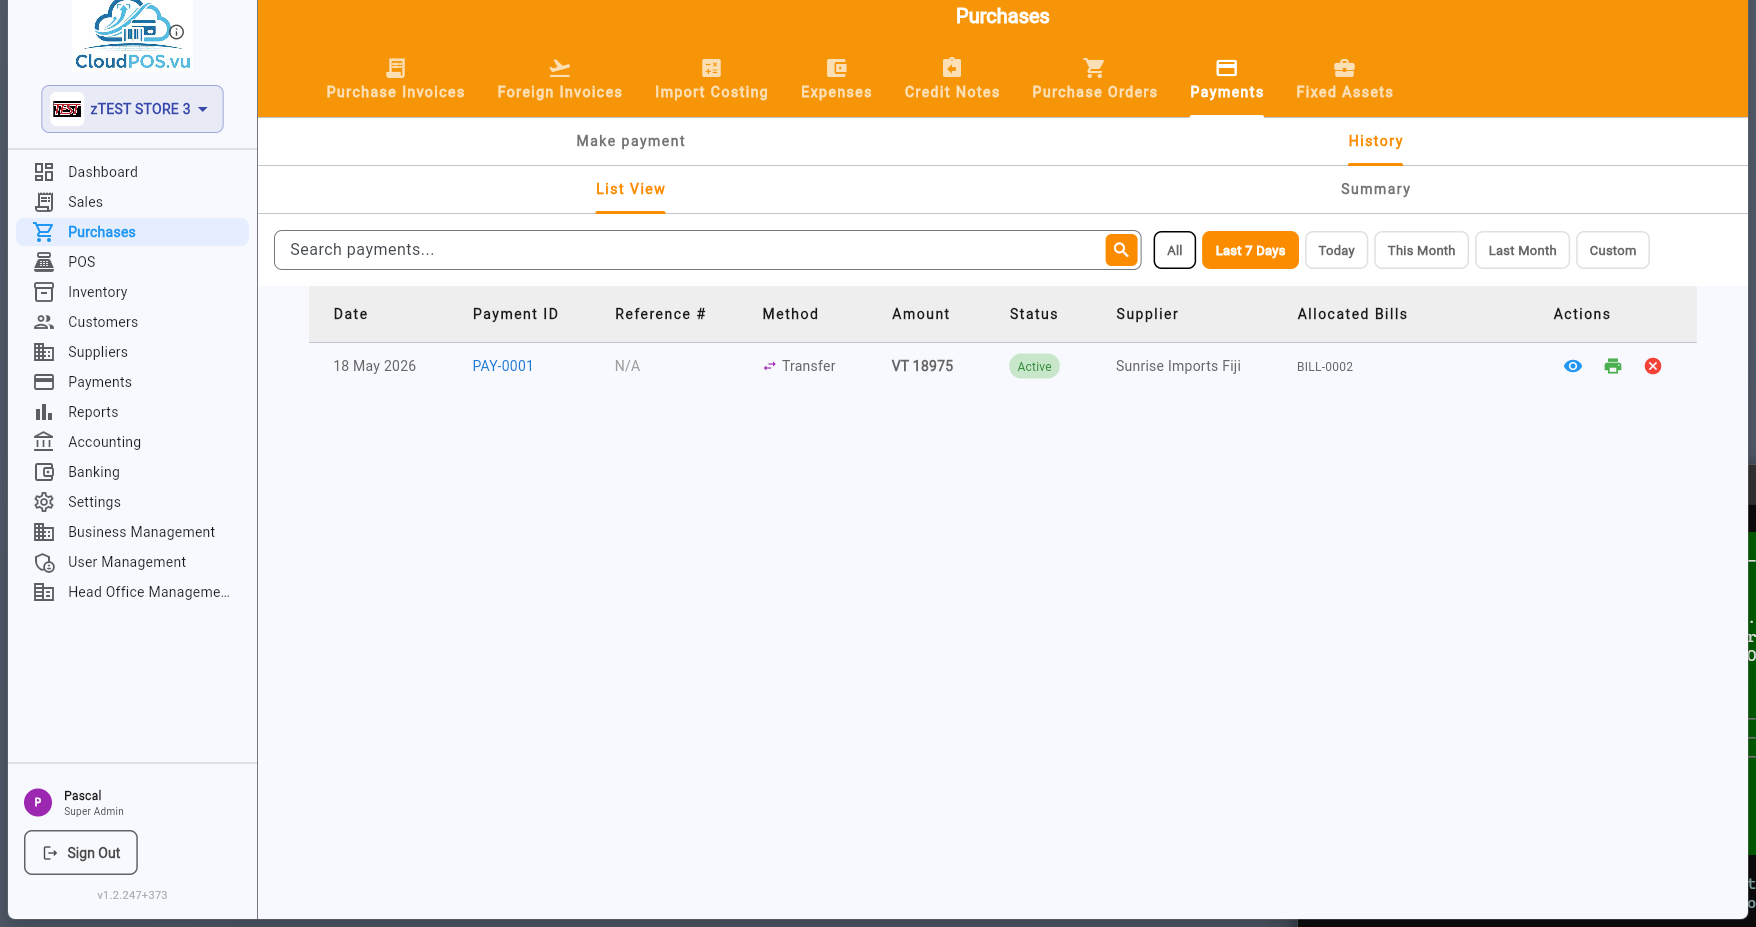
Record a new payment to a supplier — select the supplier, invoice, amount, and method.
View all past payments with date, supplier, amount, method, and reference.
The Fixed Assets tab manages long-term assets such as equipment, furniture, vehicles, and machinery.
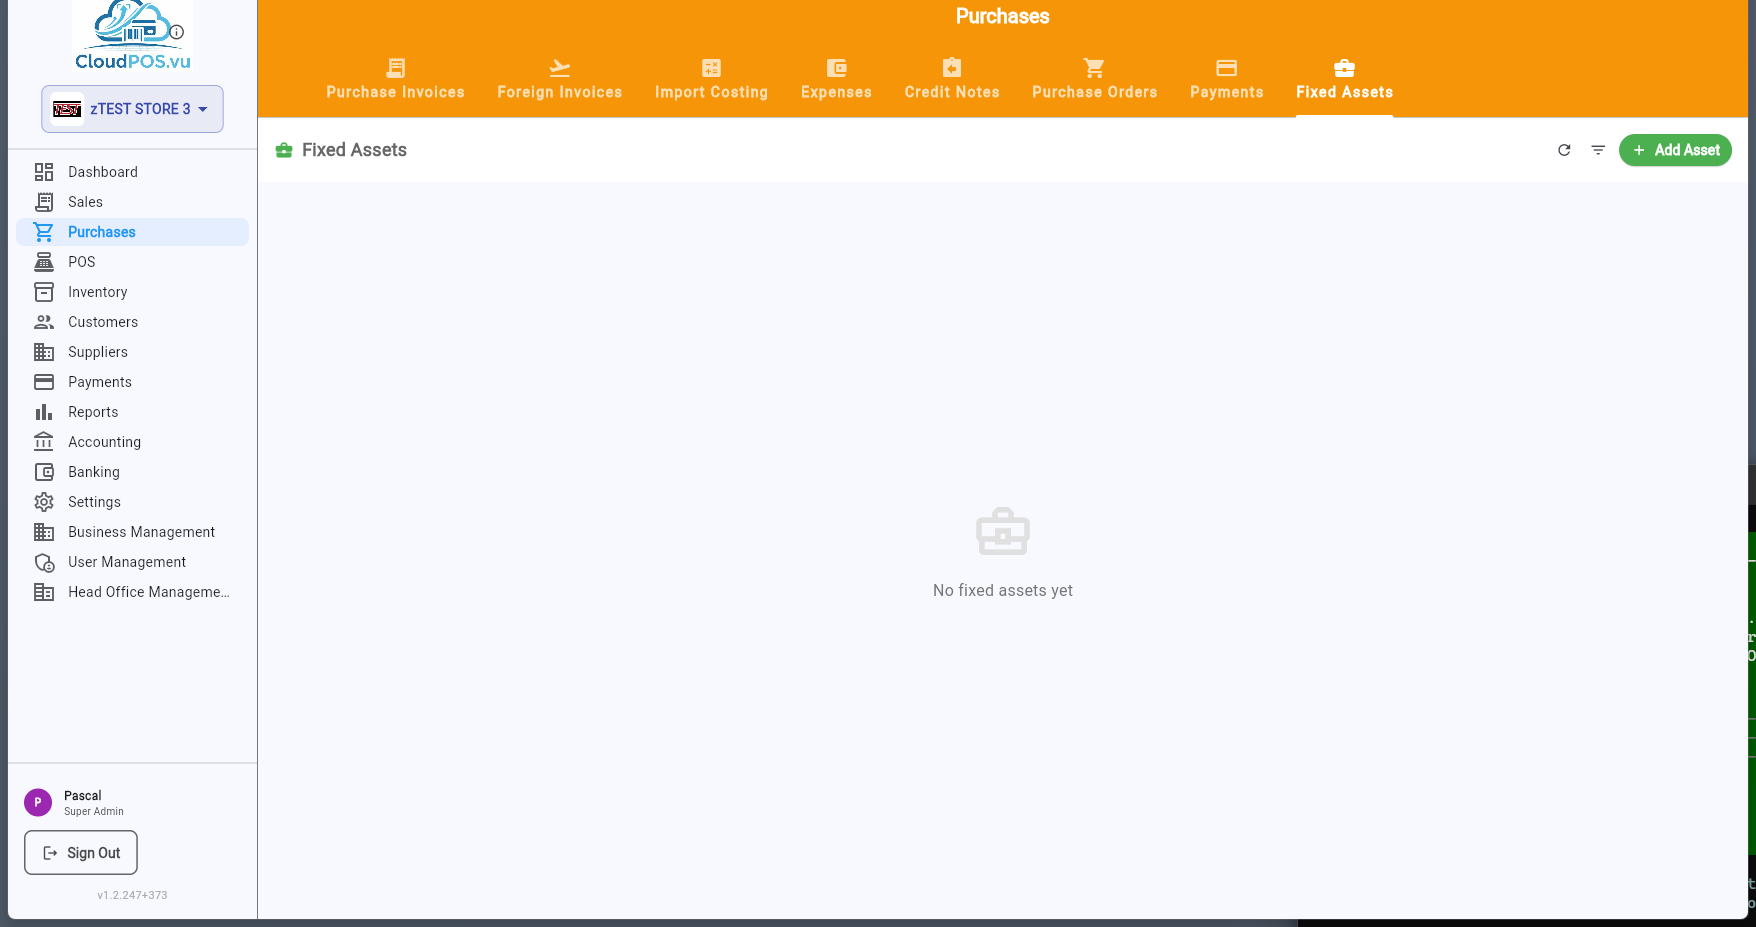
Fixed assets can be created from scratch or converted from a purchase invoice. Each asset tracks its purchase cost, depreciation method, useful life, and current book value.
Every purchase document has a ⋯ action menu with context-sensitive options. Available actions change based on the document's status.
🧾 Draft Invoice Actions
Open the invoice in read-only mode.
Open the invoice for editing. Full editing is available — change items, amounts, supplier.
Create journal entries and change status to Unpaid. All items must be linked to stock products.
Upload a scan or photo of the supplier's original invoice document.
Delete the draft. Only available while status is Draft — posted invoices cannot be deleted.
🟡 Unpaid Invoice Actions
Open the invoice in read-only mode.
Edit product assignments only. Amounts are locked because journal entries have been posted.
Record a payment against this invoice. Opens the payment dialog.
Issue a credit note for this invoice — for returns or corrections.
Upload the supplier's original invoice document.
Cancel the invoice and reverse journal entries. Requires admin privileges for posted invoices.
Point of Sale
Terminals, selling, cart, split & voucher payments, layby, refunds, fiscal and sessions
The POS follows a structured daily workflow designed for accountability and financial tracking:
The POS Management screen lists all your POS terminals with their real-time status. Each terminal card shows:
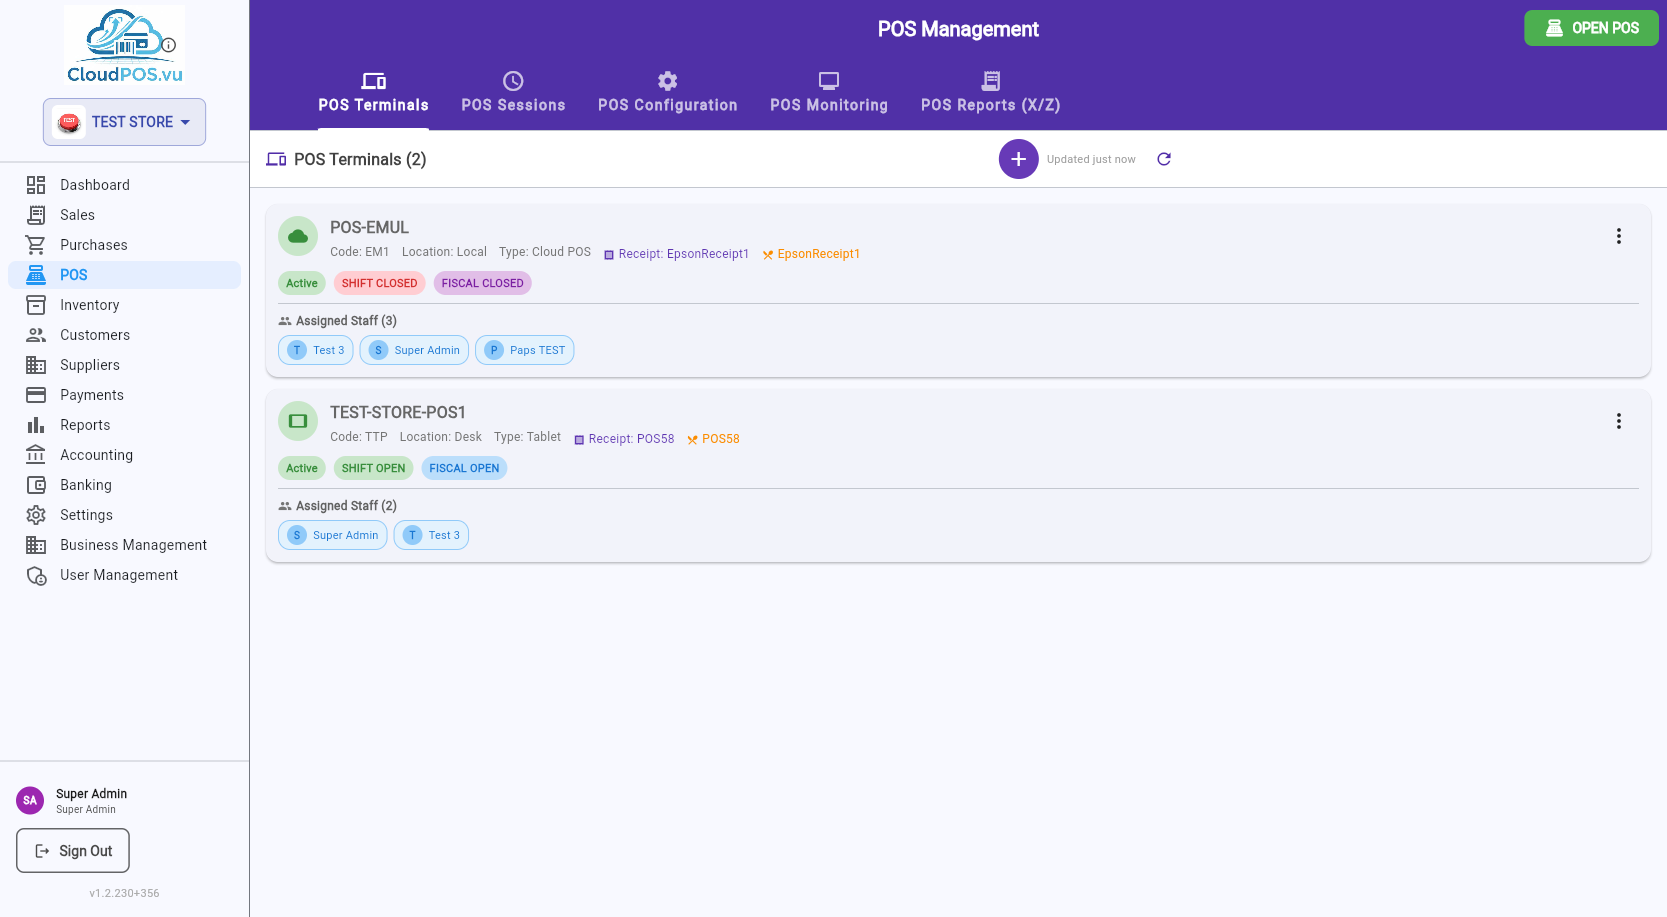
Status Badges
Whether the terminal is enabled for use. Inactive terminals cannot open shifts.
Whether a cashier shift is currently running. A ⚠️ warning appears if a shift has been open for more than 24 hours.
Whether the fiscal period is open. The fiscal period closes when you run the Z-Report (End Day). A new fiscal period opens automatically with the next shift.
Printer Information
Each terminal card also shows which printers are assigned:
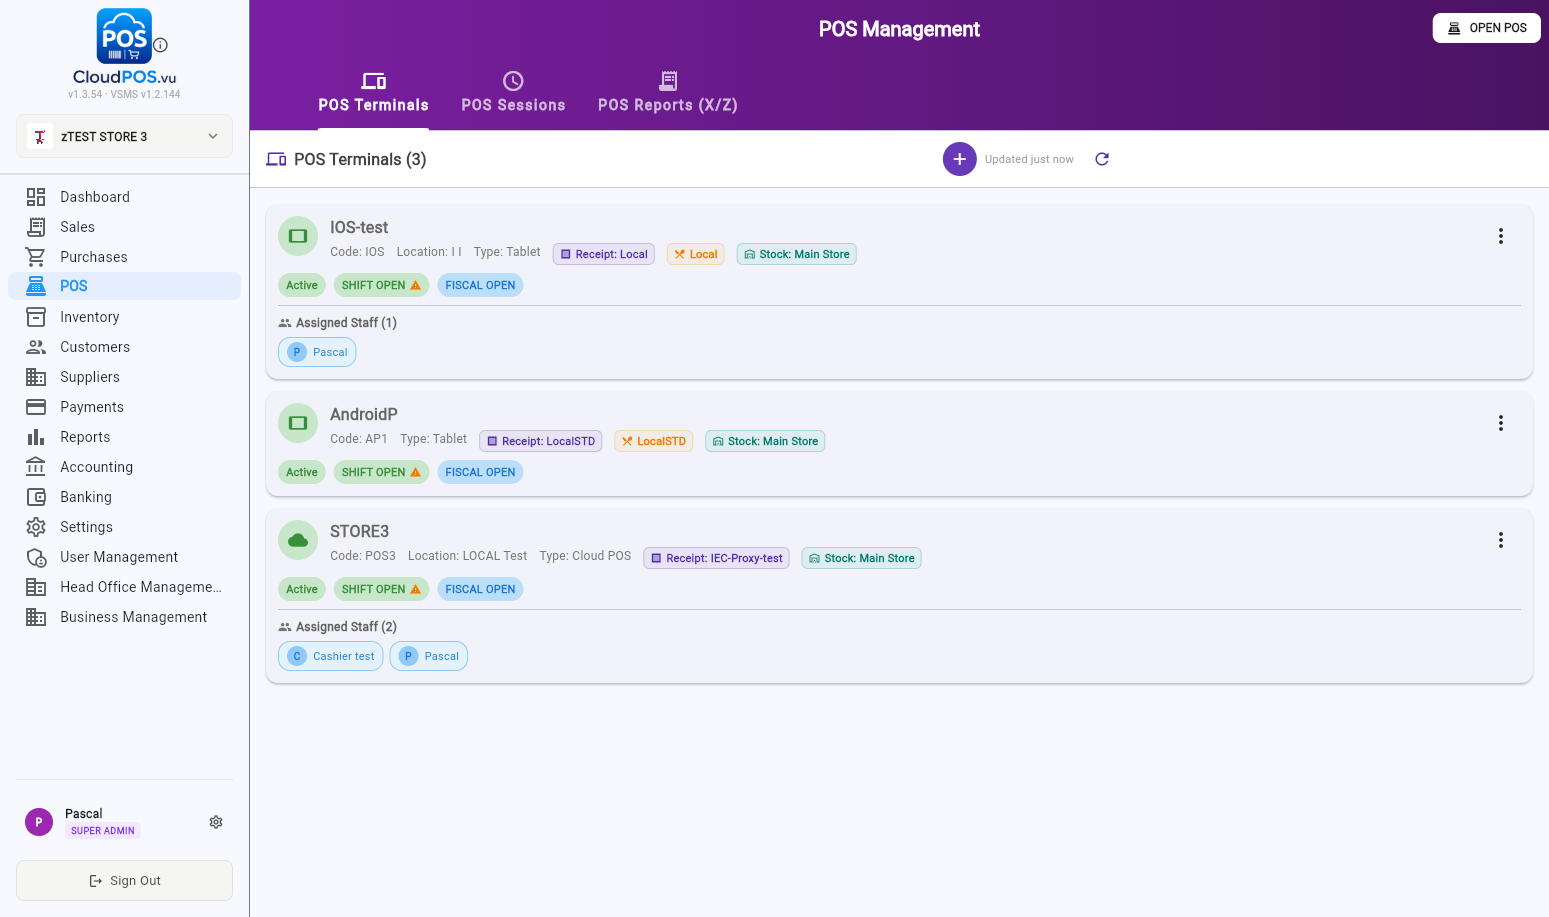
The printer used for customer receipts. Shown in purple with the printer name. If none is assigned, "No receipt printer" is displayed.
Kitchen or bar printers that receive order tickets when items are sold. Shown in orange. Multiple order printers are separated by •.
Terminal Actions Menu
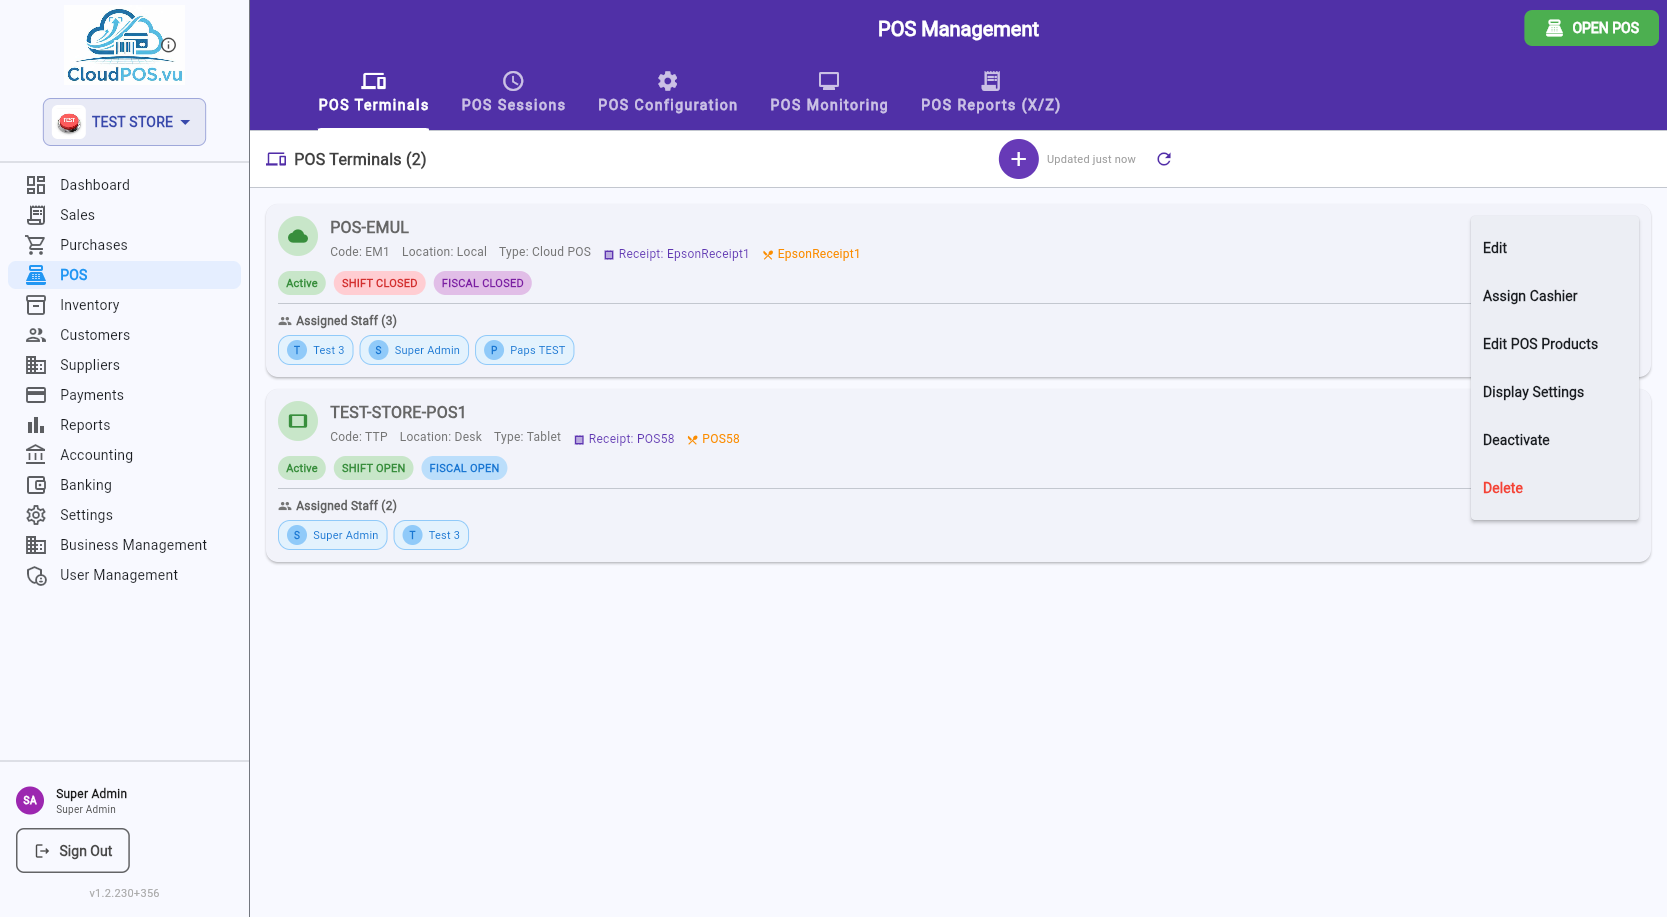
Click Edit from the terminal menu to configure all terminal parameters:
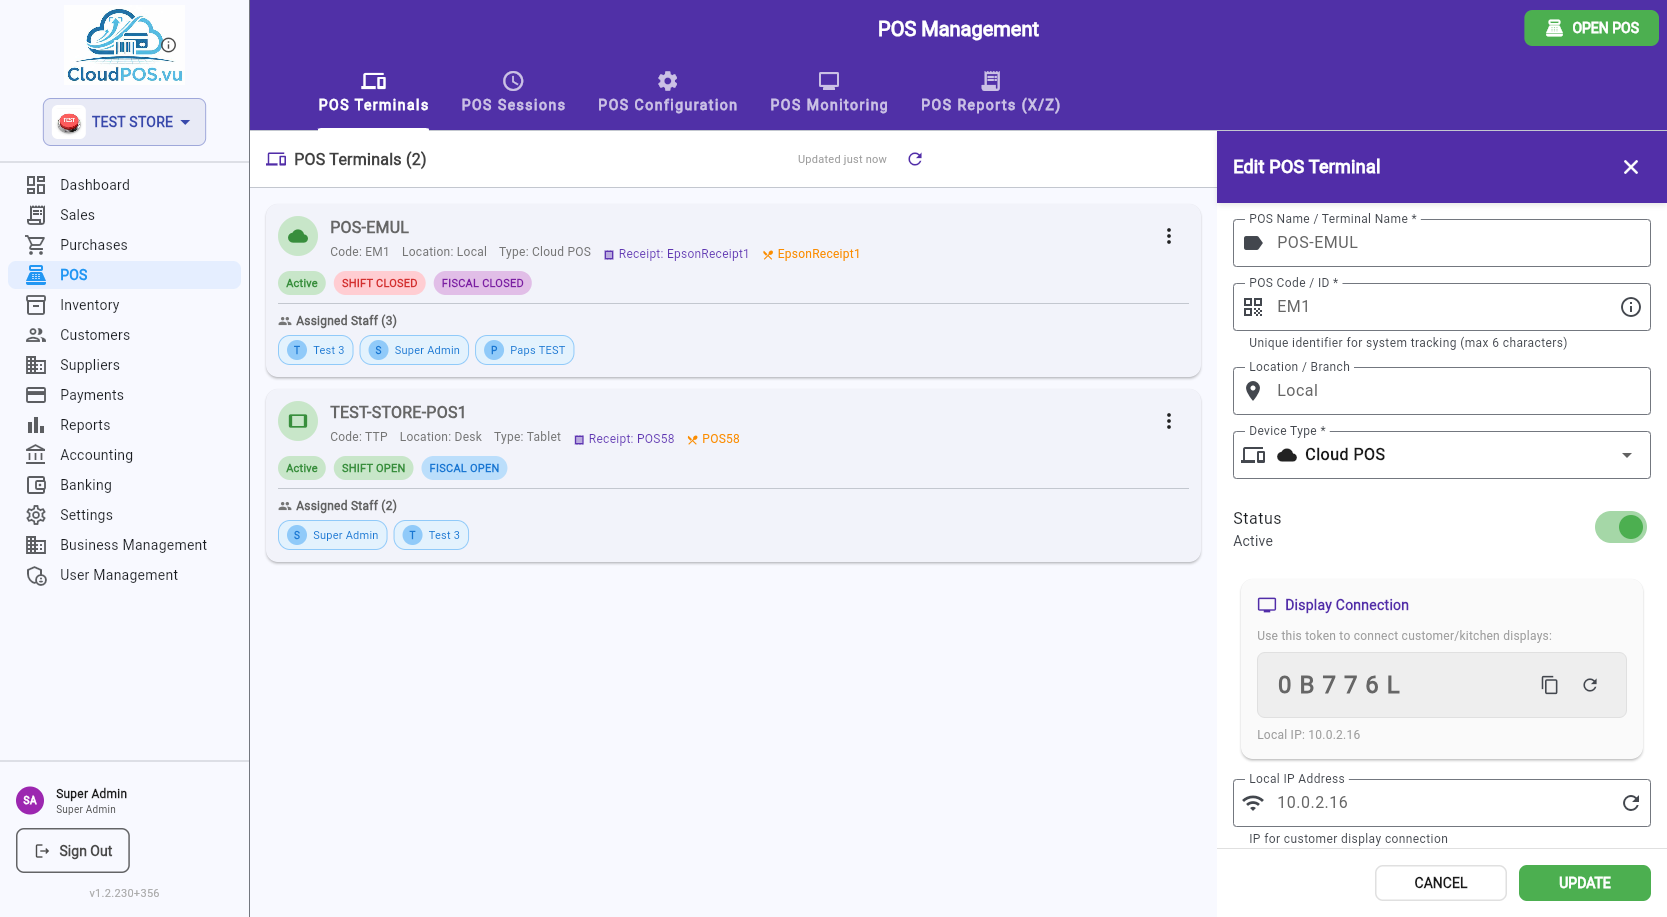
Parameters
Display name for the terminal (e.g., "Main Counter POS #1").
Unique 3–6 character identifier for system tracking. Cannot be changed while a fiscal shift is active.
Physical location (e.g., "Store 1", "Department A").
Tablet, PC, Mobile, or Cloud POS — determines the icon shown in the terminal list.
Active/Inactive toggle. Inactive terminals cannot be used.
Auto-detected or manual. Used for customer display connection.
Token + IP for connecting a second-screen customer display. Can be regenerated.
Assign receipt and order printers to this terminal.
Auto-generated code used to link a physical device to this terminal. Can be regenerated.
Device Pairing Flow
The info card at the bottom explains how to link a device:
- Create the terminal — a pairing code is auto-generated.
- Open the POS on the target device.
- Tap POS LOGIN on the login screen → enter the pairing code.
- The device is now linked to this terminal and business.
- Cashiers log in with POS ID + PIN for daily use.
Click Assign Cashier to control which staff members can log into this terminal using POS ID + PIN:
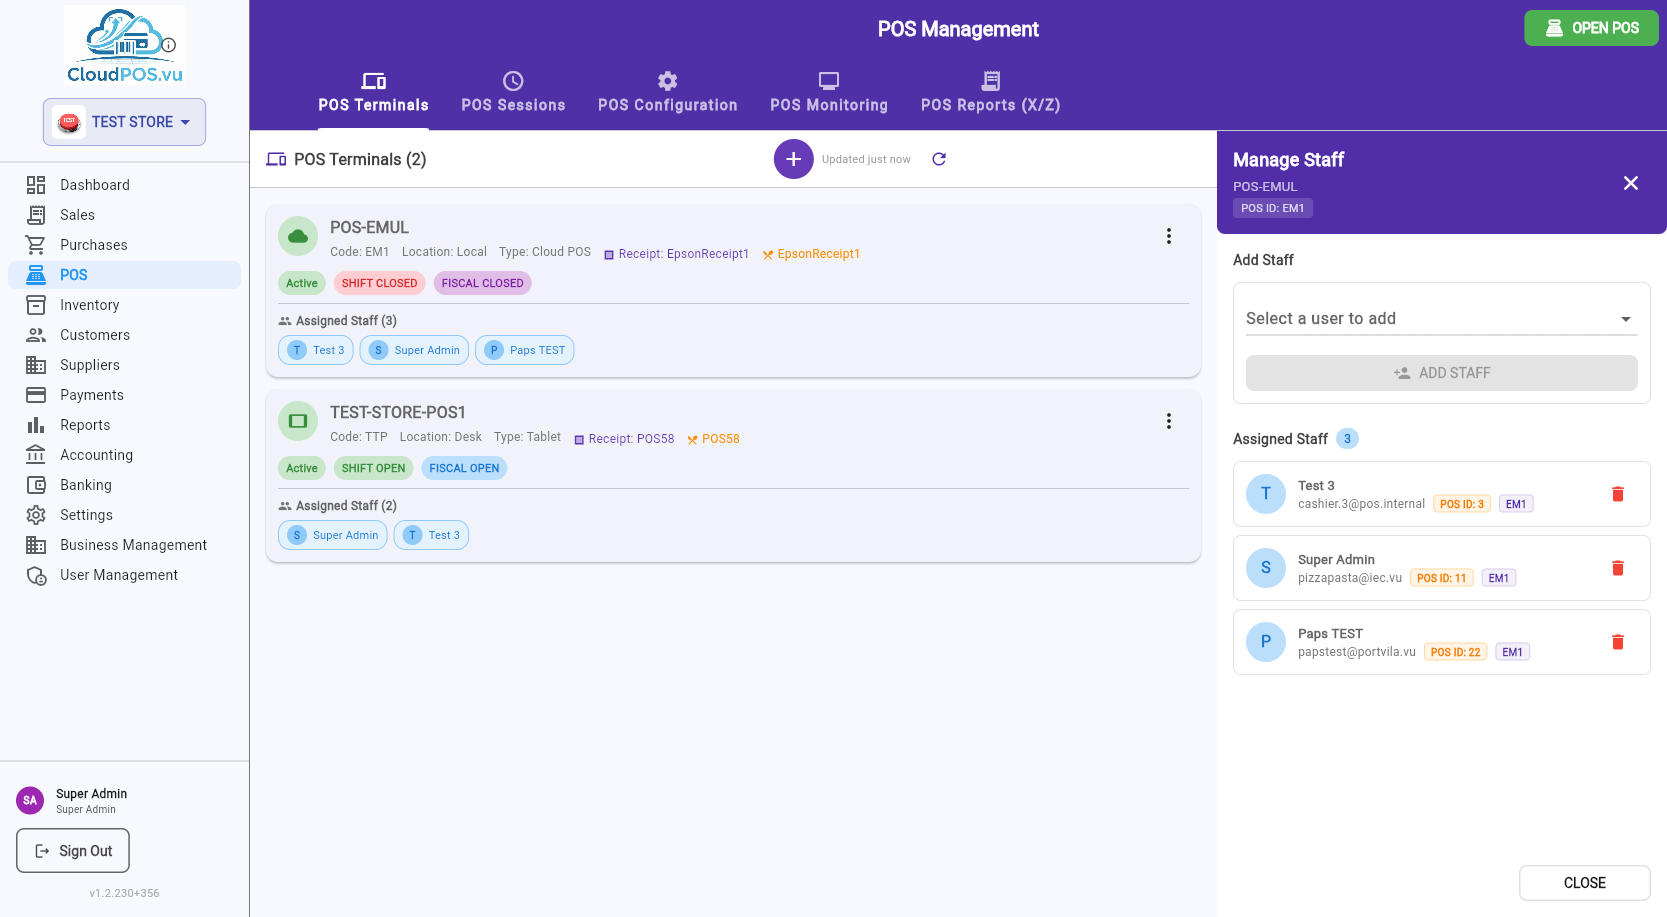
Add Staff
Select a user from the dropdown (shows all business users with their POS ID) and click ADD STAFF.
Assigned Staff List
Each assigned staff member shows their avatar, name, email, POS ID badge, and terminal code badge. Click the 🗑️ icon to remove a staff member.
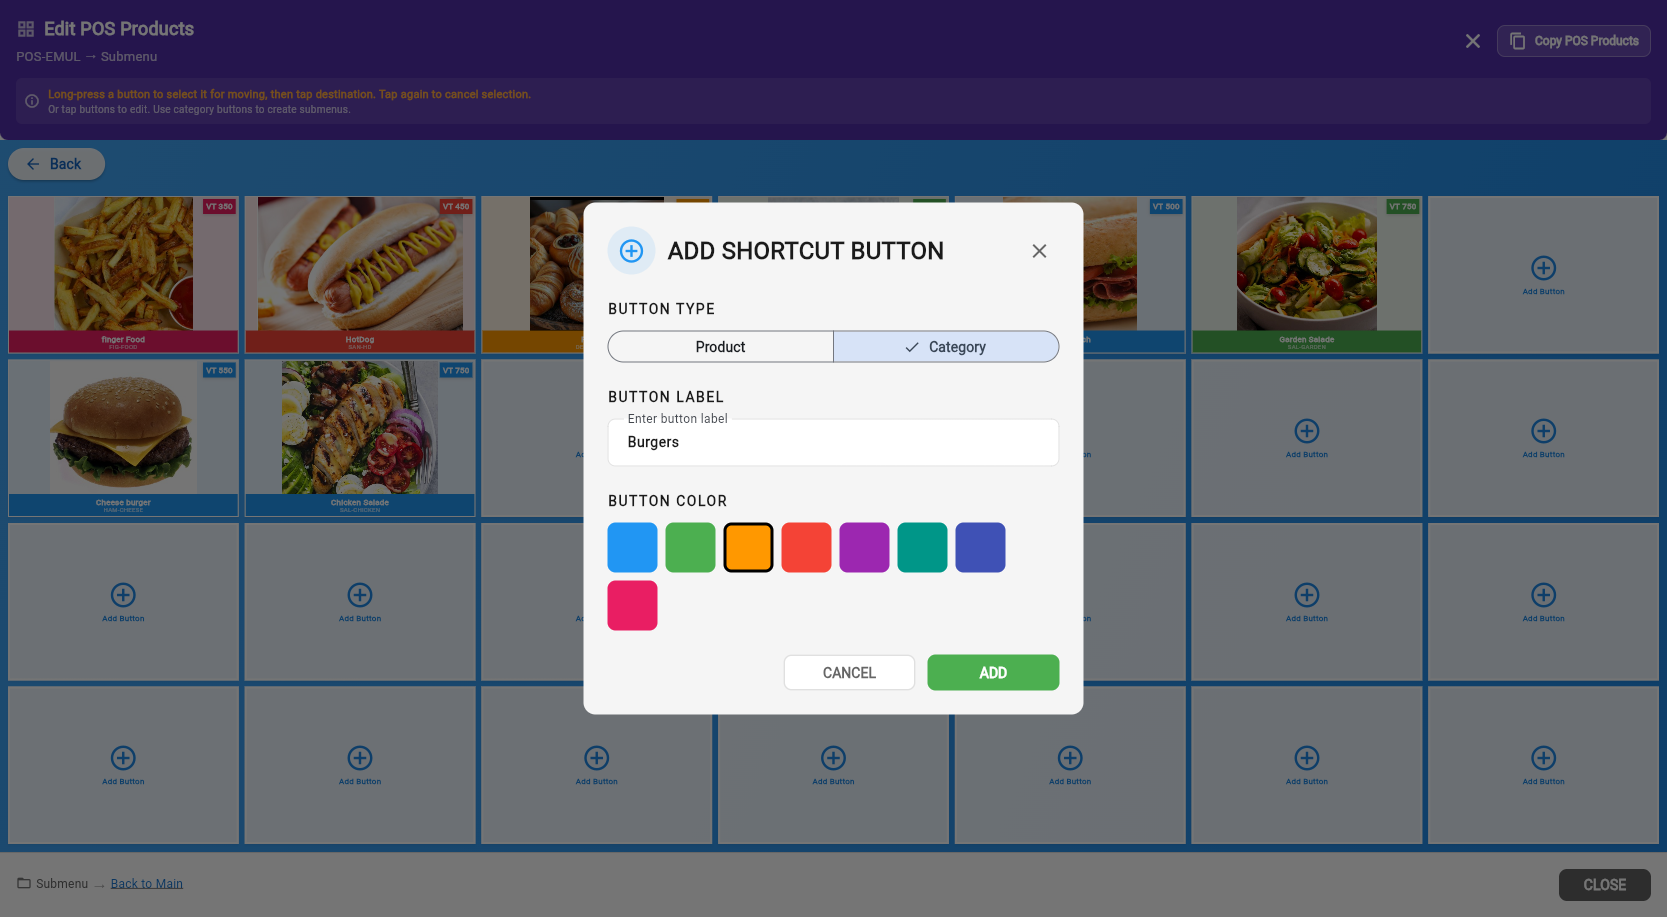
Click Edit POS Products to configure the button layout on the POS selling screen. The grid is 7 columns × 4 rows (28 buttons per page).
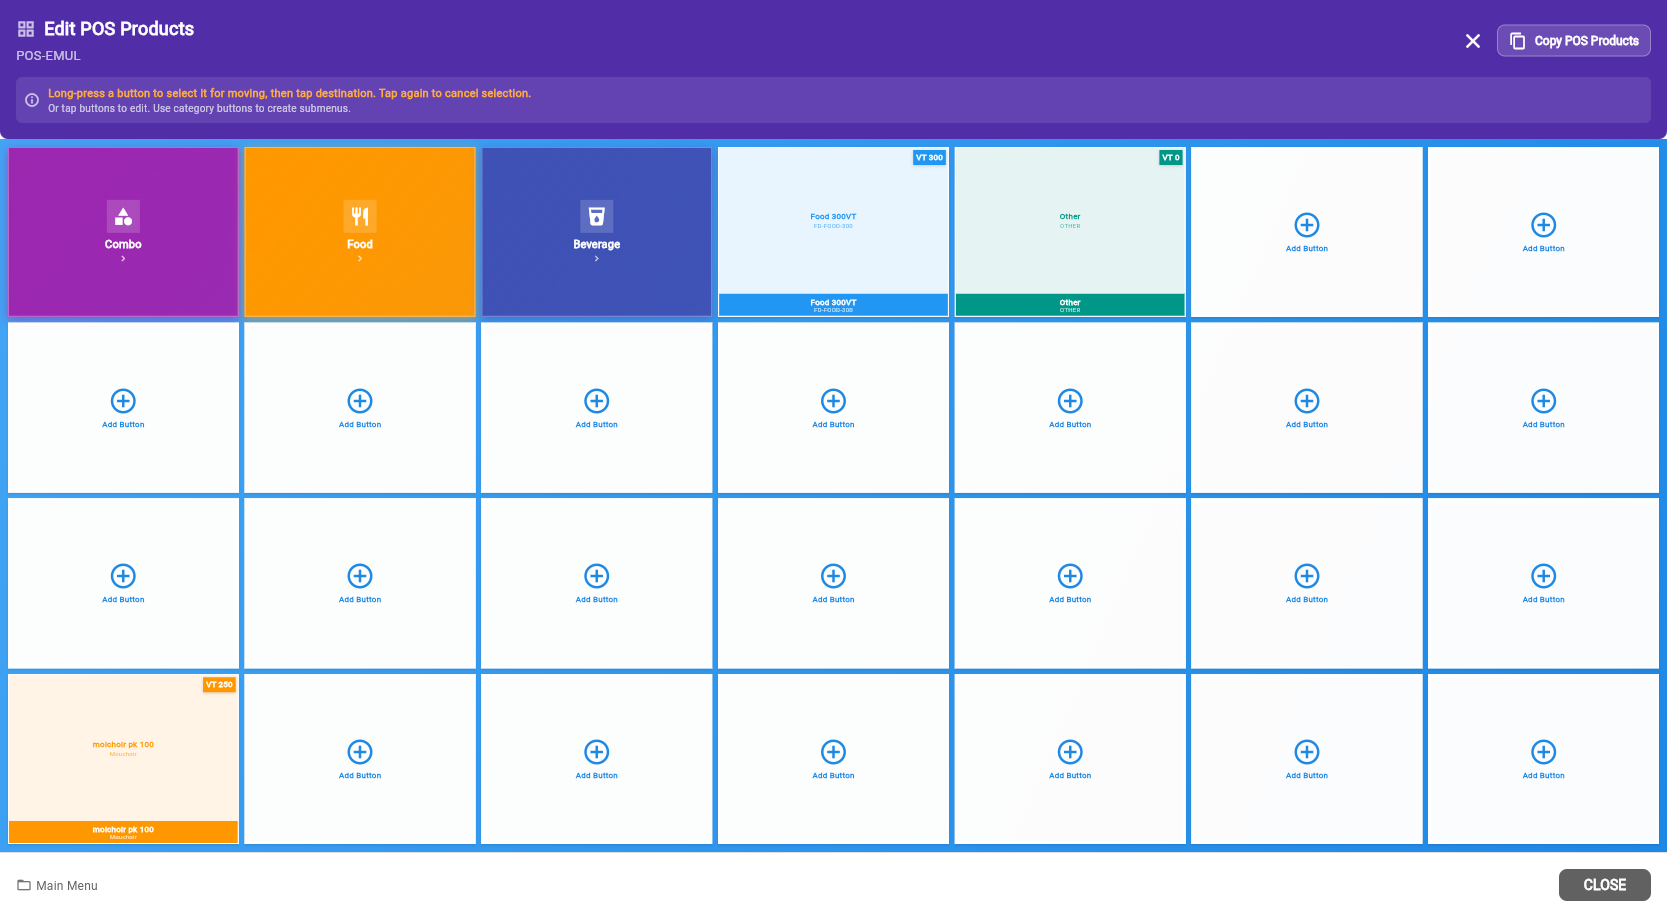
Button Types
Linked to a product. Tapping it in selling mode adds the product to the cart.
Opens a submenu grid. Use categories to organize products into groups (Drinks, Food, etc.).
Moving Buttons
To rearrange buttons on the grid:
- Long-press a button to select it for moving (highlighted).
- Tap the destination slot to move or swap.
- If the destination has a button, they swap positions.
- Tap the selected button again to cancel the move.
Adding a Button
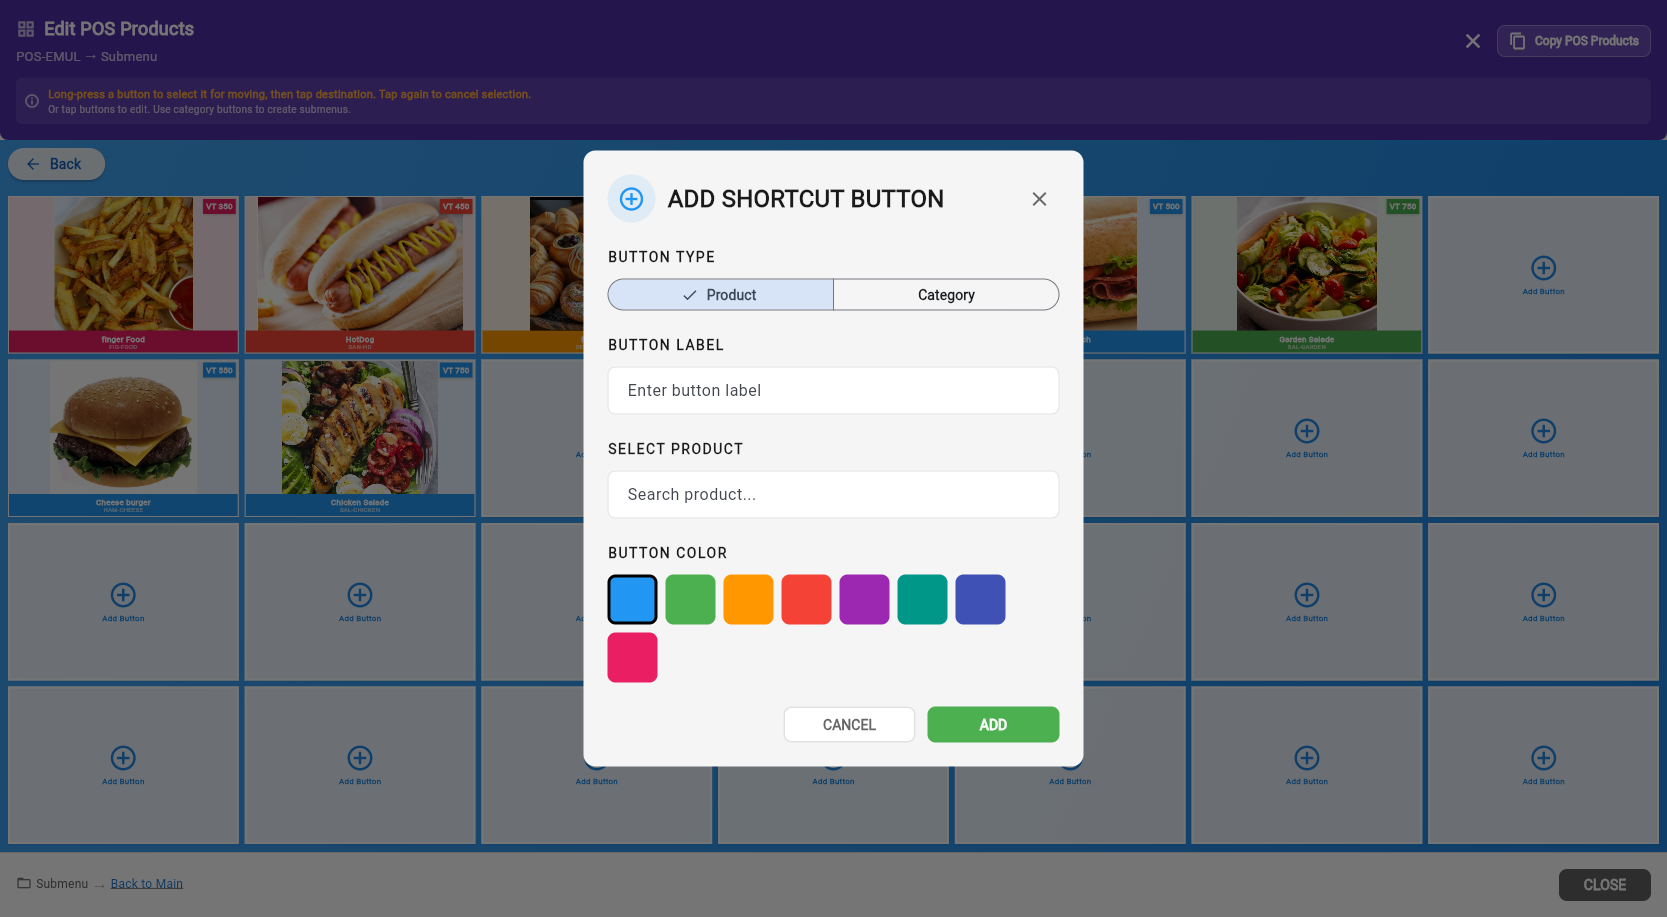
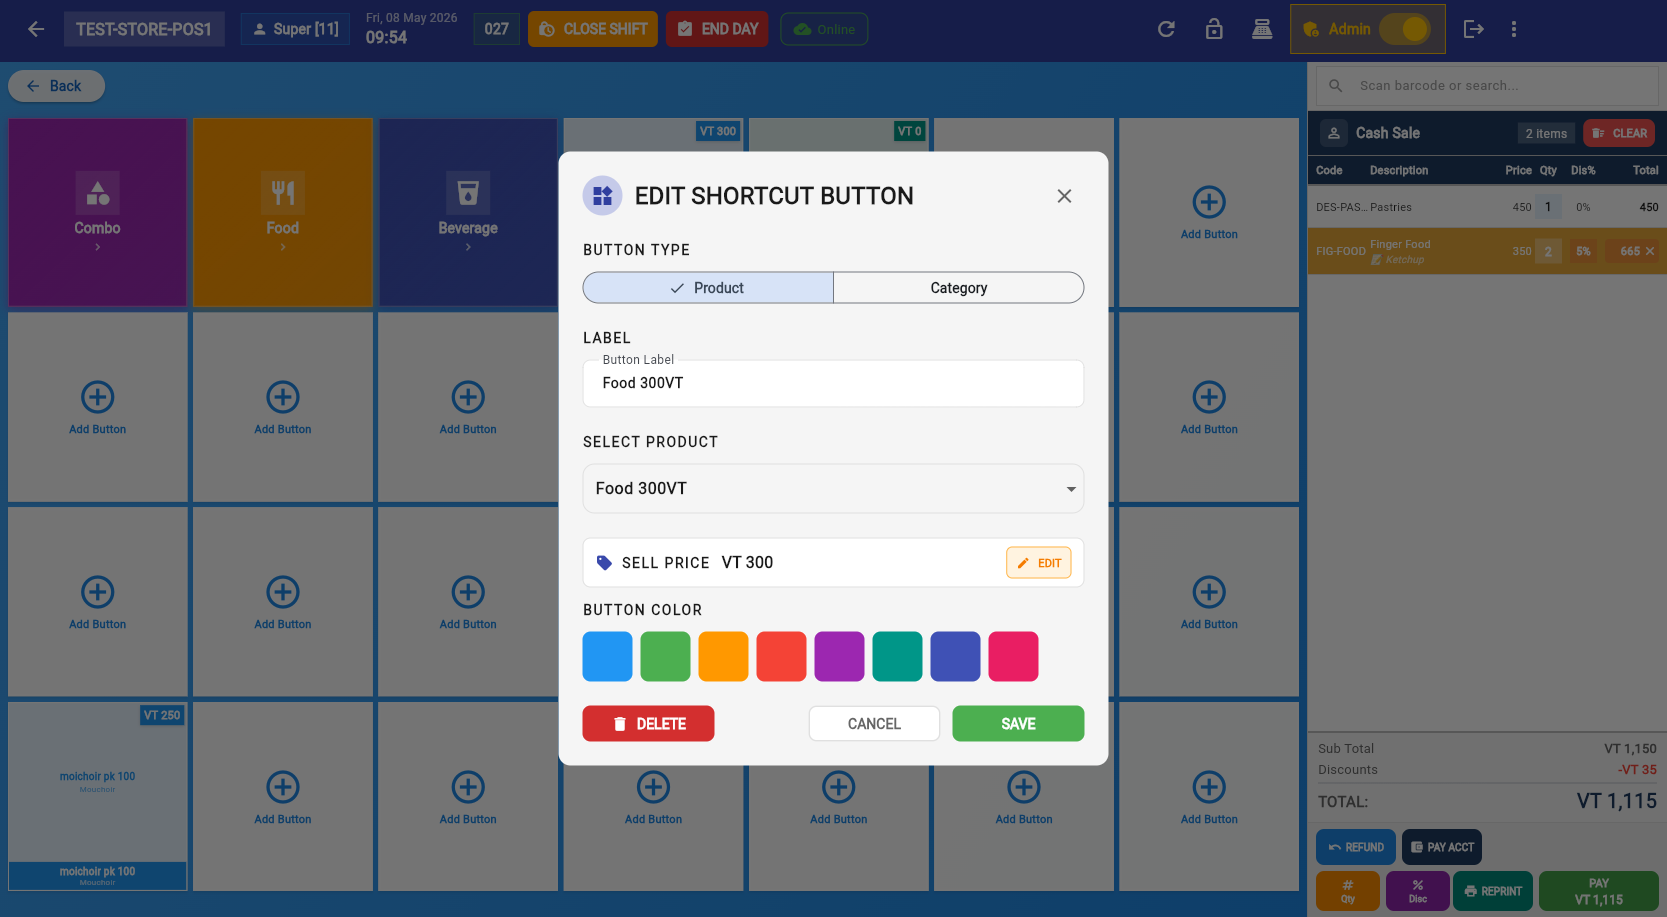
Tap an empty slot (or use the + button) to open the Add Shortcut Button dialog:
- Button Type: Product or Category (segmented toggle).
- Button Label: Text displayed on the grid button.
- Select Product: Search by name or SKU (Product type only). Usage indicators show if a product is already on other buttons.
- Button Color: 8 color options for visual organization.
Product Usage Indicators
Product is not on any button — good candidate to add.
Product is already on one button.
Product is on multiple buttons — may be intentional or a duplicate.
Copy from Another Terminal
Use the Copy POS Products button in the header to clone the entire grid layout from another terminal. This replaces all buttons on the current terminal — use with caution.
Click Display Settings to configure the second-screen customer display:
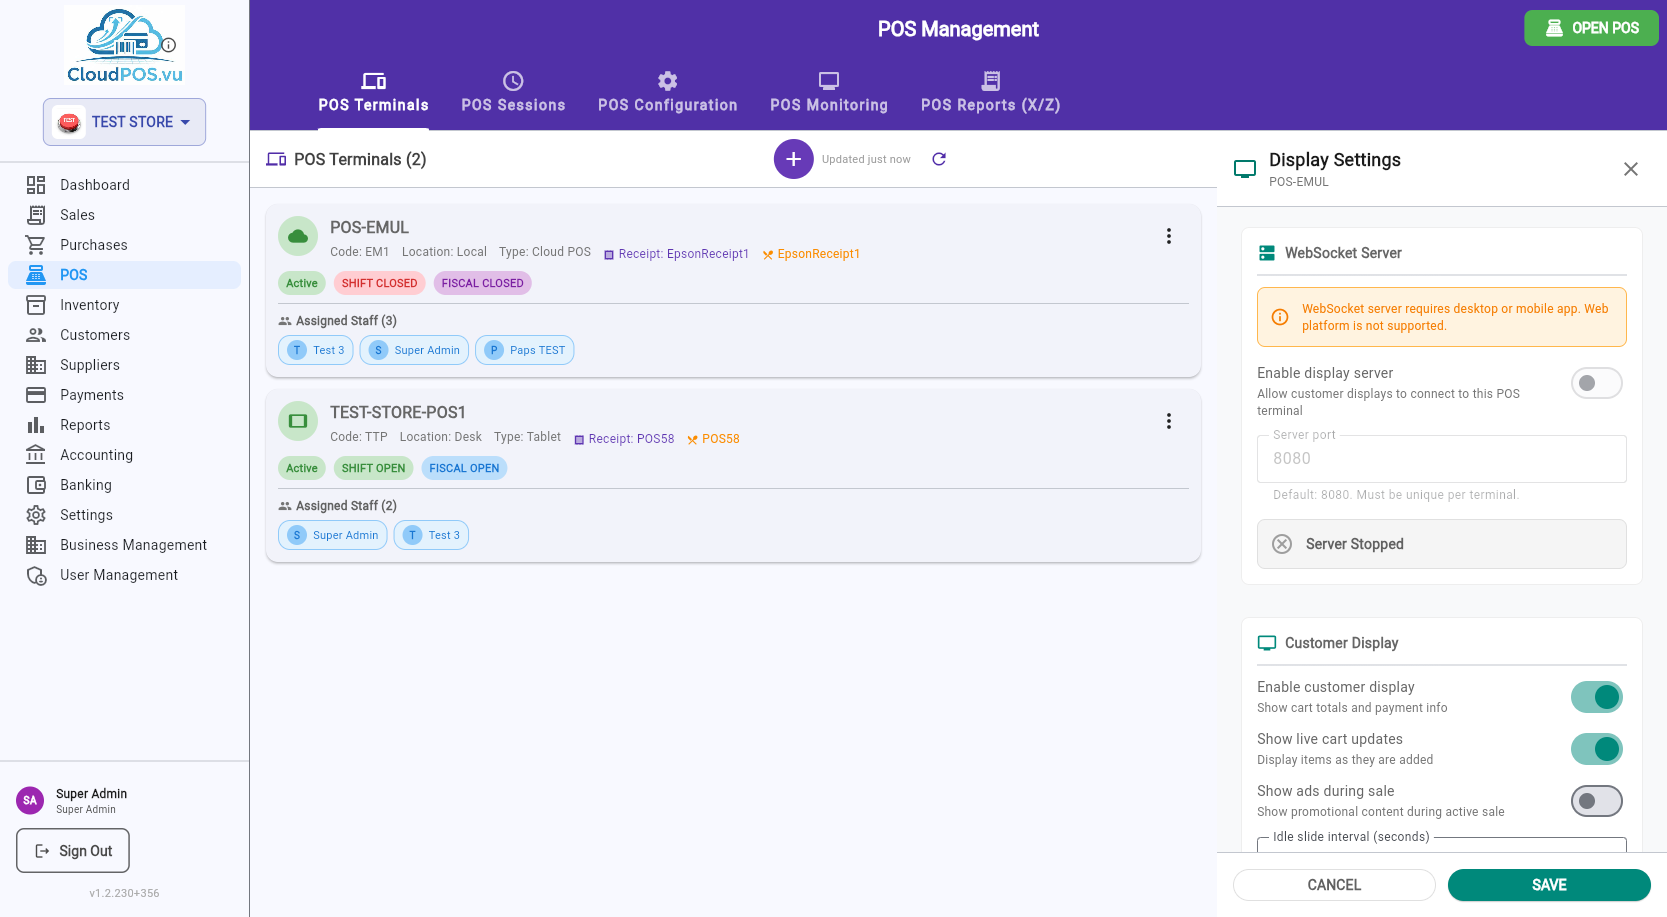
WebSocket Server
Enables a local WebSocket server that customer/kitchen displays connect to. Requires the desktop or mobile app (not available on web).
- Enable display server — start/stop the WebSocket server.
- Server port — must be unique per terminal (default: 8080).
- Server status — shows Running/Stopped in real time.
Customer Display
- Enable customer display — show cart totals and payment info on the second screen.
- Show live cart updates — display items as they are added to the cart.
- Show ads during sale — display promotional content during an active sale.
- Idle slide interval — seconds between image/video transitions when idle.
Idle Content
Configure images and videos to display when the POS is idle. Add URLs (one per line) for images or videos to show as a slideshow on the customer display.
CloudPOS.vu has two login paths from the login screen:
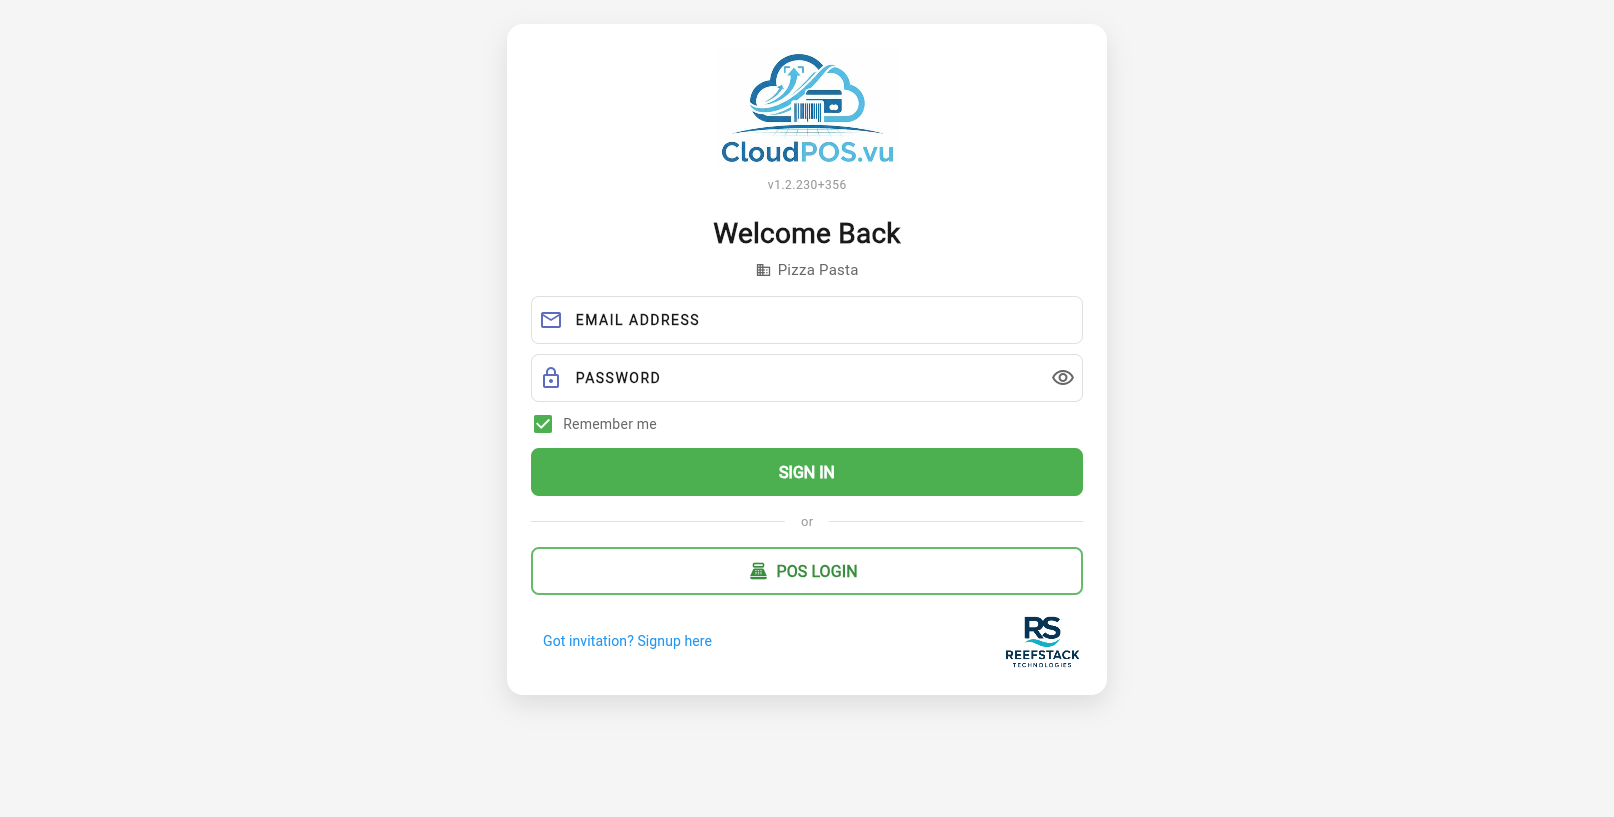
Admin/back-office login. Full access to all modules including POS Management, Settings, Reports.
Cashier quick login using POS ID + PIN. Always visible — handles pairing automatically if device is not yet linked.
First-Time Device Pairing
When POS LOGIN is tapped on an unpaired device, the Pair Device dialog appears:
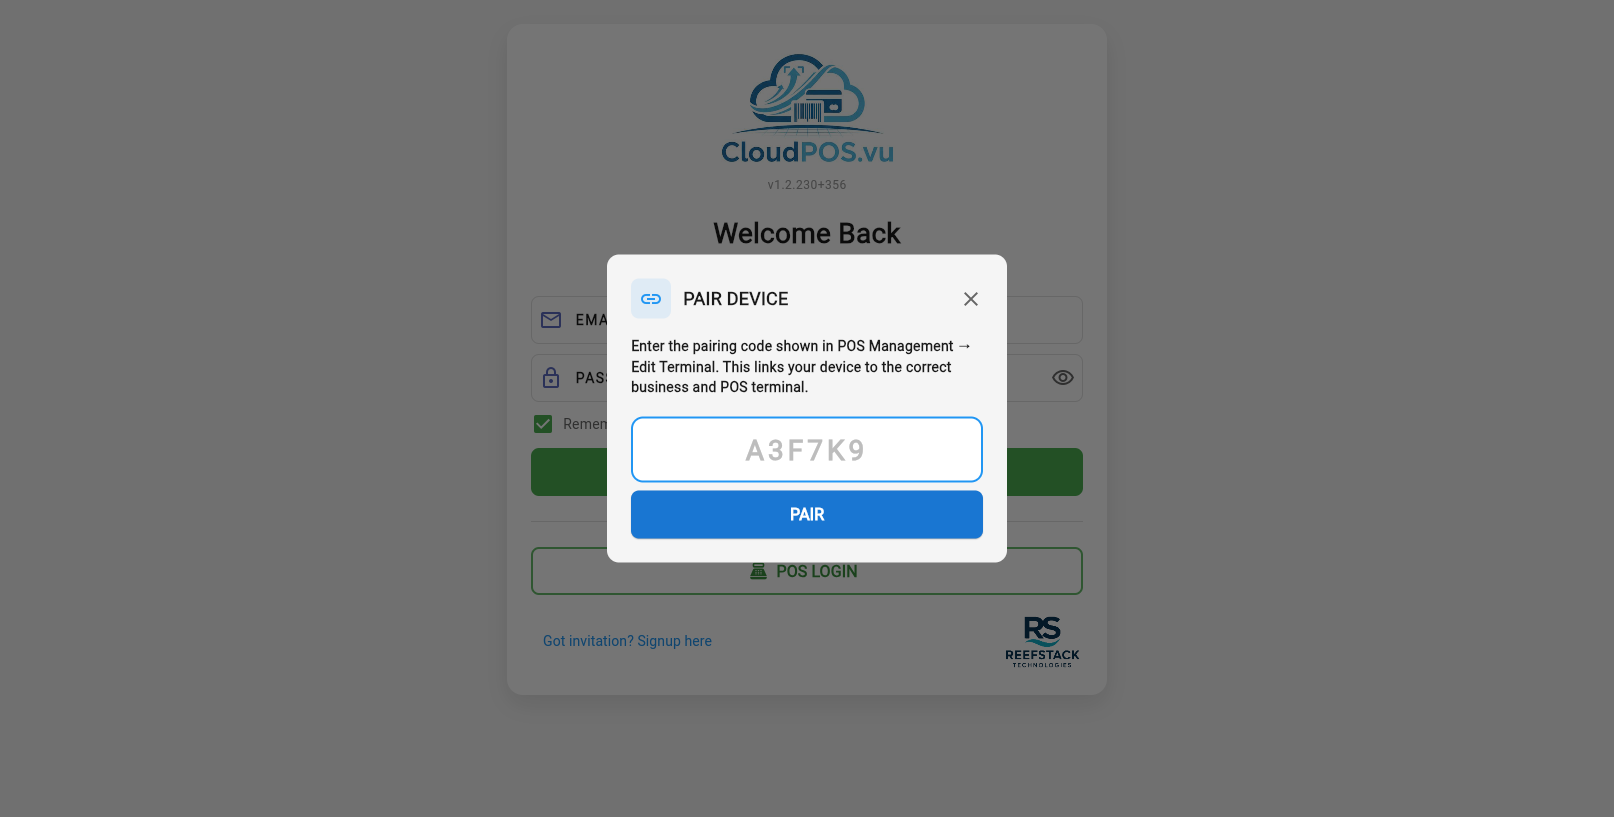
- Get the pairing code from POS Management → Edit Terminal → Device Pairing Code.
- Enter the code on the POS device.
- The code is unique per database — it automatically links the device to the correct business and terminal.
- On success, the device stores the binding and proceeds to the POS Login.
Cashier Login (POS ID + PIN)
After pairing (or if already paired), the POS Login dialog appears:
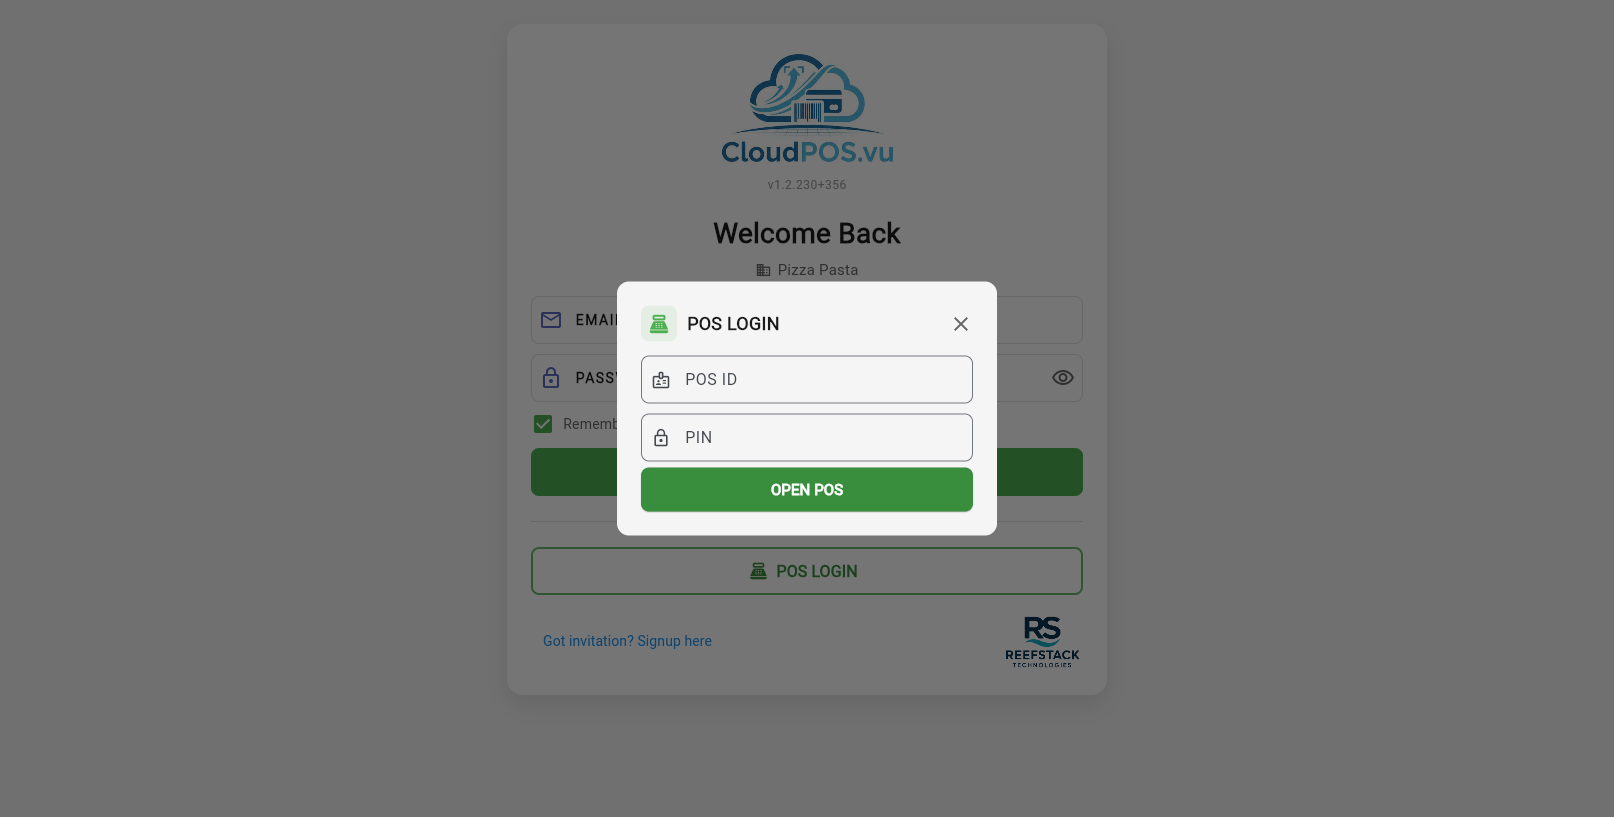
The cashier enters their POS ID (numeric) and PIN to authenticate. Only staff assigned to this terminal can log in.
When accessing POS from the back office (sidebar → Open POS), you first select a terminal:
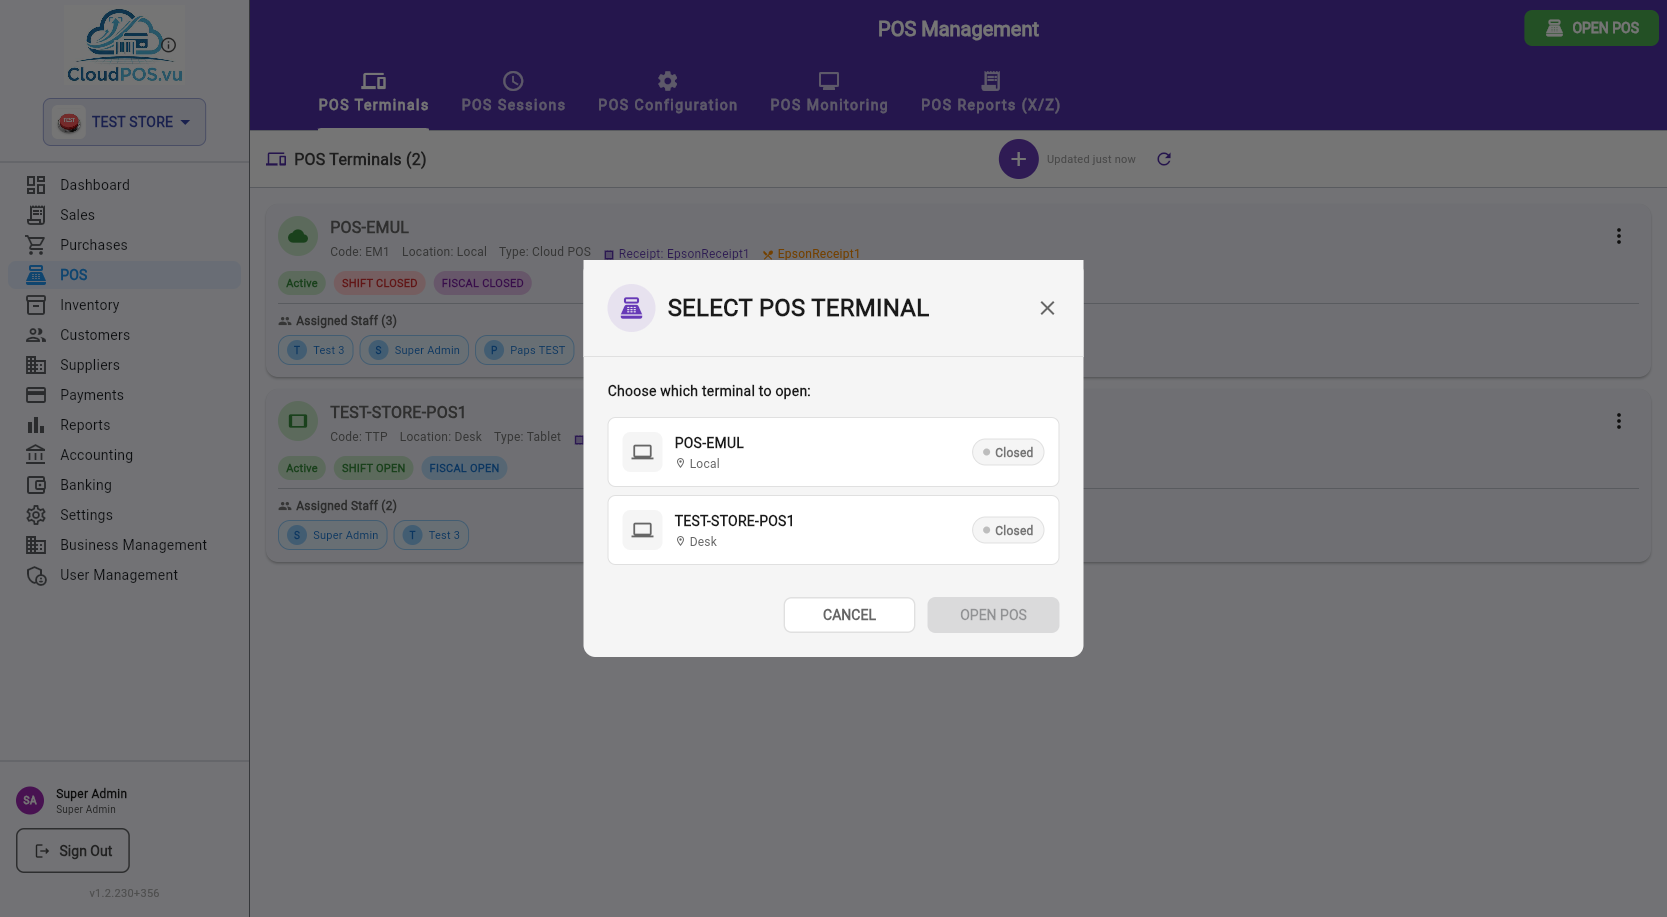
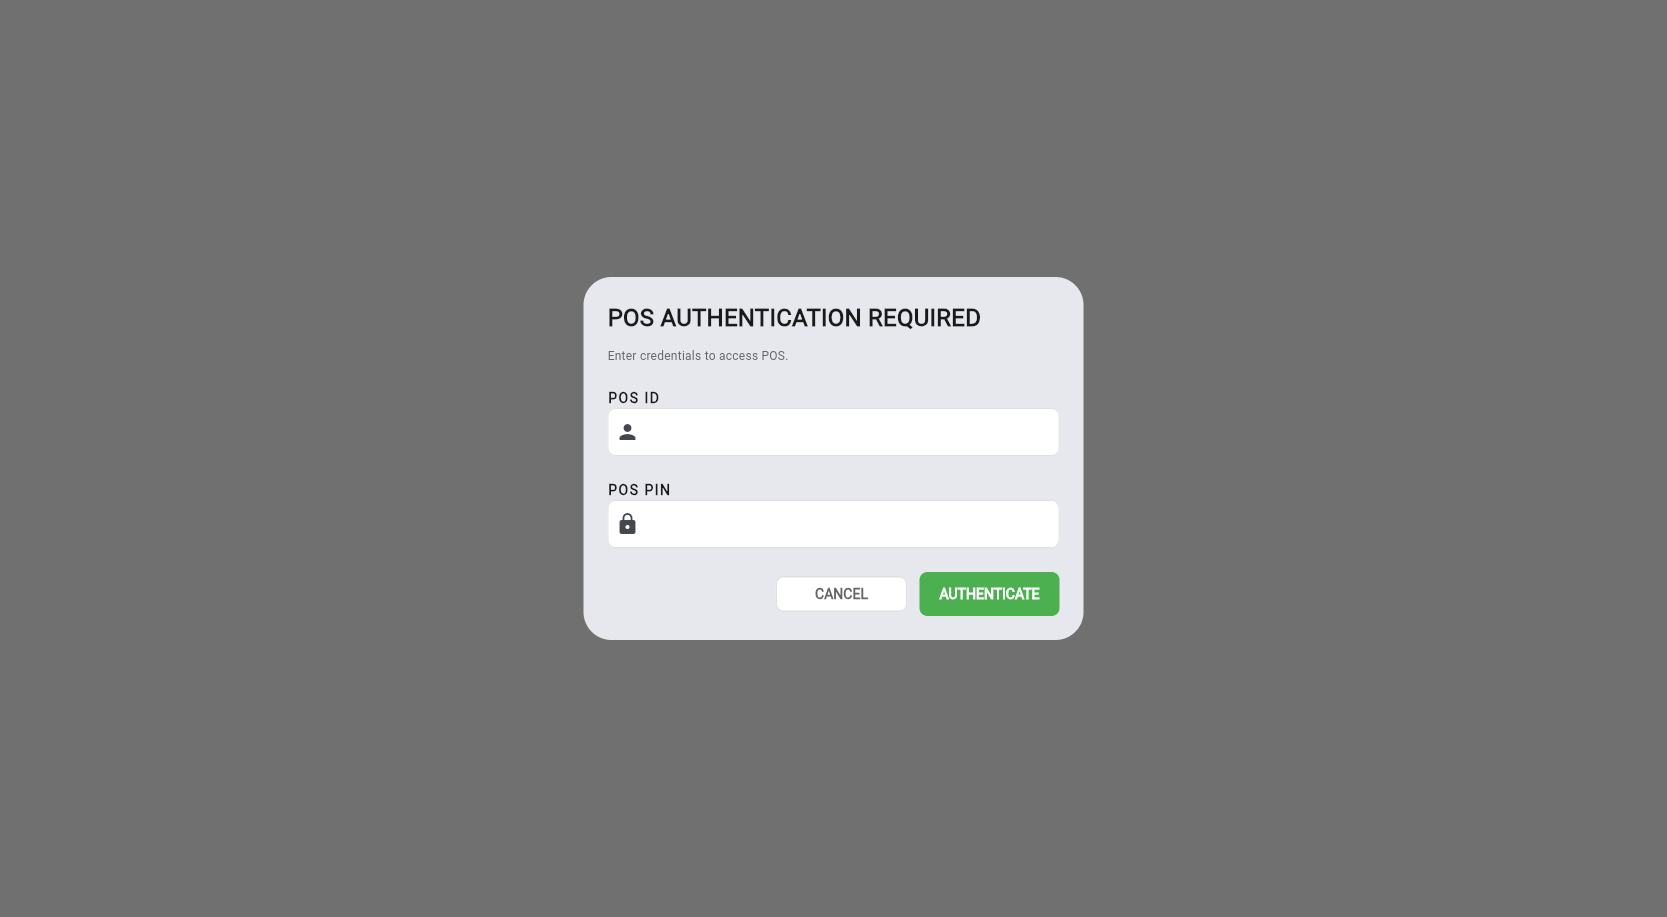
After selecting a terminal, POS authentication is required:
If no shift is open, the Open Shift dialog appears:
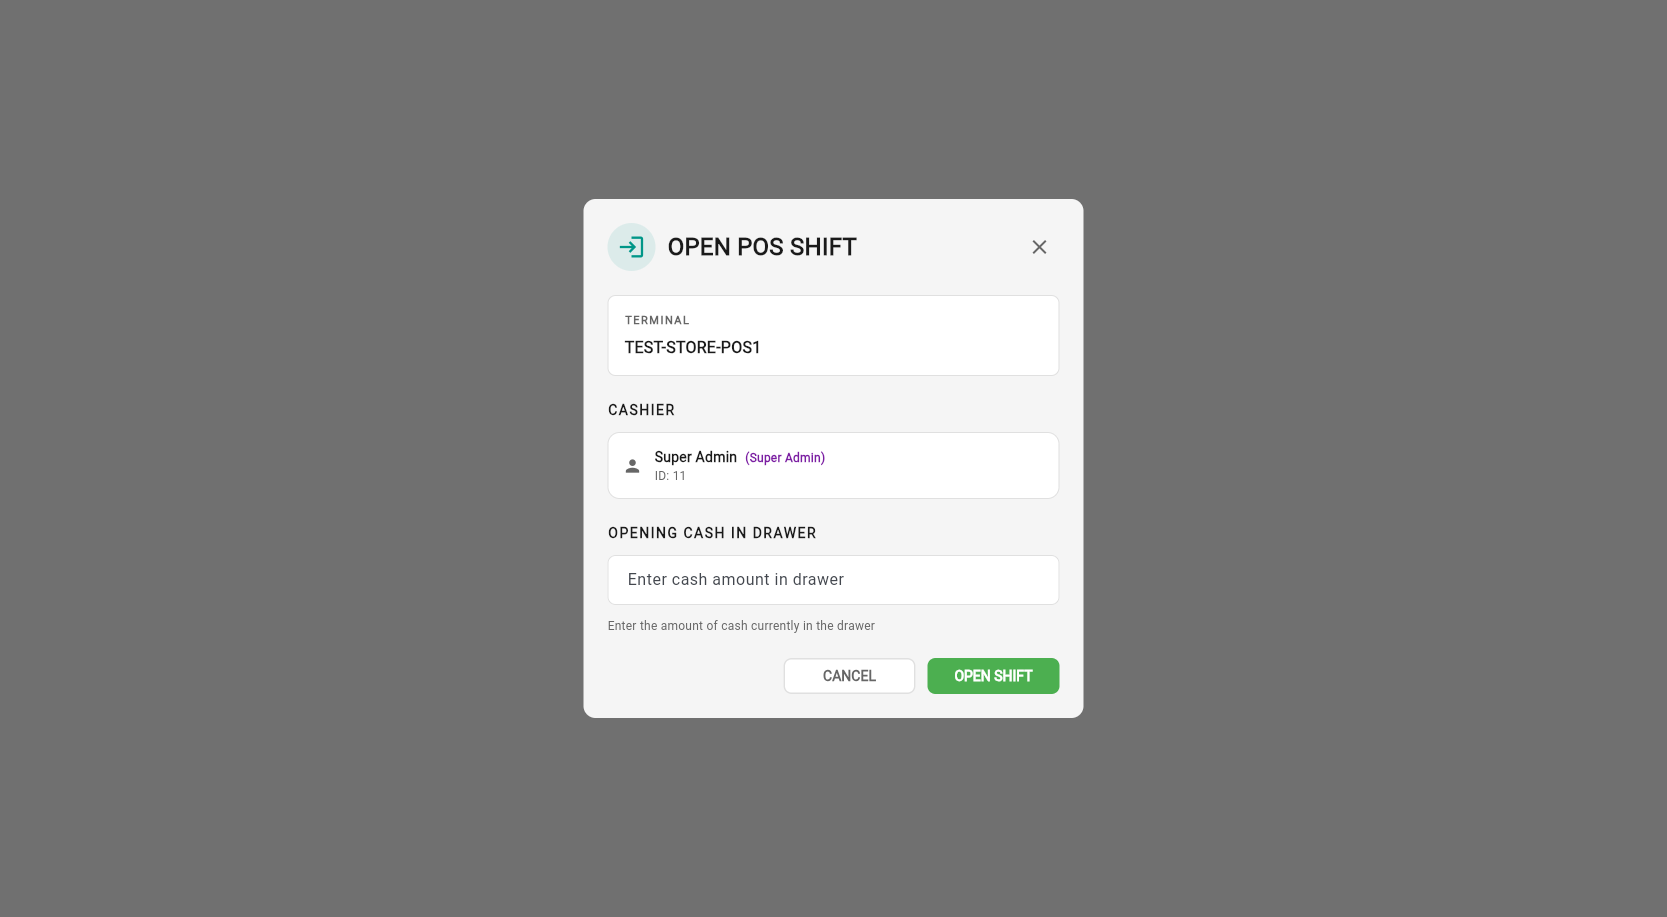
The Opening Cash is the amount of money in the cash drawer at the start of the shift. This is used for cash variance reporting in the Z-Report.
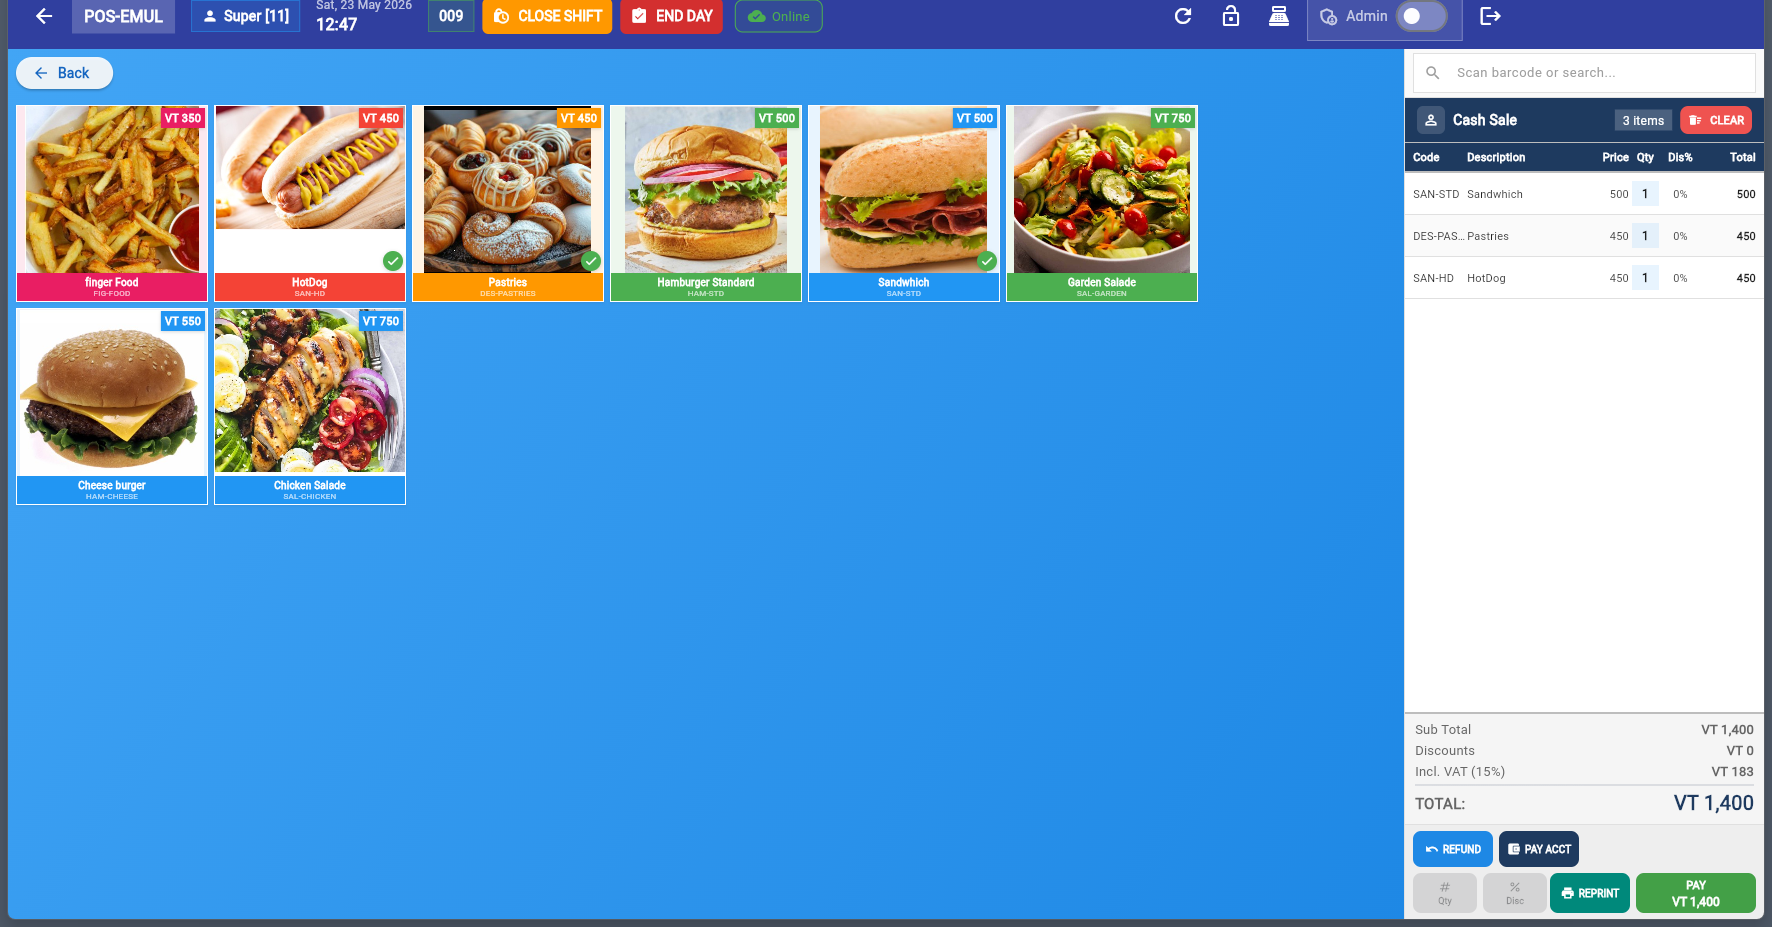
The main POS selling screen is divided into two areas: the product grid (left) and the cart panel (right):
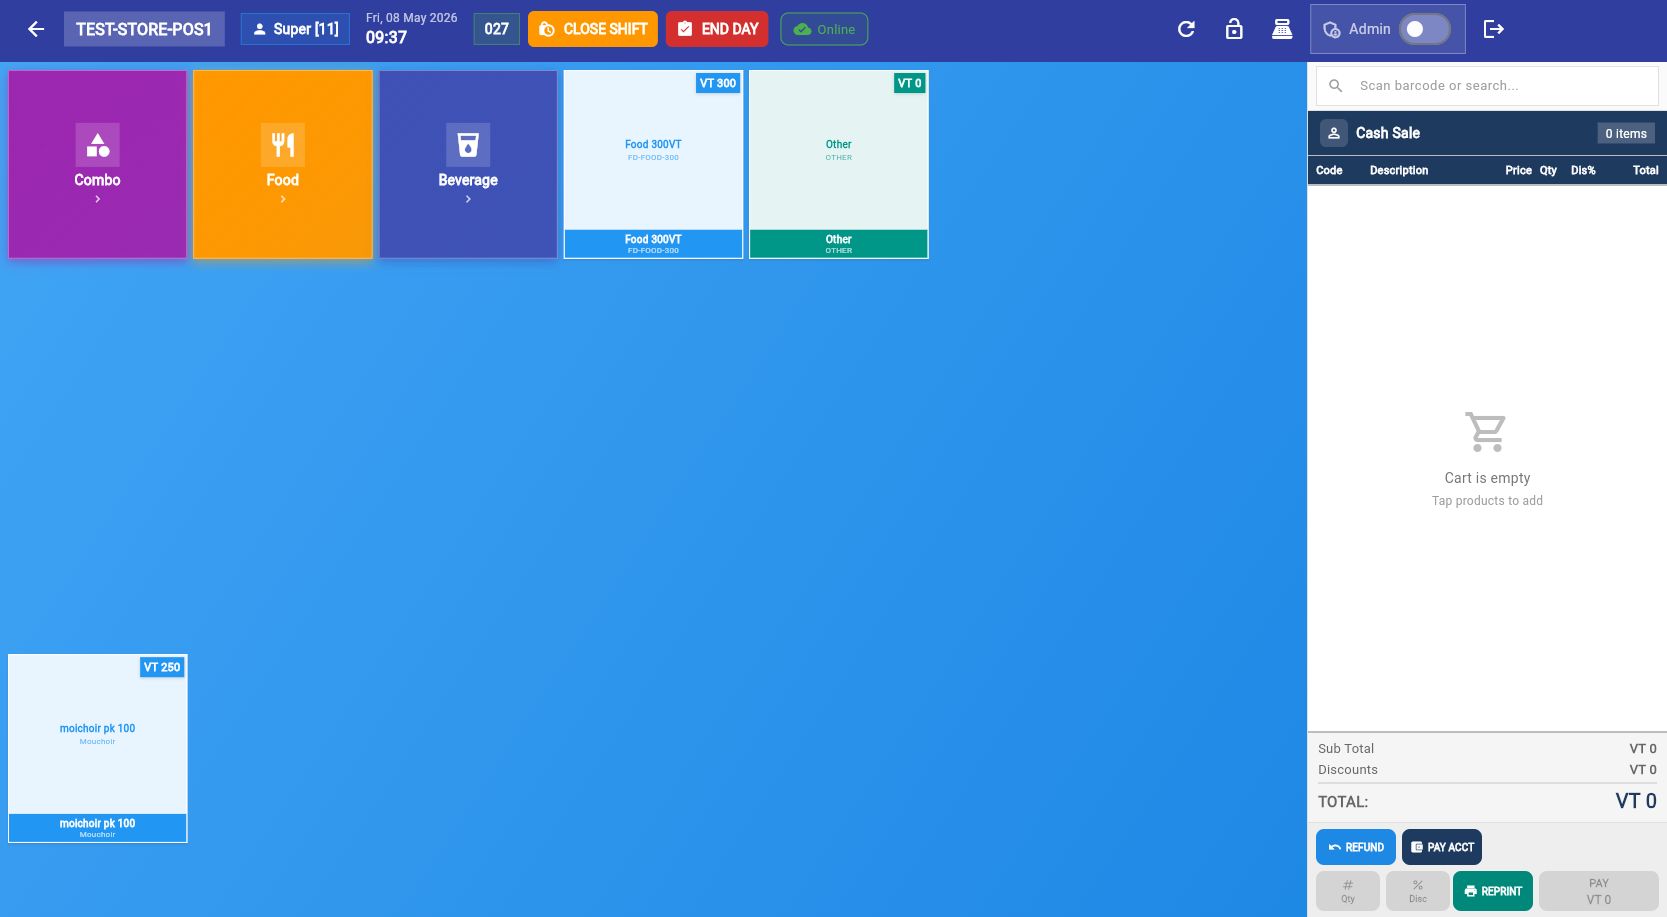
Adding Products
Tap a product button on the grid to add it to the cart. The cart updates in real time with quantity, price, and tax. You can also find products by searching by name or by scanning a barcode (GTIN) with a USB or Bluetooth barcode scanner.
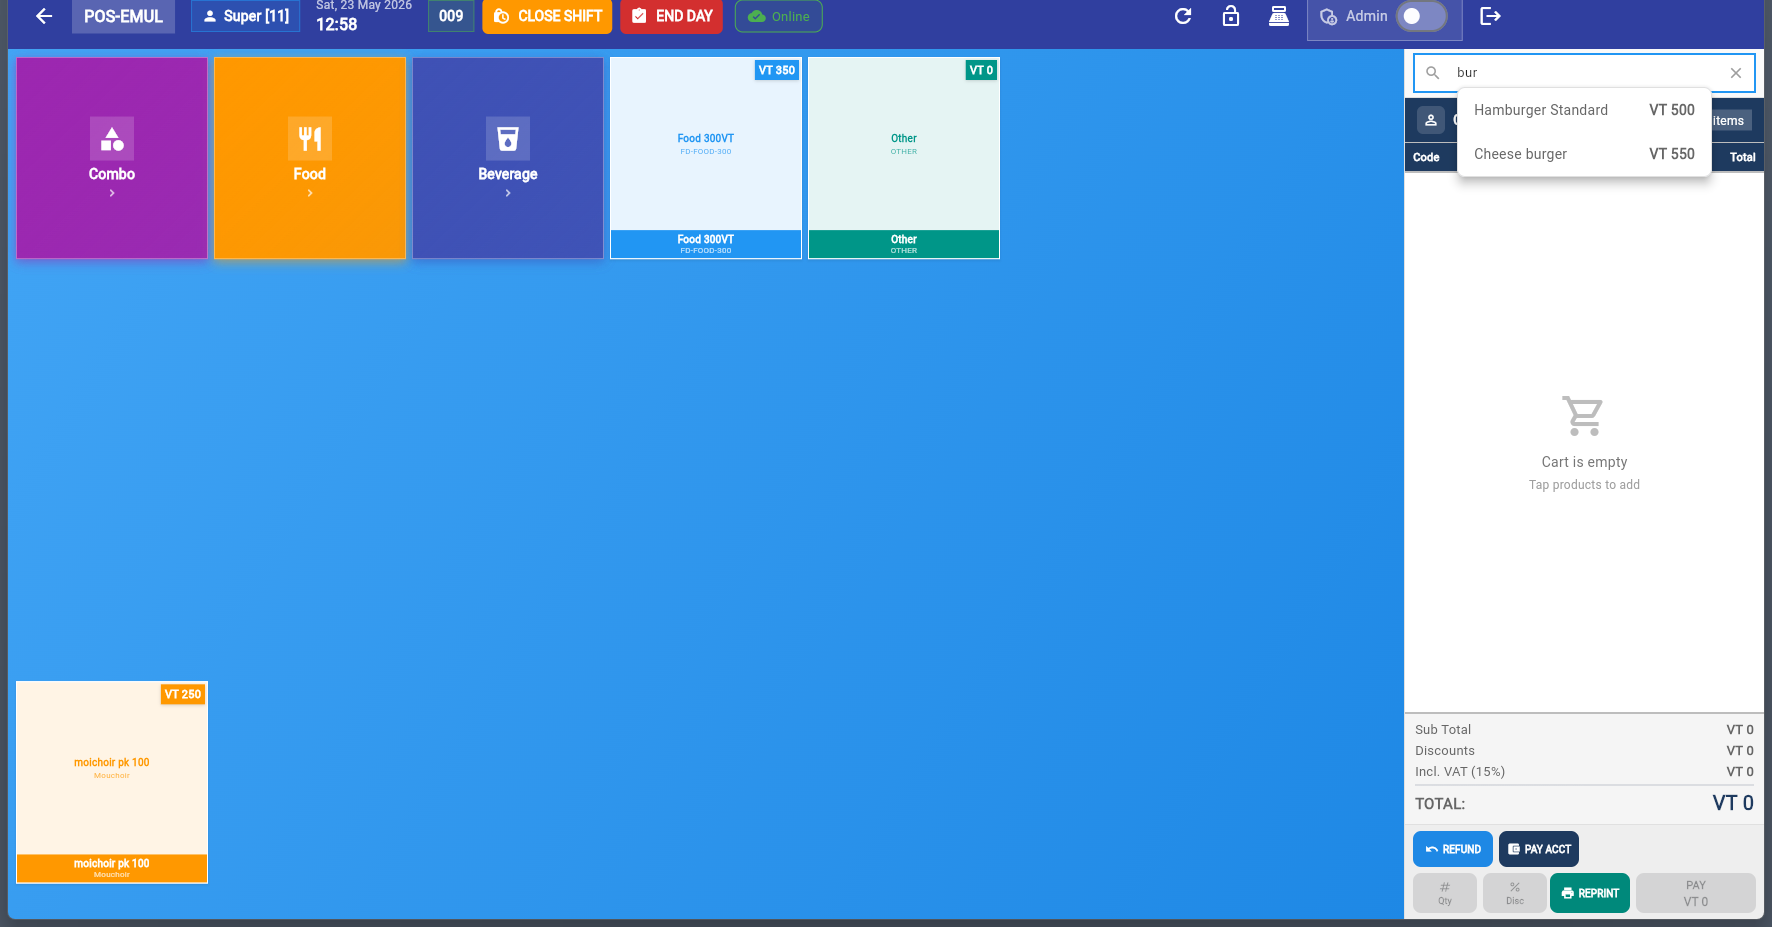
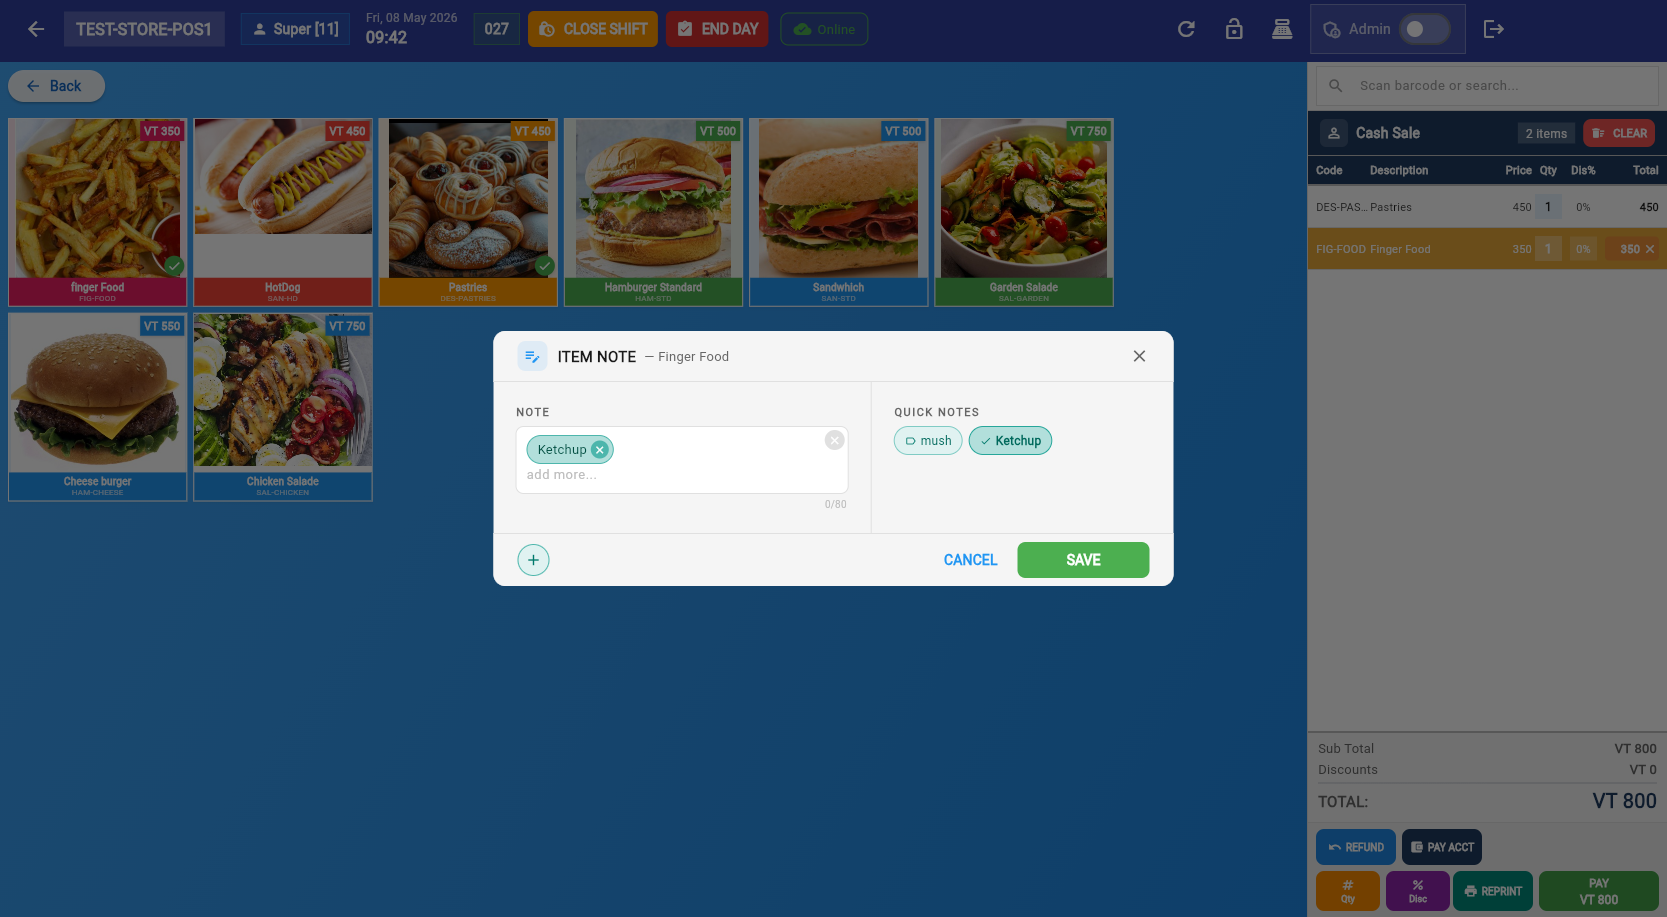
Item Notes
Double-click on a cart item to add an item note. Notes are printed on:
- The customer receipt
- The kitchen/order ticket (if the product is set to print to an order printer)
Remove Item from Cart (Void Function)
Tap the ✕ button on any cart item to instantly remove it before issuing the fiscal invoice. This is the Void Function — individual items can be removed without cancelling the entire sale.
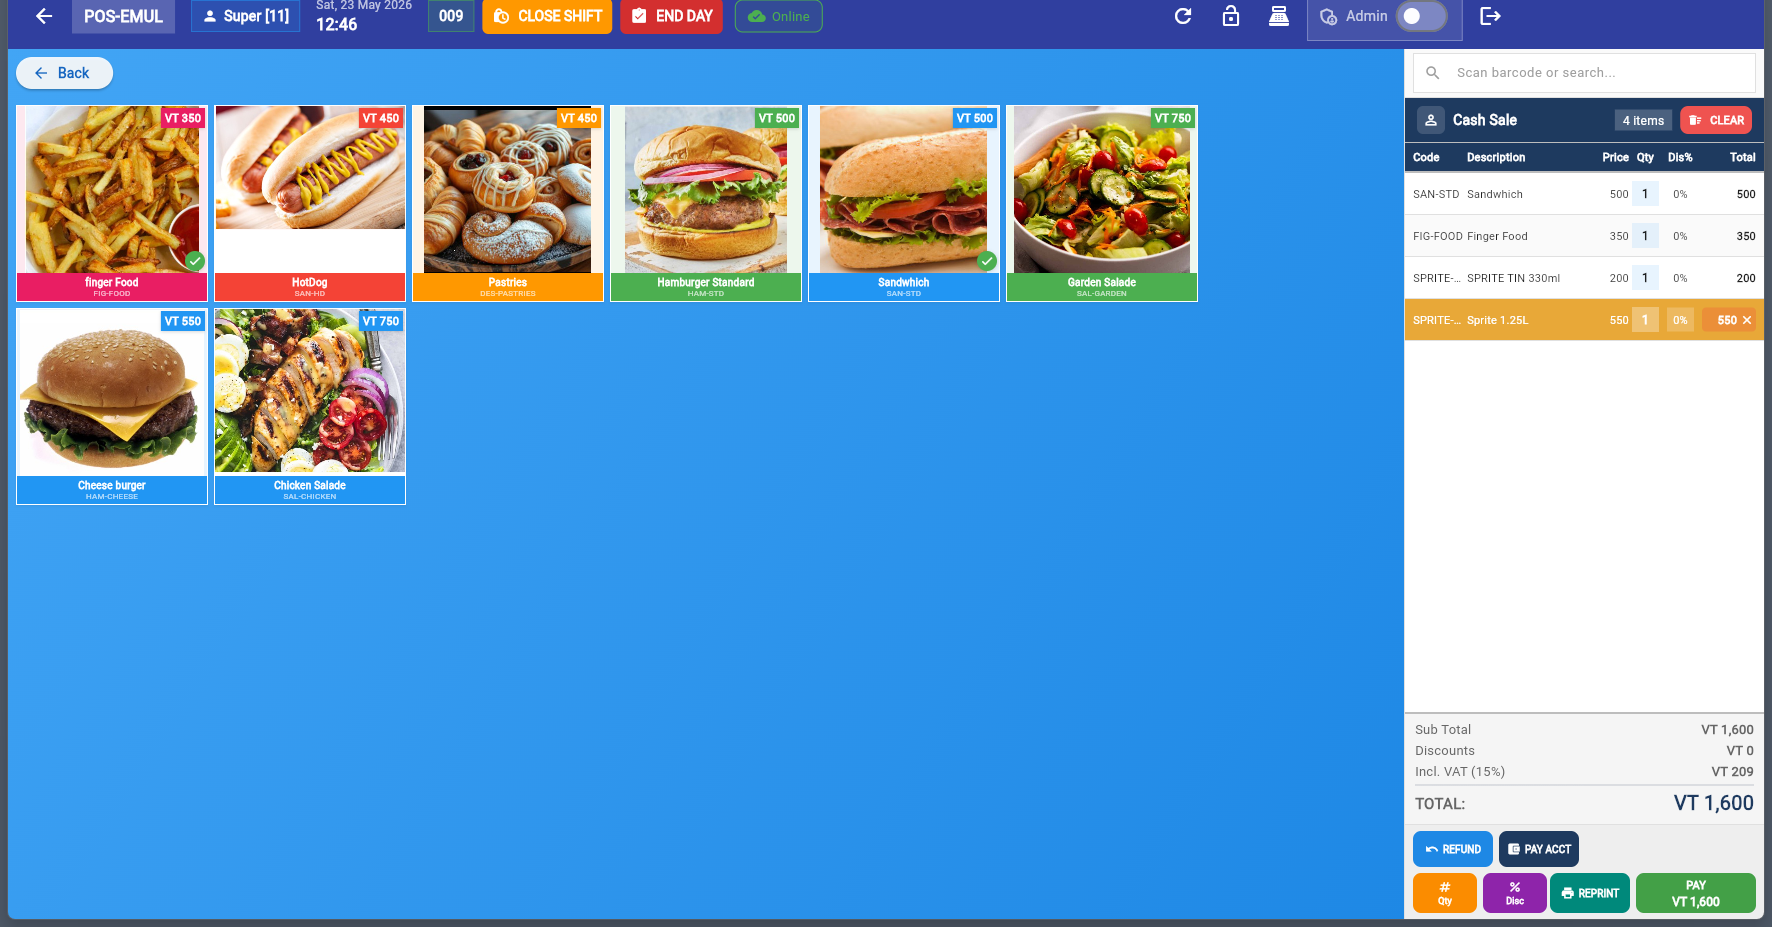
Change Quantity
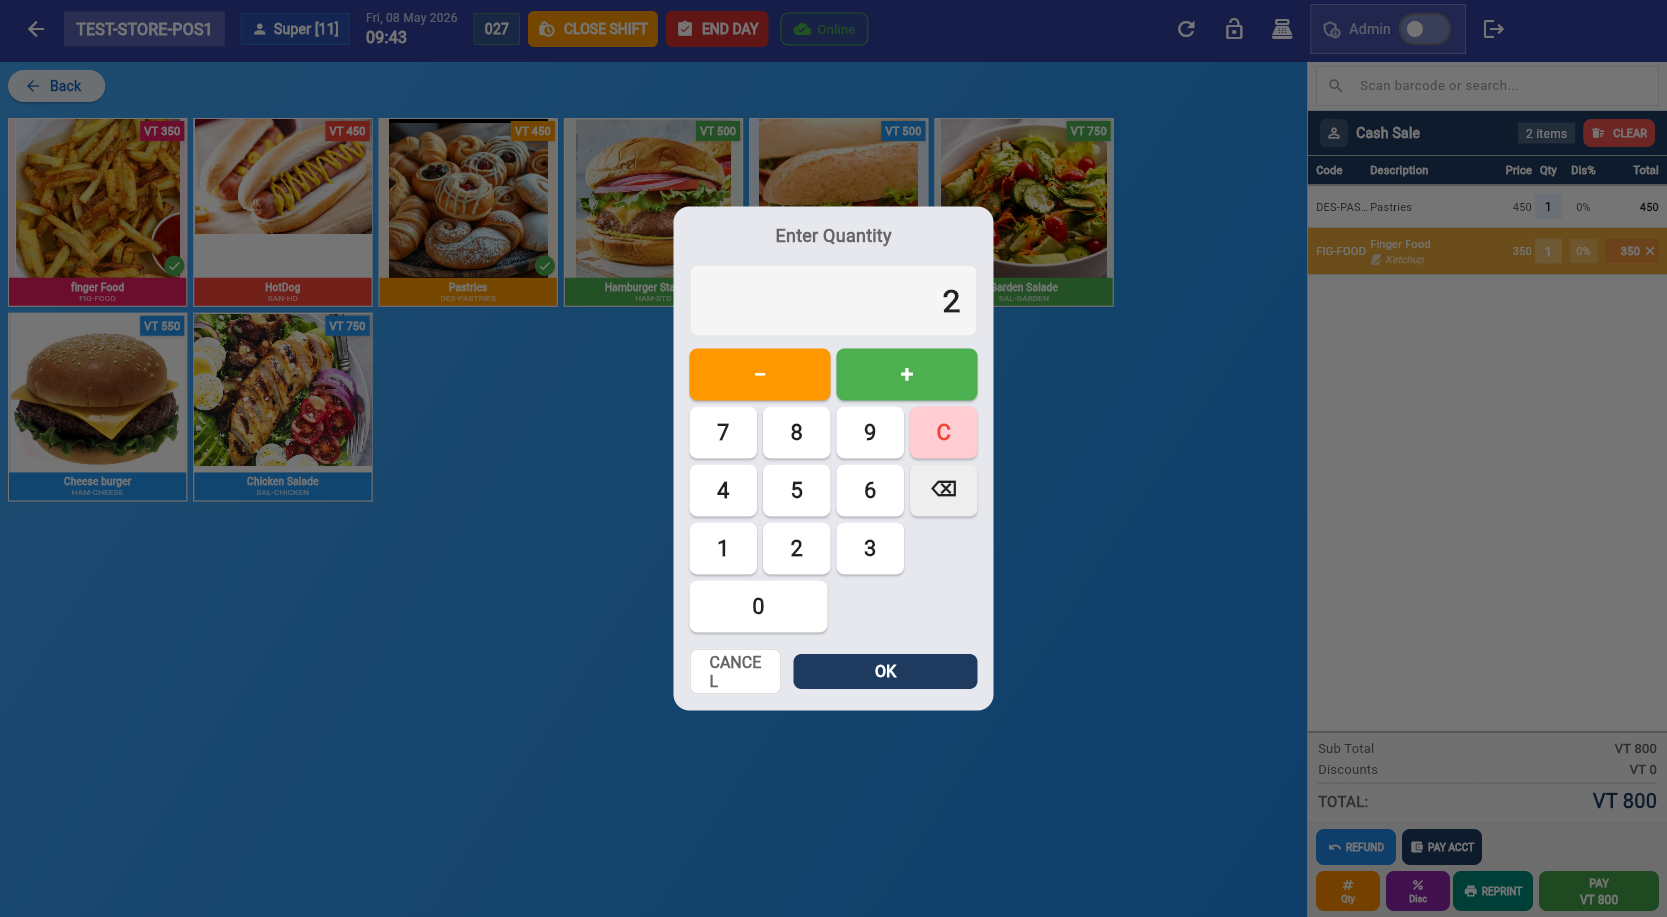
Tap the qty button on a cart item to open the quantity dialog. Use the numpad to set the exact quantity.
Apply Discount
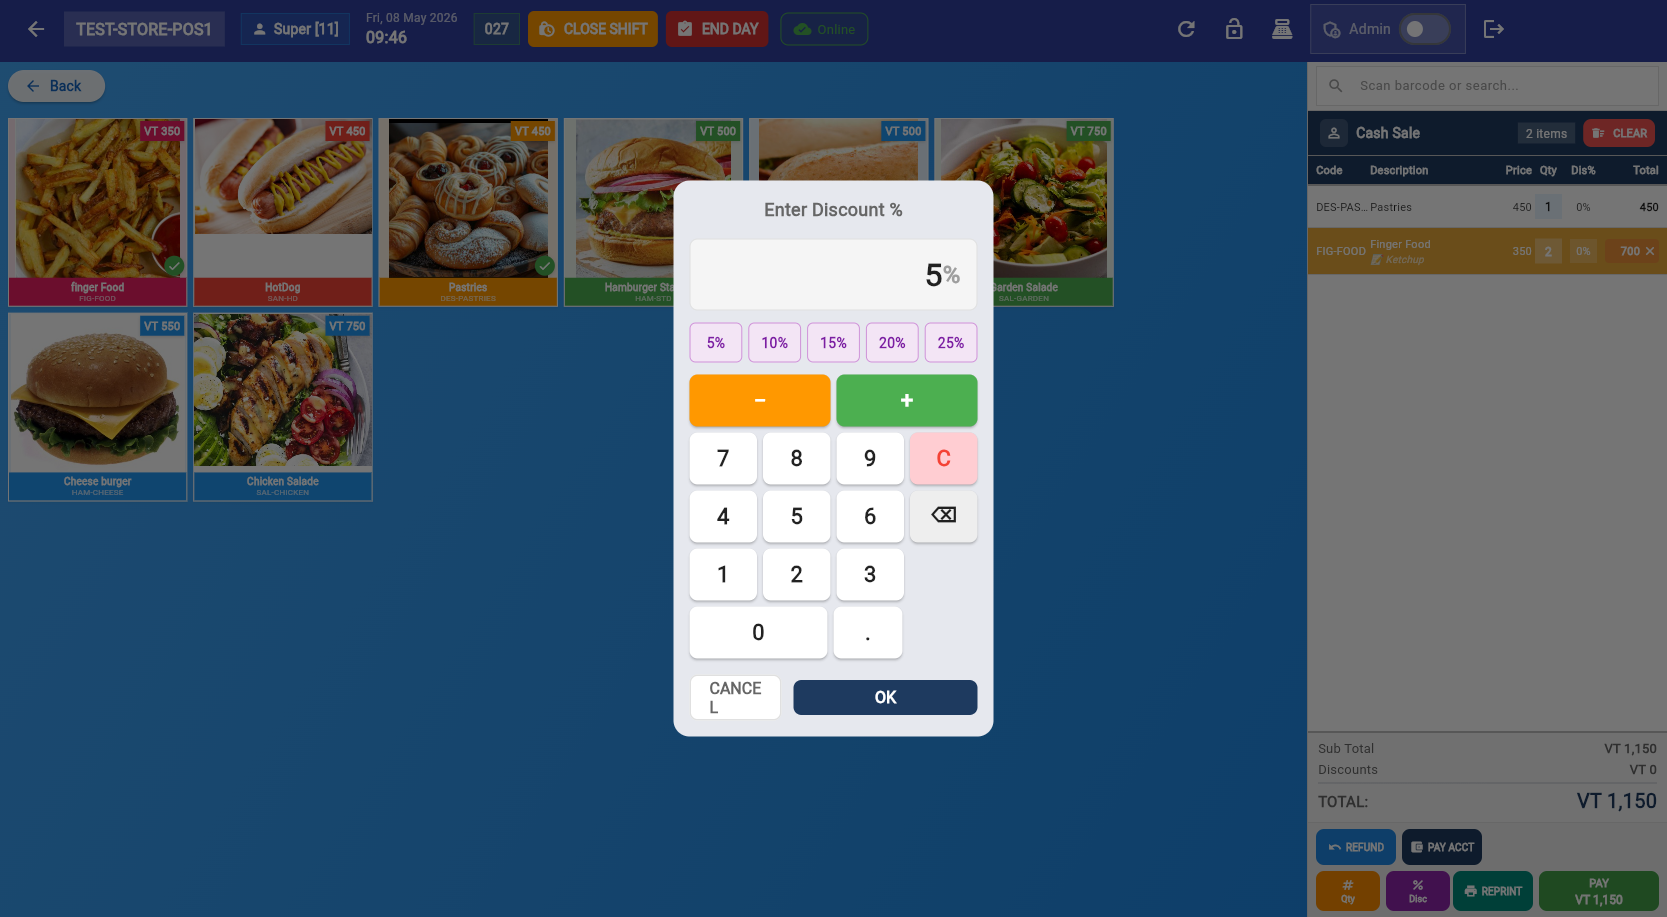
Apply a discount percentage to an individual cart item. The discount is reflected in the line total immediately.
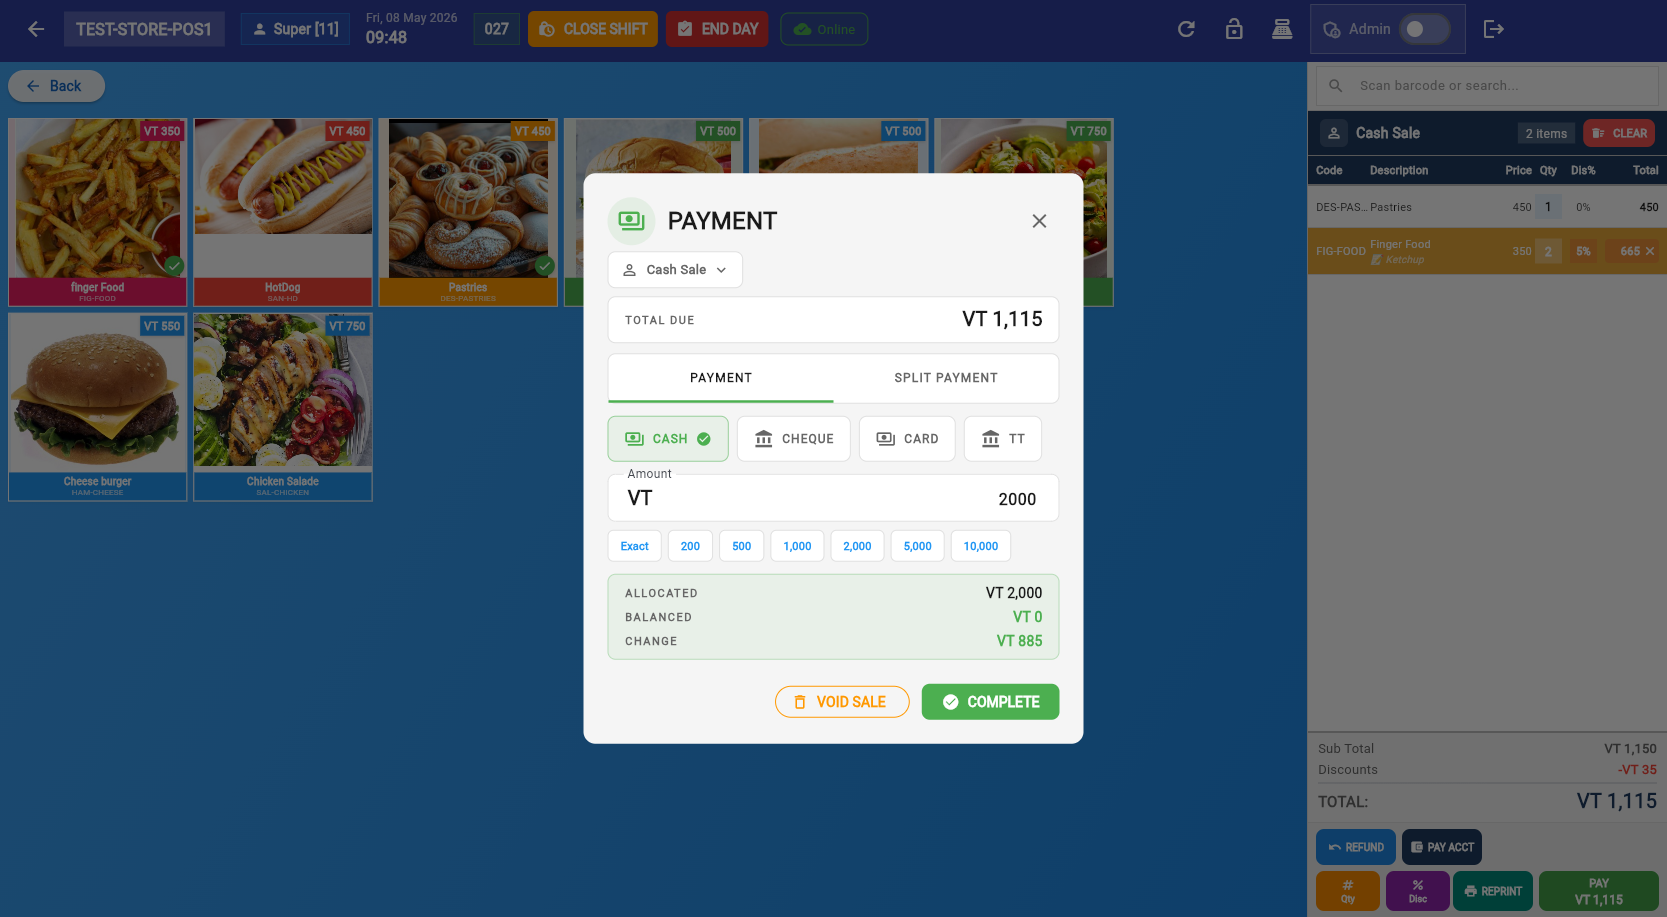
Tap Pay to open the payment dialog:
Payment Features
Optionally link the sale to a customer. Search by name or create a new customer on the fly.
Cash, Card, Bank Transfer, Cheque, Mobile Payment — configured in Settings → Payments.
Combine multiple payment methods for one sale. Add amounts until balance reaches zero.
Cancel the sale. Records it as a voided invoice (status: "voided", amount: 0) with all original products visible — used to track staff cancellations.
Split Payment
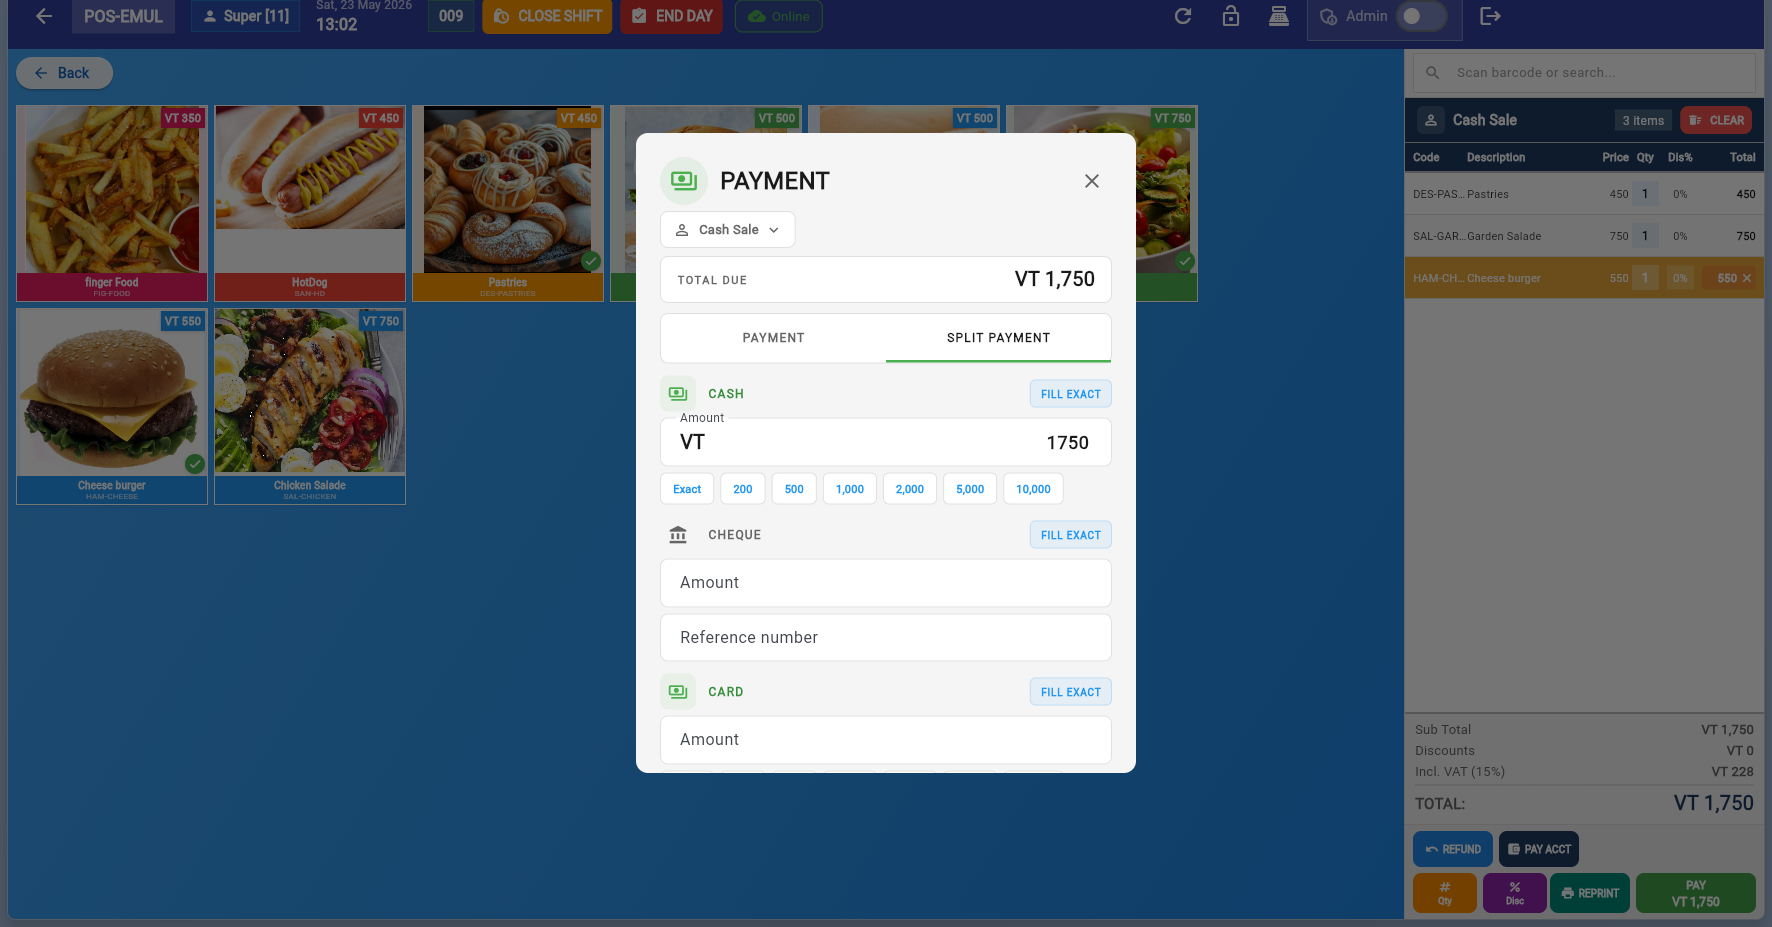
Split payment lets you divide the total across multiple payment methods. Add each method with its amount — the remaining balance updates in real time. When the balance reaches zero, you can complete the payment.
The POS top bar and cart panel provide quick access to all common actions. Here's what each button does:
Top Bar Buttons
Reloads products and syncs pending offline data with the server. Use when products were updated in back office and need to appear on the POS.
Locks the POS screen. No sales or actions can be performed while locked. Requires re-authentication (POS ID + PIN) to unlock. Use when stepping away briefly.
Opens the physical cash drawer connected to the receipt printer. Disabled when POS is locked.
Switches admin mode on/off. Enables grid editing, price changes, and access to the admin menu (⋯).
Signs out the current cashier and returns to the login screen.
Returns to the back office (admin only — hidden for cashiers).
Cart Panel Buttons
Empties the entire cart. Only visible when items are in the cart.
Opens the discount dialog for an individual cart item. Enter a percentage to apply.
Opens the payment dialog to complete the sale. Only active when items are in the cart.
Reprints the last receipt. Useful when the customer requests a copy or the printer jammed.
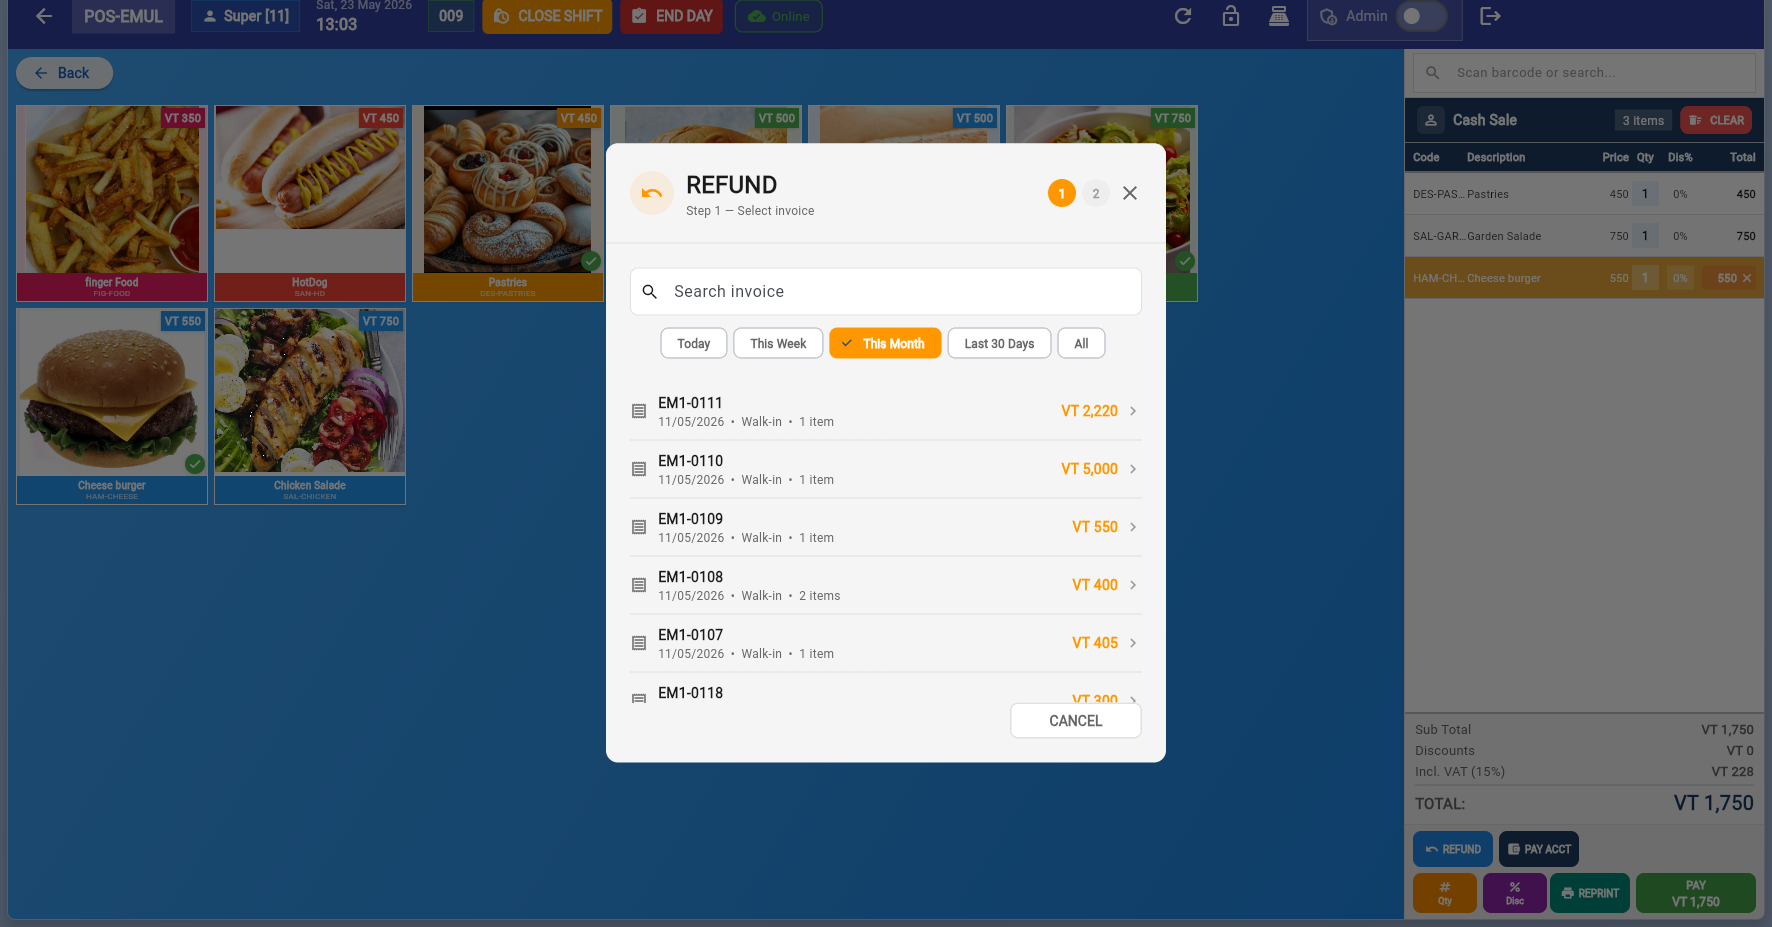
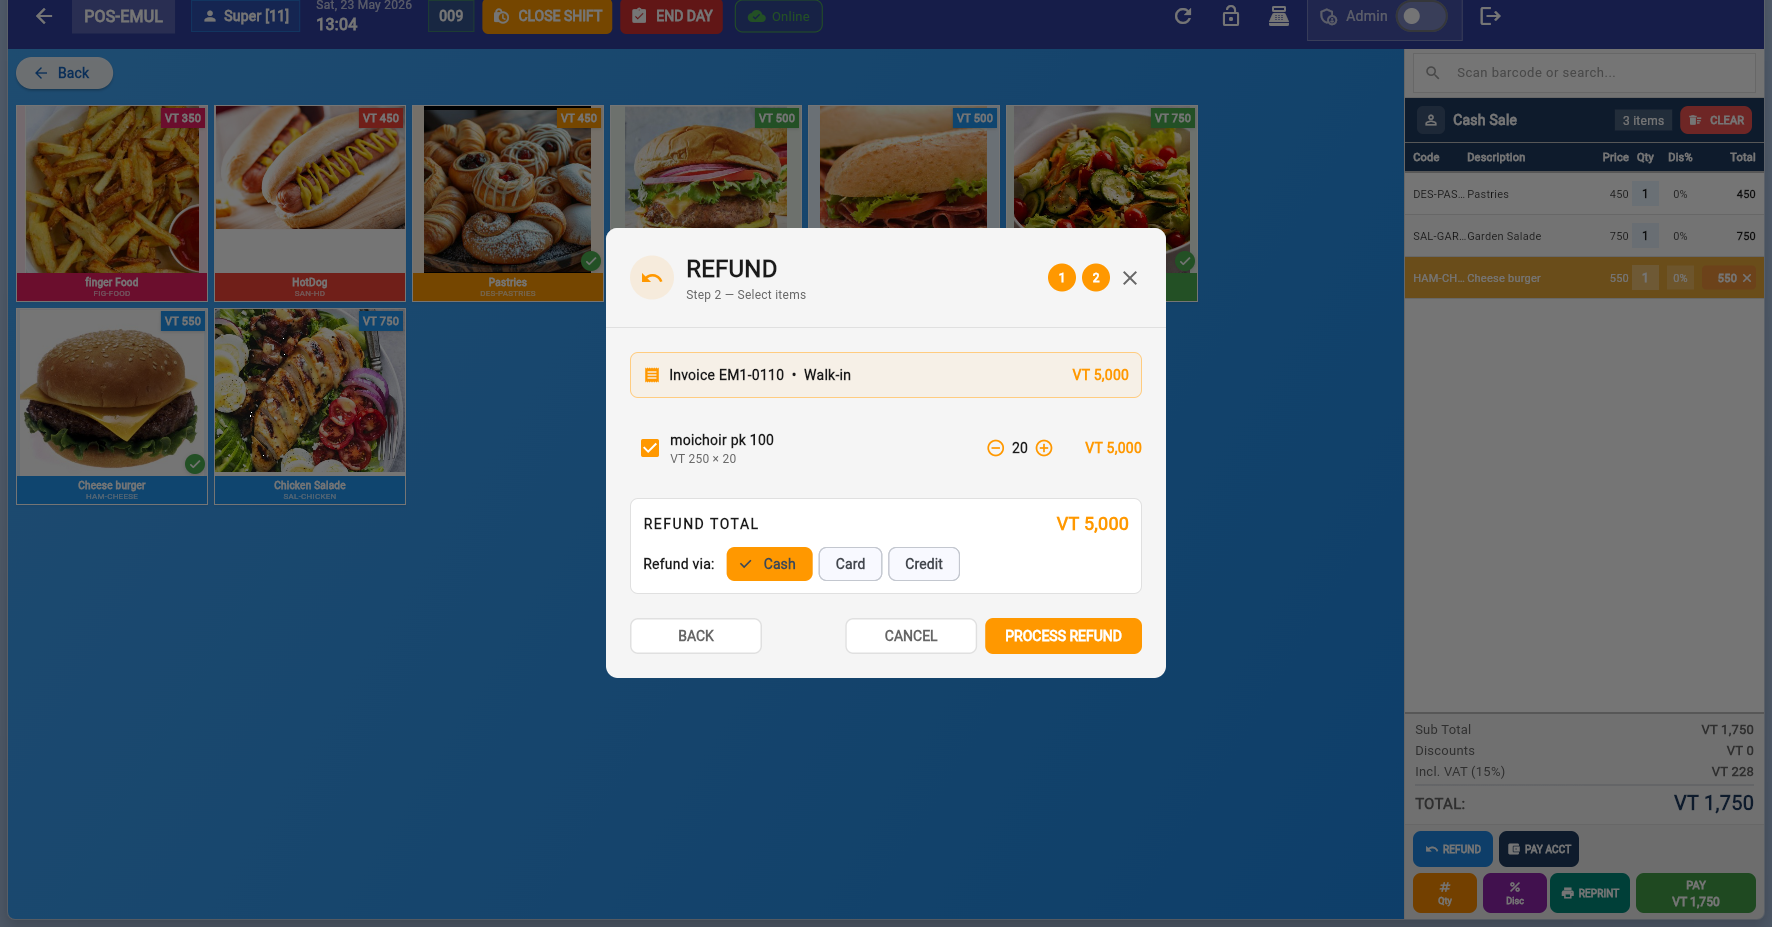
Opens the refund dialog to process a return. Search for a past invoice and select items to refund. A Reference Number linking to the original SDC Invoice Number is mandatory for all refunds.
Opens a dialog to record a payment against a customer's outstanding account balance (on-account sales).
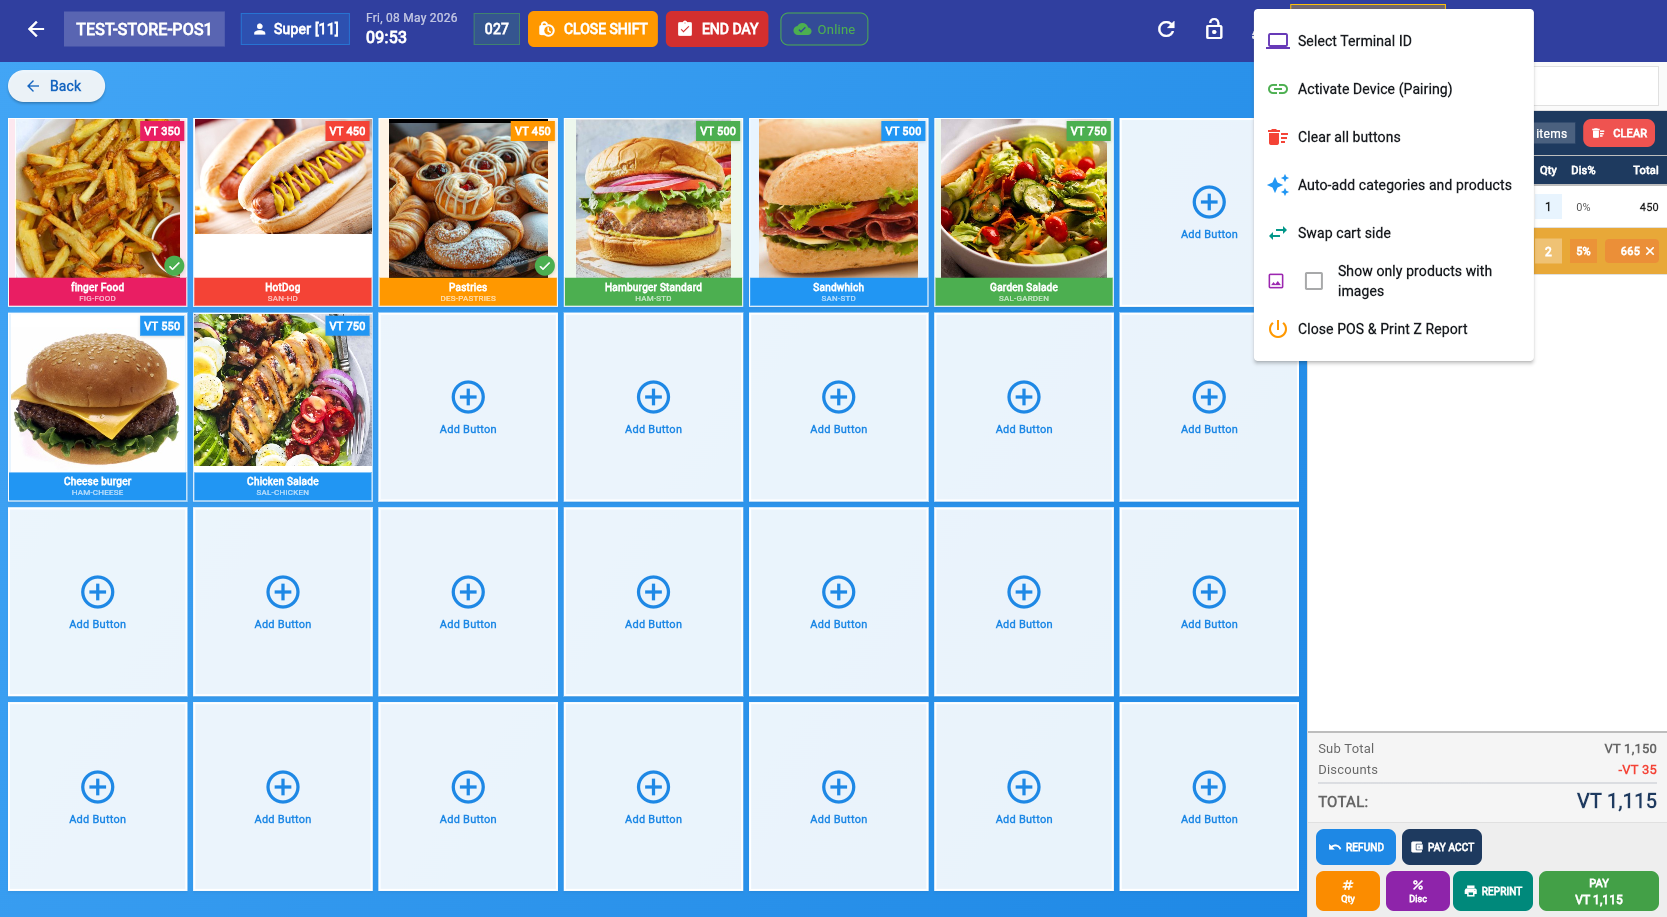
Admin Menu (⋯)
Only visible when Admin mode is toggled on. Additional options:
Switch to a different POS terminal without signing out.
Enter a pairing code to link this device to a terminal.
Removes all shortcut buttons from the current grid page. Use before reorganizing.
Automatically populates the grid with categories and products from your inventory.
Moves the cart panel from right to left (or vice versa).
Filters the product grid to show only products that have an image assigned.
Closes the POS screen and prints the Z-Report in one action. Used at end of day.
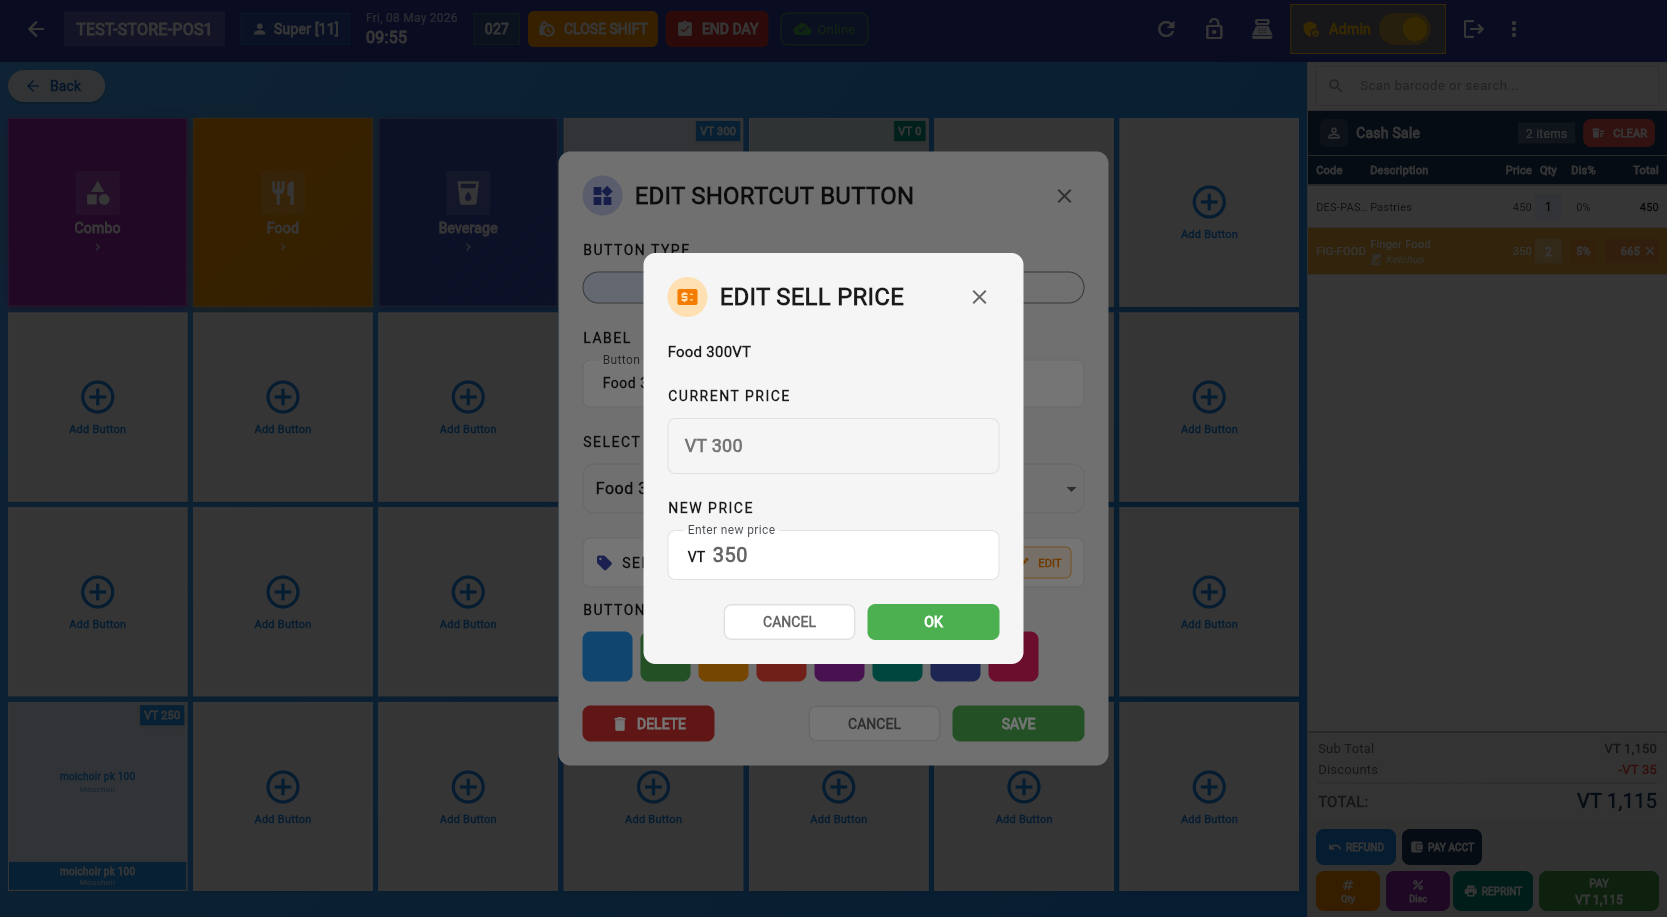
Toggle the Admin switch in the top bar to enter supervisor mode. This enables grid editing and administrative actions directly from the POS screen.
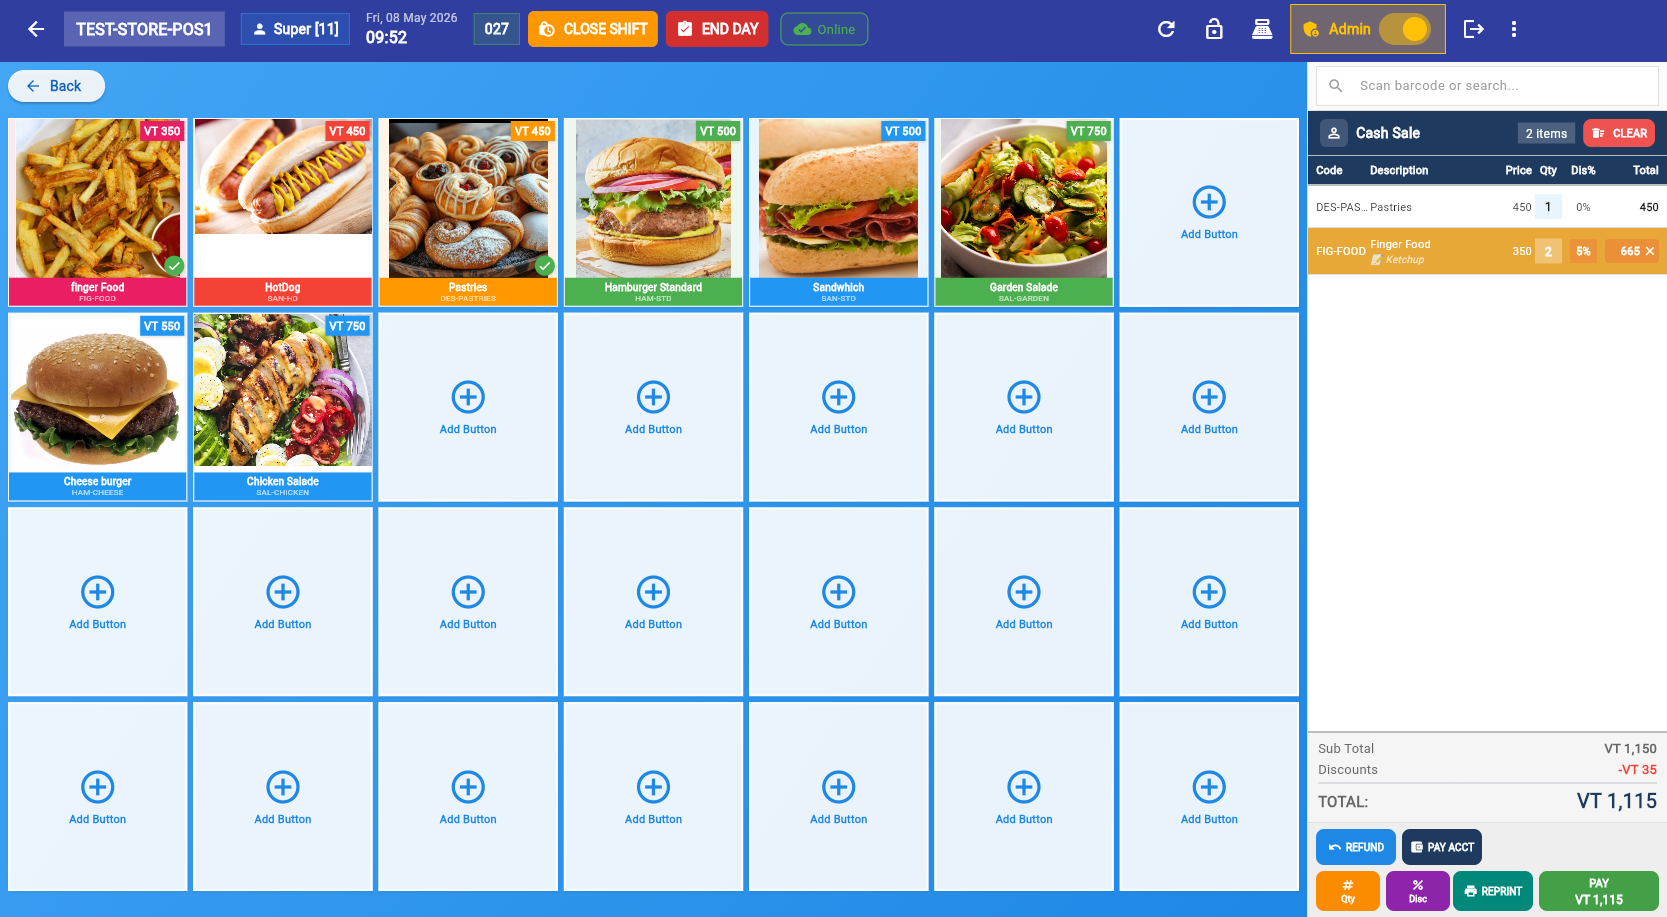
Admin Menu
Edit Shortcut Button
Edit Sell Price
Close Shift
Shift Closed
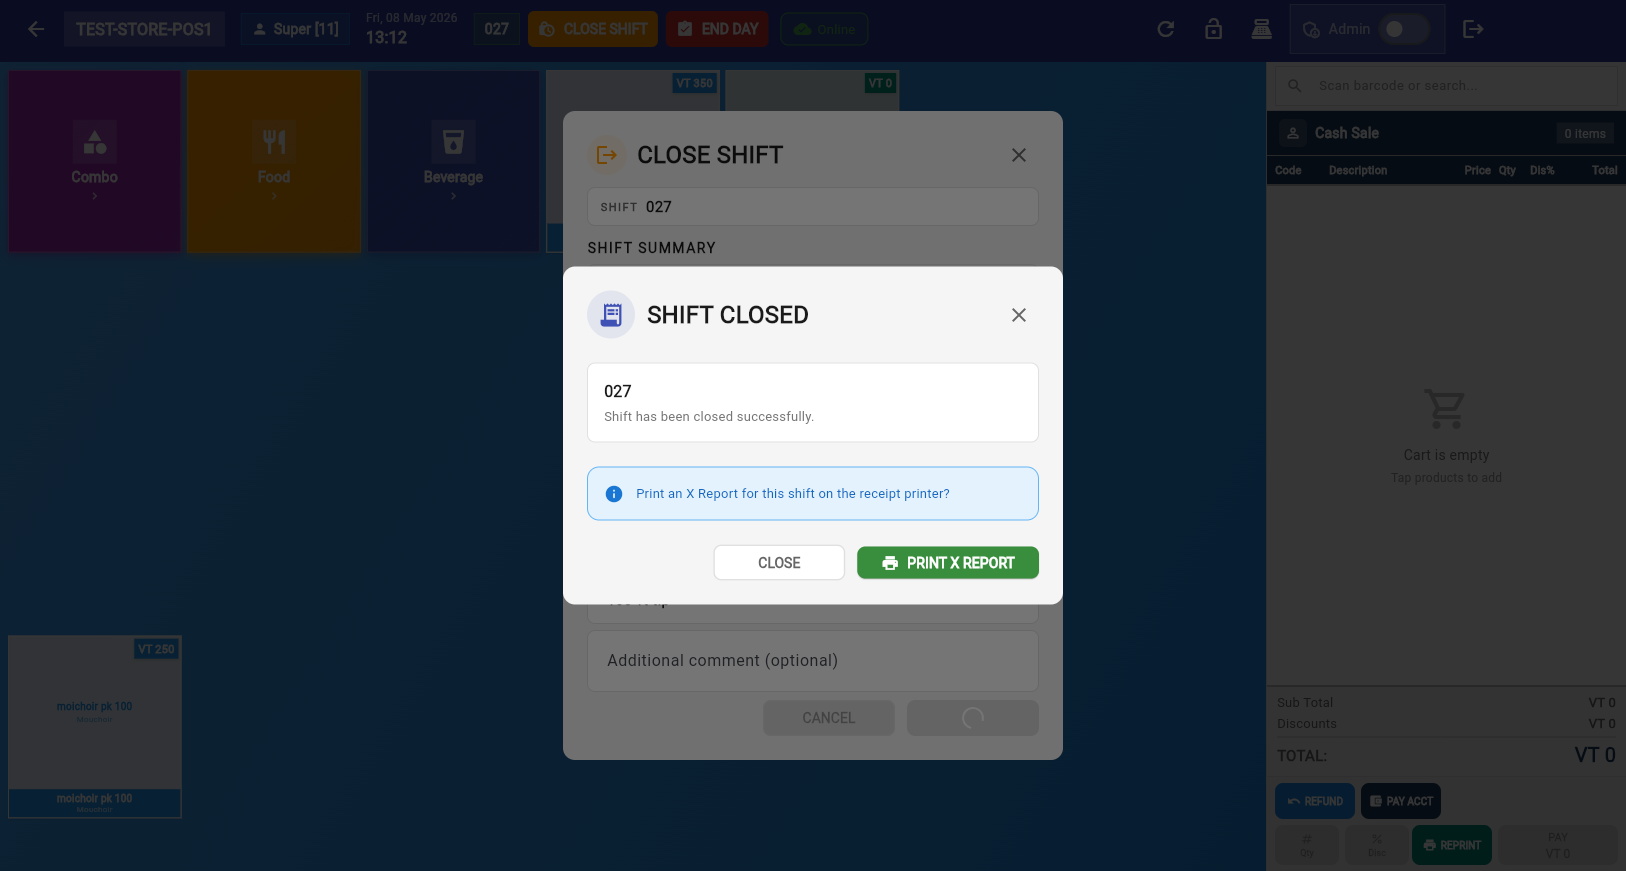
After closing a shift, you can print an X-Report — a summary of sales during that shift without closing the fiscal period.
Post-Shift Options
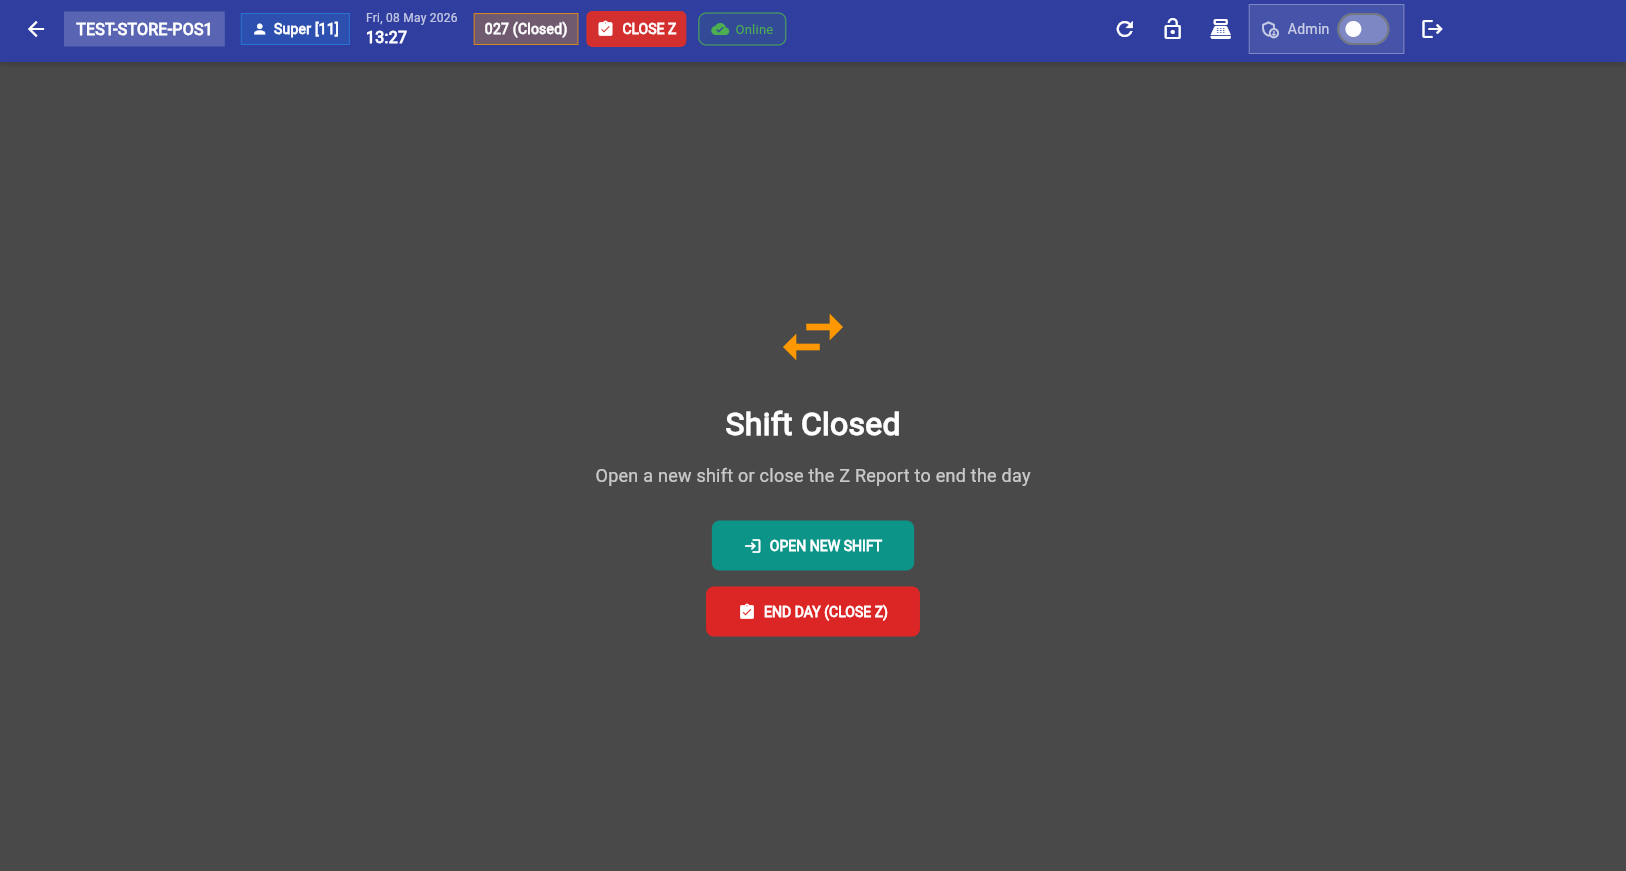
Start a new cashier shift. The fiscal period remains open — sales continue accumulating for the Z-Report.
Run the Z-Report and close the fiscal period. This is typically done at the end of the business day.
Z-Report (Fiscal Close)
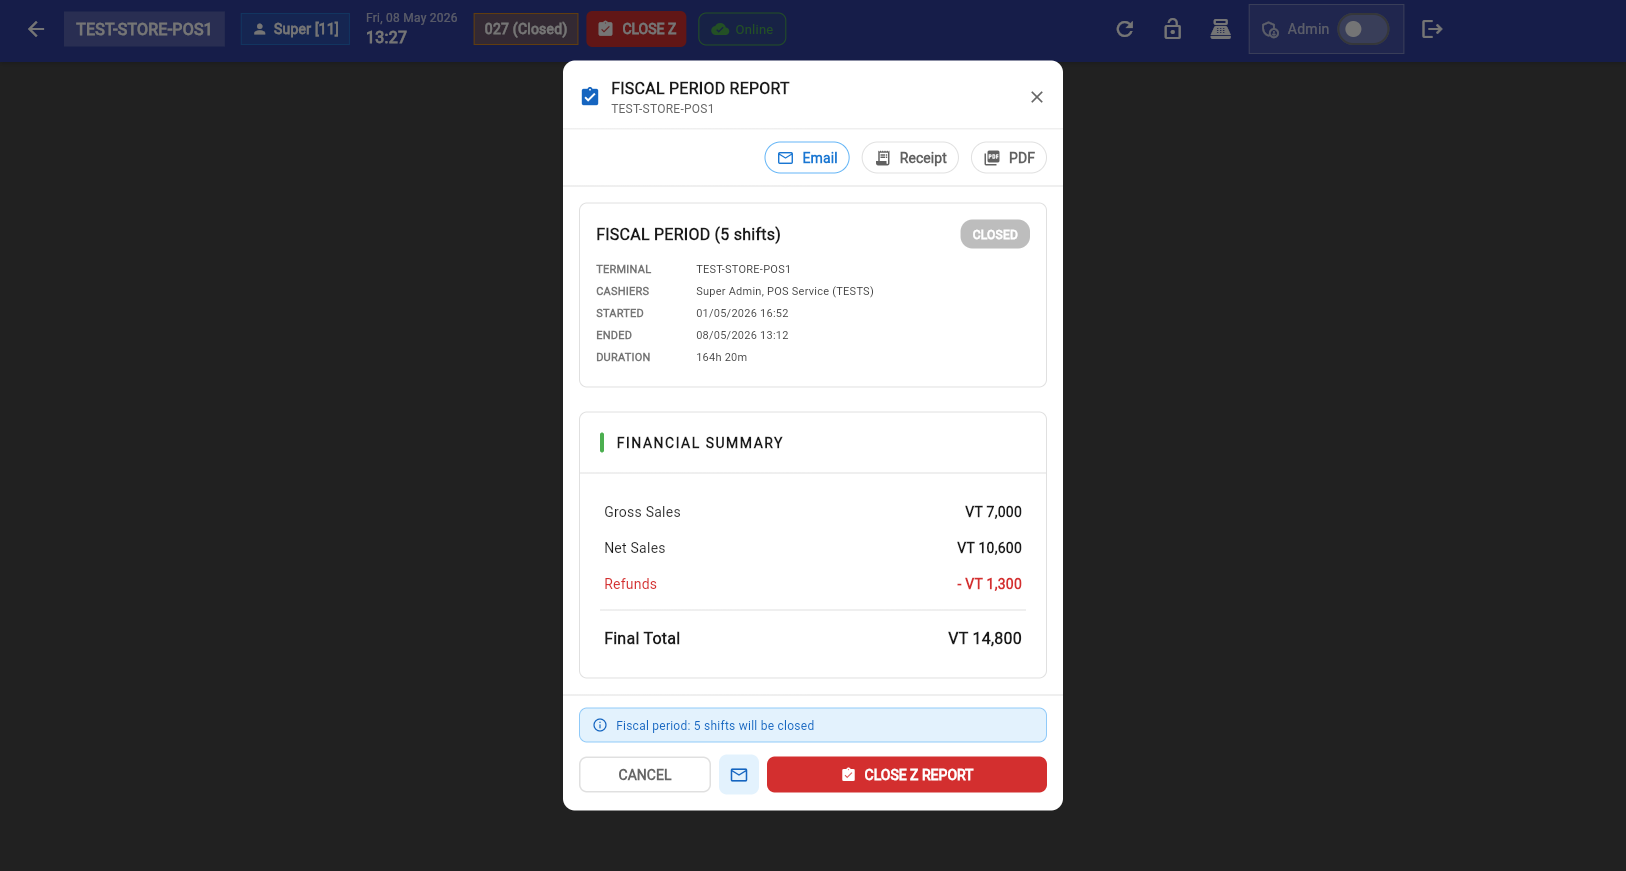
The Z-Report shows the complete financial summary for the fiscal period: total sales, tax collected, payment method breakdowns, cash variance, and discounts. Click Close Z Report to finalize.
Stock Sales Report
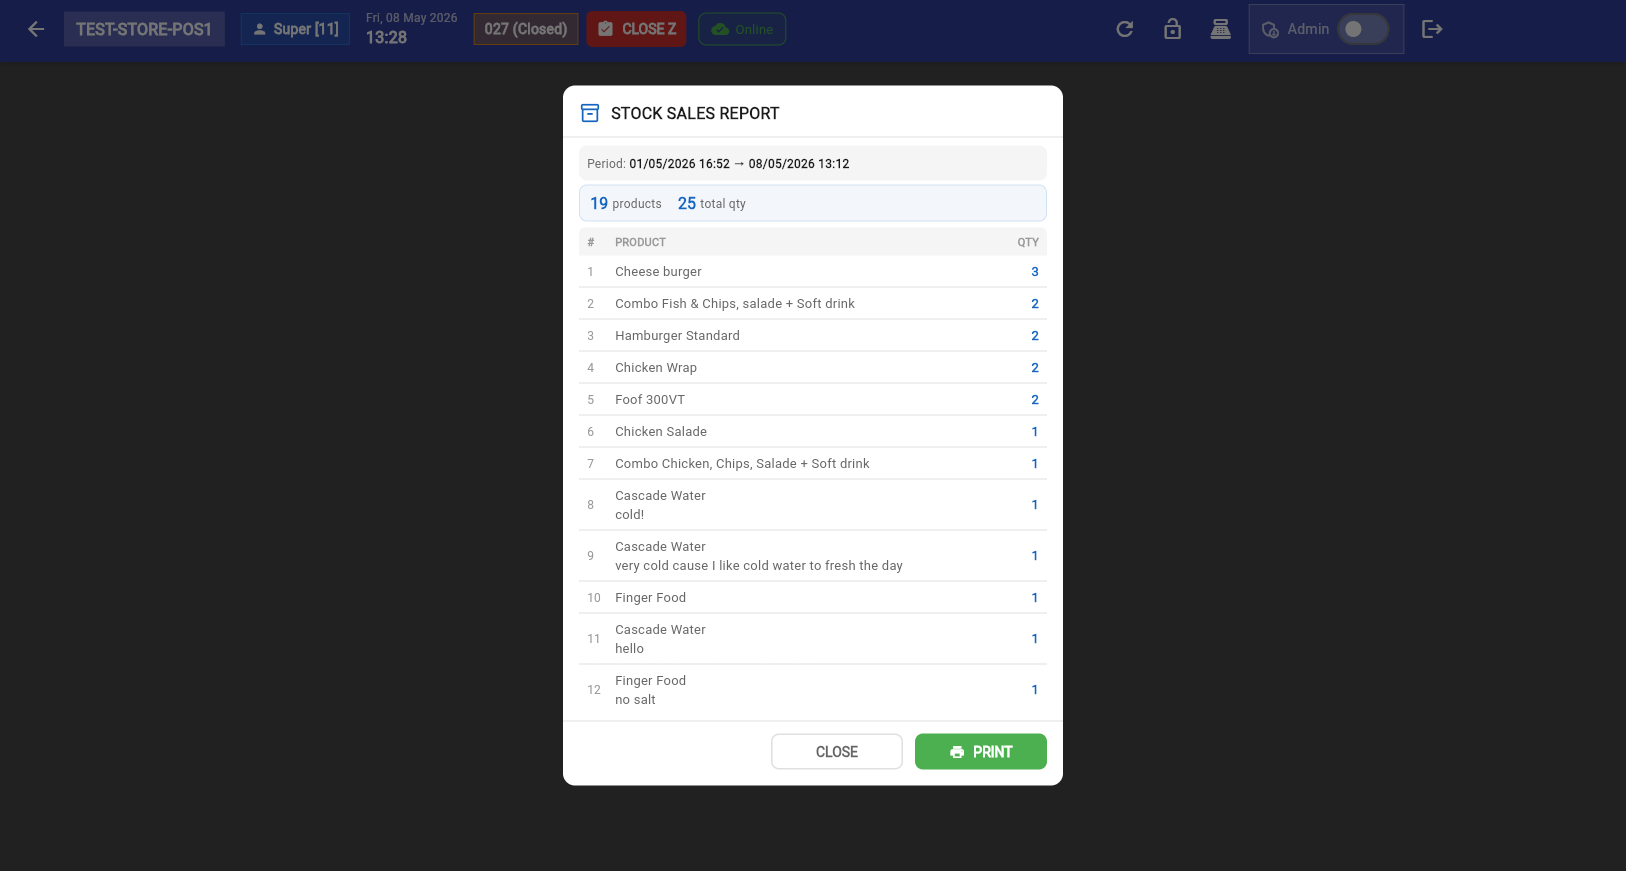
After closing the Z-Report, the Stock Sales Report shows exactly which products were sold and in what quantities — useful for inventory reconciliation.
Tap the Refund button in the cart panel to process a return. The refund dialog shows past invoices — select the original invoice, then choose items to refund. A Reference Number (the original SDC Invoice Number) is mandatory for all refund transactions.
Navigate to Settings → Printers to manage receipt and order printers:
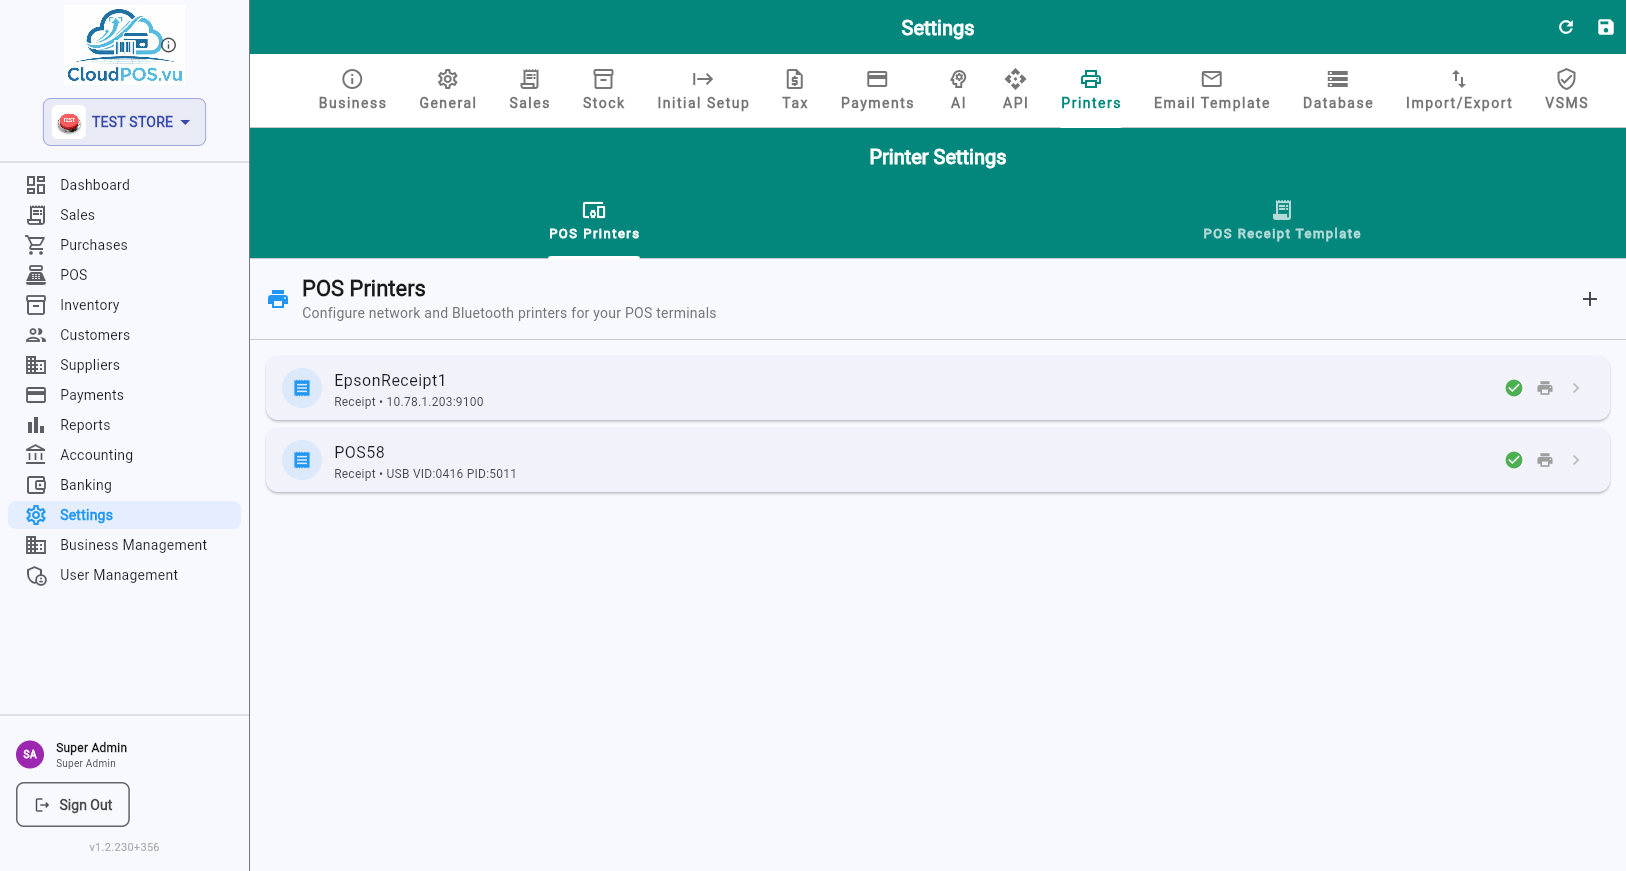
Add Printer
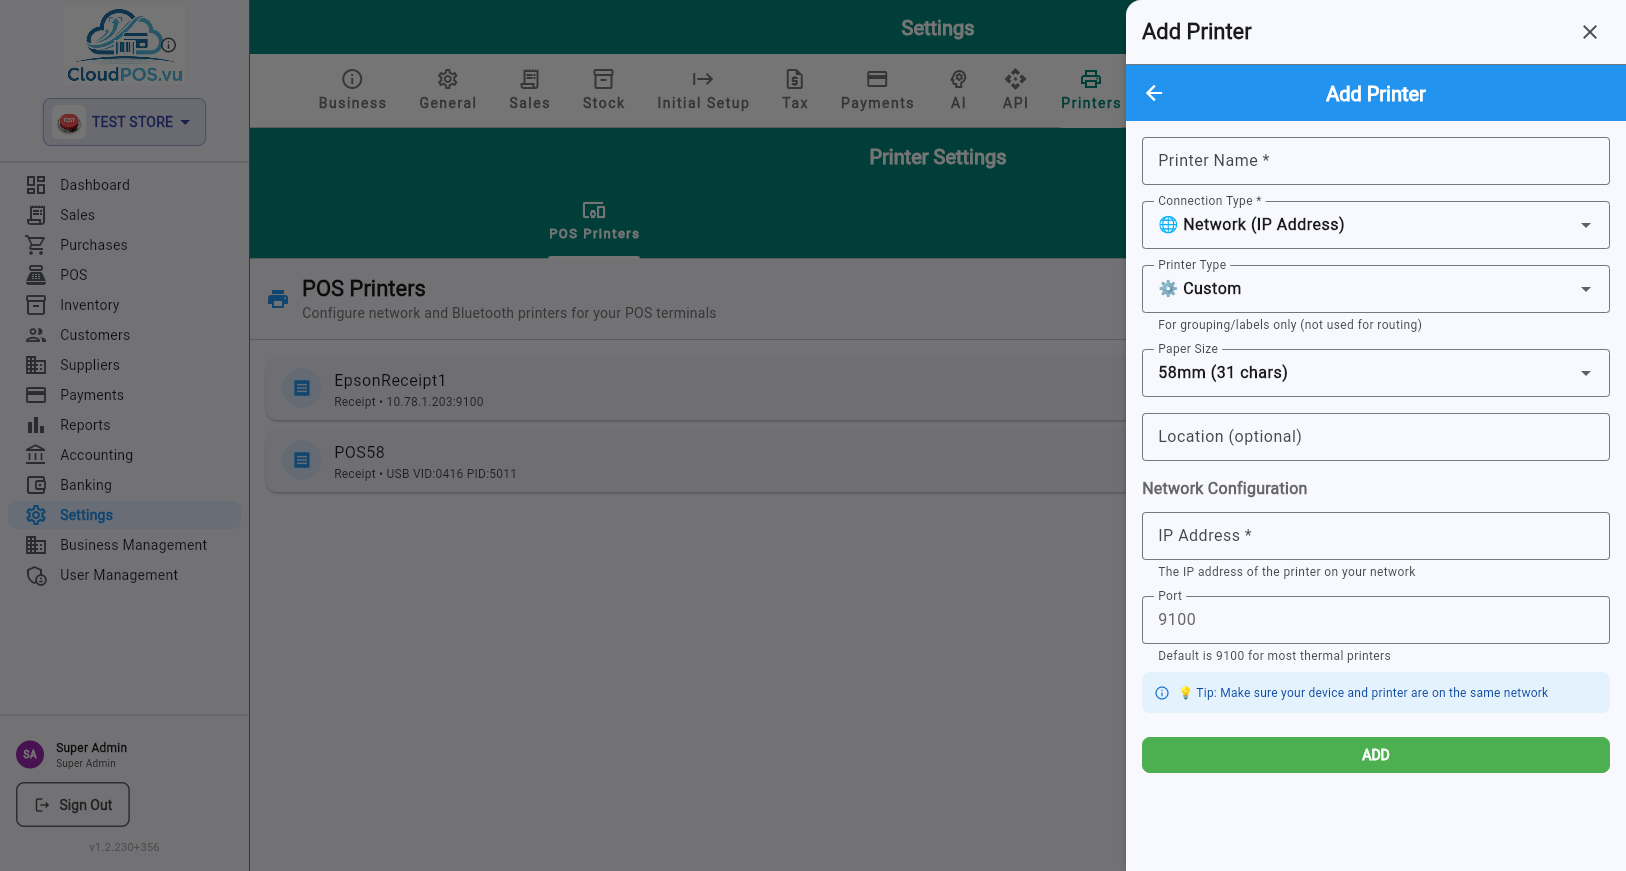
Printer Configuration
Display name (e.g., "Main Receipt", "Kitchen Ticket").
Network (IP/port), Bluetooth (MAC address), or USB (Vendor/Product ID).
Printer protocol — Custom, Epson, Star, etc.
58mm or 80mm — must match the physical printer.
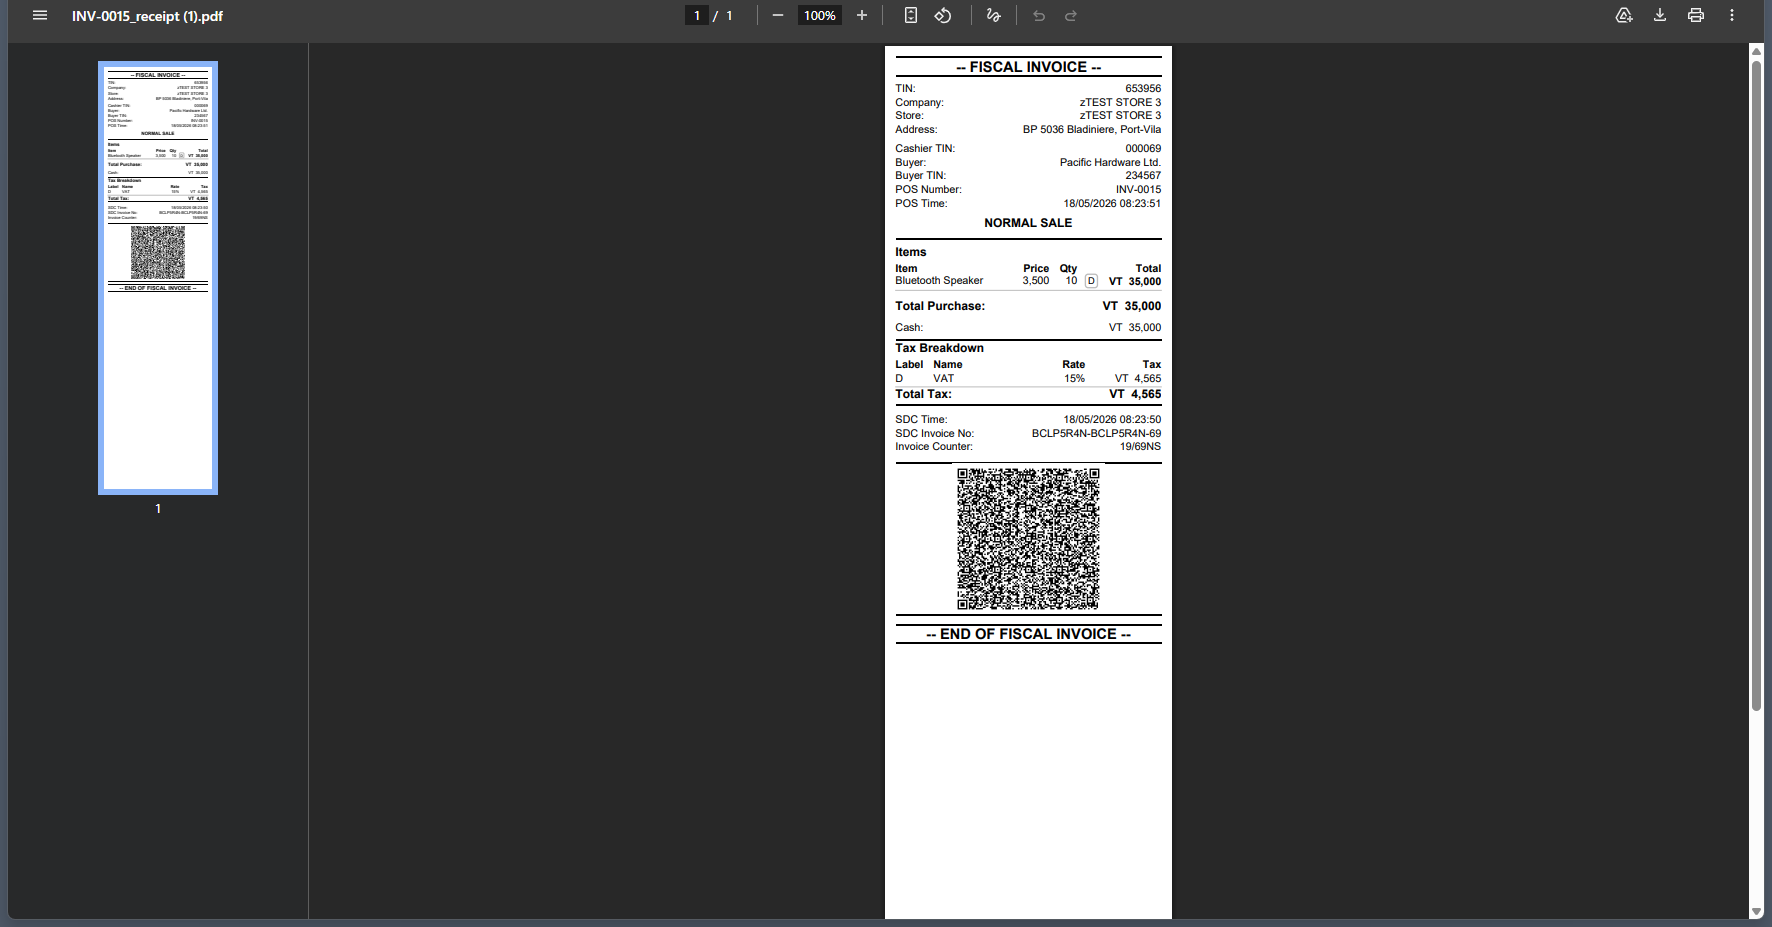
Every completed sale is fiscalized through the SDC and can be issued in printed or electronic form:
Printed directly on the connected receipt printer (58mm or 80mm). Includes SDC header (TIN, Company, Store, Address, District), items with tax labels, tax breakdown, QR code, and SDC metadata.
Full-page fiscal receipt PDF with all SDC data, QR code, and tax labels. Available from the invoice action menu → "Receipt PDF".
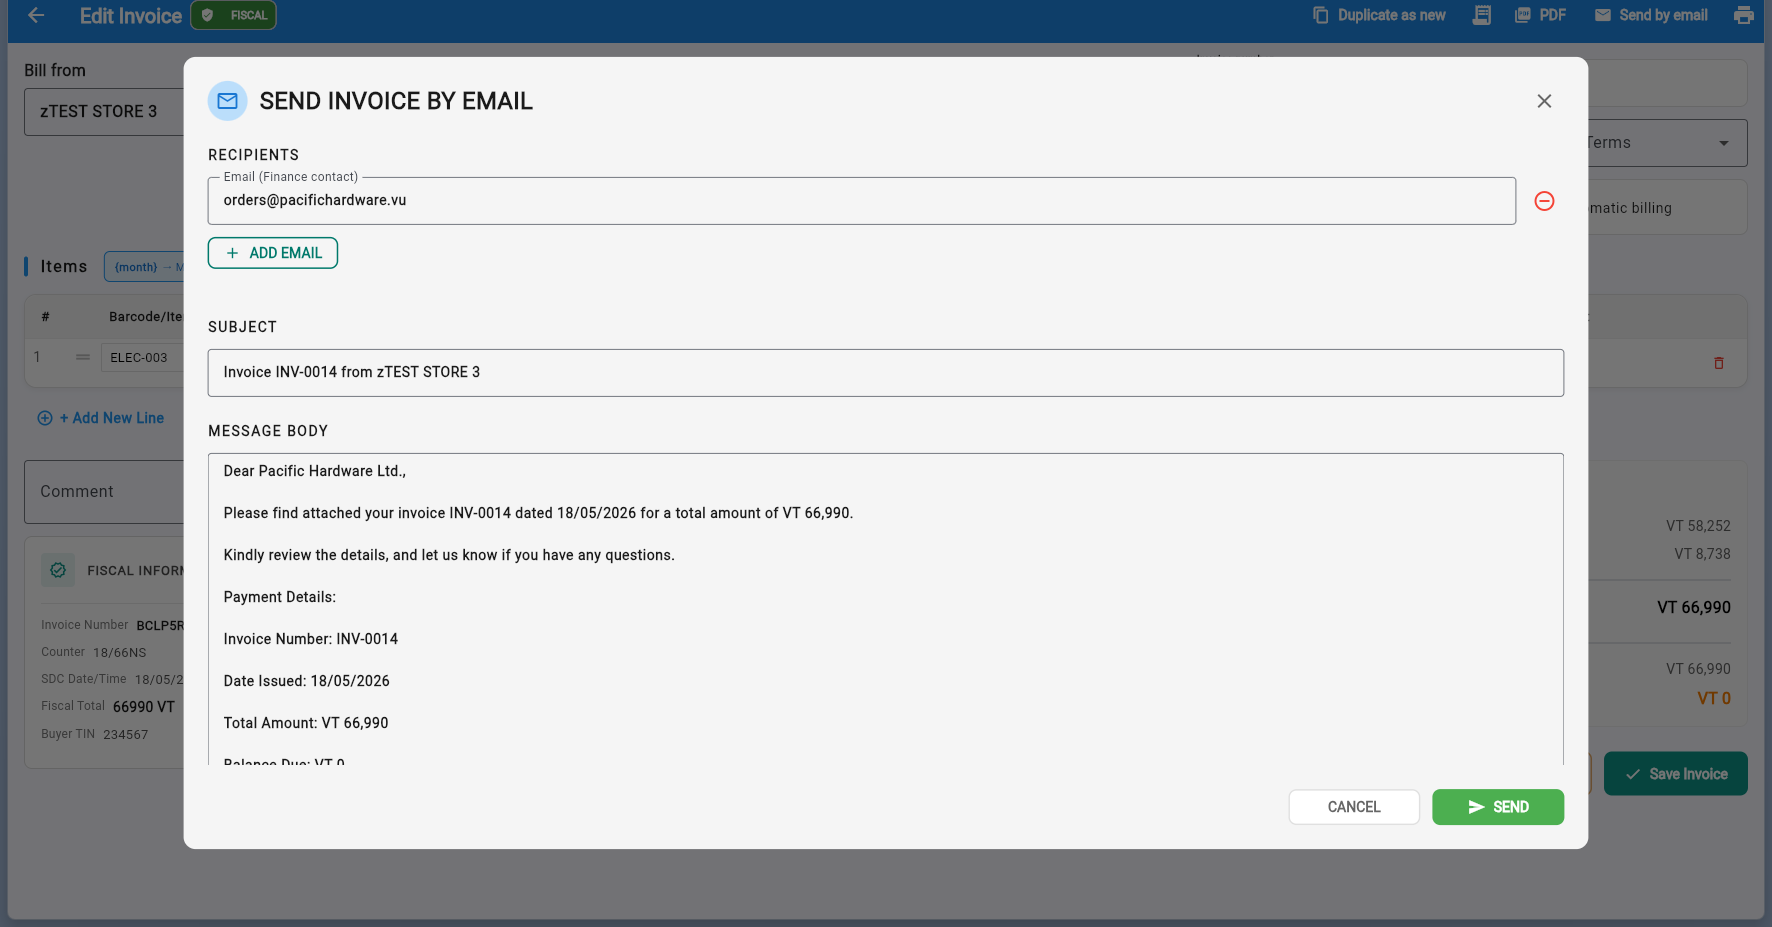
Send the fiscal invoice as a PDF attachment via email. Includes a clickable "SDC Invoice Verification" hyperlink, replacing the QR code for electronic delivery per TaxCore specification.
Print a verified copy with SDC data via "Print Copy (SDC)" in the action menu. Requires the original SDC Invoice Number as reference.
The POS Sessions tab in POS Management shows every cashier shift across all terminals — open and closed — with cash-drawer figures and variances.
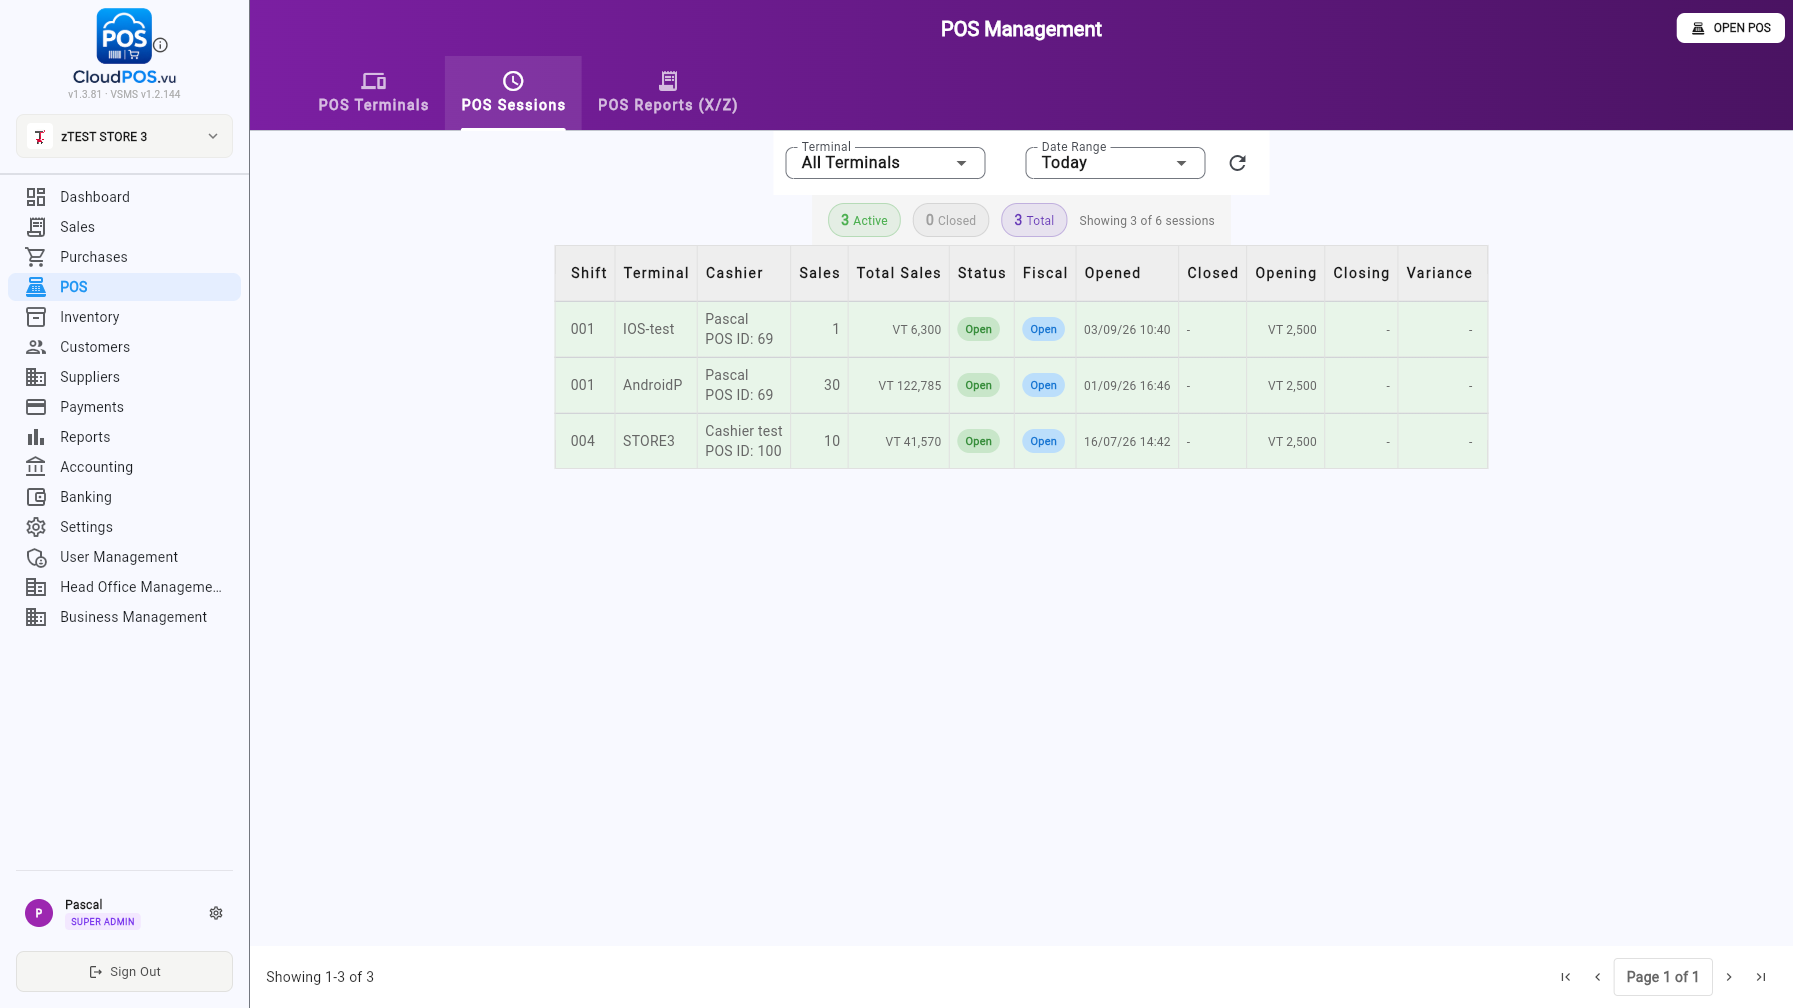
Filter by terminal and date range (Today by default). Chips at the top show how many sessions are Active, Closed and the Total. This is the fastest way to audit who opened a shift, when, and whether the counted cash matched.
The POS Reports (X/Z) tab lets the back office print an X-Report (mid-shift snapshot) or review the Z-Report (end-of-day fiscal close) for any terminal — without walking to the device.
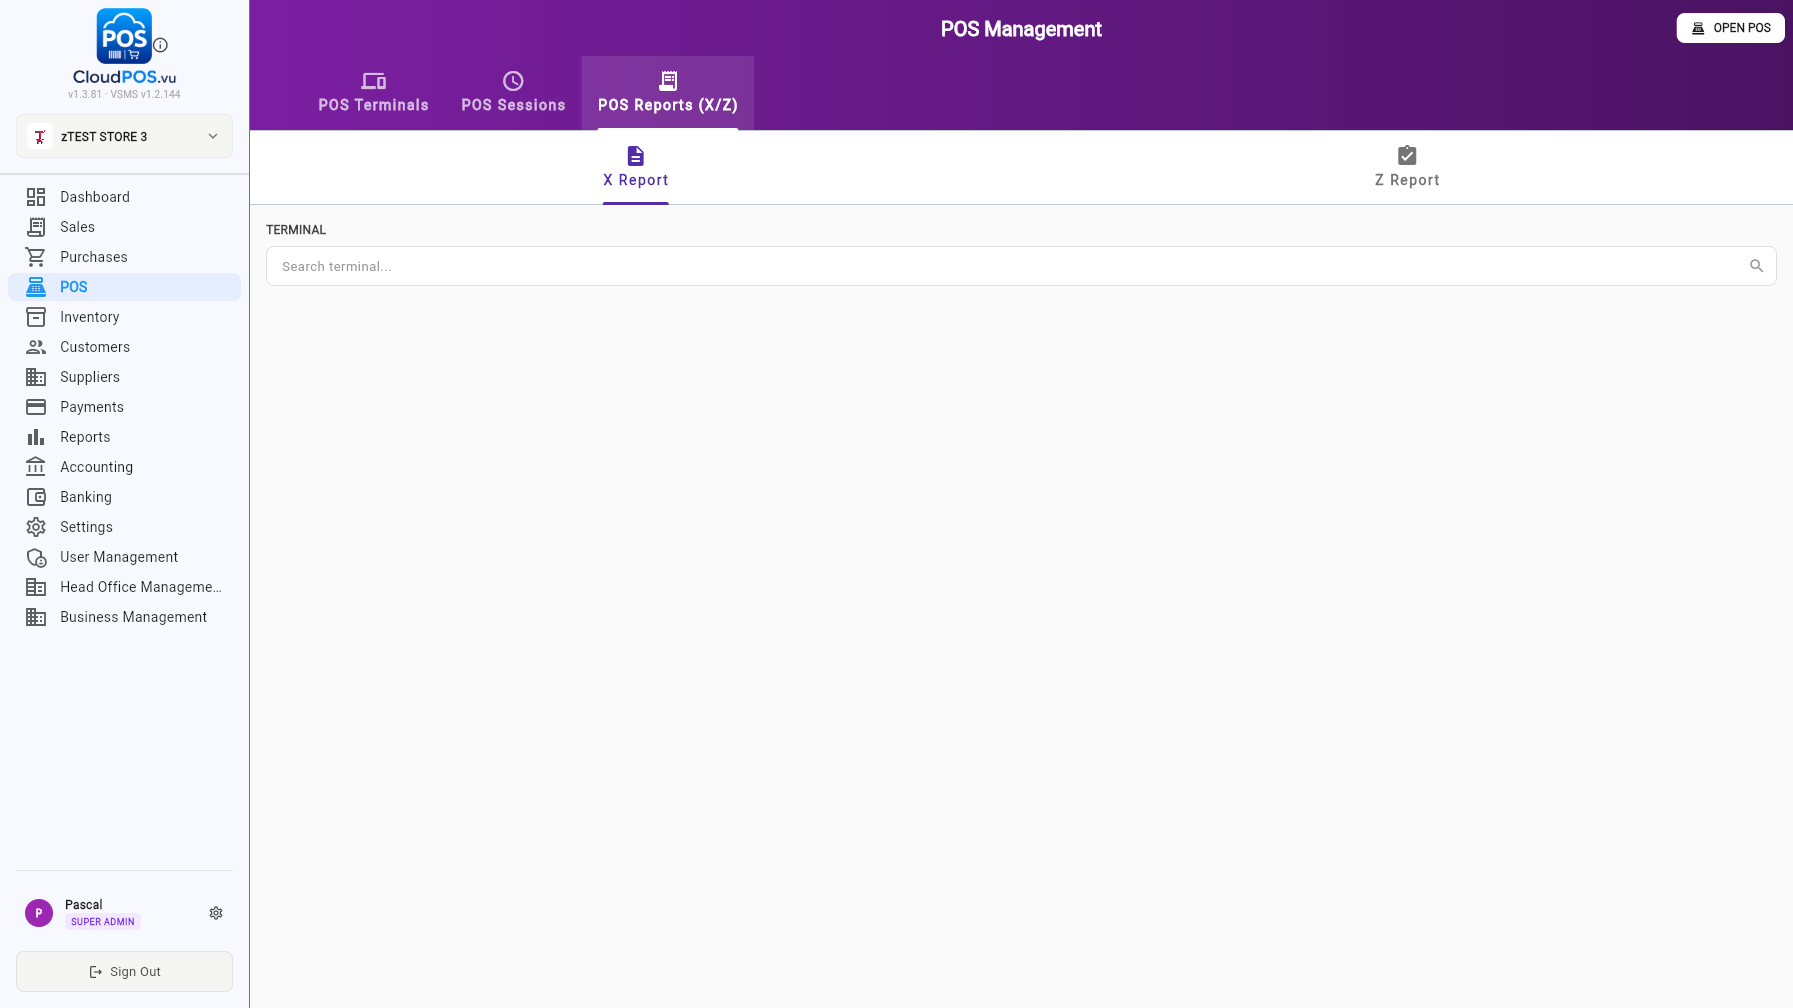
Shift & Day Close
Shifts, X-Report, Z-Report and end of day
One cashier's working session. A cashier opens a shift, processes sales, then closes it. Multiple shifts can run in one day.
Spans one or more shifts. Closed by running the Z-Report (End Day). A new fiscal period opens with the next shift automatically.
When a cashier logs in and no shift is open on the terminal, the Open Shift dialog appears automatically.
Steps
Count the cash in the drawer at the start of your shift.
Enter the amount in the Opening Cash field.
Click OPEN SHIFT — the shift is now active and you can start selling.
After opening, the POS selling screen is ready to use. The shift status badge on the terminal card changes to SHIFT OPEN.
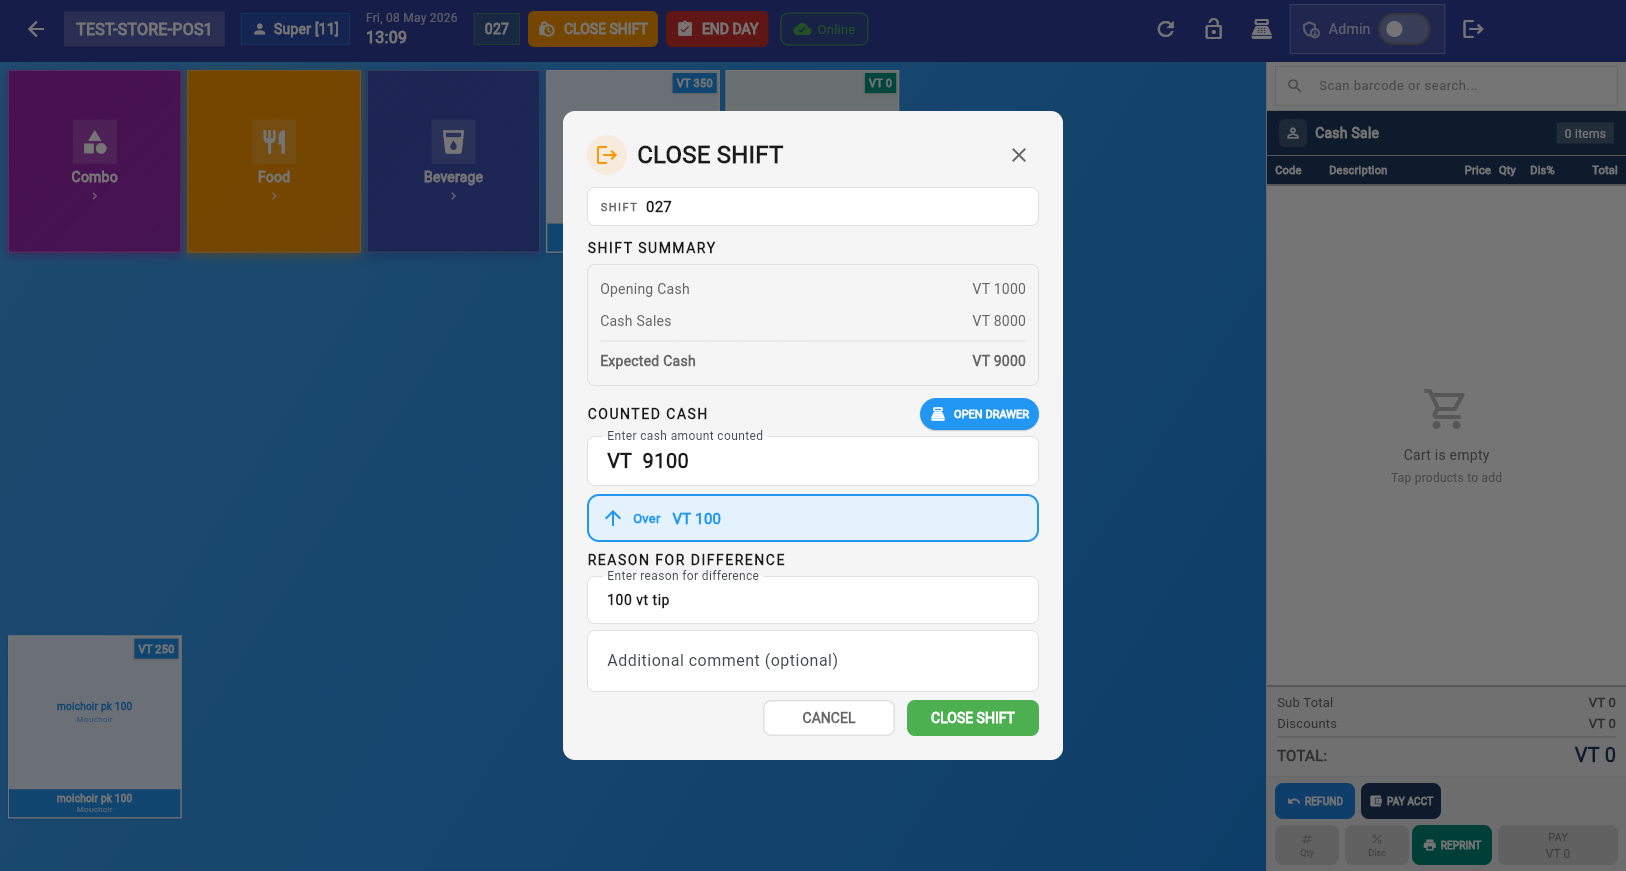
When the cashier finishes their session, click Close Shift in the POS top bar.
Steps
Count the cash in the till.
Enter the counted amount in the dialog. The difference (vs expected cash) is calculated automatically.
If there is a difference, provide a reason (required when cash doesn't match).
Click CLOSE SHIFT to end the shift.
After closing, you can print the X-Report — a summary of the shift's sales without closing the fiscal period.
After closing a shift, the POS shows two options:
Start a new cashier shift. The fiscal period remains open. Choose this when another cashier is taking over, or when you're continuing sales.
Run the Z-Report and close the fiscal period. Choose this at the end of the business day when all sales are done.
Click End Day to open the Fiscal Period Report (Z-Report). This is the final report of the day.
What the Z-Report Shows
Gross sales for the entire fiscal period (all shifts combined).
VAT breakdown by rate — needed for VAT returns.
Total per payment method: cash, card, bank transfer, etc.
Expected cash vs actual cash — based on opening cash, sales, and closing cash.
Steps
Review the report — verify sales totals, tax, and payment breakdowns.
Click CLOSE Z REPORT to finalize the fiscal period.
Stock Sales Report
After closing the Z-Report, the Stock Sales Report appears showing exactly which products were sold and in what quantities:
Use this report to reconcile inventory and verify stock levels before the next business day.
Can I open multiple shifts in one day?
Yes. Each cashier opens and closes their own shift. The fiscal period spans all shifts until you run End Day.
What happens if I forget to close a shift?
A ⚠️ warning appears on the terminal card after 24 hours. The shift can still be closed normally. The next shift cannot open until the current one is closed.
Can I print the X-Report without closing the shift?
Yes. The X-Report can be printed at any time from Admin Mode. It shows current totals without closing anything.
What's the difference between X-Report and Z-Report?
Mid-day snapshot. Can be printed anytime. Does not close anything. Resets nothing.
End-of-day final report. Closes the fiscal period. Irreversible. Required for VAT reporting.
Do I need to close all shifts before running End Day?
Yes. All shifts must be closed before you can run the Z-Report. Close each cashier's shift first, then End Day.
Receipt & Order Printing
Printer connections, routing rules and real-world setups
CloudPOS prints two different kinds of tickets, configured in different places:
| Customer receipt | Order chit (kitchen/bar) | |
|---|---|---|
| What | The fiscal/sales receipt handed to the customer at payment. | A short preparation ticket (items + quantities + notes) for kitchen or bar staff. |
| Printed on | The terminal's Receipt Printer — assigned per POS in POS Management. | The printer assigned to each product ("On-order printer"), constrained by the terminal's Order Printers list. |
| When | At payment (and reprints / fiscal copies). | At payment, and for restaurant held orders (ORDER / ADD-ON chits). |
All printers of the business live here. Each row shows its name and connection: USB (Vendor/Product ID), Network (IP : port) or CloudPOS Print Proxy.
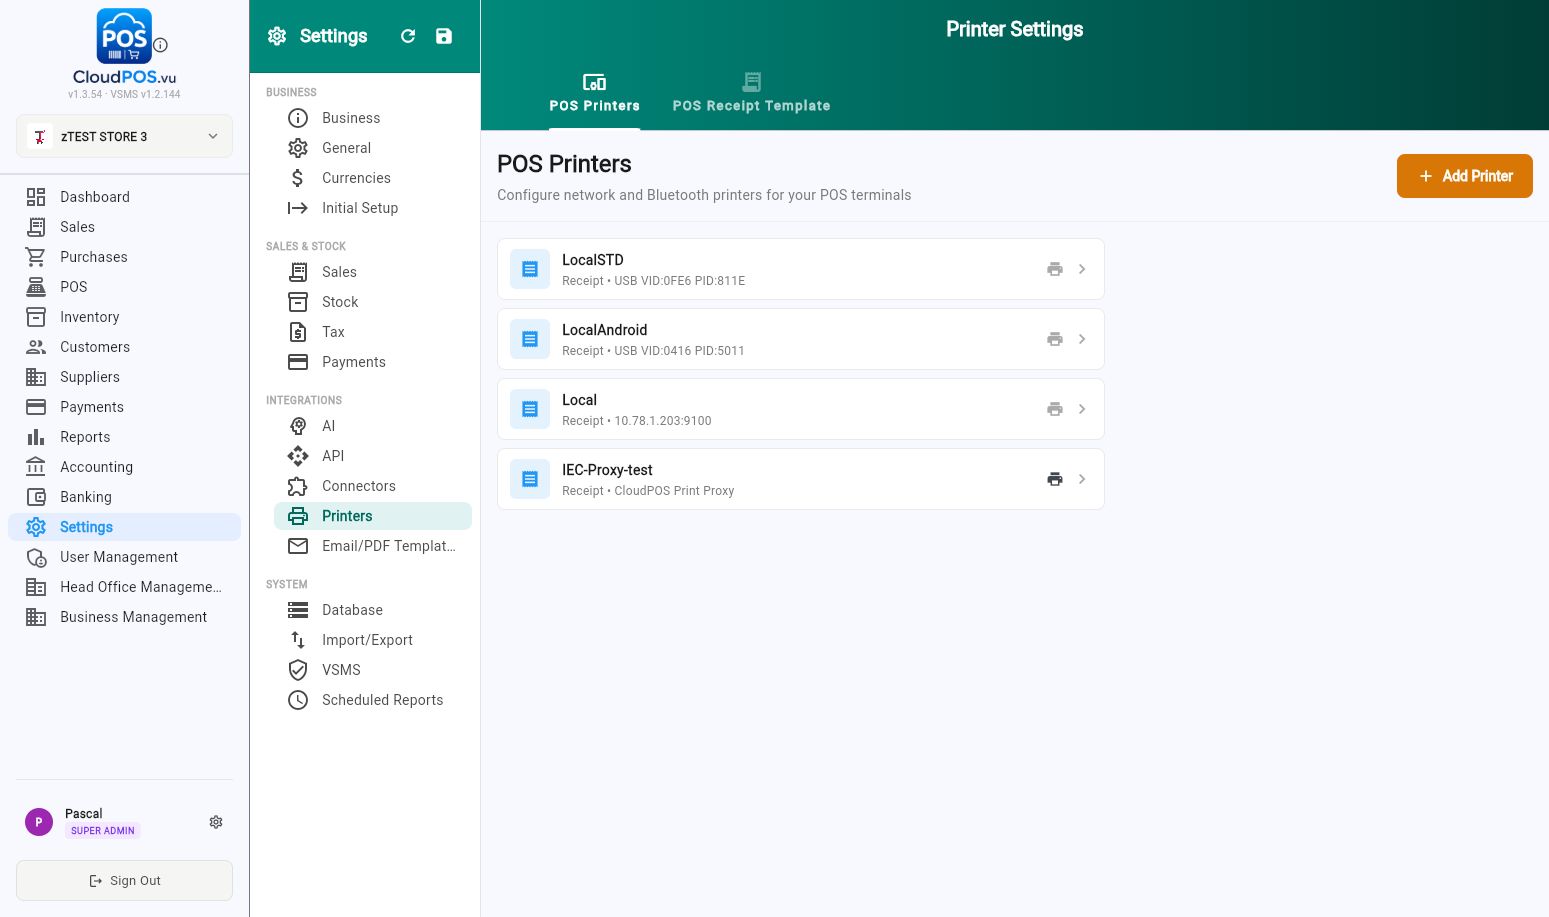
Use + Add Printer to register a new one:
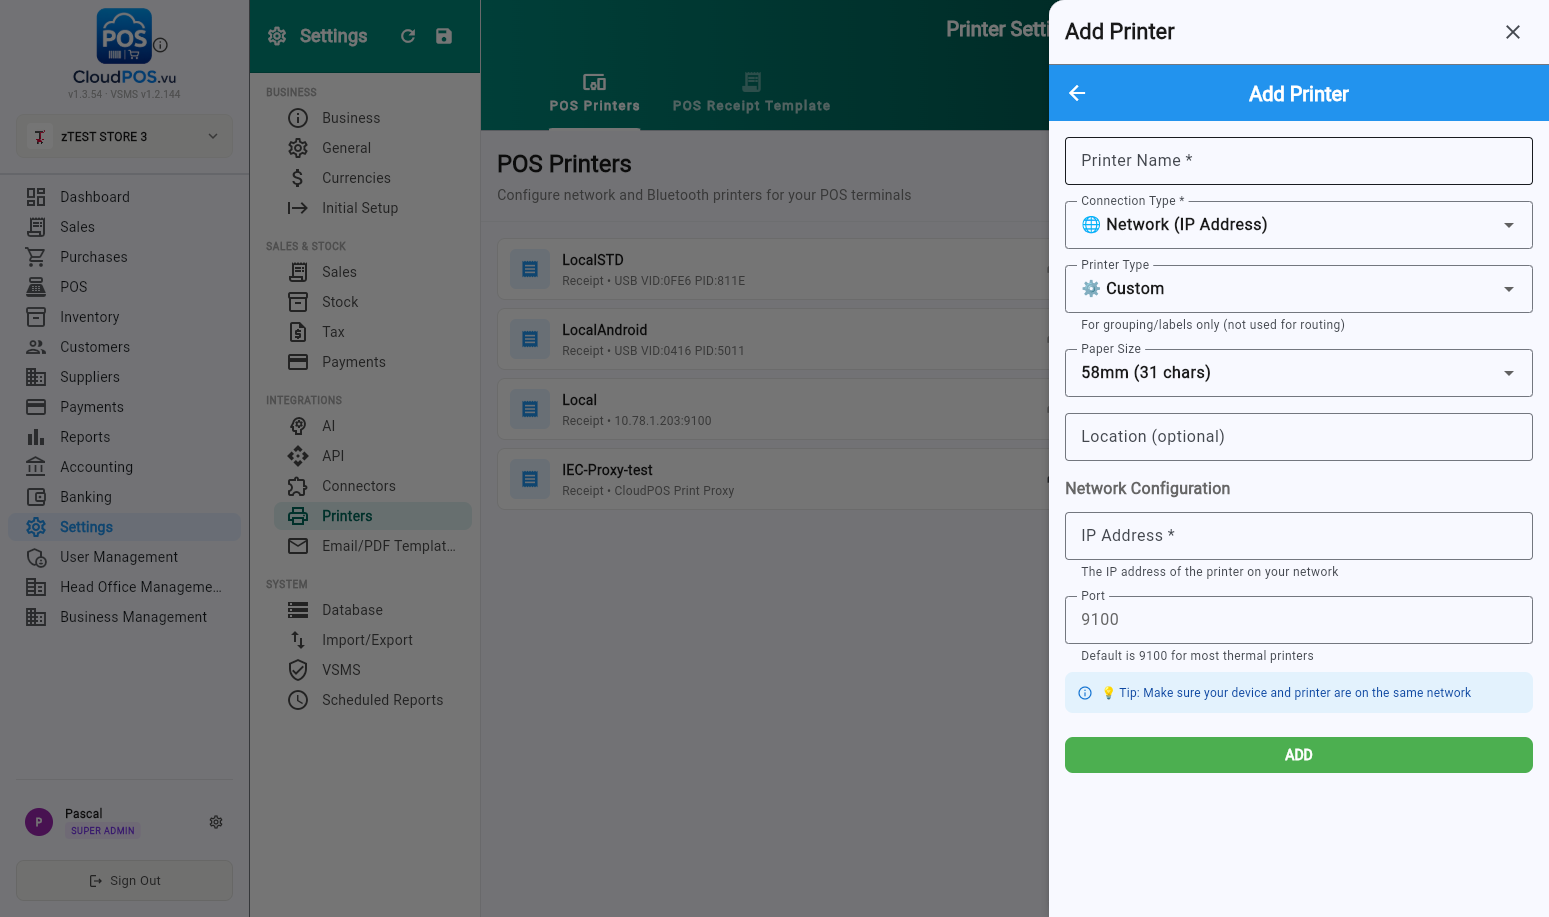
Connection types
| Type | Use it when | Notes |
|---|---|---|
| Network (IP Address) | The printer is a WiFi/Ethernet thermal printer on the same network as the POS device. | Port is almost always 9100. Recommended type for kitchen/bar printers shared between POS. |
| USB (for desktop/mobile app) | The printer is plugged into the POS device itself. | On the web version no device fields are needed — printing goes through the CloudPOS Print Proxy, which uses the printer selected in its own config page. |
| CloudPOS Print Proxy | Web POS printing to a printer attached to (or reachable from) the PC running the local proxy app. | The proxy token must equal the terminal name. |
Editing a printer
Click a row to edit it. Network printers expose their IP/port; USB printers on the web show the "USB via printing proxy" notice instead of device fields:
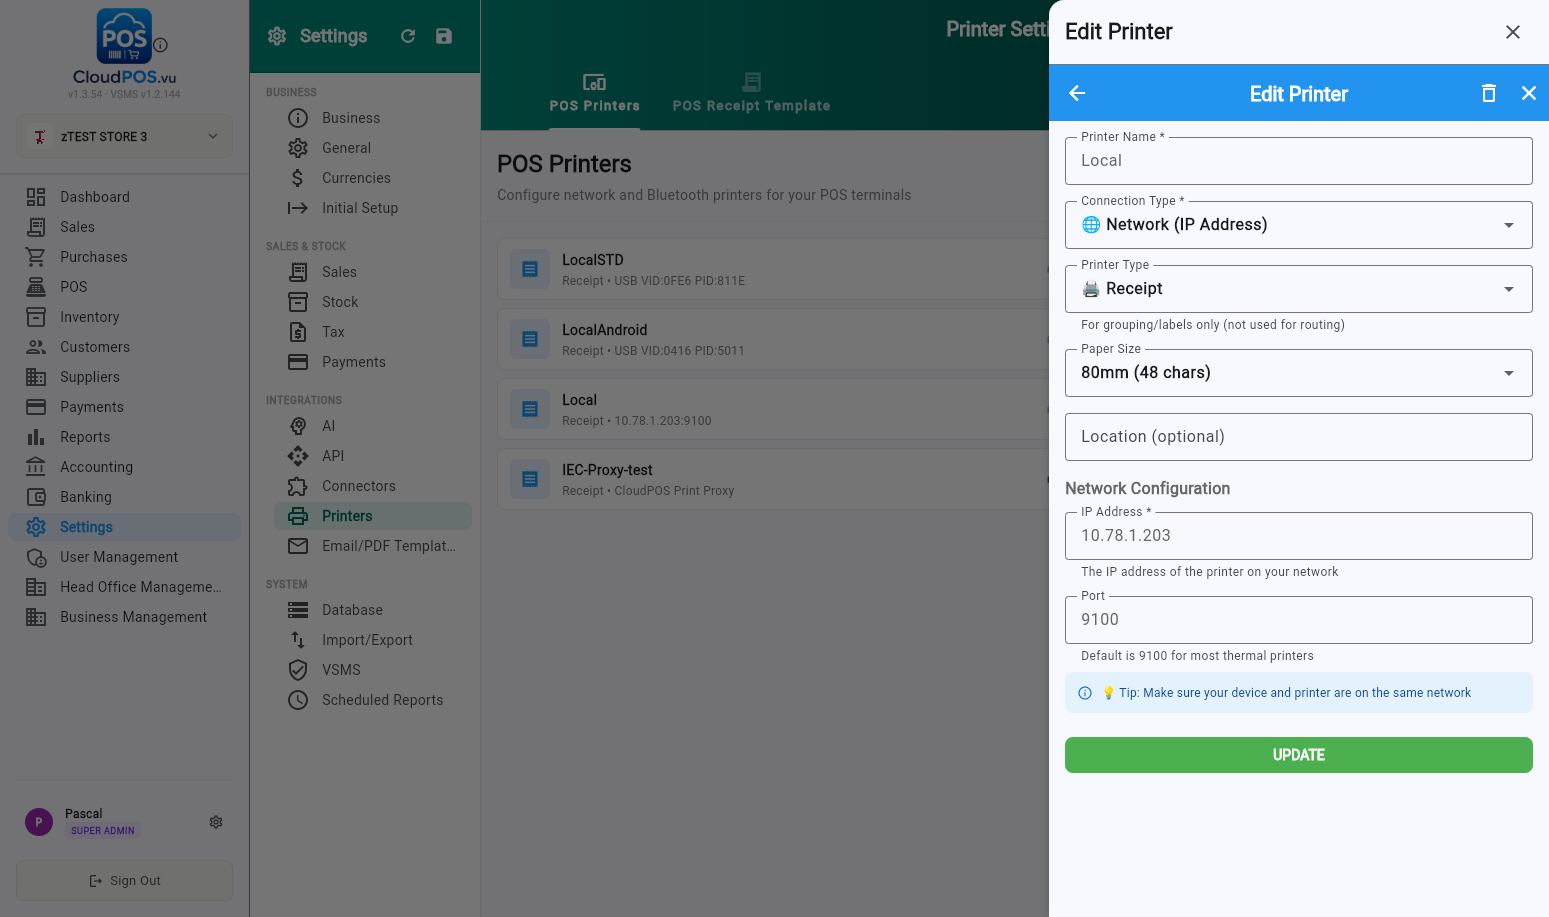
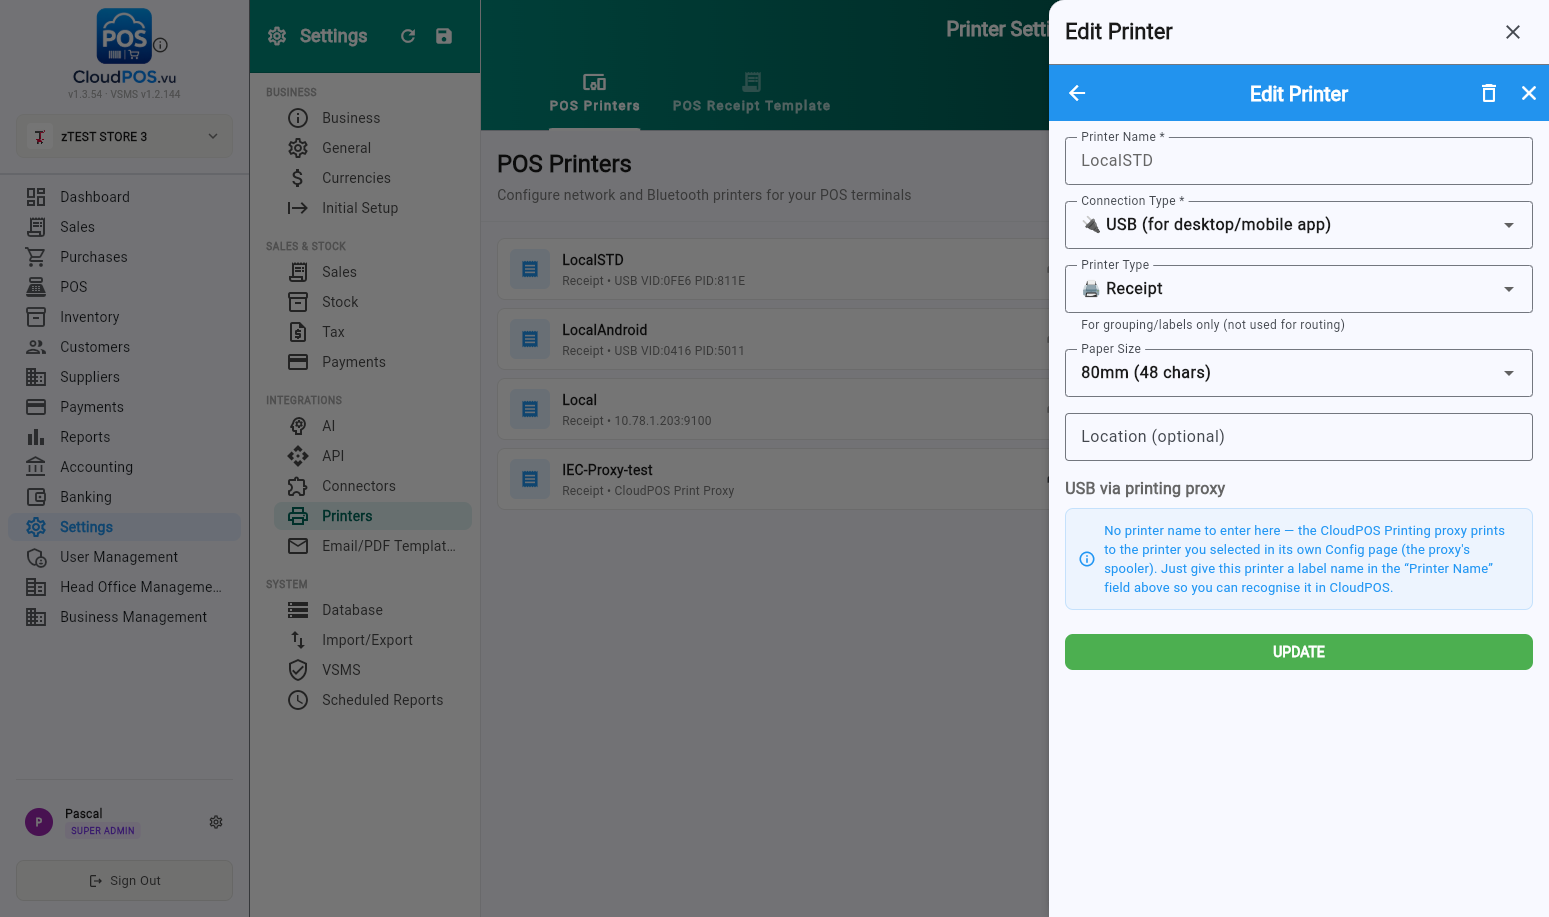
Open POS Management (sidebar → POS). Every terminal card shows which printers are assigned to it — the purple Receipt: badge and the orange order-printer chips:
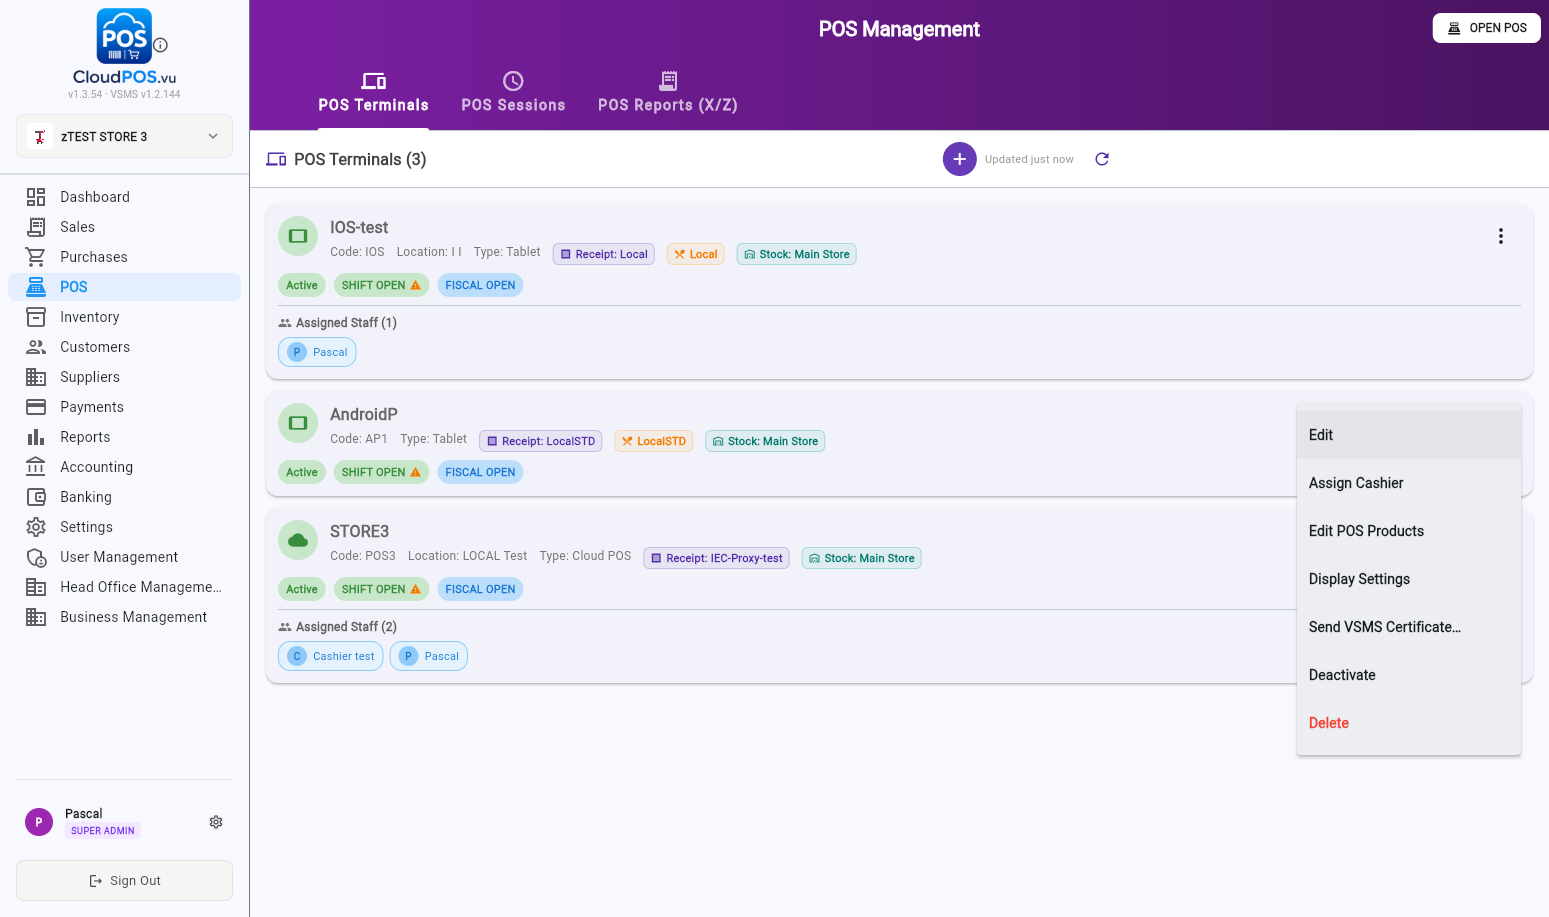
Open the terminal's ⋮ menu → Edit:
The Edit panel contains everything printing-related for this POS:
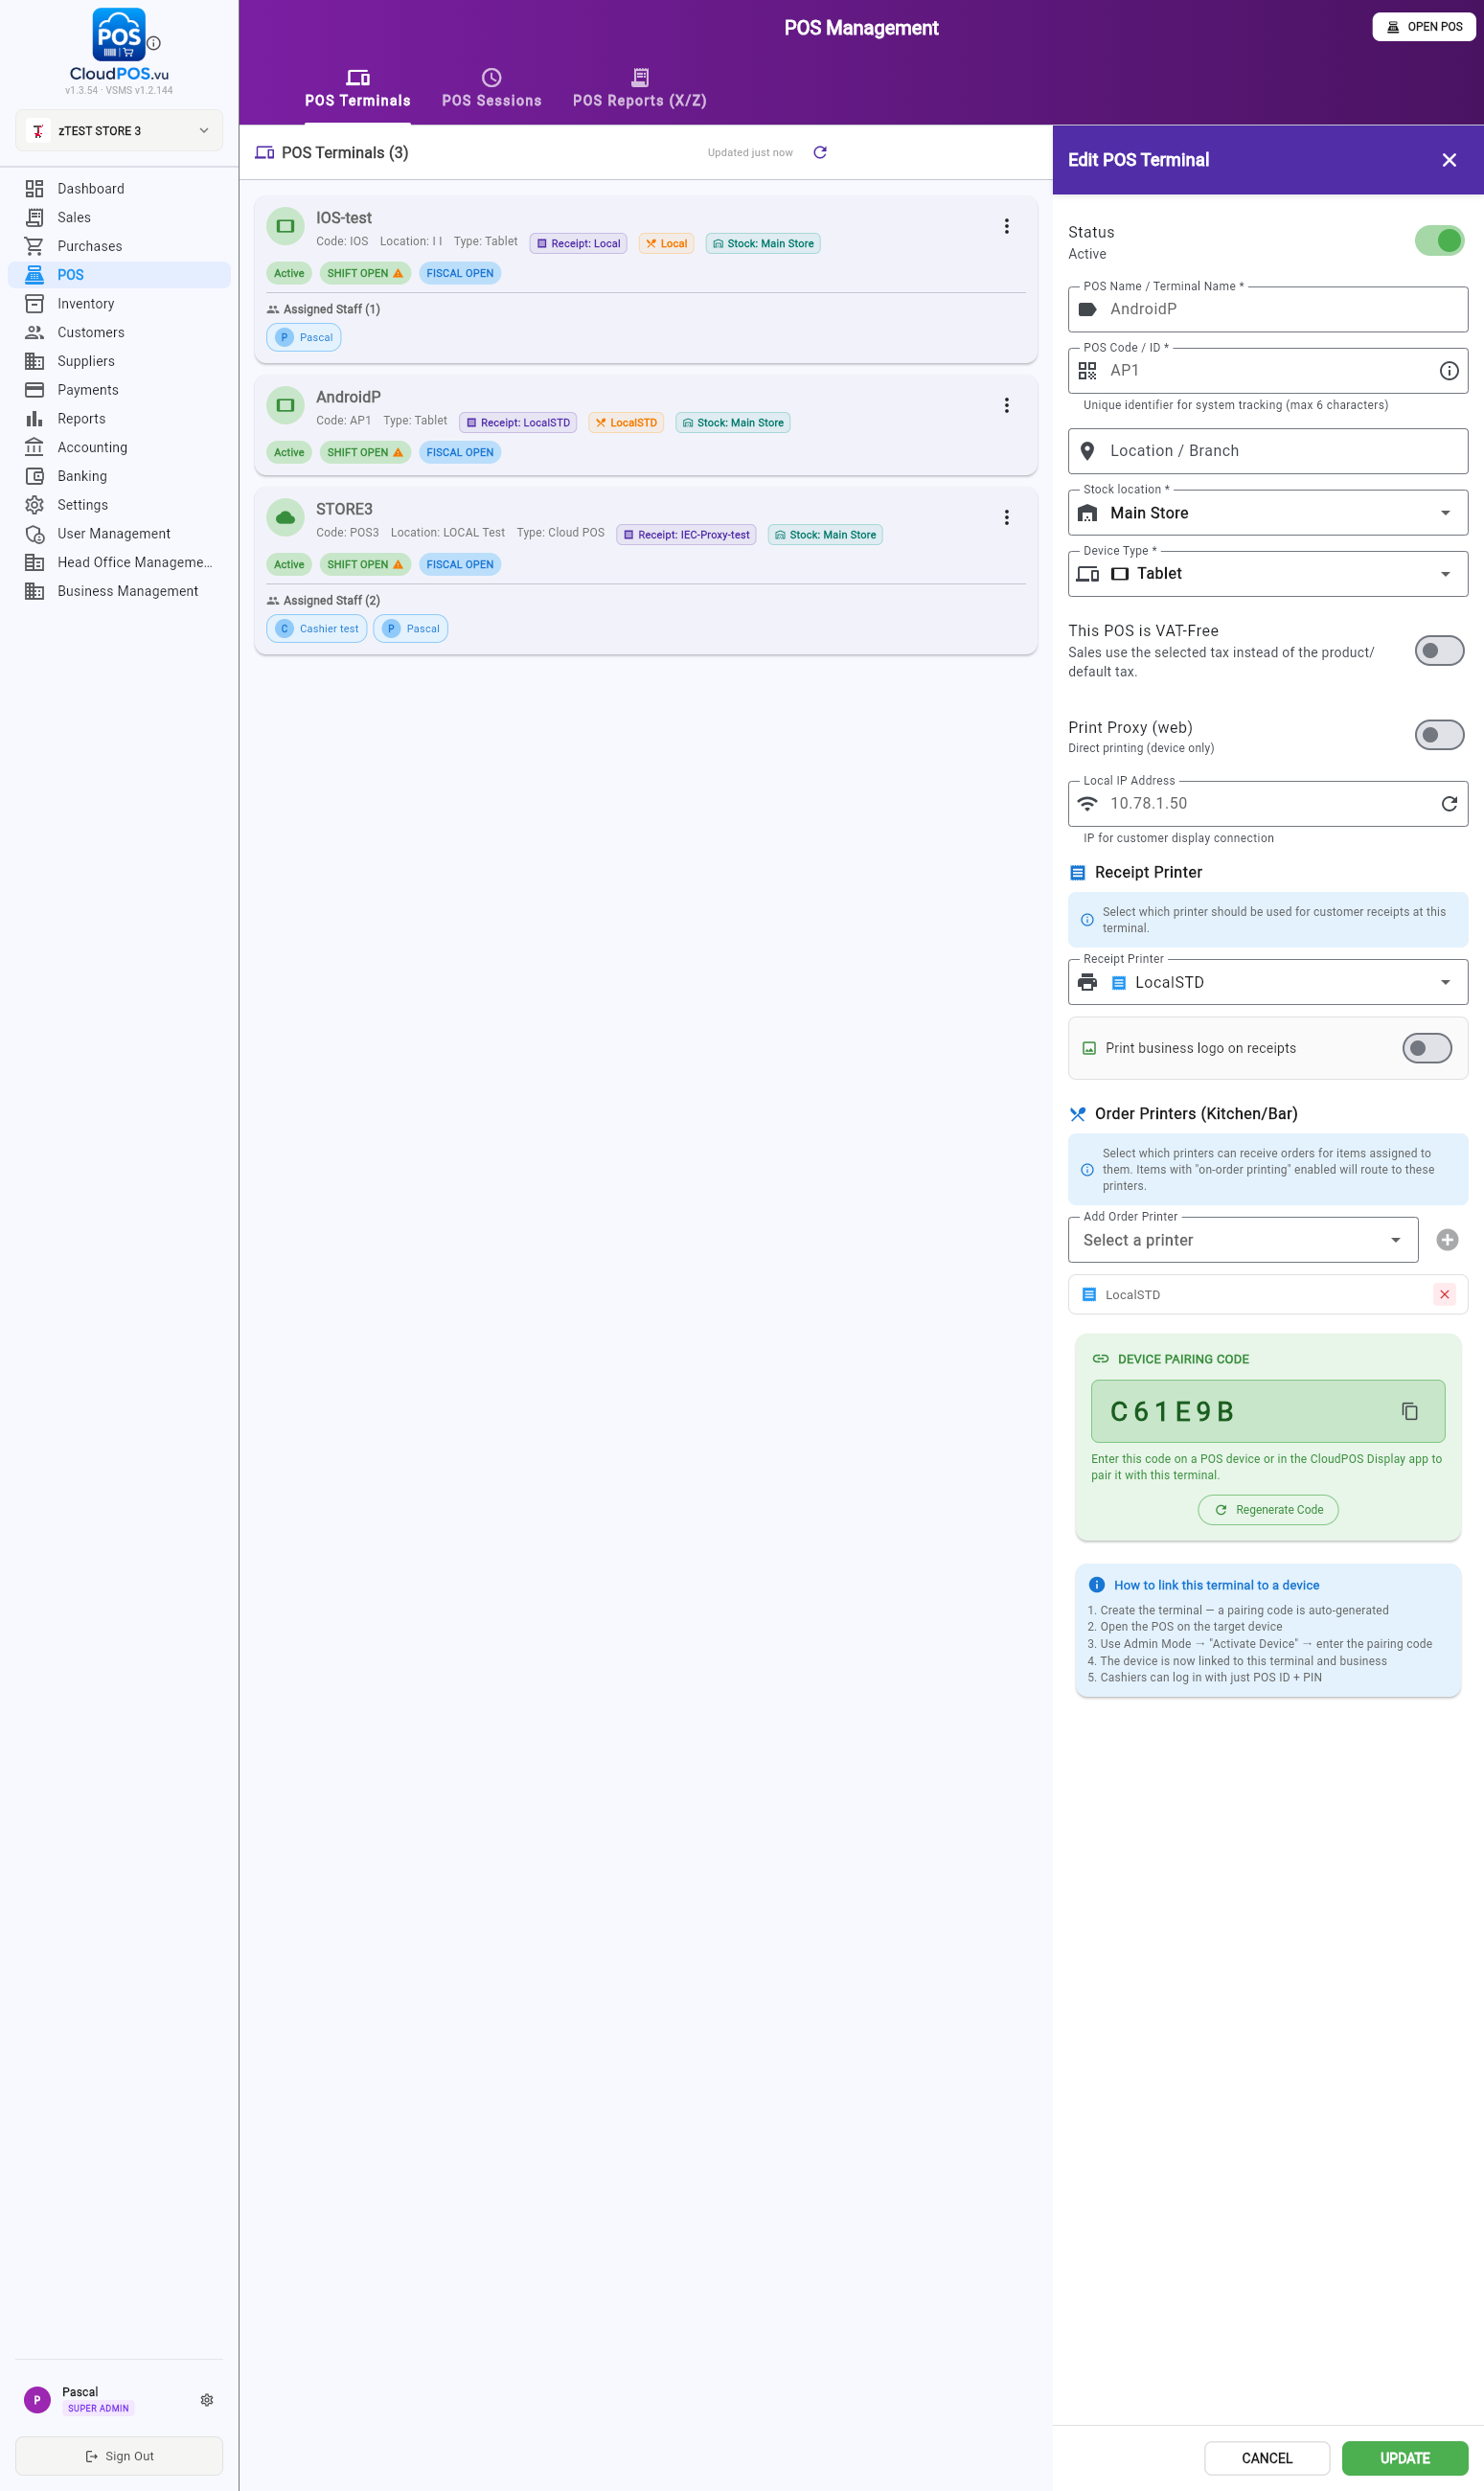
- Receipt Printer — the customer-receipt printer for this POS. The "Print business logo on receipts" toggle sits right under it.
- Print Proxy (web) — for the web version: prints are forwarded to the local CloudPOS Printing app on that machine (the proxy token is the terminal name). Native Android/Windows POS print directly.
- Order Printers (Kitchen/Bar) — see the next chapter.
Order chits are driven by two settings that must agree:
a) The product — open the product in Inventory and set On-order printer (Classification & availability section). Products set to No printing never produce order chits:
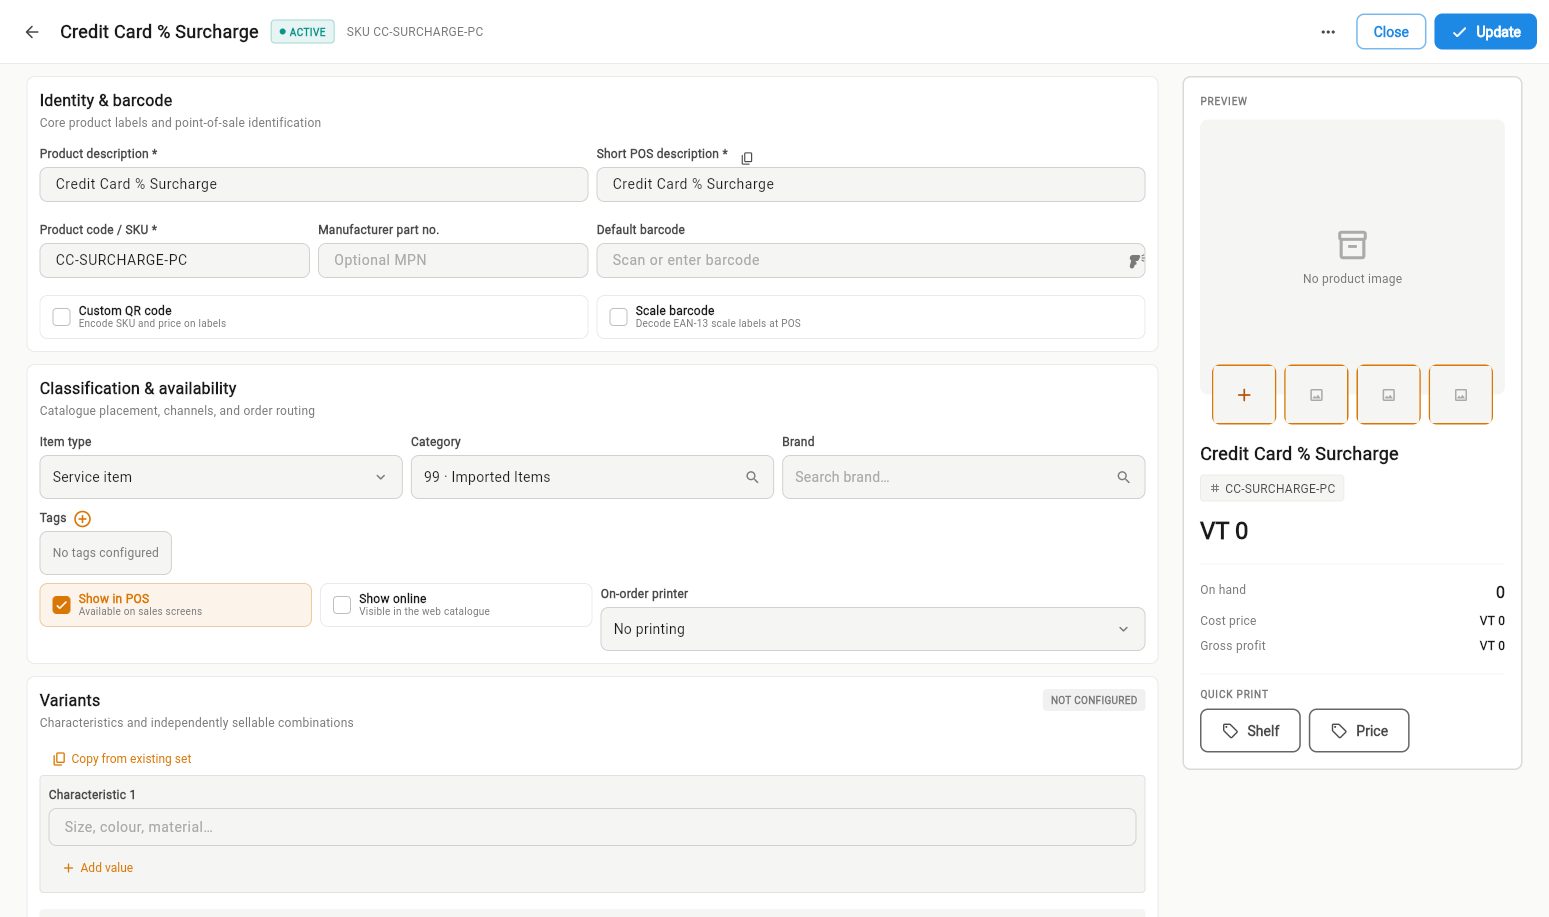
b) The selling terminal — the product's printer must also be in the selling POS's Order Printers (Kitchen/Bar) list (screenshot in chapter 3). This list is the terminal's allow-list: an item whose product printer is not on it is skipped for order printing.
At payment, items are grouped per printer (one chit each, with quantities and item notes). For restaurant held orders the chit is titled ORDER / ADD-ON and shows the table reference instead of the invoice number.
Small shop — one printer does everything
Assign the same printer to the terminal as Receipt Printer and add it as an Order Printer. Receipts and order chits both print on it; assign "On-order printer" only on products that actually need a preparation ticket.
Restaurant with a bar
The bar's receipt printer is a normal printer in the list. Assign it as an Order Printer on every POS in the restaurant, and set On-order printer = Bar printer on the drinks products. Drinks chits print at the bar from any POS that sells them; food can route to a kitchen printer the same way.
Two POS, no kitchen printer — "each POS prints its own orders"
Use the per-terminal switch in the terminal form: Redirect any print order to this printer (v1.3.56+). When enabled on a POS, every order chit from that POS — whatever the products say — prints as one ticket on that POS's default receipt printer. Enable it on both POS and each prints its own orders locally. Requires a default receipt printer; otherwise the terminal falls back to normal routing.
| Symptom | Check |
|---|---|
| No order chit for an item | Product's On-order printer set? Is that printer in the selling terminal's Order Printers list? (Items with an unassigned printer are skipped.) |
| Receipt doesn't print on web | Terminal's Print Proxy (web) on? Proxy app running, and its token equals the terminal name? |
| Network printer unreachable | Printer and POS on the same network, correct IP, port 9100 not blocked. |
| USB printer prints on one device only | Normal — USB is local to the machine the proxy app runs on. For shared printing use a network printer. |
| Wrong printer after changing an IP | Printer edits invalidate cached assignments within 5 minutes — restart the POS or wait for the cache to refresh. |
Importing Data
Chart of accounts, customers, suppliers, sales invoices and supplier bills from CSV
Go to Settings → Import/Export, then pick a data type. Stock/Products has been importable for a while — Customers and Suppliers use the exact same pattern: paste or upload a CSV, match its columns to CloudPOS fields, review a preview, then import.

Paste CSV text directly, or use Open File to load a .csv/.txt file from disk.
Your CSV's headers are auto-matched to the right field. Nothing is ever silently dropped — unmatched columns show as "— none —" for you to assign.
See exactly which rows are new and which will be skipped before anything touches the database.
A row that matches an existing customer or supplier is skipped, not updated — your manually-edited records are never silently changed by an import.
This is the first import step — before Customers, Suppliers, or anything else — because every other importer's optional account-code fields (AR, AP, Expense) reference codes from this chart. Only available before the business has recorded any sales or purchases.
Map a parent_code column to build the account tree. If your source export doesn't have an explicit parent-code column (only implies hierarchy through code-number ranges), accounts still import correctly — they just come in flat, without the grouping.
Add an optional balance column to post an opening trial balance in the same file. This is a distinct, second confirmation step shown after accounts are created — you see the computed Total Debits, Total Credits, and Owner's Equity plug before anything is posted, and it can only be done once per business (same one-shot rule as the manual Opening Balances screen, which this reuses).
If your source system marks rollup/summary rows (e.g. "Assets", "Current Assets") with a Header flag, map that column to is_header and mark those rows H. They still import as accounts for the hierarchy, but their balance is never posted — it's a subtotal of the accounts underneath, not an independent balance.
Positive = debit, negative = credit. This is an assumption, stated plainly in the balance-posting step — review the computed Debit/Credit/plug totals before confirming, since an implausible plug (e.g. assets showing mostly as credits) is the signal that a source export uses a different convention.
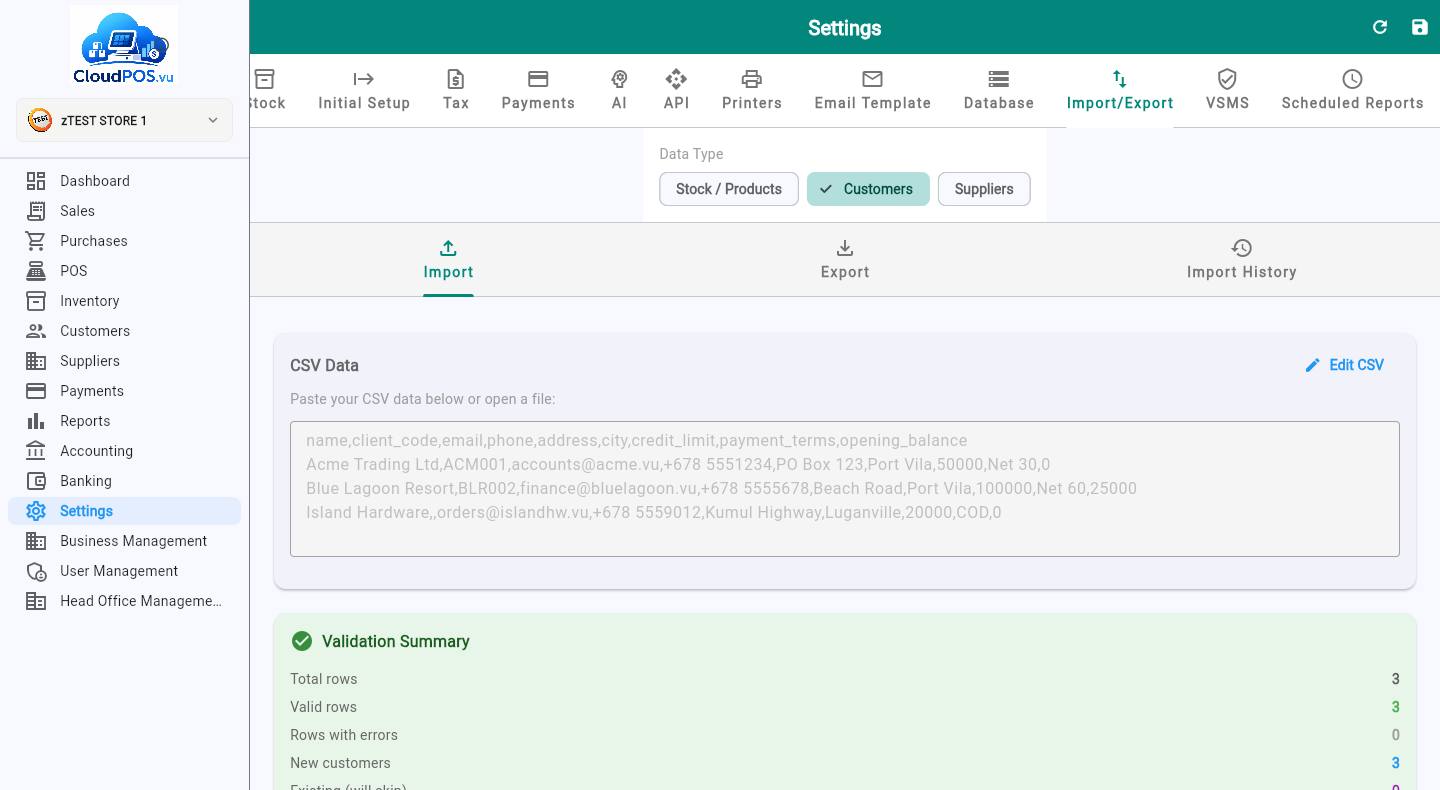
Click the Customers chip. Only name is required — every other column is optional and assigned in the mapping step. Use LOAD SAMPLE to see a working example, or paste your own file's data straight in.
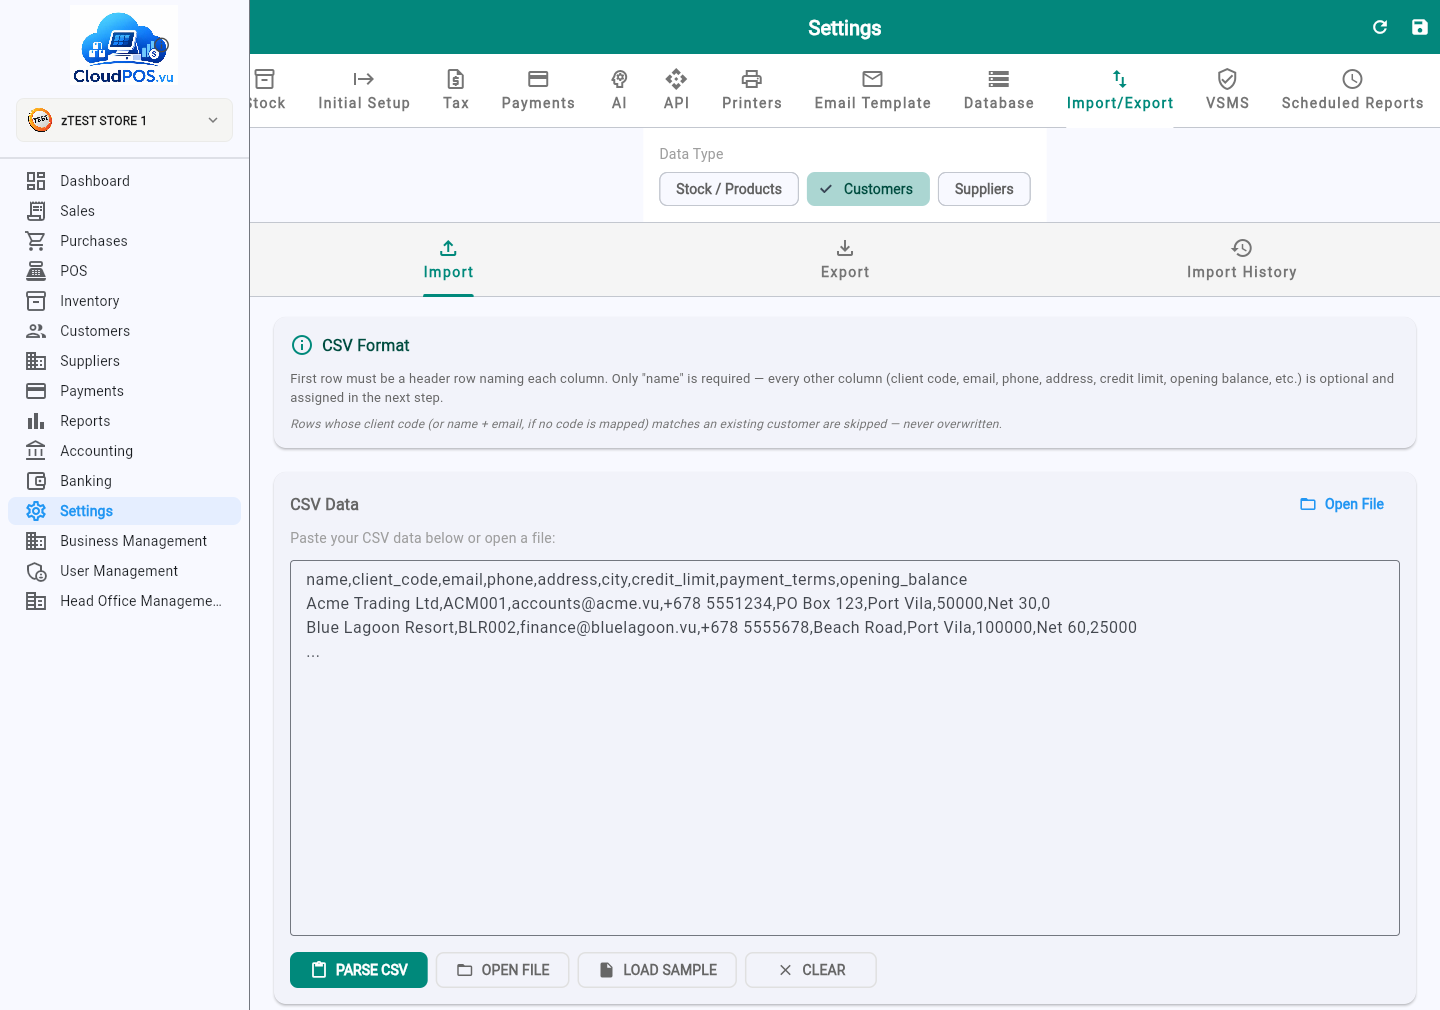
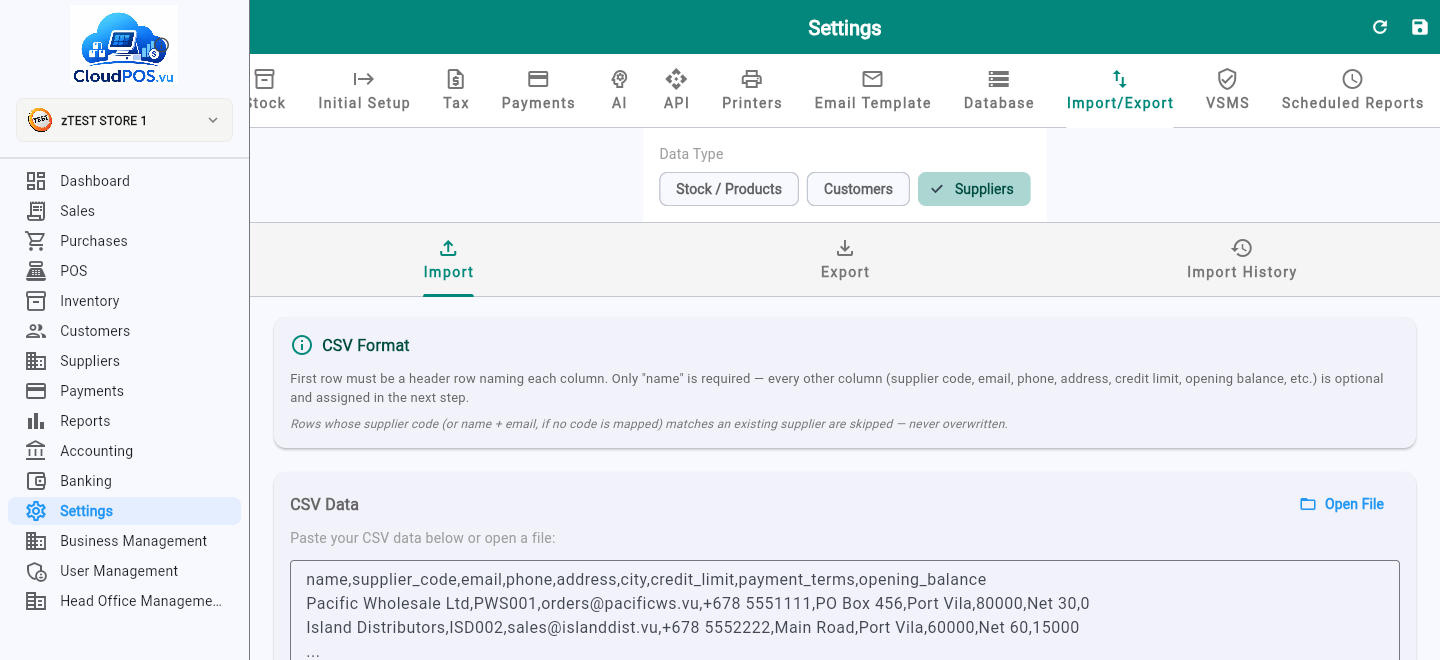
- Paste or load your CSVPaste your data (with a header row) into the box, or click OPEN FILE. Click LOAD SAMPLE to try it with example data first.
- Click PARSE CSVCloudPOS reads the header row and auto-guesses which column fills which field.
- Review the column mappingConfirm or correct each field's assigned column (see Column Mapping Explained below). Name is the only field that must be resolved before continuing.
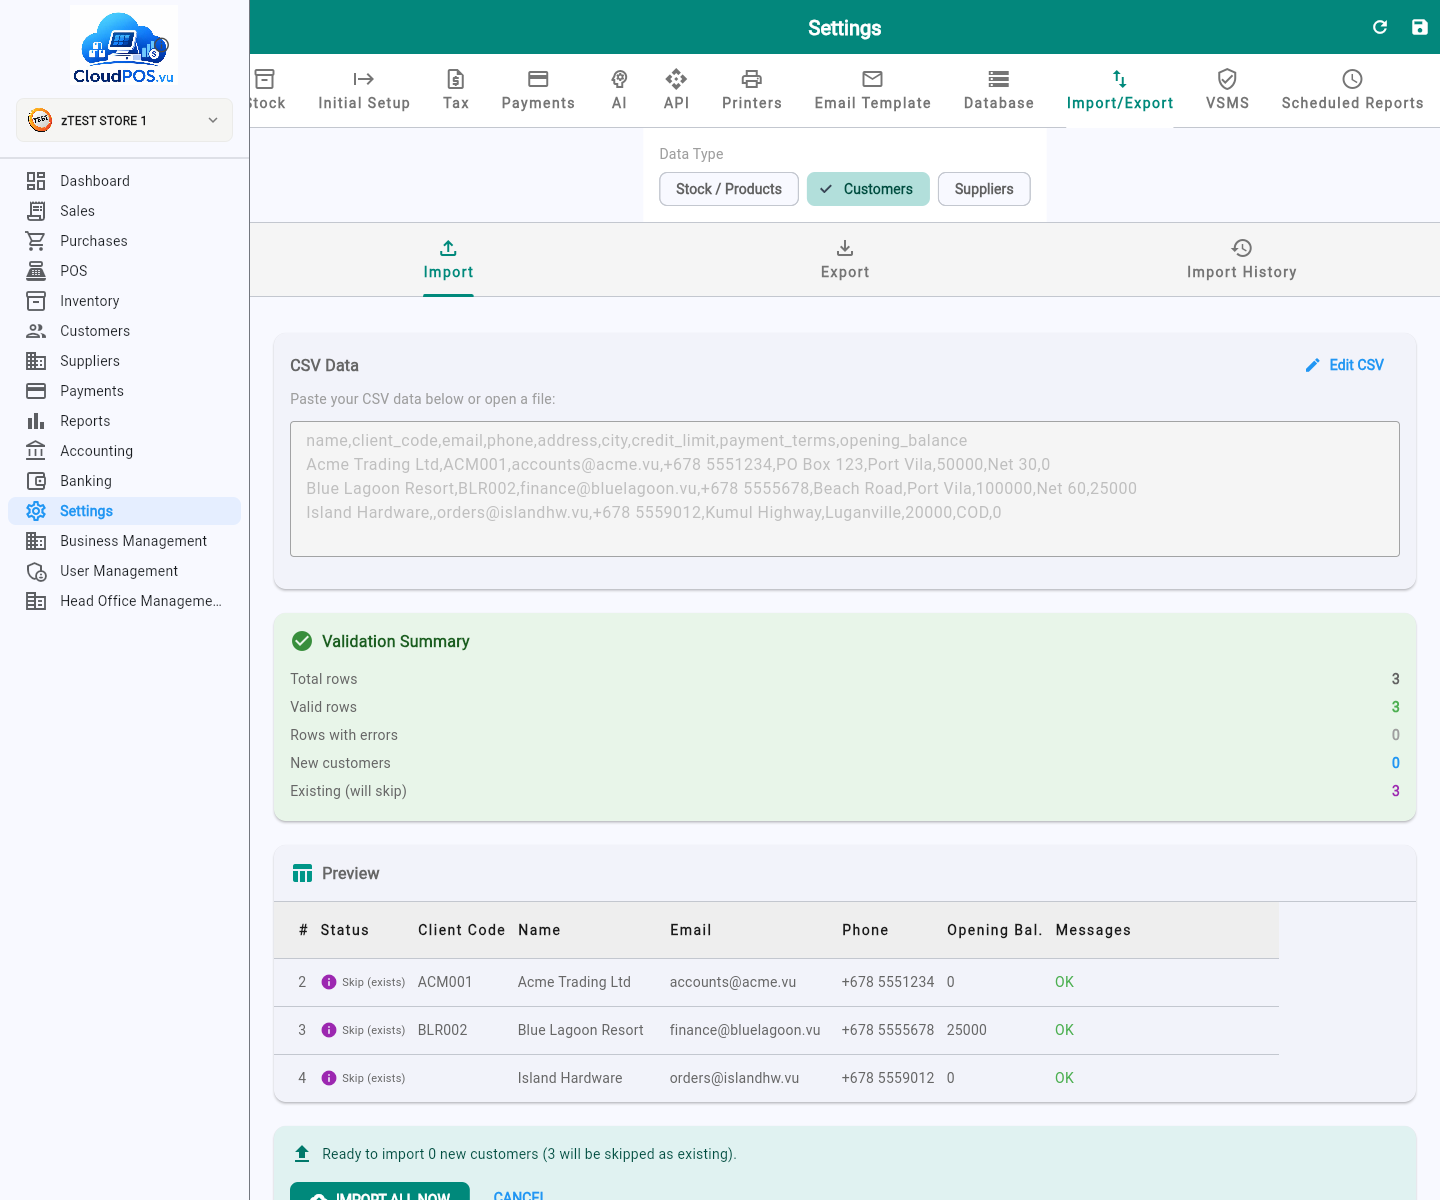
- Check the previewEvery row is shown with a status — New or Skip (exists) — before you commit anything.
- Click IMPORT ALL NOWOnly the New rows are written. Existing customers are left untouched.
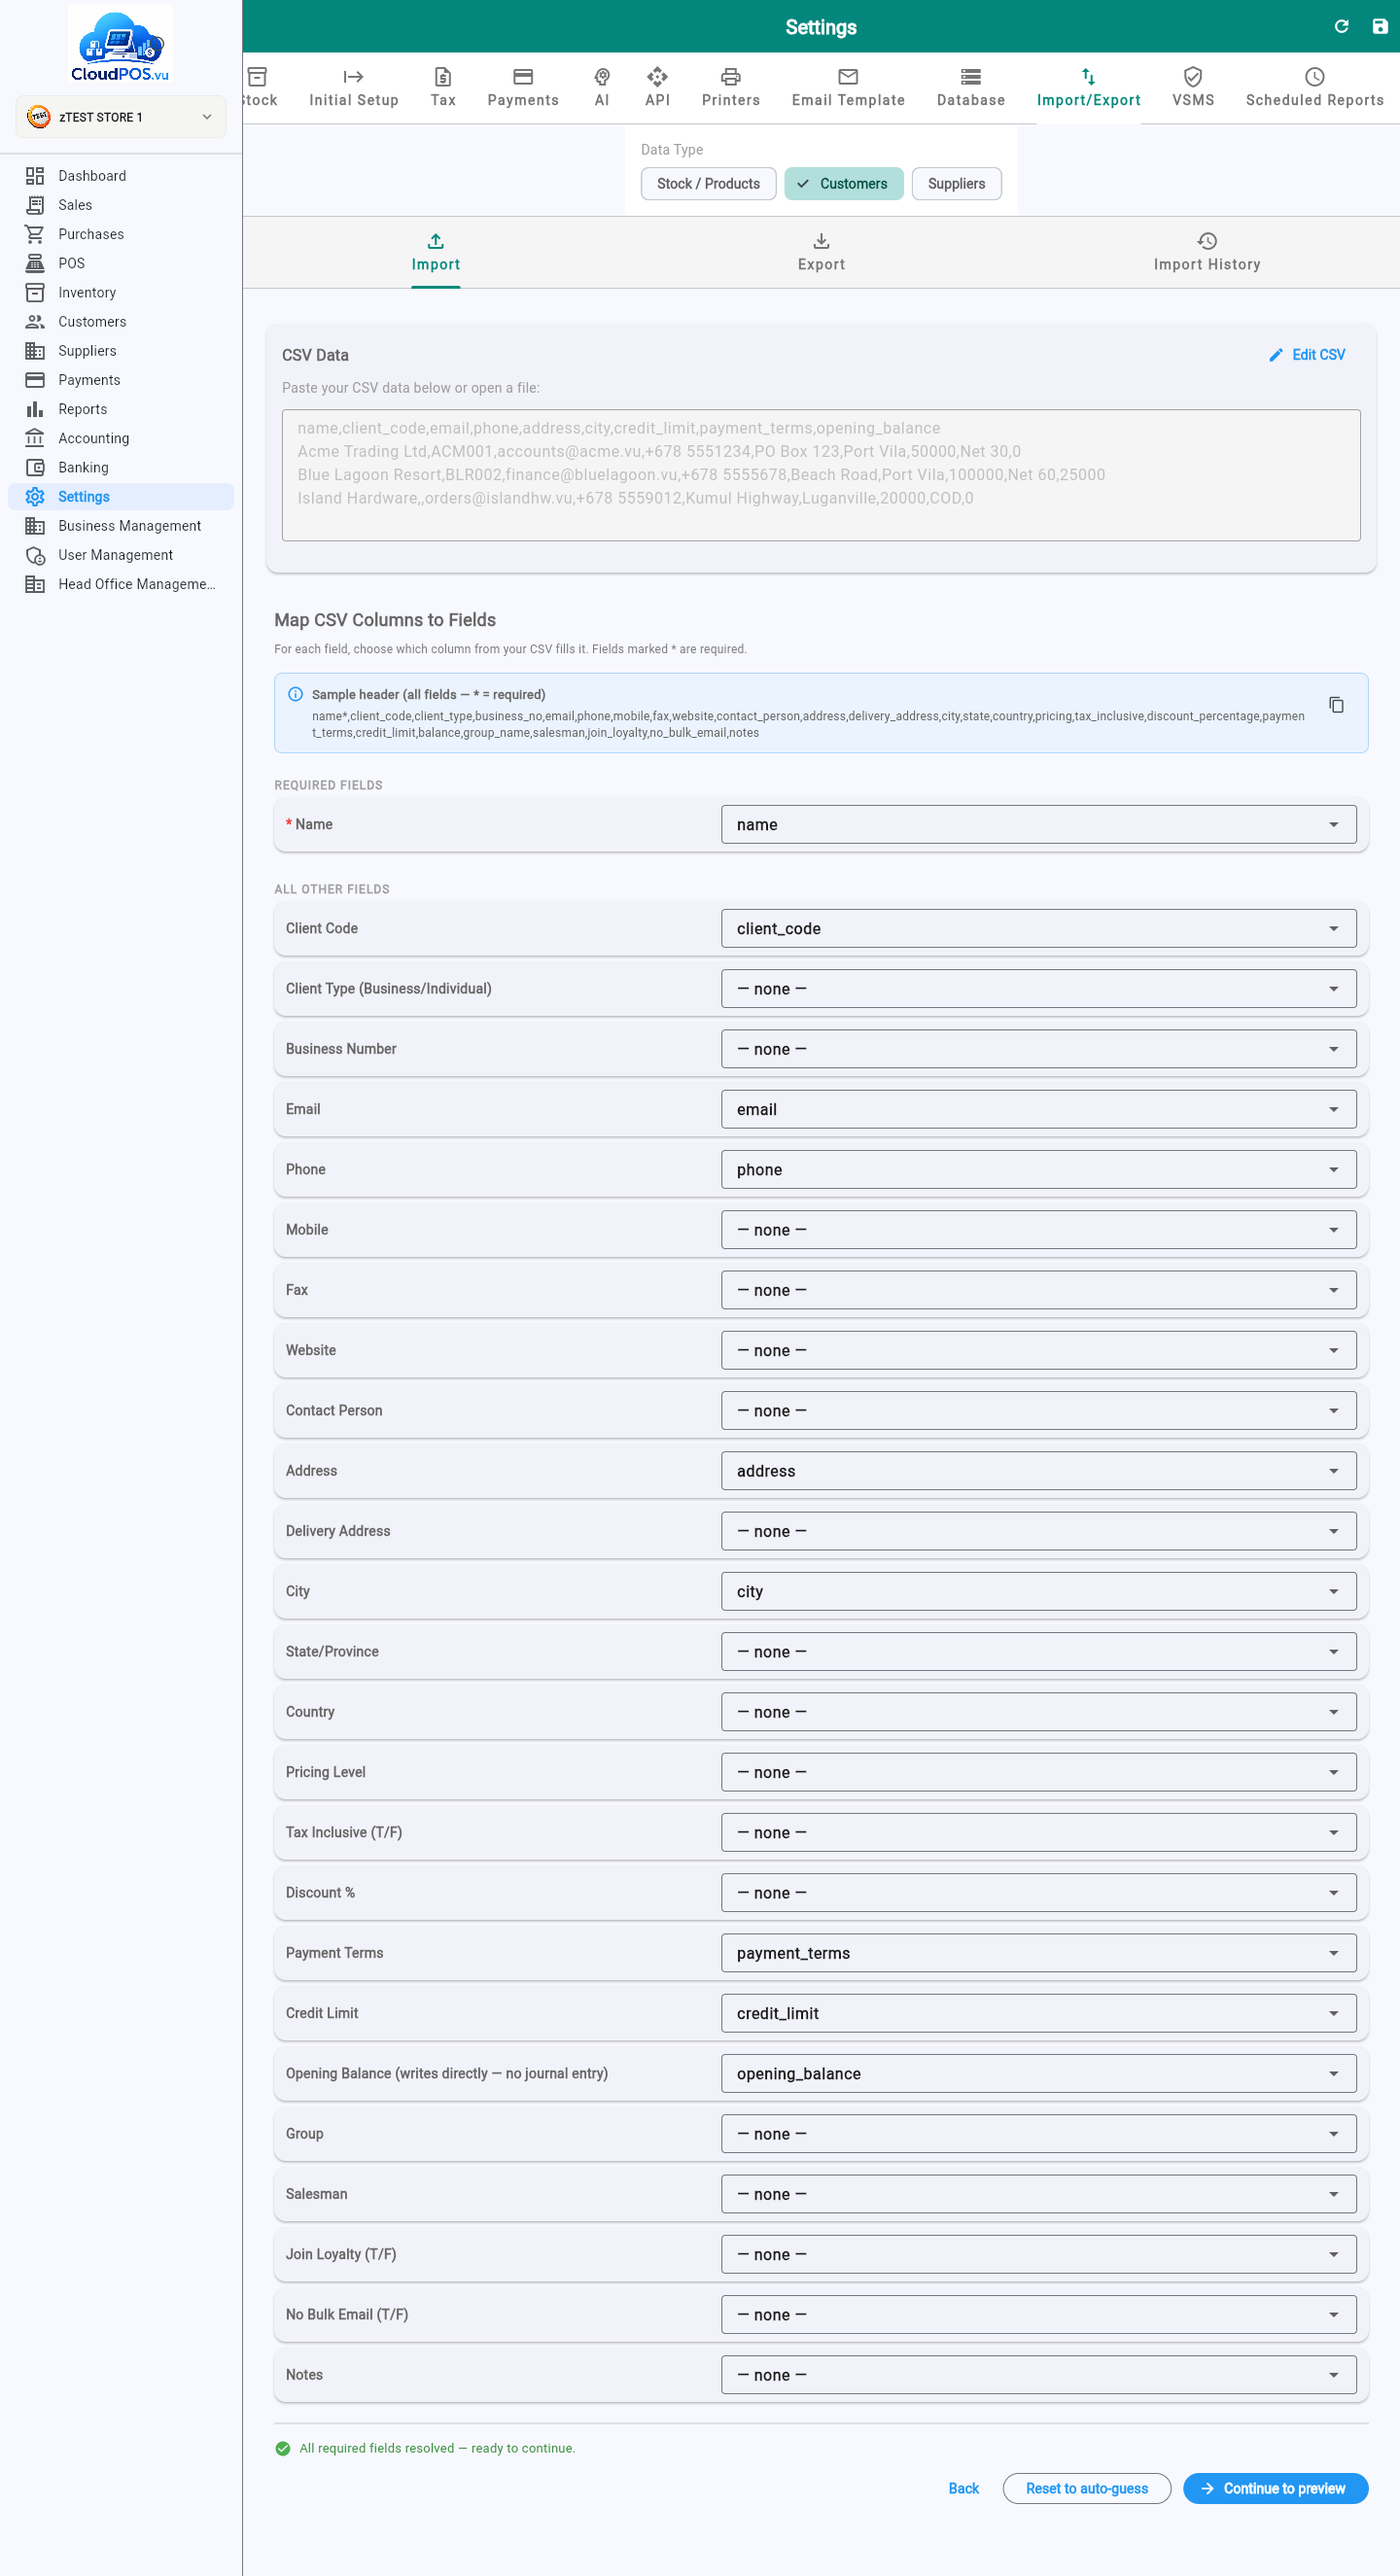
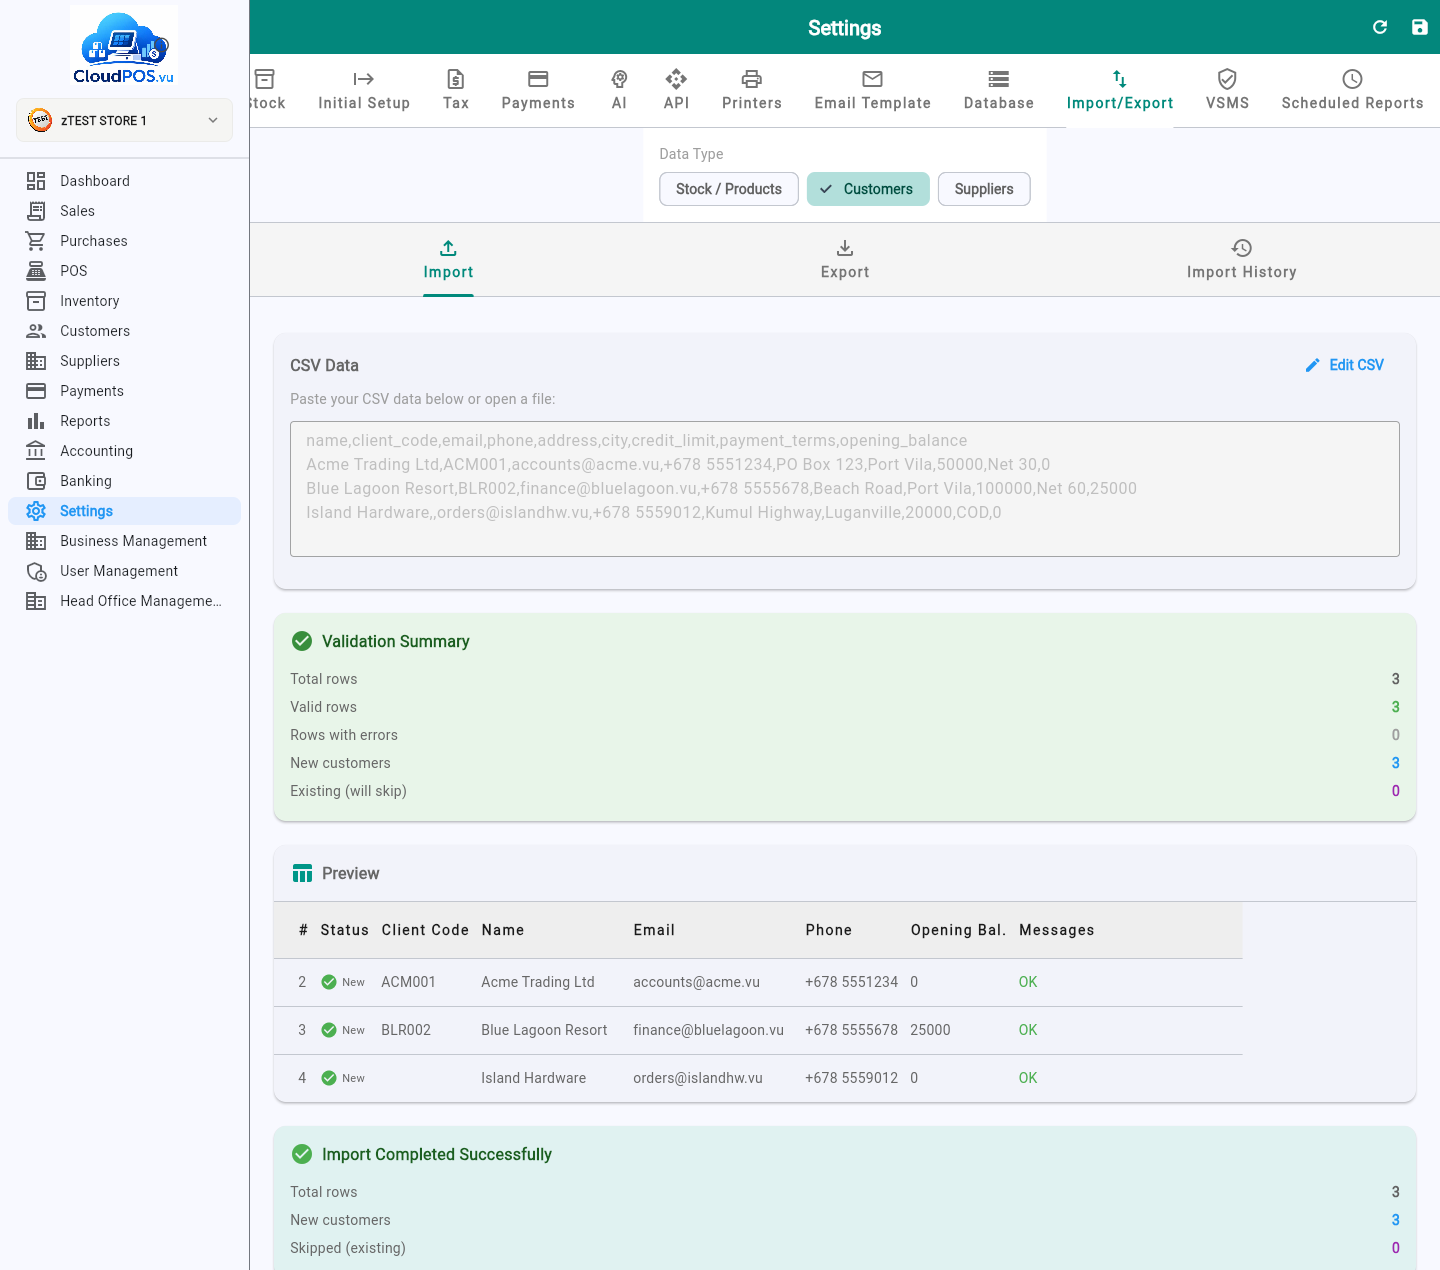
Suppliers import works identically to Customers — same paste/upload, mapping, preview, and skip-on-duplicate behaviour — just with supplier-specific fields (supplier_code instead of client_code, no loyalty/pricing fields).
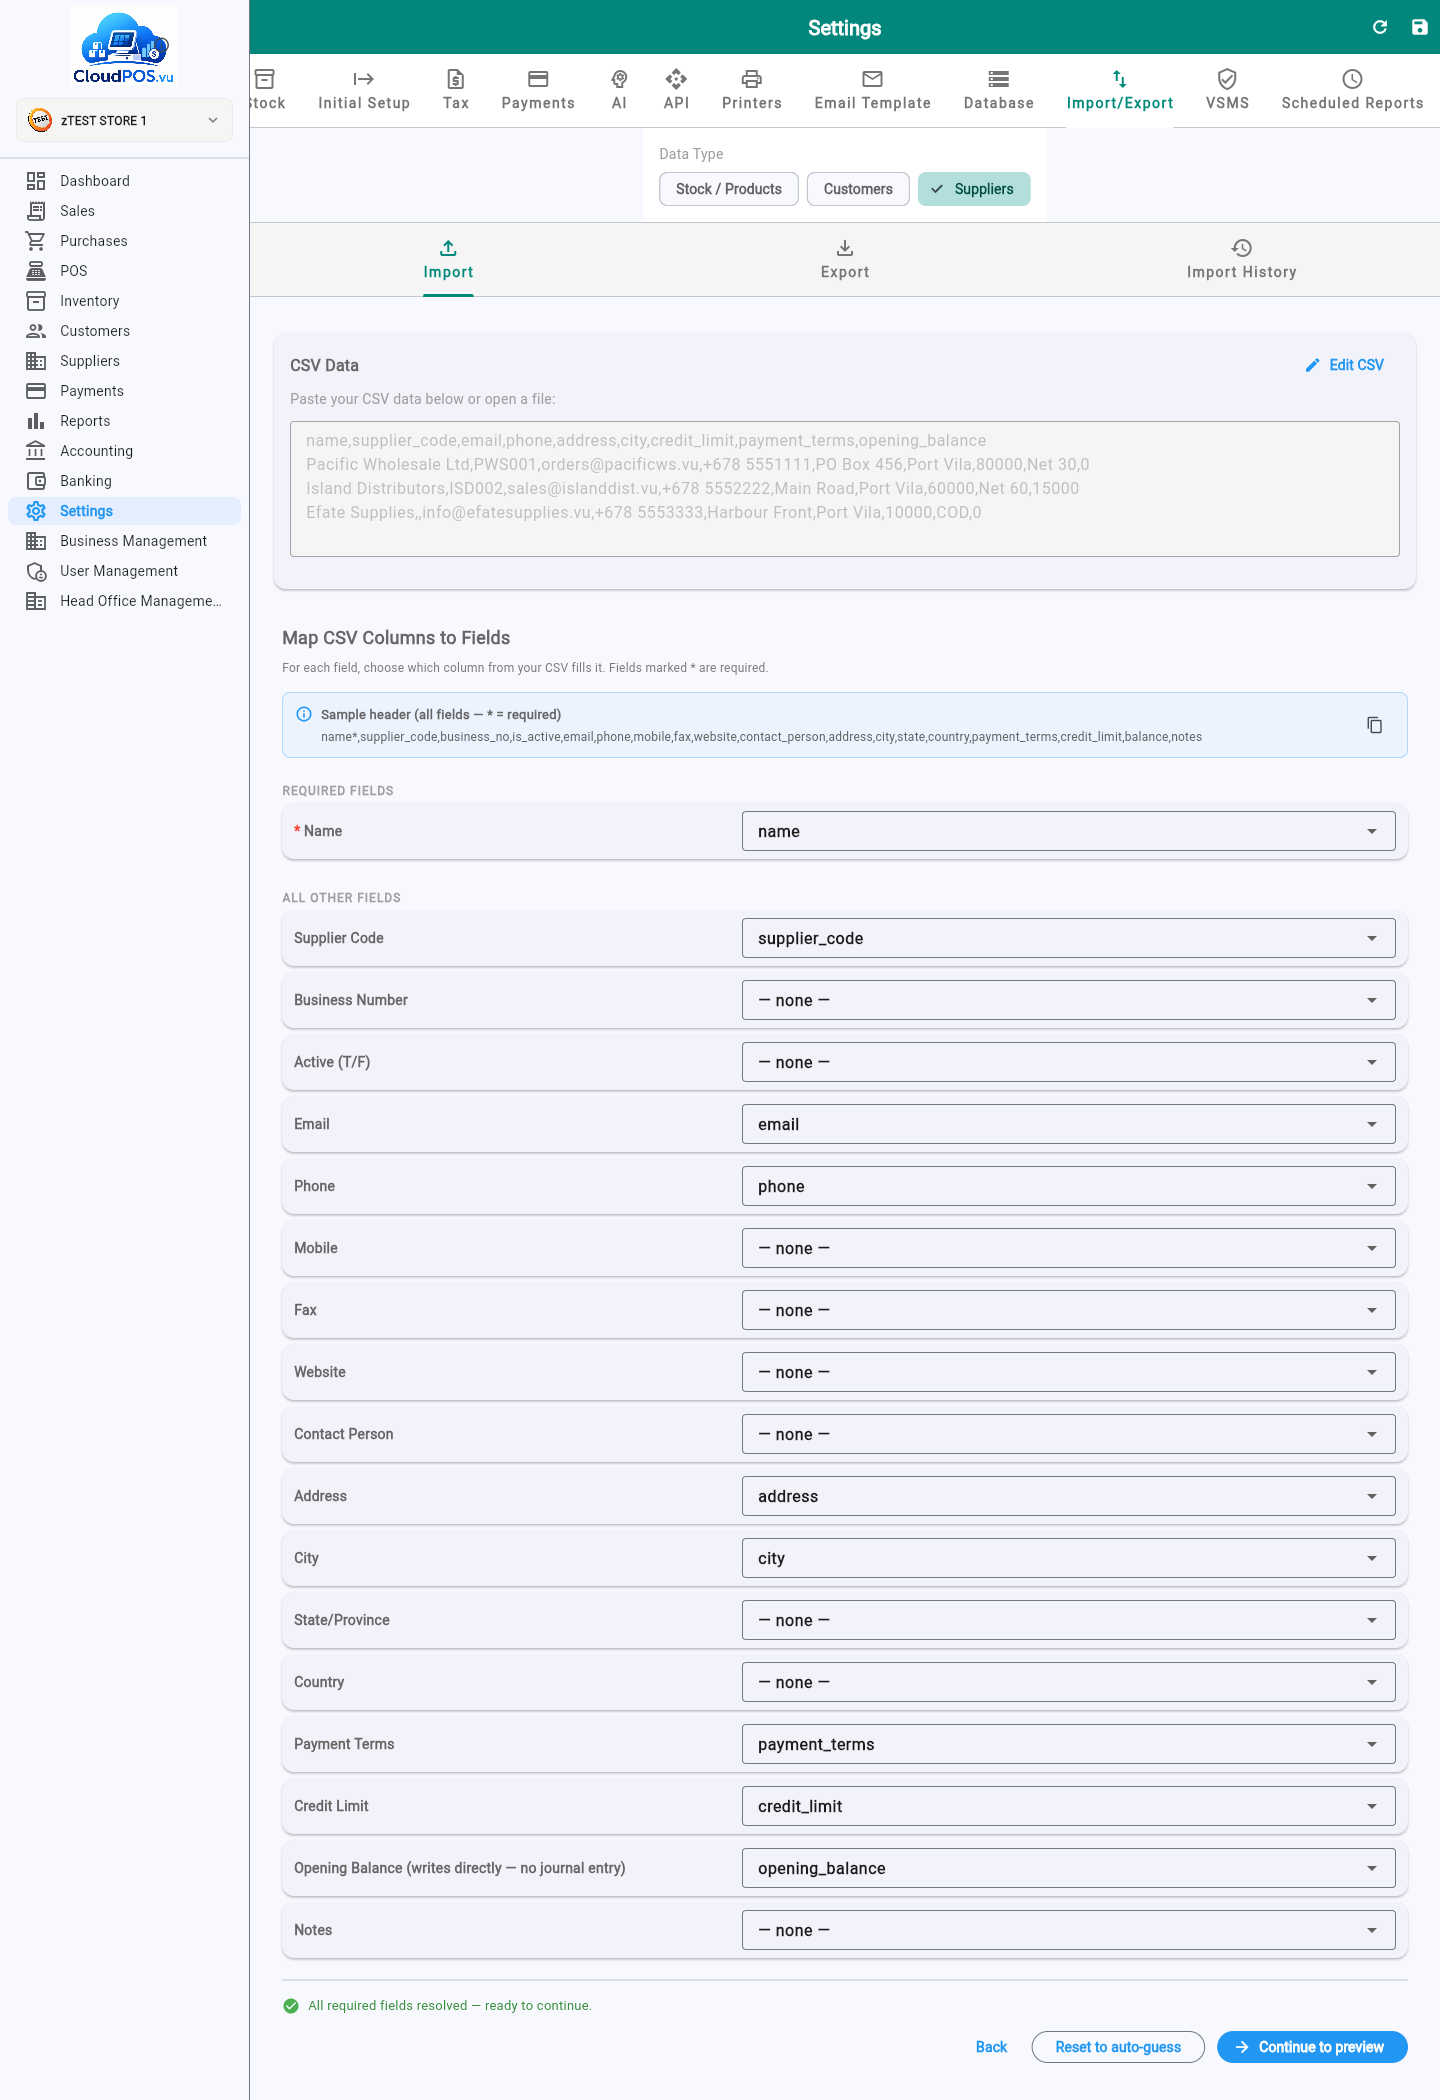
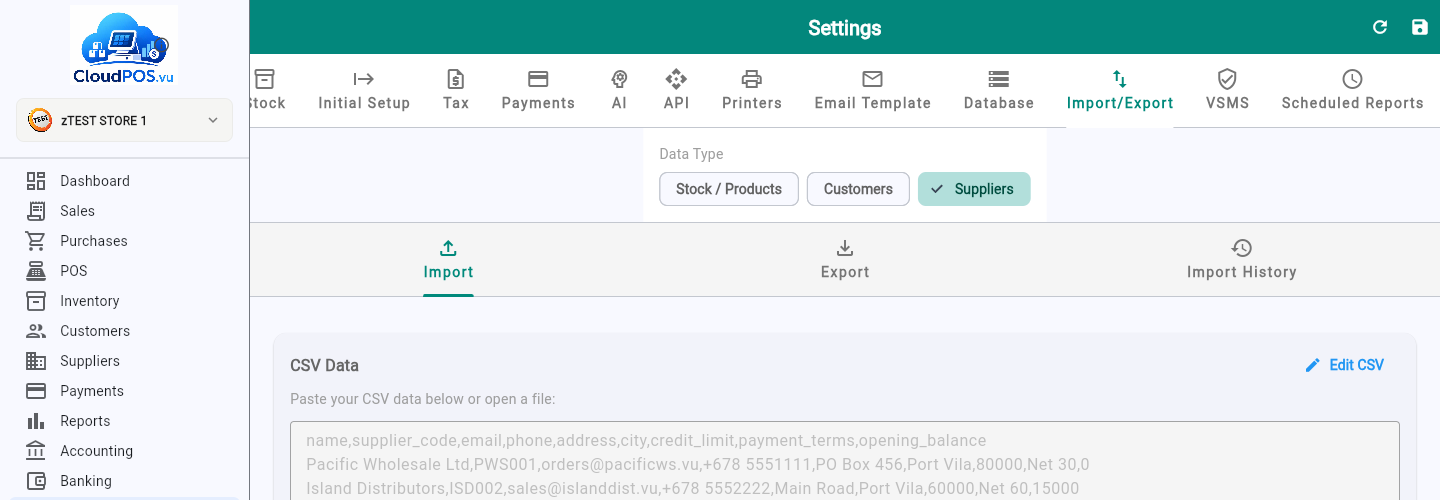
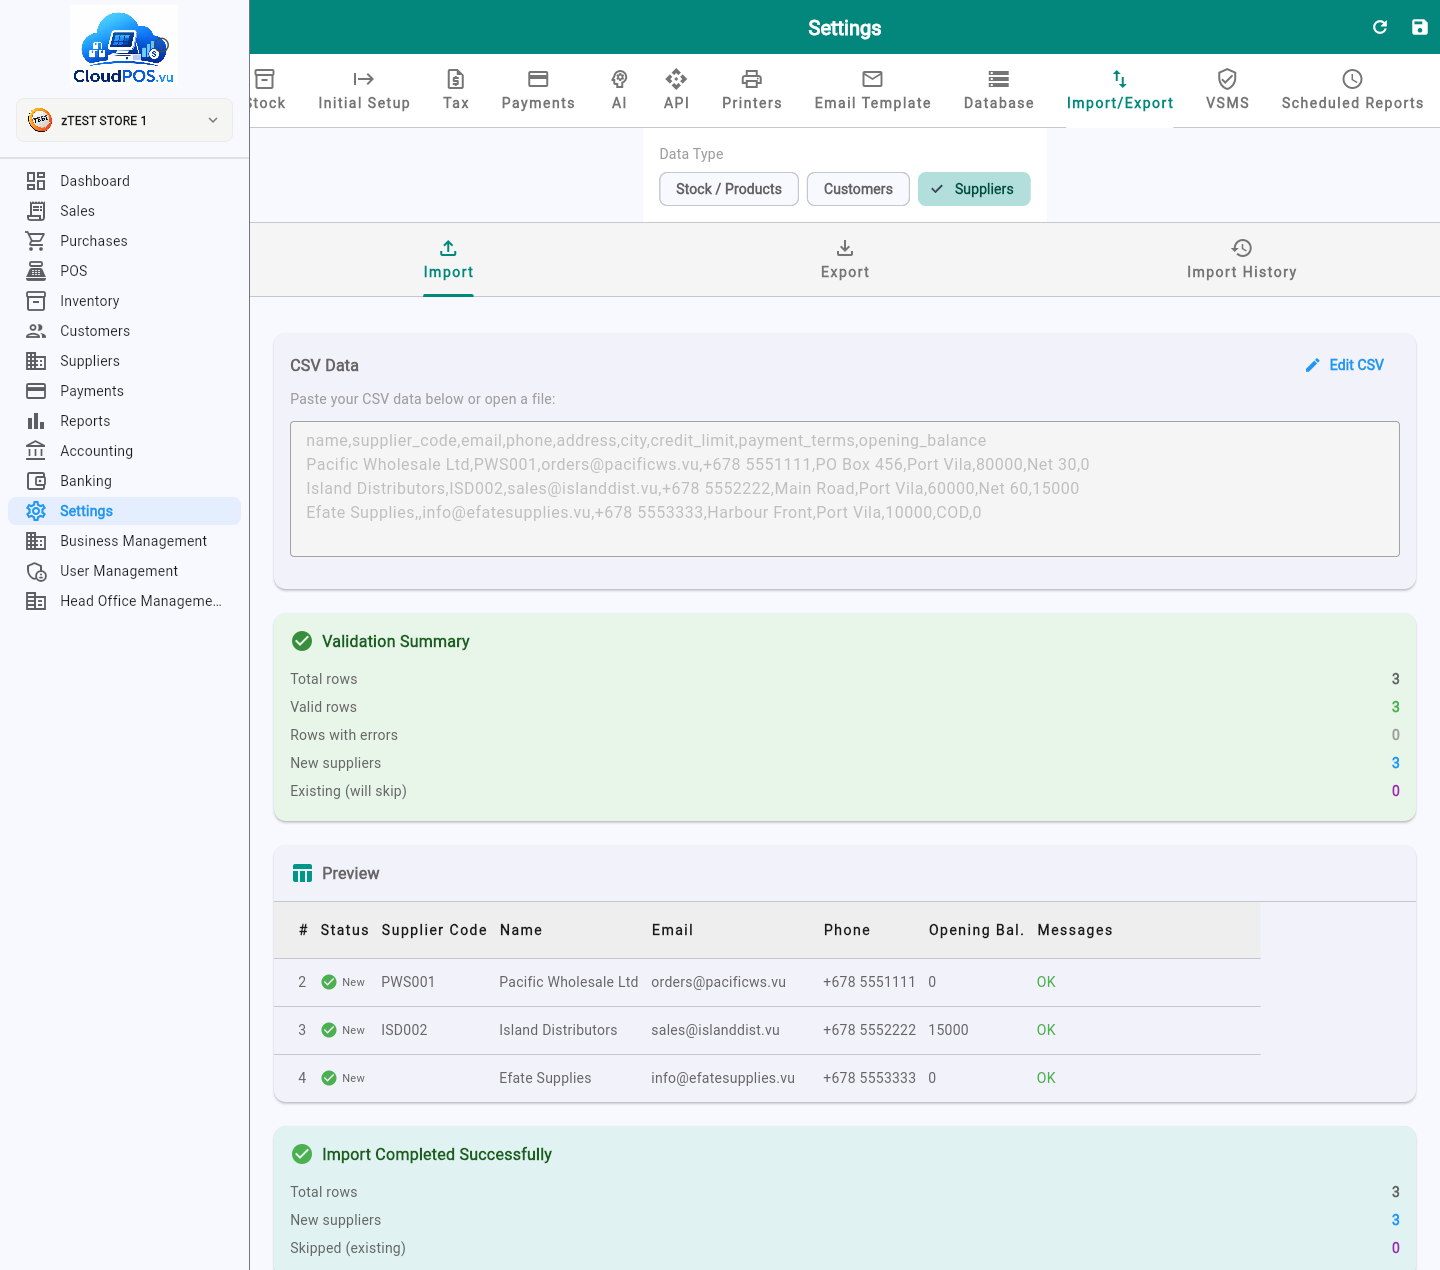
Every exporter names its columns differently. Instead of forcing an exact header format, CloudPOS lists every importable field and lets you assign a CSV column to each one — field-first, not column-first, so a required field that's missing from your file is always visible, never silently skipped.
How auto-matching works
When you click PARSE CSV, each of your CSV's headers is matched in three passes:
- Exact / known alias — e.g. client code, code, and account code all match Client Code.
- Fuzzy match — close spelling or wording variants are matched if the confidence is high enough.
- Unmatched — anything left is shown as — none —. Nothing is dropped without you seeing it.
Fixing the mapping
Each field row has a dropdown listing your CSV's columns. Pick a different column, or — none — to leave a field unmapped. Assigning a column to a field automatically un-assigns it from wherever it was before — one CSV column can only ever fill one field at a time.
Use Reset to auto-guess to discard manual changes and re-run the automatic matching, or Back to pick a different file entirely.
Re-importing a file — on purpose or by accident — never creates duplicates and never silently overwrites data you've already edited in the app. Every row is matched against existing records before anything is written:
If the row has a client_code / supplier_code, that's matched against existing records first.
Rows with no code fall back to matching on Name and Email together.
A match means the row is skipped — never updated — and counted separately in both the preview and the final result.
Import your old system's sales invoices as historical records — searchable, printable, and correctly reflected in each customer's balance, but not re-posted as live sales. Import your Chart of Accounts and Customers first — a warning banner reminds you if either looks incomplete, but it won't block the import; any row referencing a customer that doesn't exist yet will simply fail with a clear message.
VAT and discounts are calculated the exact same way a manually-entered invoice is — but no journal entry is posted to the books at import time, and no fiscal (VSMS) signature is ever requested. If you later run Repost Accounting (Settings → Database), imported invoices are included like any other invoice and get real journal entries built from them, recomputing your books from the full invoice history.
Each affected customer's balance is recalculated from the imported invoices' unpaid amounts. If you already set an Opening Balance for that customer via Customer import, this supersedes it — the invoices become the source of truth.
Give a row your old system's invoice number to keep it on the printed invoice and in reports; leave it blank to auto-generate a new one. Re-importing a file that includes a number already in CloudPOS skips that invoice — never overwrites.
Imported line items are never linked to a product record, so importing historical invoices can't change today's on-hand stock counts.
Same idea as Sales Invoices, for what you owe instead of what you're owed. Local supplier bills only — VAT-registered domestic vendors. This is not for foreign/import purchases (customs duty, landed cost, dual-currency import costing) — that has its own dedicated flow elsewhere in the app. Import your Chart of Accounts and Suppliers first — a warning banner reminds you if either looks incomplete, but it won't block the import.
VAT and discounts are calculated using the bill's own "unit price includes tax" setting — but no journal entry is posted at import time. If you later run Repost Accounting, imported bills are included like any other and get real journal entries built from them.
Each line's expense account is resolved at import time — from an explicit expense_account_code column, else the supplier's own default, else the business default purchase account — so a future Repost Accounting run has a real account to post to, not just at repost time.
Each affected supplier's balance is recalculated from the imported bills' unpaid amounts.
Give a row your old system's bill number to keep it on record; leave it blank to auto-generate a new one (BILL-####). Re-importing a file that includes a number already in CloudPOS skips that bill — never overwrites.
The mapping step's "Sample header" box always shows the full, current list for copy-paste — this table is a readable version of the same fields.
Chart of Accounts
| Field | CSV key | Notes |
|---|---|---|
| Account Code | code | Required Reconcile-match key. Up to 50 characters — plenty of room for long numeric codes. |
| Account Name | name | Required |
| Account Type | account_type | Required asset / liability / equity / income / expense |
| Parent Account Code | parent_code | Builds the account hierarchy |
| Tax Type | tax_type | |
| Active | is_active | T/F — defaults to Active if unmapped |
| Header Row | is_header | Mark H for rollup/summary rows — imported for structure, balance never posted |
| Opening Balance | balance | Positive = debit, negative = credit. Posted as a separate, reviewed step after accounts are created — Asset/Liability rows only, one-shot per business. |
Customers
| Field | CSV key | Notes |
|---|---|---|
| Name | name | Required |
| Client Code | client_code | Primary duplicate-match key |
email | Used as a fallback match key | |
| Phone / Mobile / Fax | phone / mobile / fax | |
| Address / Delivery Address | address / delivery_address | |
| City / State / Country | city / state / country | |
| Business Number | business_no | |
| Contact Person / Website | contact_person / website | |
| Client Type | client_type | Defaults to "Business" if unmapped |
| Group / Salesman | group_name / salesman | |
| Pricing Level | pricing | Defaults to "Retail" if unmapped |
| Tax Inclusive | tax_inclusive | T/F, true/false, 1/0, yes/no |
| Discount % | discount_percentage | Number |
| Payment Terms | payment_terms | e.g. COD, Net 30, Net 60 |
| Credit Limit | credit_limit | Number |
| AR Account Code | ar_account_code | Chart of Accounts code. Blank = use the business default AR account; a code that doesn't exist is left blank with a warning, never guessed. |
| Join Loyalty / No Bulk Email | join_loyalty / no_bulk_email | T/F |
| Opening Balance | balance | Writes directly — no journal entry |
| Notes | notes |
Suppliers
| Field | CSV key | Notes |
|---|---|---|
| Name | name | Required |
| Supplier Code | supplier_code | Primary duplicate-match key |
email | Used as a fallback match key | |
| Phone / Mobile / Fax | phone / mobile / fax | |
| Address / City / State / Country | address / city / state / country | |
| Business Number | business_no | |
| Contact Person / Website | contact_person / website | |
| Active | is_active | T/F — defaults to Active if unmapped |
| Payment Terms | payment_terms | e.g. COD, Net 30, Net 60 |
| Credit Limit | credit_limit | Number |
| AP Account Code | ap_account_code | Chart of Accounts code. Blank = use the business default AP account; a code that doesn't exist is left blank with a warning, never guessed. |
| Expense Account Code | expense_account_code | Chart of Accounts code. Blank = use the business default purchase account. |
| Opening Balance | balance | Writes directly — no journal entry |
| Notes | notes |
Sales Invoices
Invoice-level fields (repeat the same value on every row of one invoice) and line-item fields (one value per row).
| Field | CSV key | Notes |
|---|---|---|
| Customer Name | customer_name | Required Or use Customer Code — must already exist |
| Date | date | Required DD/MM/YYYY or YYYY-MM-DD |
| Item Description | description | Required Per line |
| Unit Price | unit_price | Required Per line |
| Invoice Number | invoice_number | Blank = auto-generate. Duplicate-match key. |
| Customer Code | customer_code | Preferred over Customer Name when given |
| Payment Terms | payment_terms | e.g. COD, Net 30, Net 60 |
| PO Number | po_number | |
| Currency Code / Exchange Rate | currency_code / exchange_rate | Blank = business default currency / 1.0 |
| Amount Already Paid | amount_paid | Set directly on the invoice — no separate payment record is created |
| Expected Total | expected_total | Validation only — warns if it disagrees with the computed total, doesn't override it |
| SKU / Barcode | sku / barcode | Free-text snapshot — never linked to a real product |
| Quantity | quantity | Per line, default 1 |
| Discount % | discount_percentage | Per line, default 0 |
| VAT % | vat_rate | Per line, default 0 — e.g. 15 for 15% |
Supplier Bills
Bill-level fields (repeat the same value on every row of one bill) and line-item fields (one value per row).
| Field | CSV key | Notes |
|---|---|---|
| Supplier Name | supplier_name | Required Or use Supplier Code — must already exist |
| Bill Date | bill_date | Required DD/MM/YYYY or YYYY-MM-DD |
| Item Description | description | Required Per line |
| Unit Price | unit_price | Required Per line |
| Bill Number | bill_no | Blank = auto-generate (BILL-####). Duplicate-match key. |
| Supplier Code | supplier_code | Preferred over Supplier Name when given |
| Supplier's Invoice Number | supplier_invoice_no | The vendor's own reference number, for your records |
| Due Date | due_date | Blank = derived from the supplier's payment terms |
| Currency Code / Exchange Rate | currency_code / exchange_rate | Blank = business default currency / 1.0 |
| Amount Already Paid | paid_amount | Set directly on the bill — no separate payment record is created |
| Unit Price Includes Tax | unit_price_includes_tax | T/F — this bill's own setting, not the business-wide default |
| Expected Total | expected_total | Validation only — warns if it disagrees with the computed total, doesn't override it |
| Quantity | quantity | Per line, default 1 |
| Discount % | discount_percentage | Per line, default 0 |
| VAT % | vat_rate | Per line, default 0 — e.g. 15 for 15% |
| Expense Account Code | expense_account_code | Chart of Accounts code, per line. Blank = the supplier's own default, else the business default purchase account. |
Unlike Stock import, Customers/Suppliers always require a header row — there's no legacy positional-column fallback.
An unparseable number (e.g. text in Credit Limit) shows a warning on that row and leaves the field unset — it doesn't fail the whole import.
If you need to change details on an existing customer or supplier, edit it directly in Customers / Suppliers — import only ever creates new records.
If AR/AP/Expense Account Code is mapped but the code doesn't match anything in your chart of accounts, that row still imports — the account is left blank (business default applies) and a warning names the missing code, in the result screen after import.
Not yet available for Customers/Suppliers in this release — only Import is supported today.
Dashboard
Your daily overview — sales, receivables, payables, VAT, inventory and cash
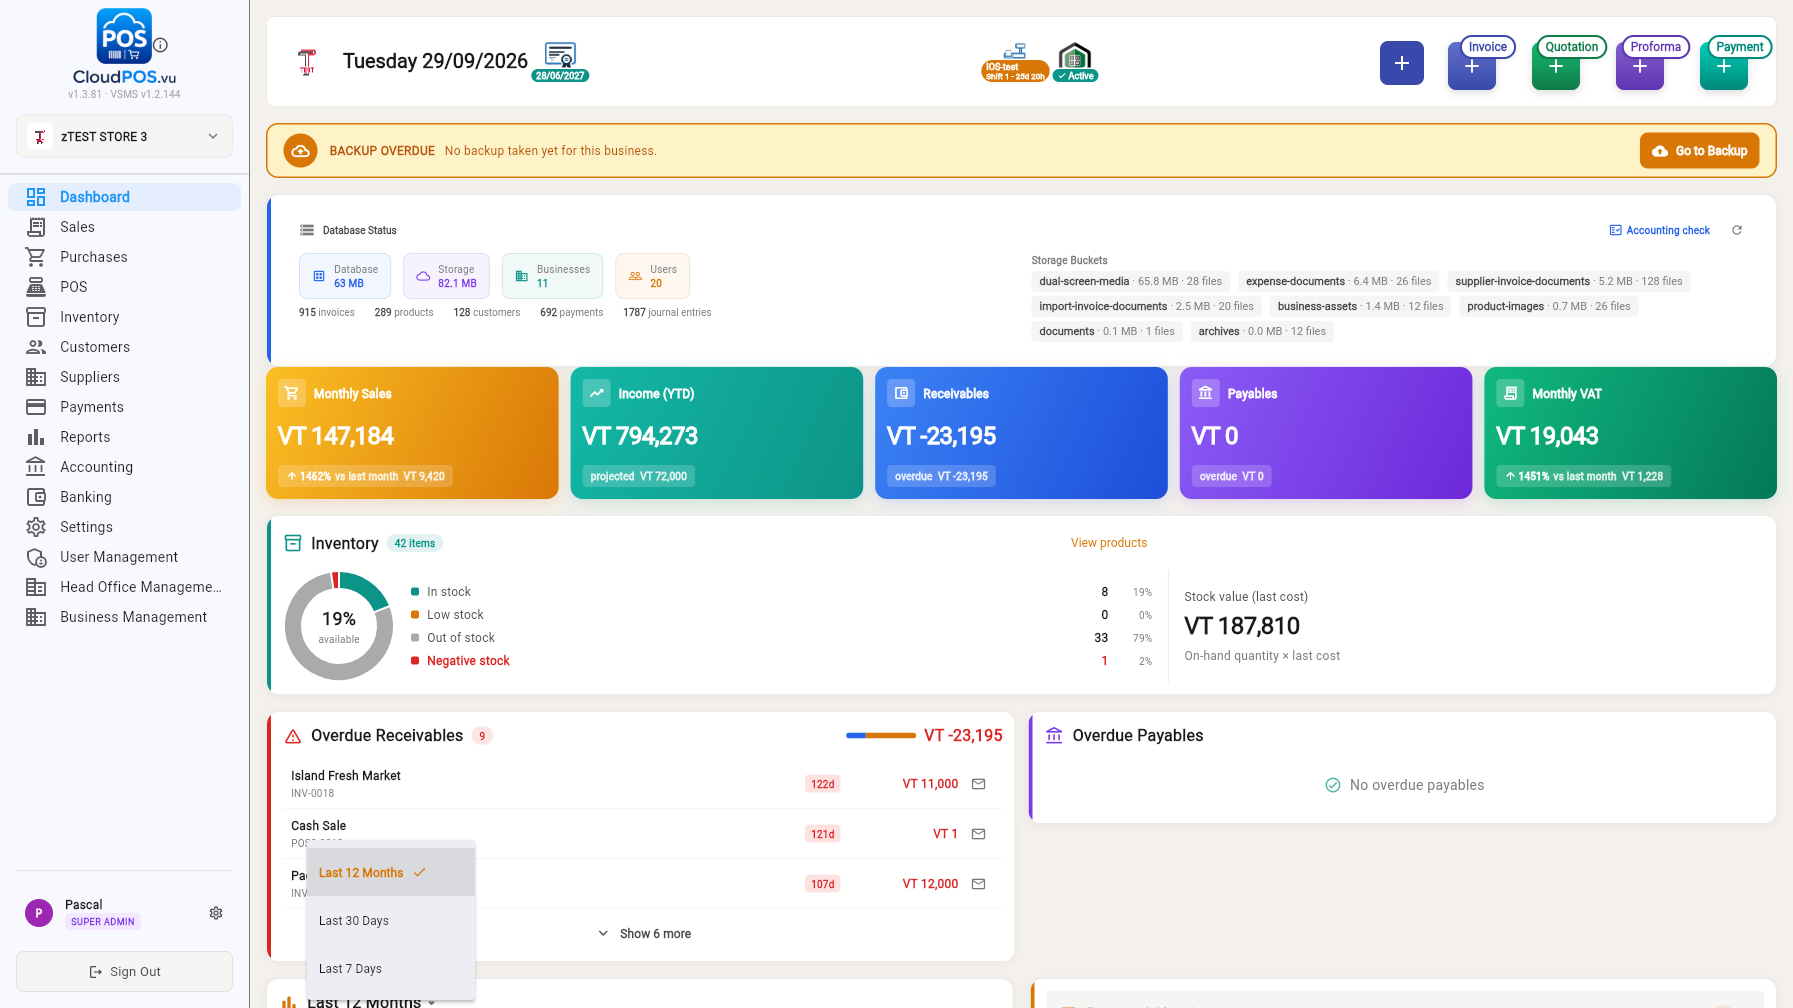
The Dashboard is the first screen after login. It shows the current date, open POS shifts, and quick-action buttons (+ Invoice, Quotation, Proforma, Payment) in the top bar.
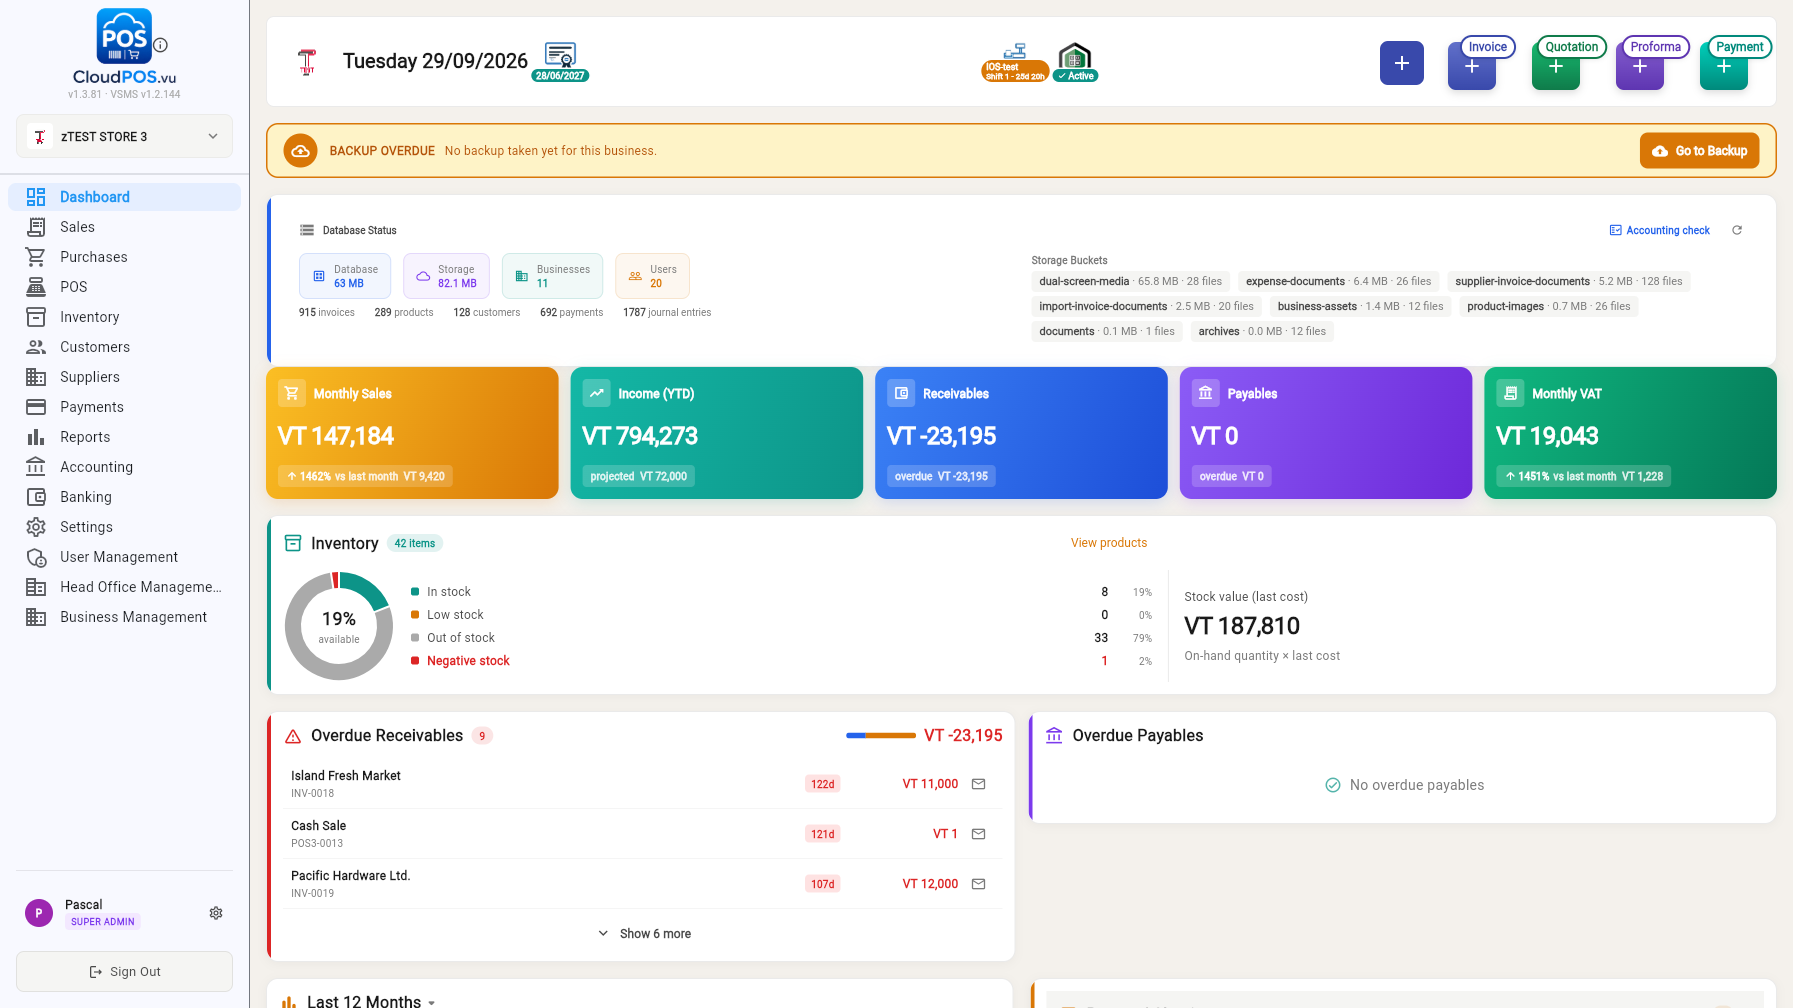
Monthly Sales, Income (YTD), Receivables, Payables and Monthly VAT — each with trend vs. last month and overdue amounts where relevant.
Stock health donut (in stock / low / out / negative), item counts and stock value at last cost. Click View products to open Inventory.
Customers and suppliers with overdue balances, with days overdue. Click a row to open the statement; use the ✉️ icon to send a payment reminder.
Last 7 Days / 30 Days / 12 Months of sales collected vs. open, and expenses paid vs. unpaid.
Incoming vs. outgoing money and net position — click to open the Banking module's Payment Clearing tab.
Bar at the top shows database health with an Accounting check shortcut and backup status.
Inventory
Products & services, movements, valuation, stock take, bulk changes and categories
The Products & Services tab lists every item you sell or stock, with retail price, cost price, margin, benefit and per-location stock.
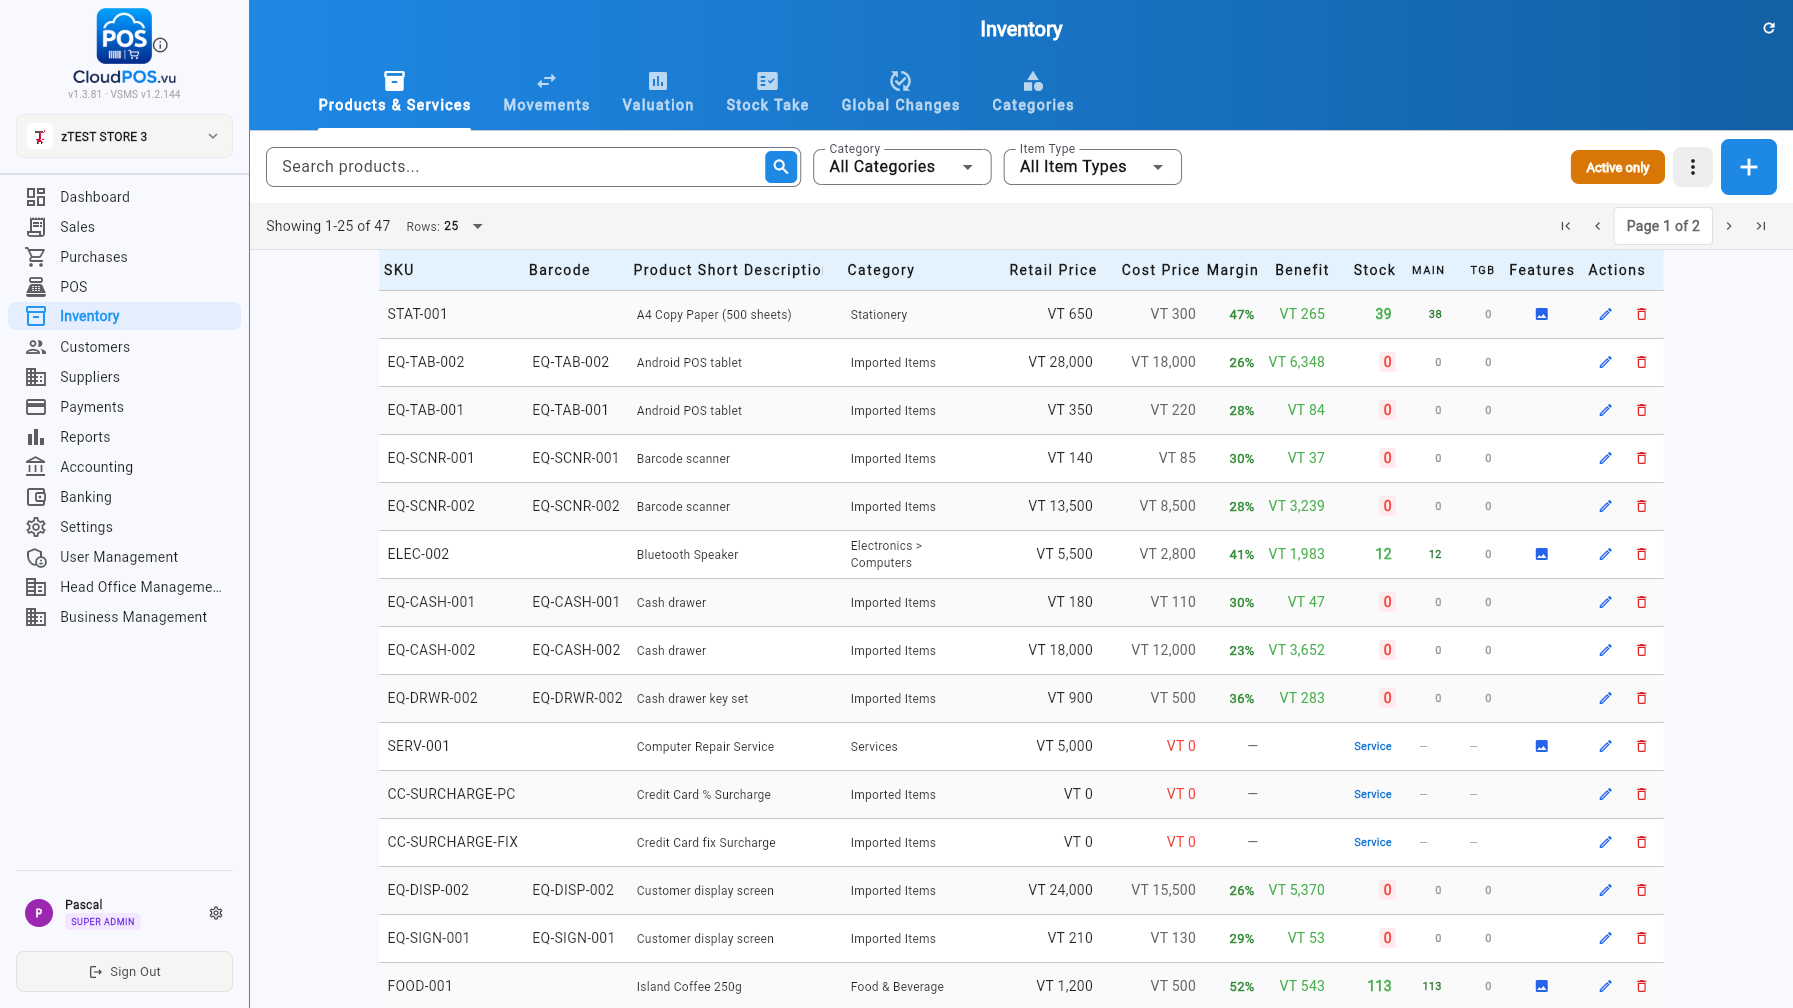
Each row shows SKU, barcode, description, category, prices, margin %, benefit and stock at each location (MAIN, TGB…). Use the ✏️ action to edit, 🗑️ to deactivate, and the 🖼️ icon shows items with images. Filter by category or item type, and toggle Active only to hide archived items.
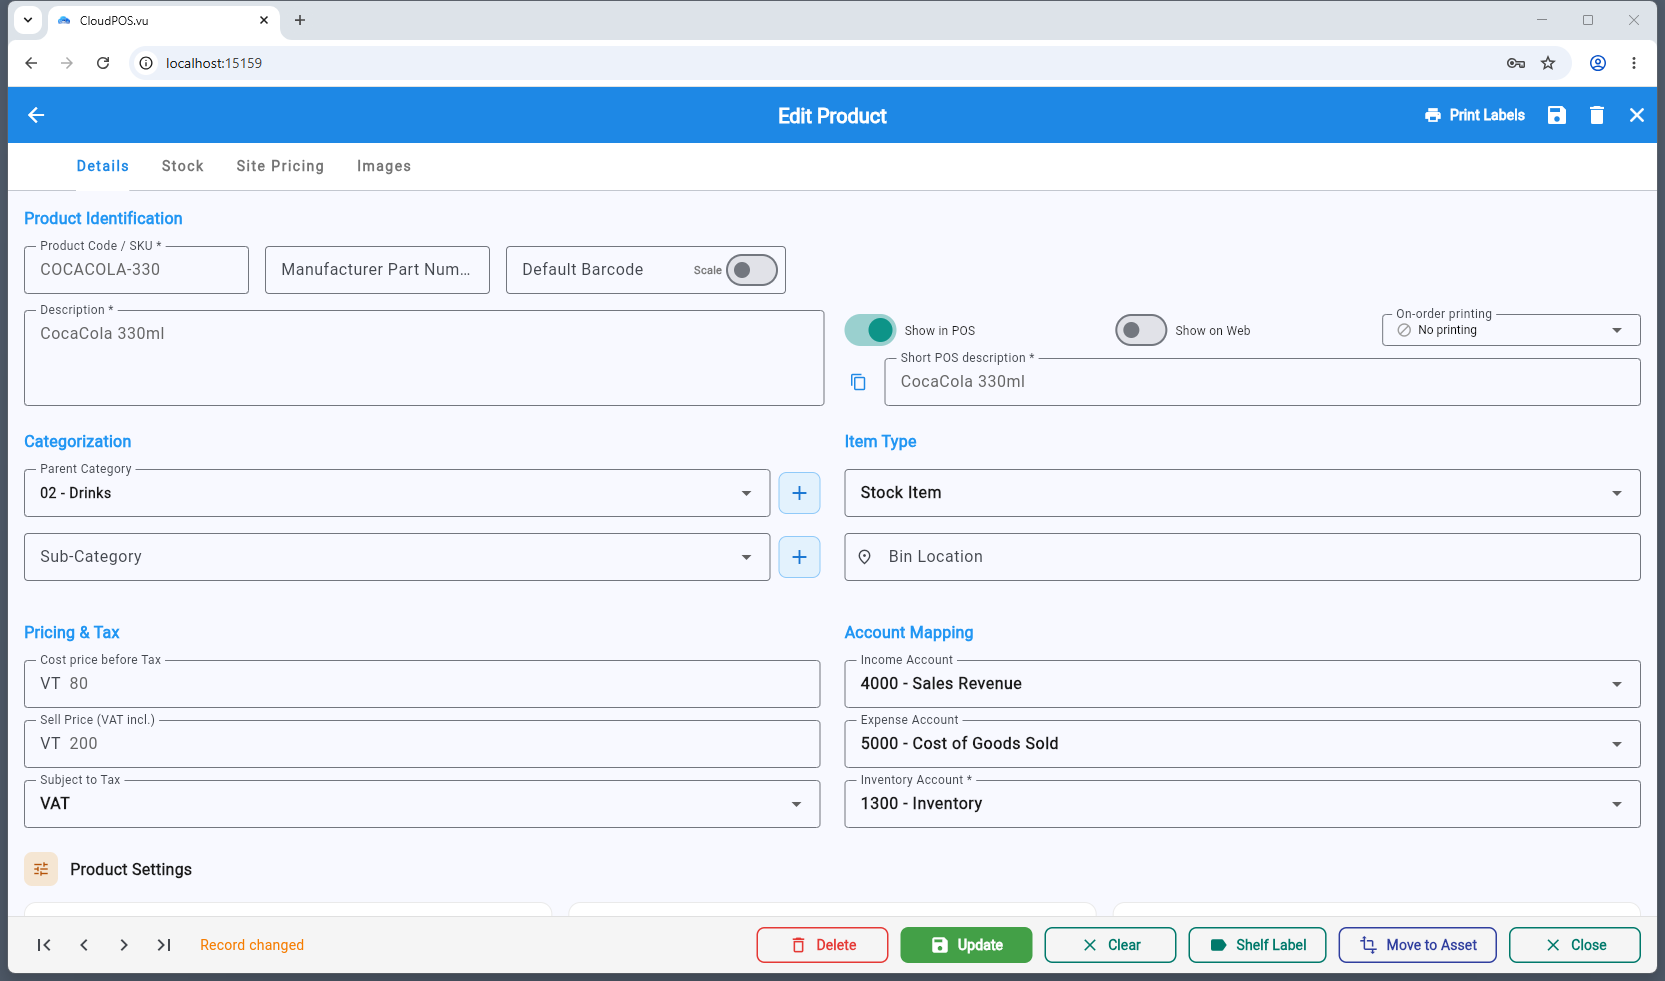
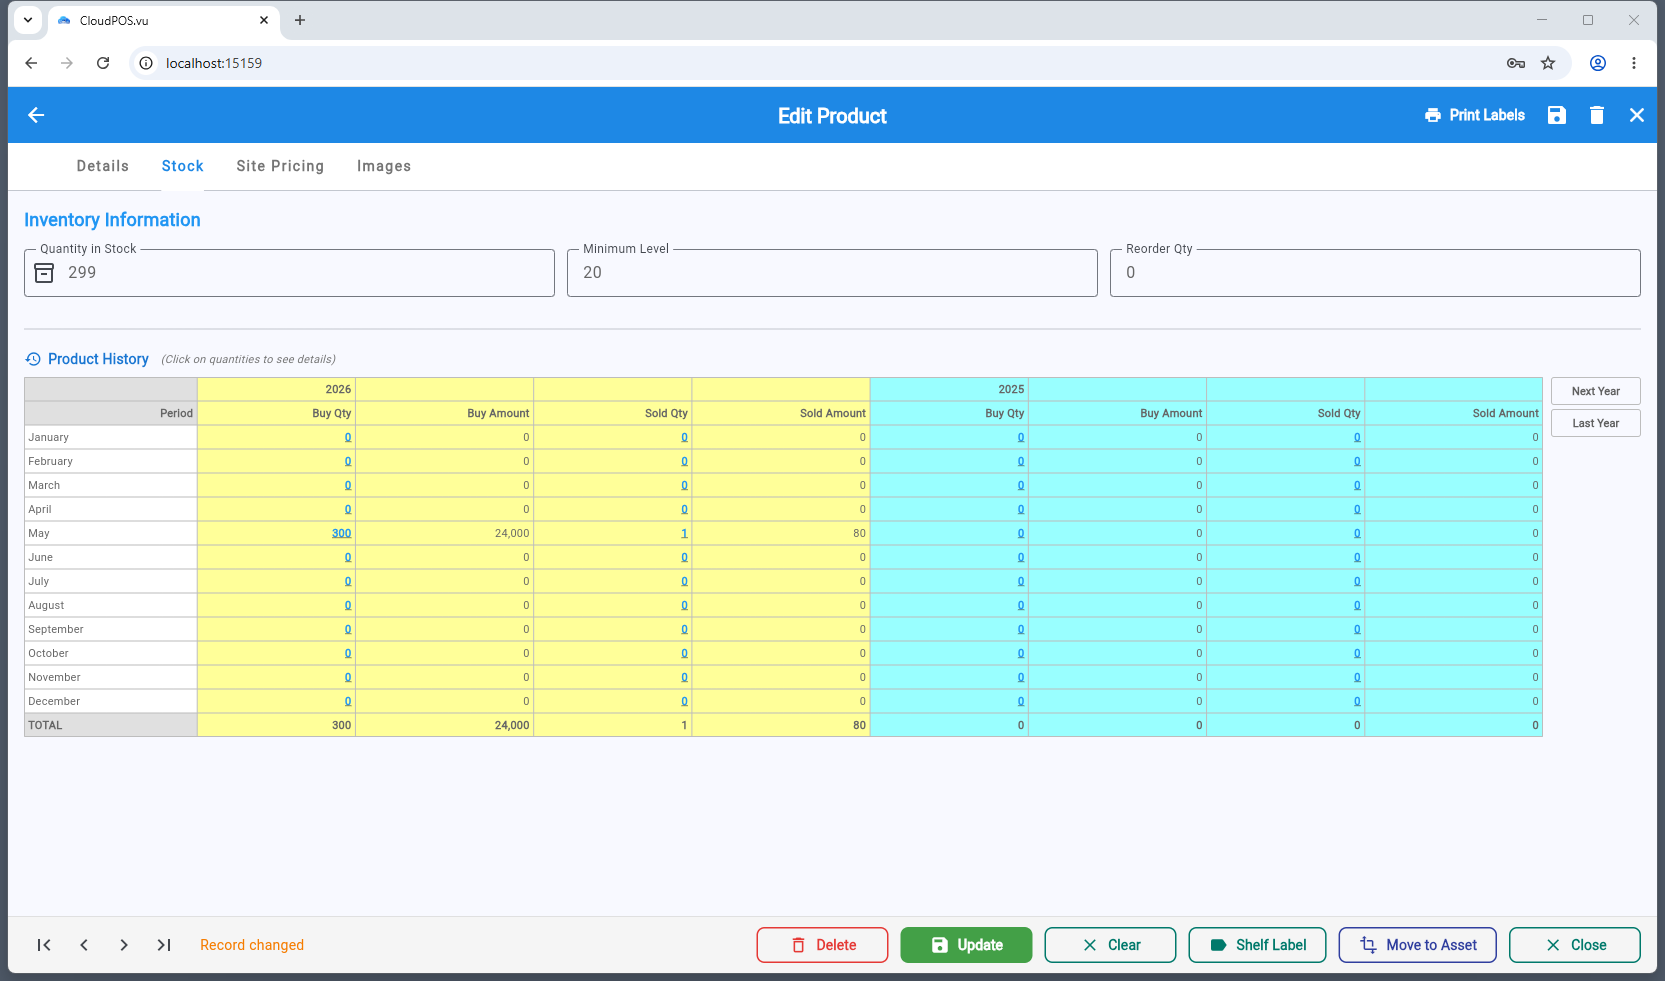
Open a product to edit everything about it in one scrollable page: identity & barcodes, classification & availability, variants, pricing & tax, tiers, inventory, sales behaviour, accounting mapping and purchase/sales history. See the Product Configuration guide for a field-by-field reference.
Define characteristics (size, colour, material…) and values to build independently sellable combinations.
Trade / Wholesale / Reseller tier percentages plus a dated special price.
Whole units only, block discount, ask quantity/price/description, serial-number and expiry tracking, custom till prompt.
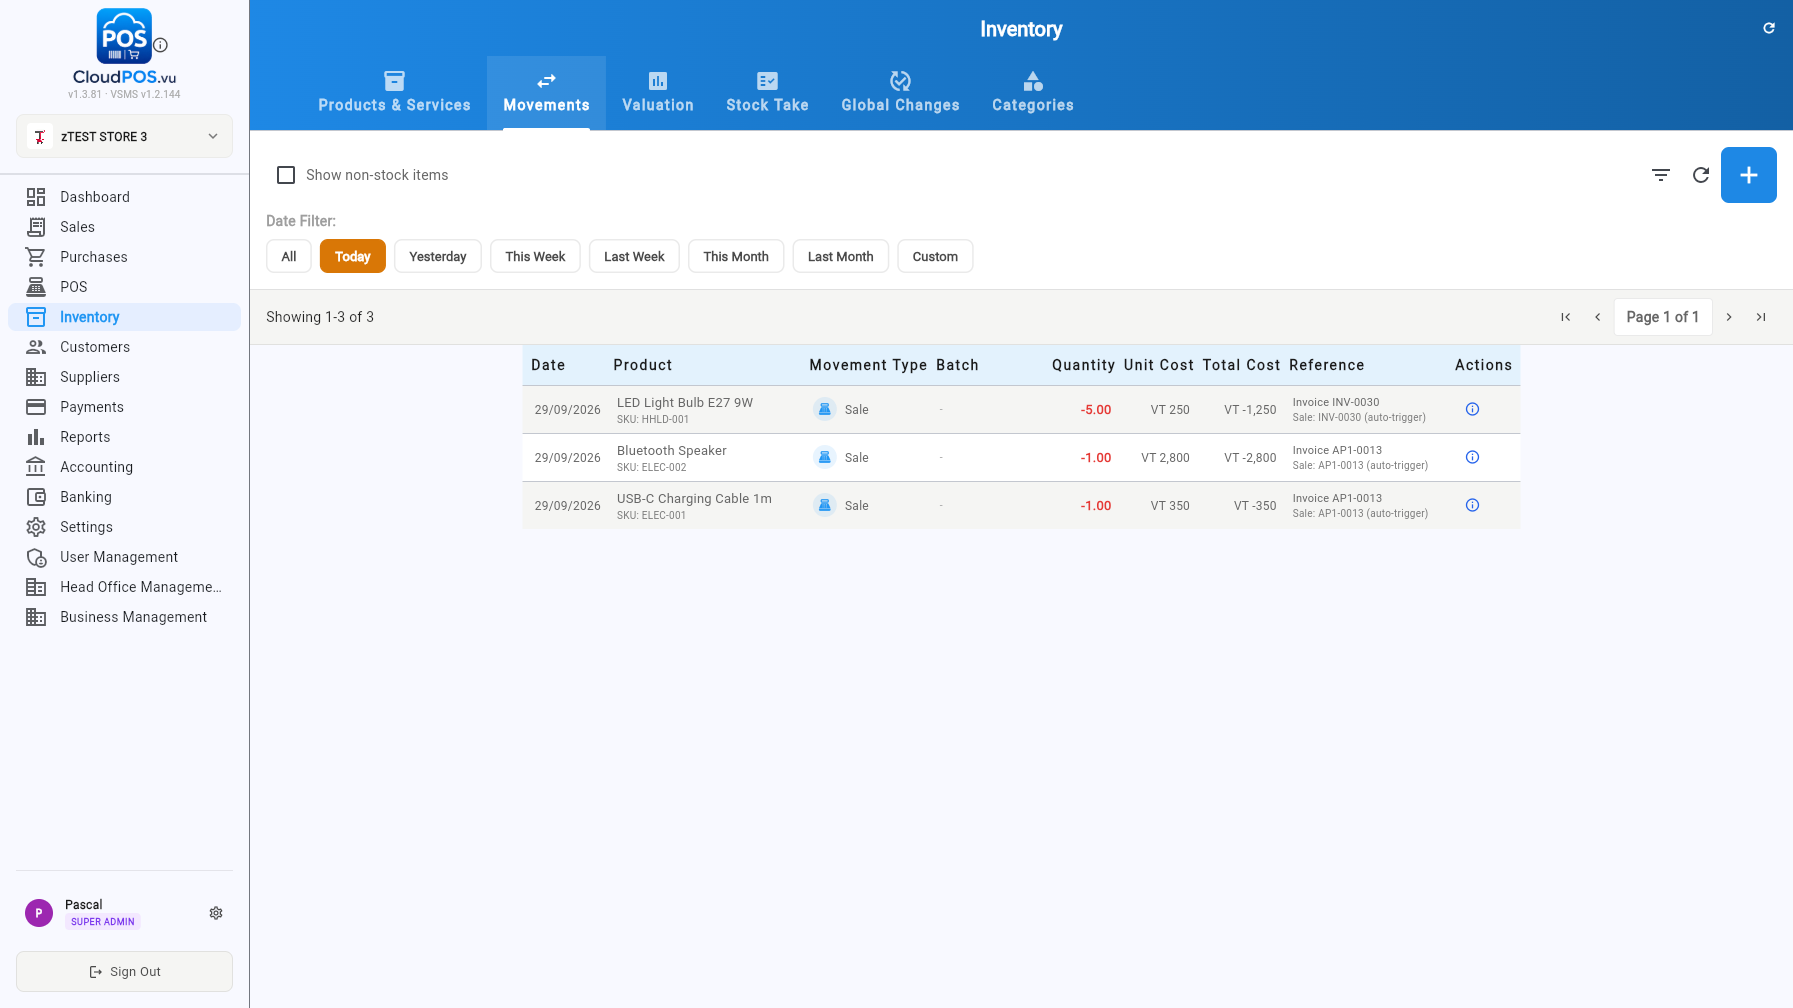
Every stock in/out movement with date, product, movement type, batch, quantity, unit/total cost and the referencing document (sale, purchase, adjustment).
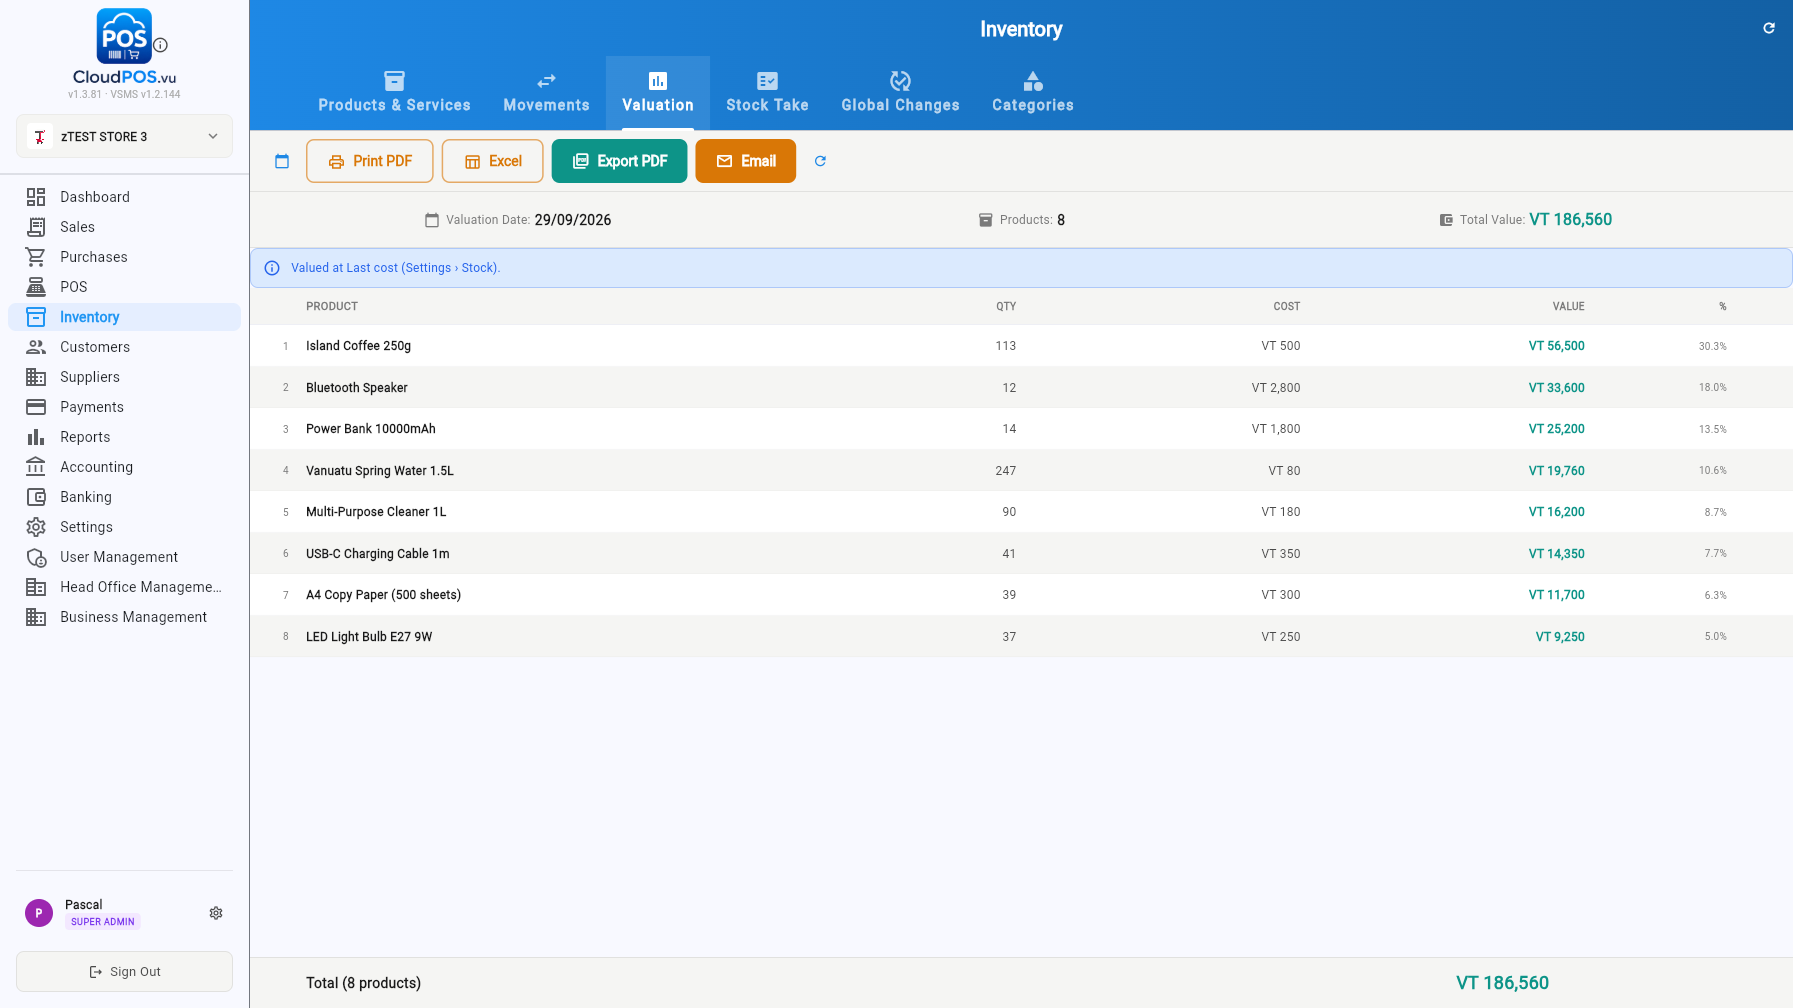
Stock value as of a chosen date, valued at last cost (Settings → Stock controls the costing method). Export to PDF/Excel or email the report.
Count physical stock and post the differences as adjustments. Pick the category, tag, count date and stock location, then enter counted quantities.
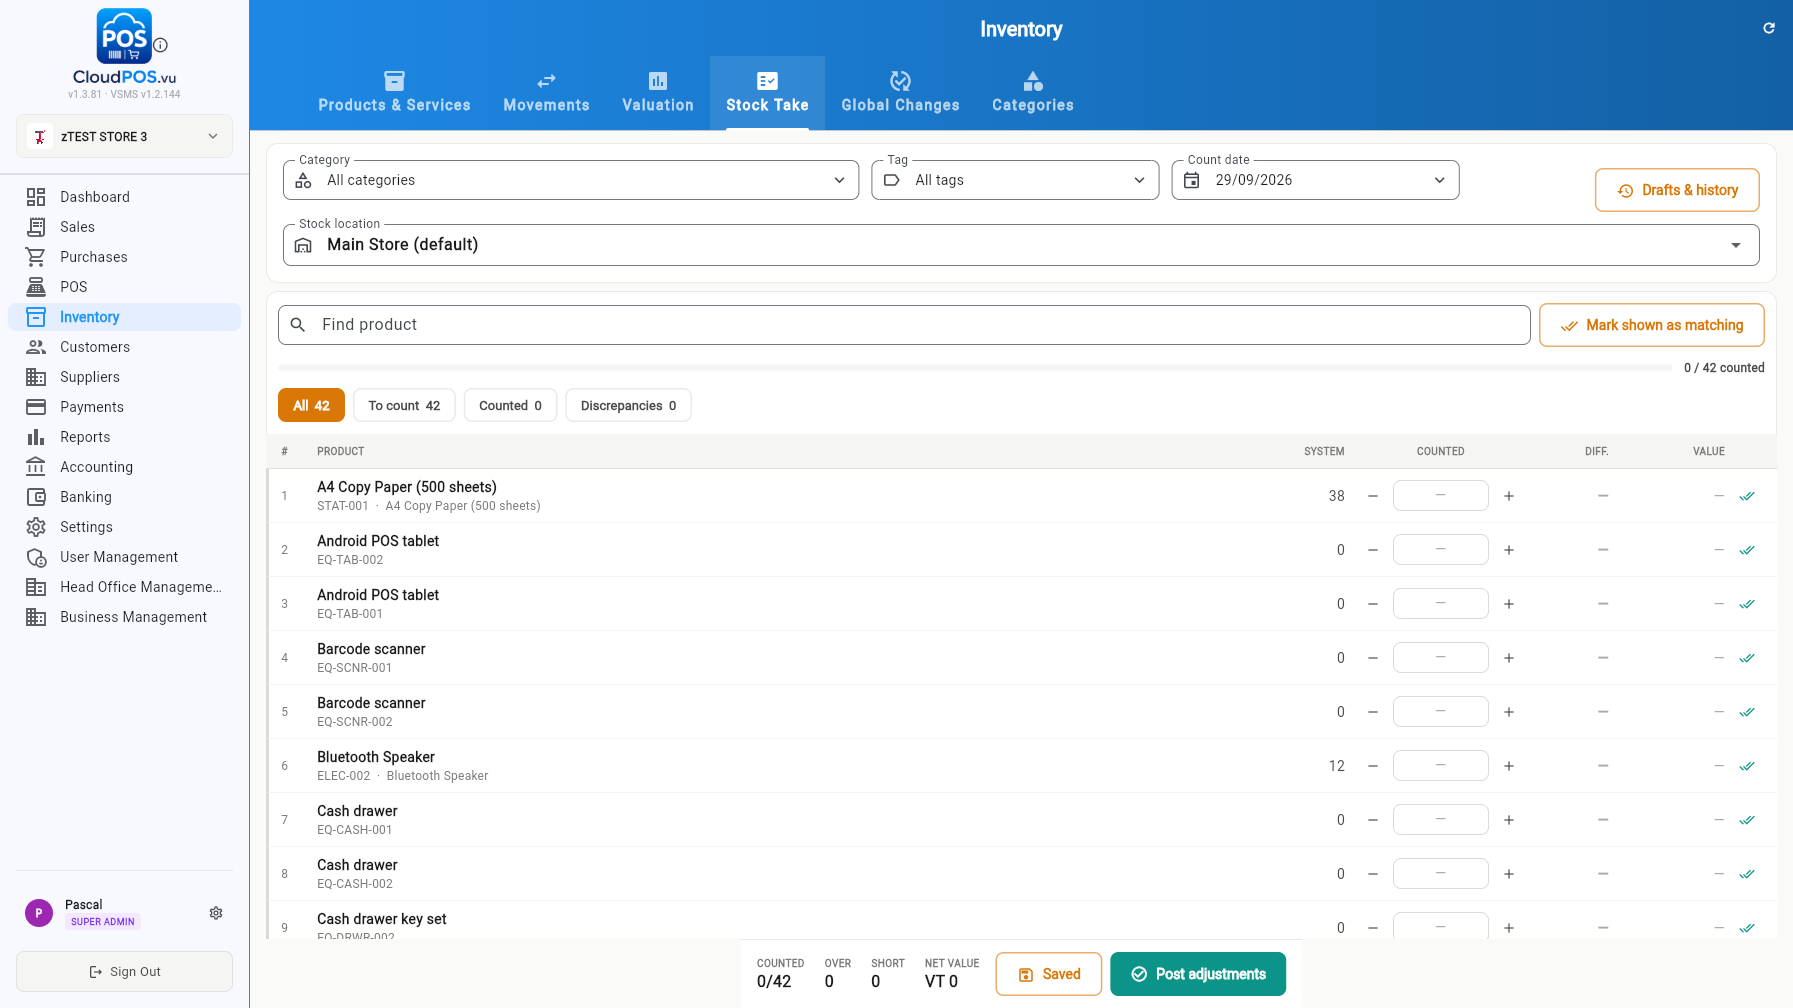
- Drafts & history — save a count as a draft and resume later.
- Post adjustments — applies all counted differences to stock in one action.
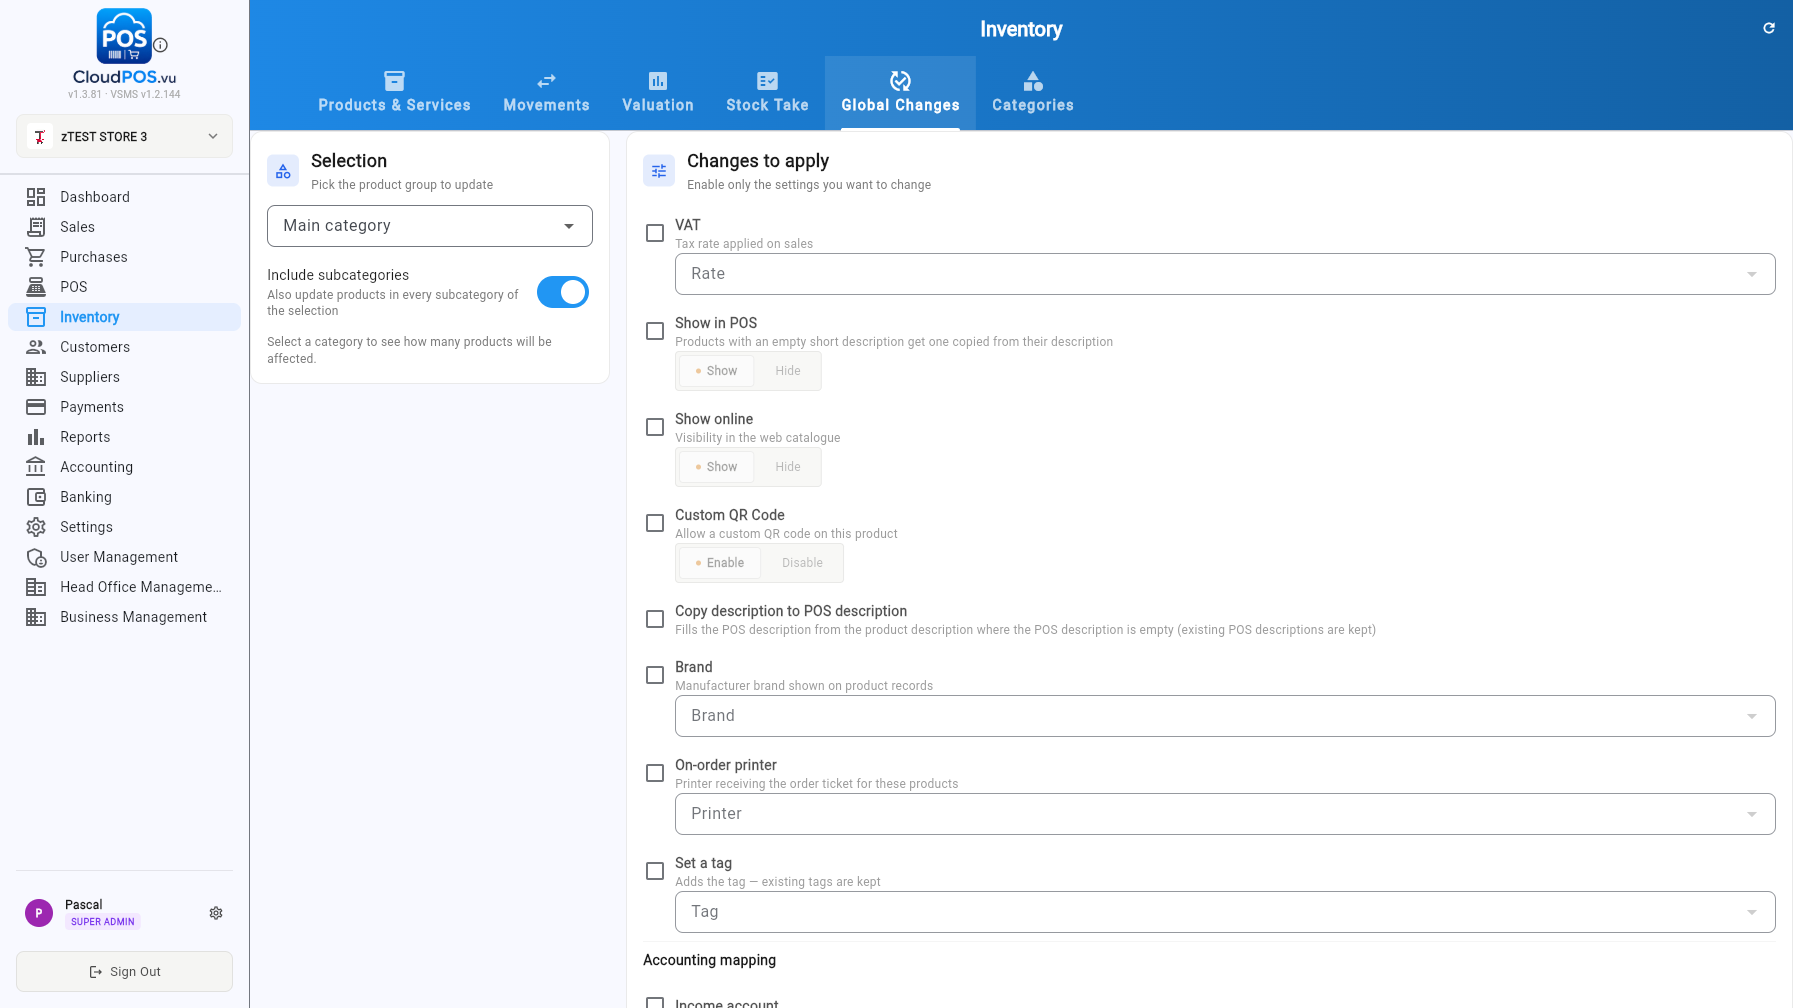
Apply bulk edits to a whole category (optionally including subcategories): VAT rate, show in POS / online, custom QR codes, copy description to POS description, brand, on-order printer, tags and accounting mapping.
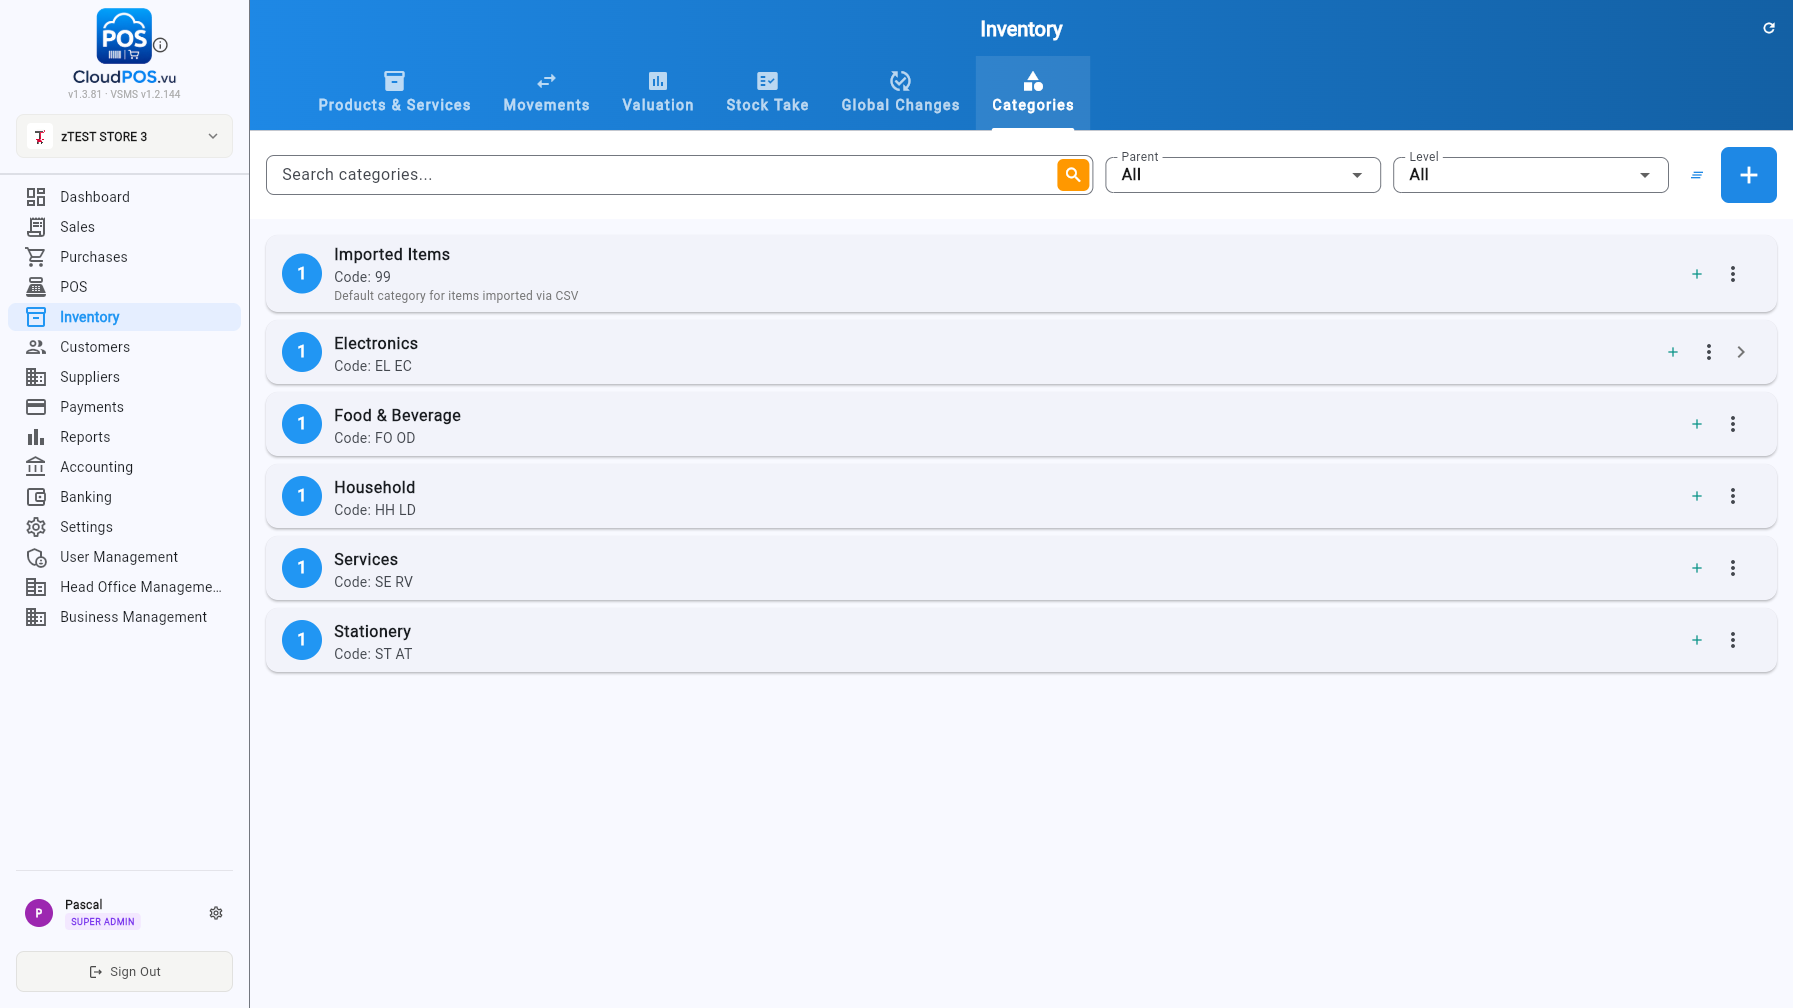
Hierarchical product categories with codes, parent/level filters and per-category product counts.
Customers & Suppliers
Customer and supplier records, statements, aging and transactions
The Customers module (green theme) holds your client list with live balance and credit per customer. Filter by All / Business / Individual / Stopped.
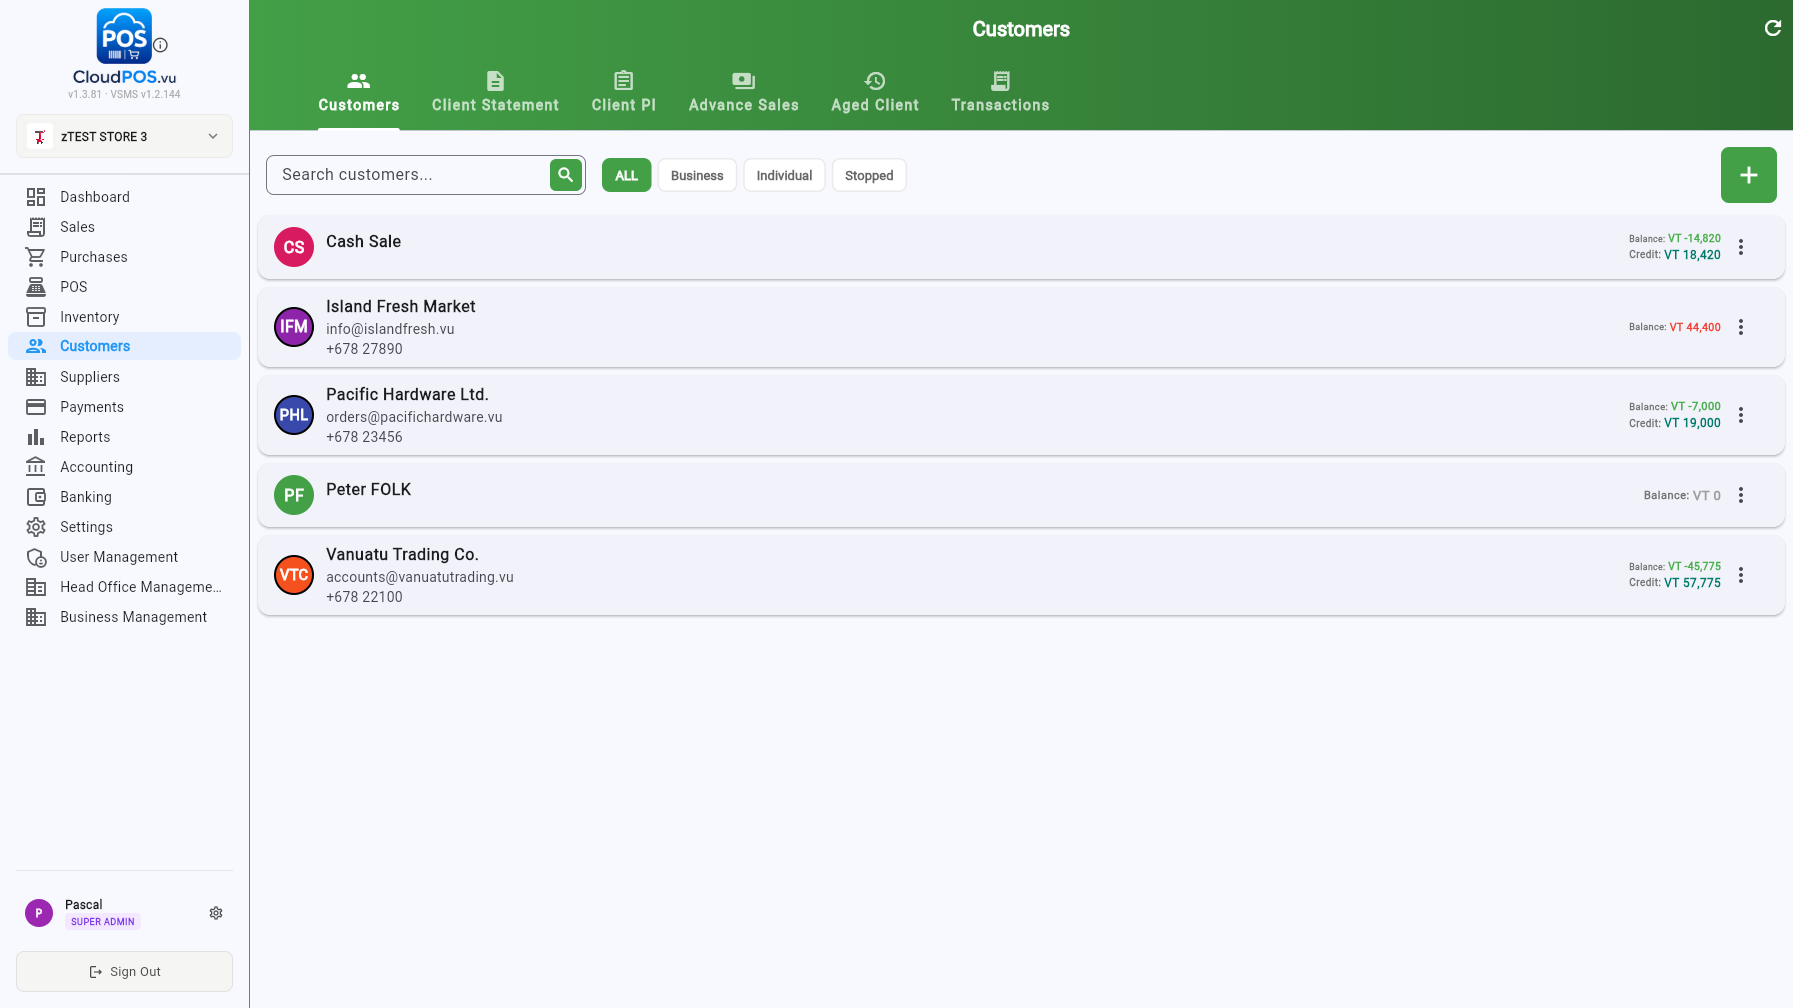
Alongside the list, five tabs give the full receivables picture:
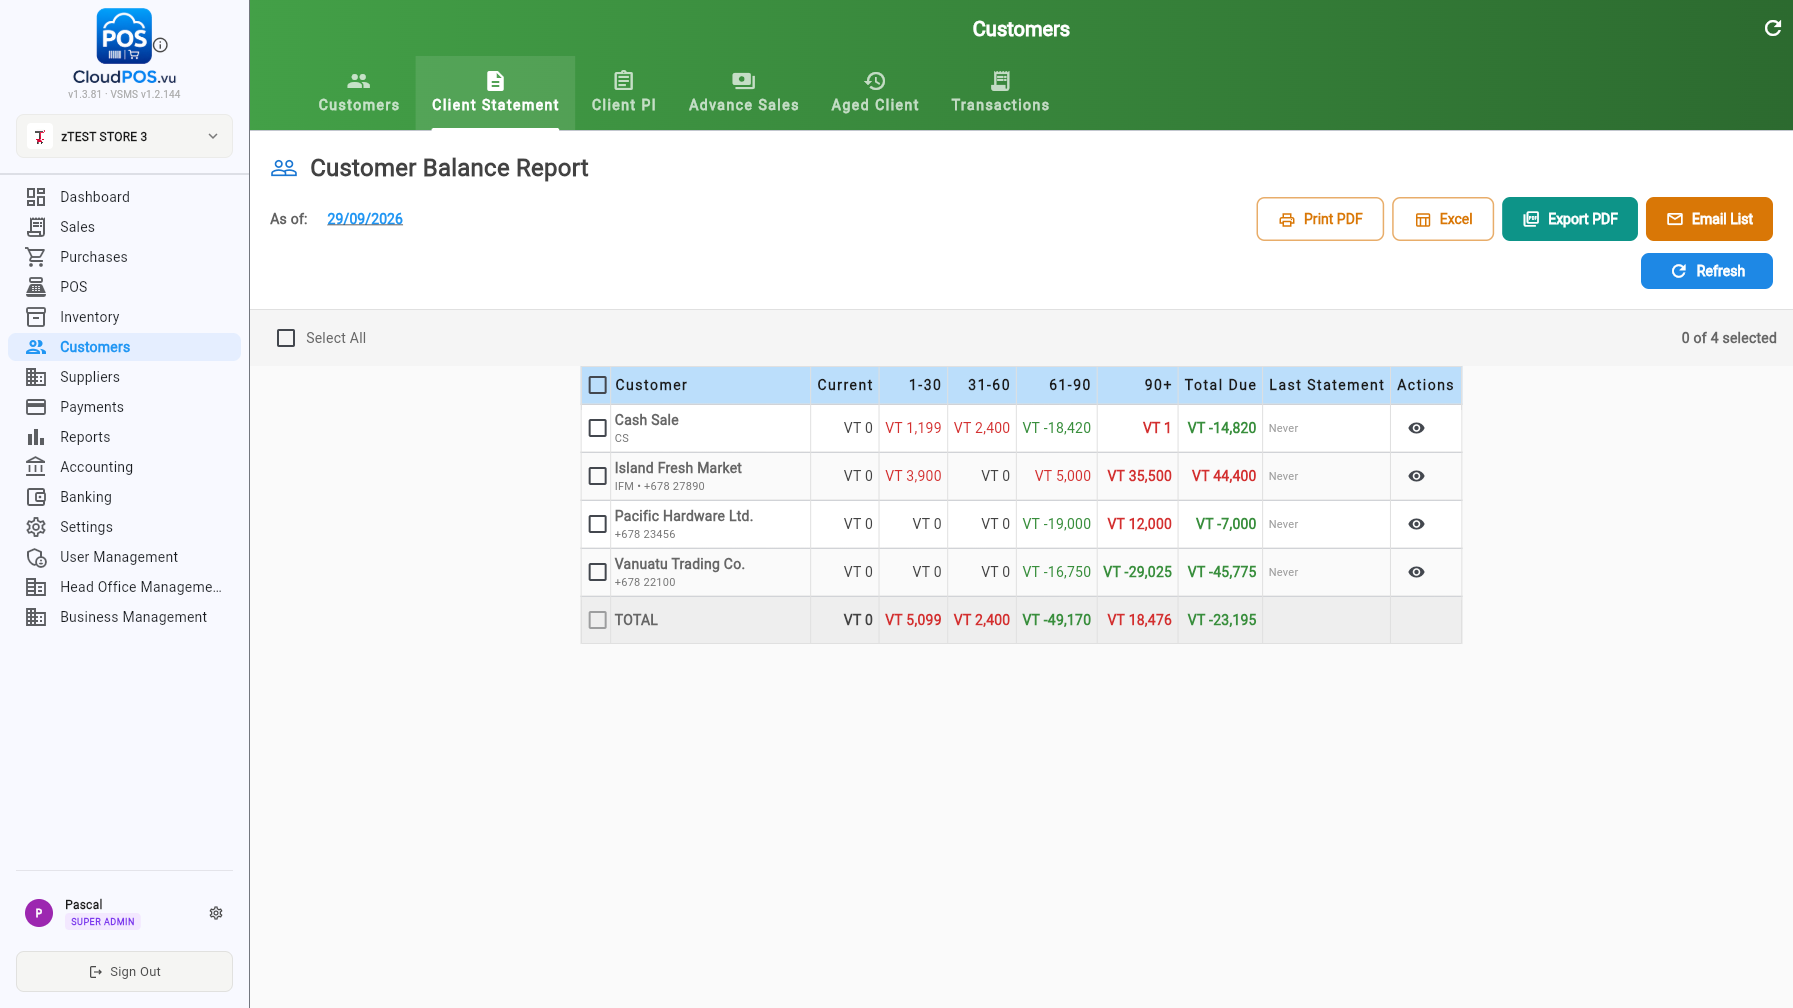
- Client Statement — Customer Balance Report with aging buckets (Current → 90+ days), per-customer drill-down (👁️) and Print PDF / Excel / Export PDF / Email List. Select several customers to email statements in bulk.
- Client PI — open proforma invoices per customer with totals and balance due.
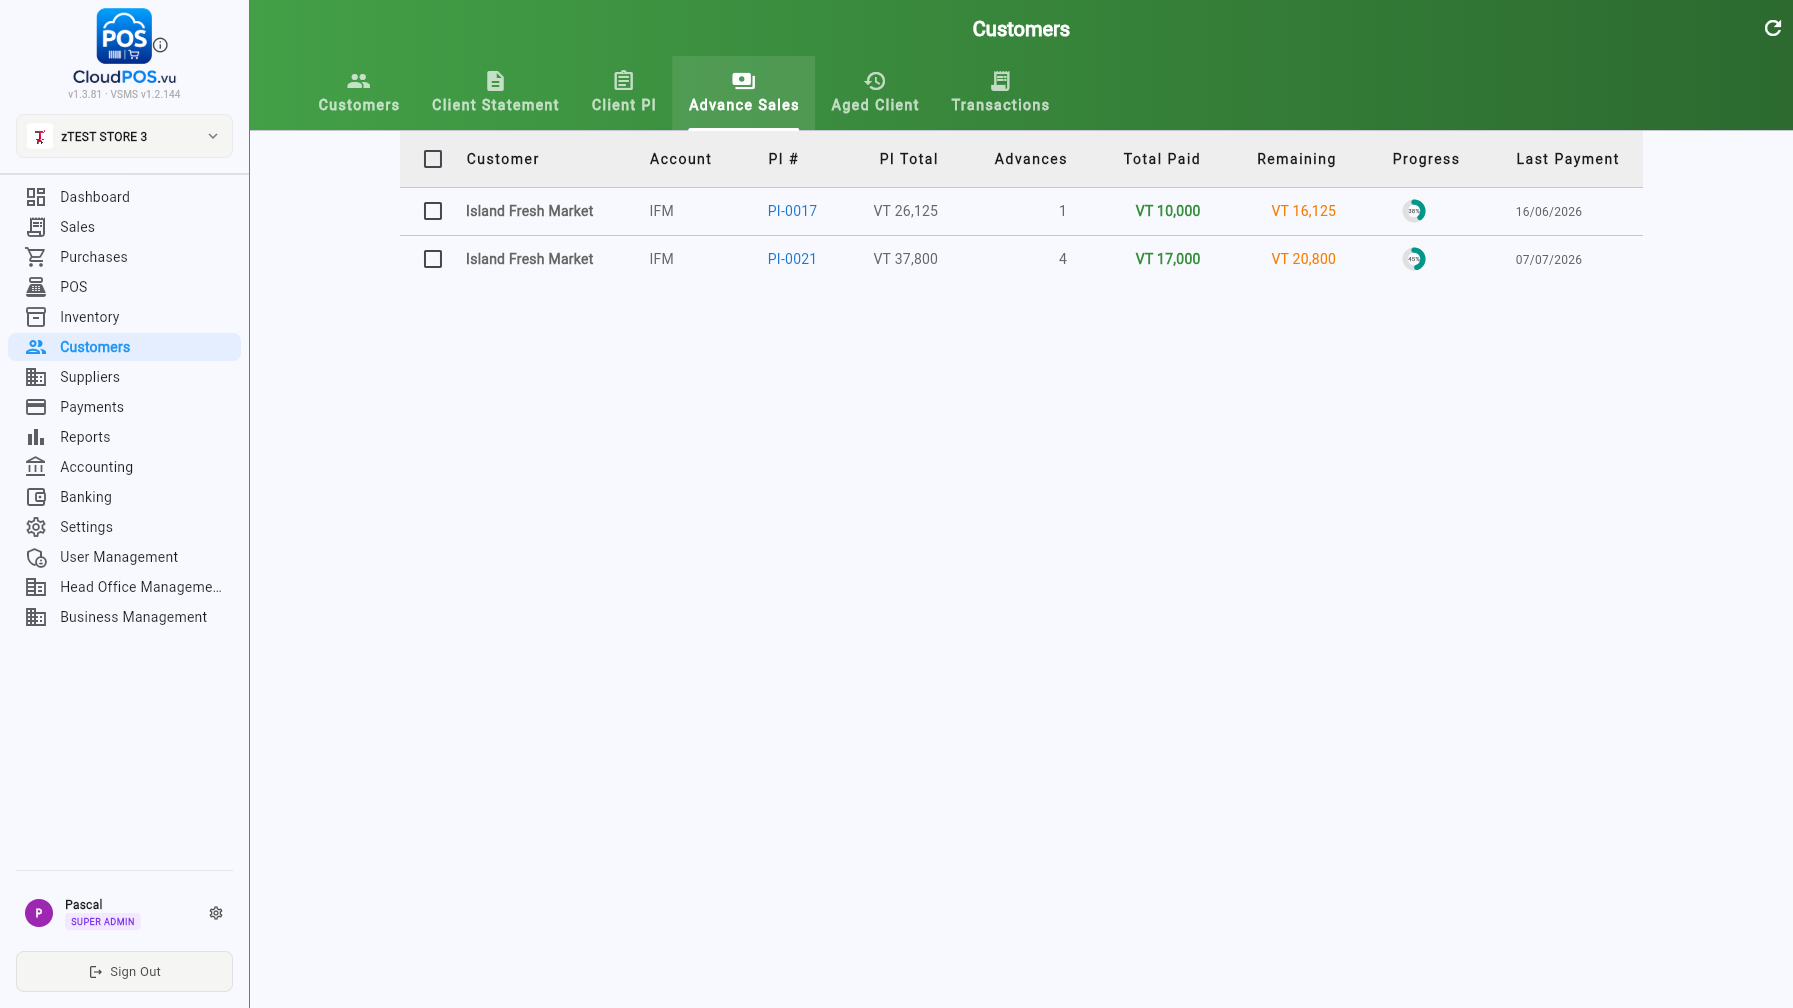
- Advance Sales — layby progress per PI: advances, total paid, remaining and a progress ring.
- Aged Client — aged balances by bucket with exports.
- Transactions — every invoice and payment in one ledger, filterable by period.
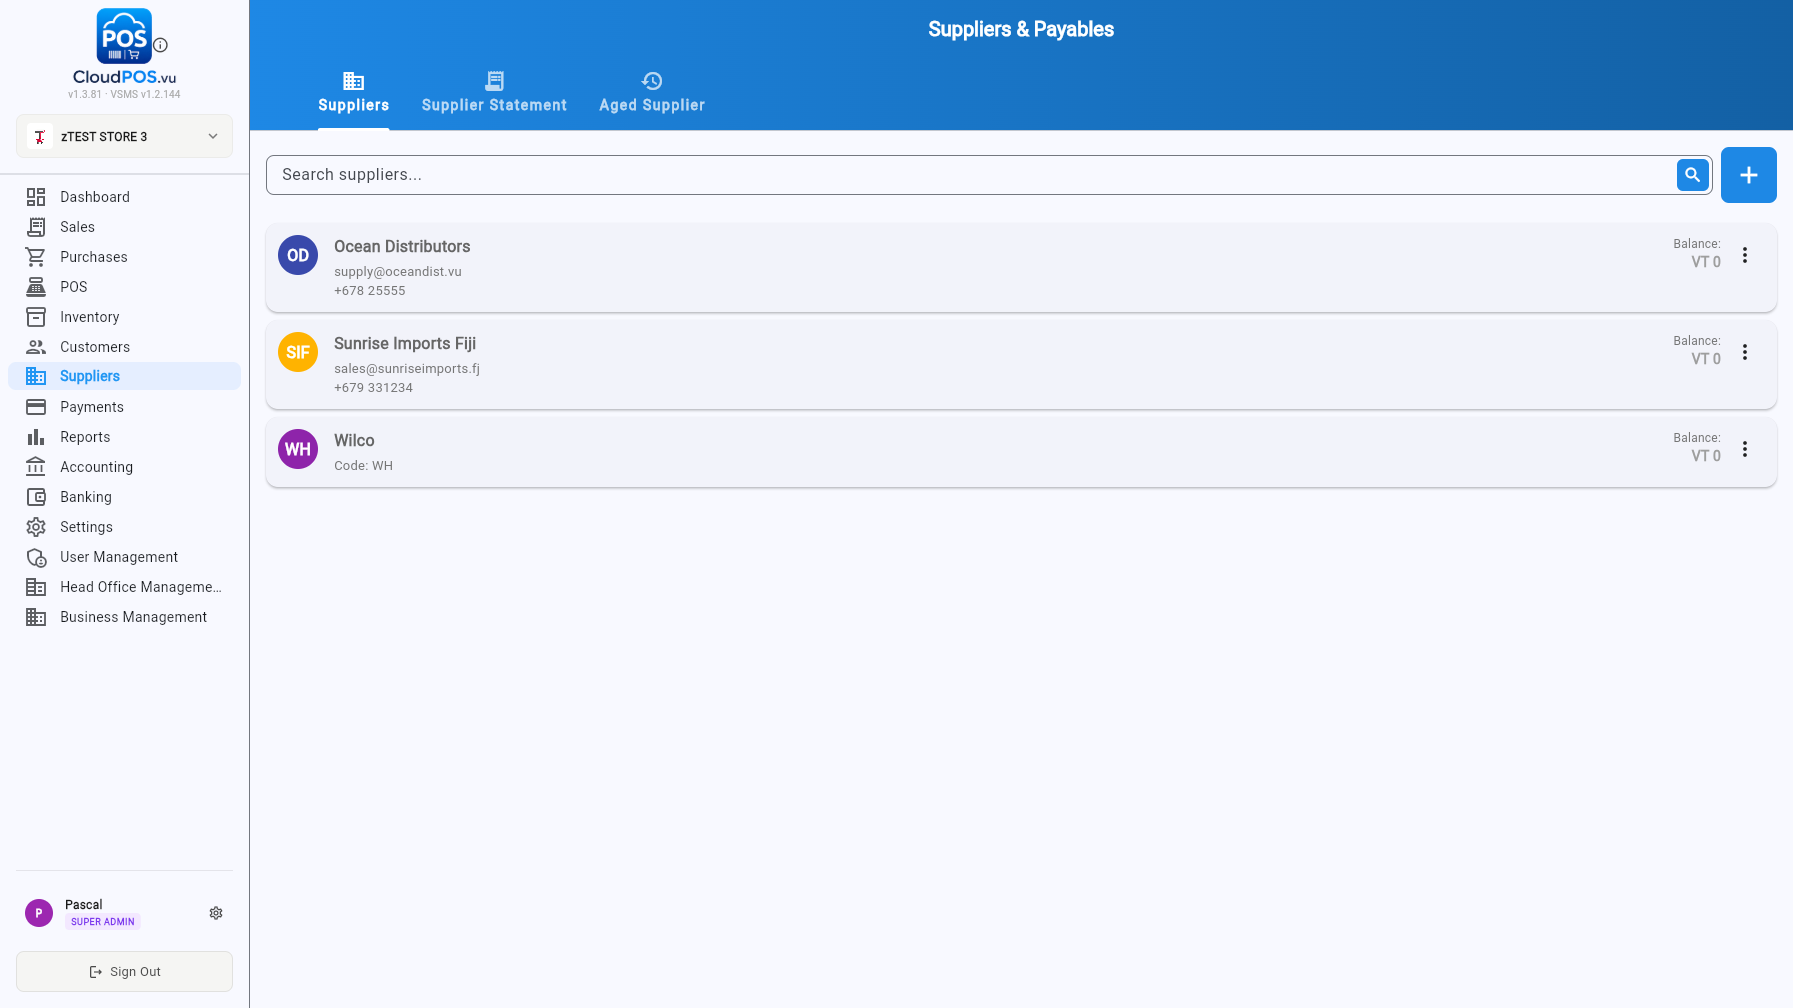
The Suppliers module (blue theme) mirrors customers for your payables: supplier cards with balance, plus Supplier Statement (Supplier Balance Report) and Aged Supplier tabs with the same export options.
Payments
Receive customer payments, pay suppliers and reconcile
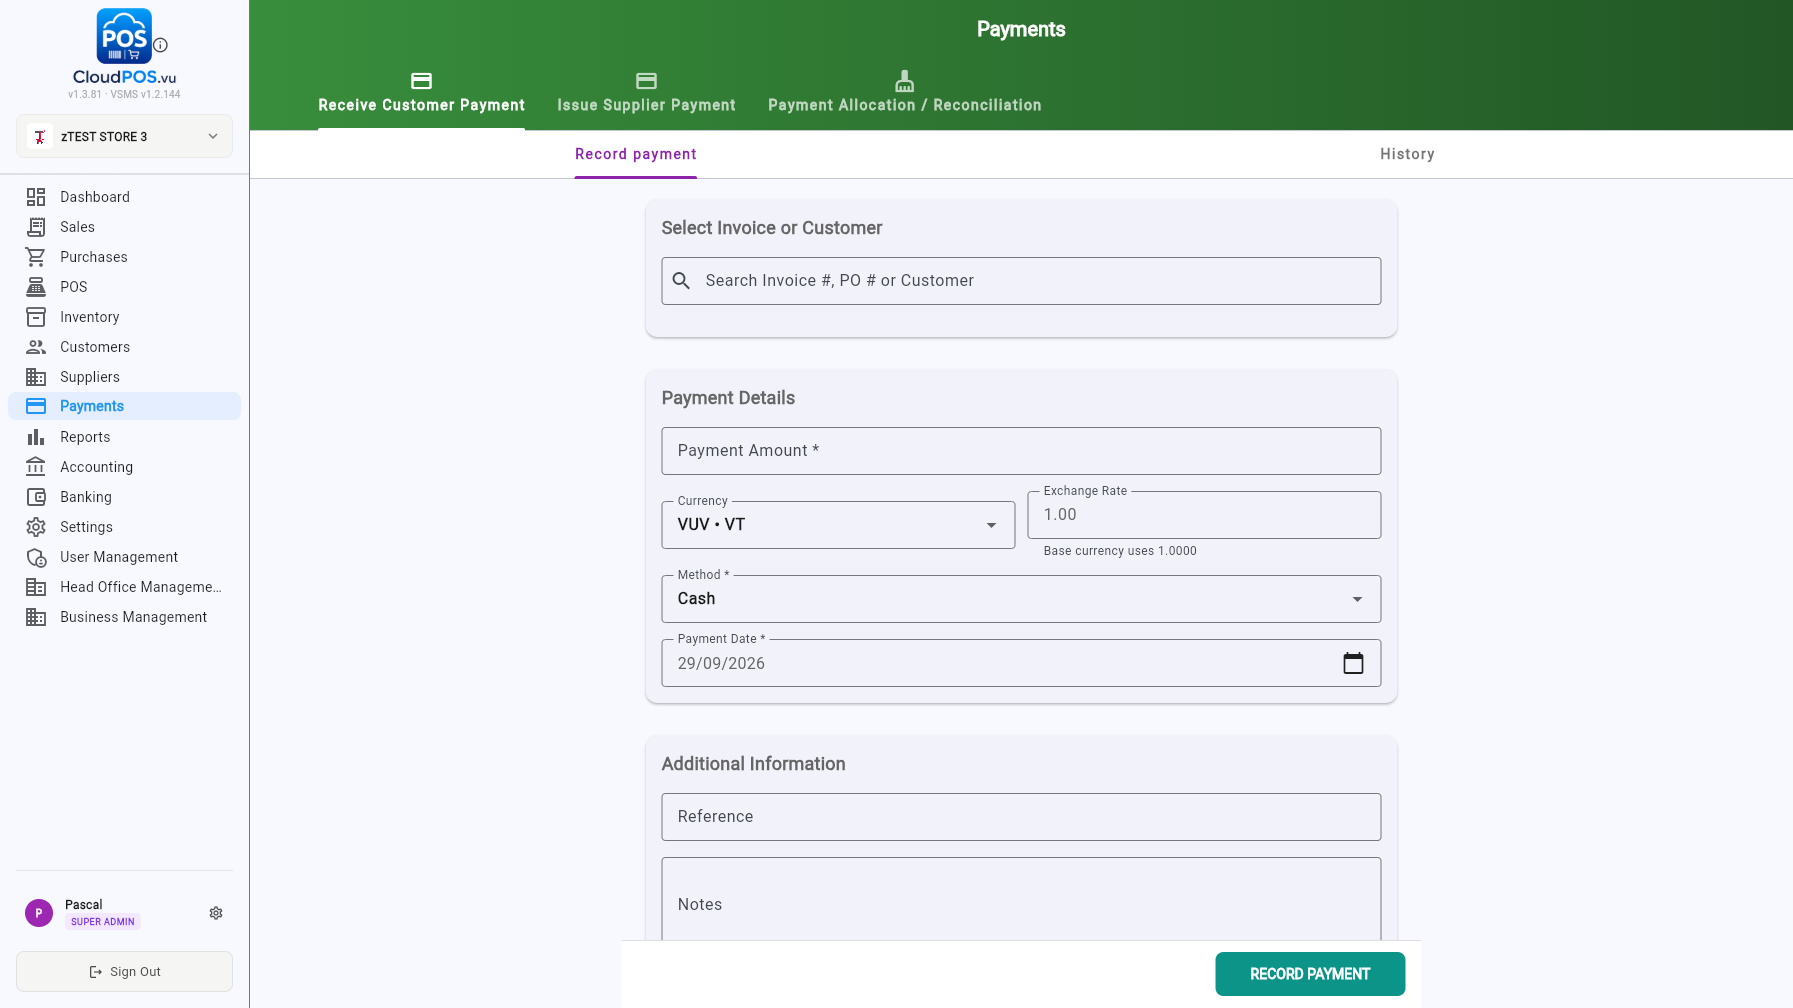
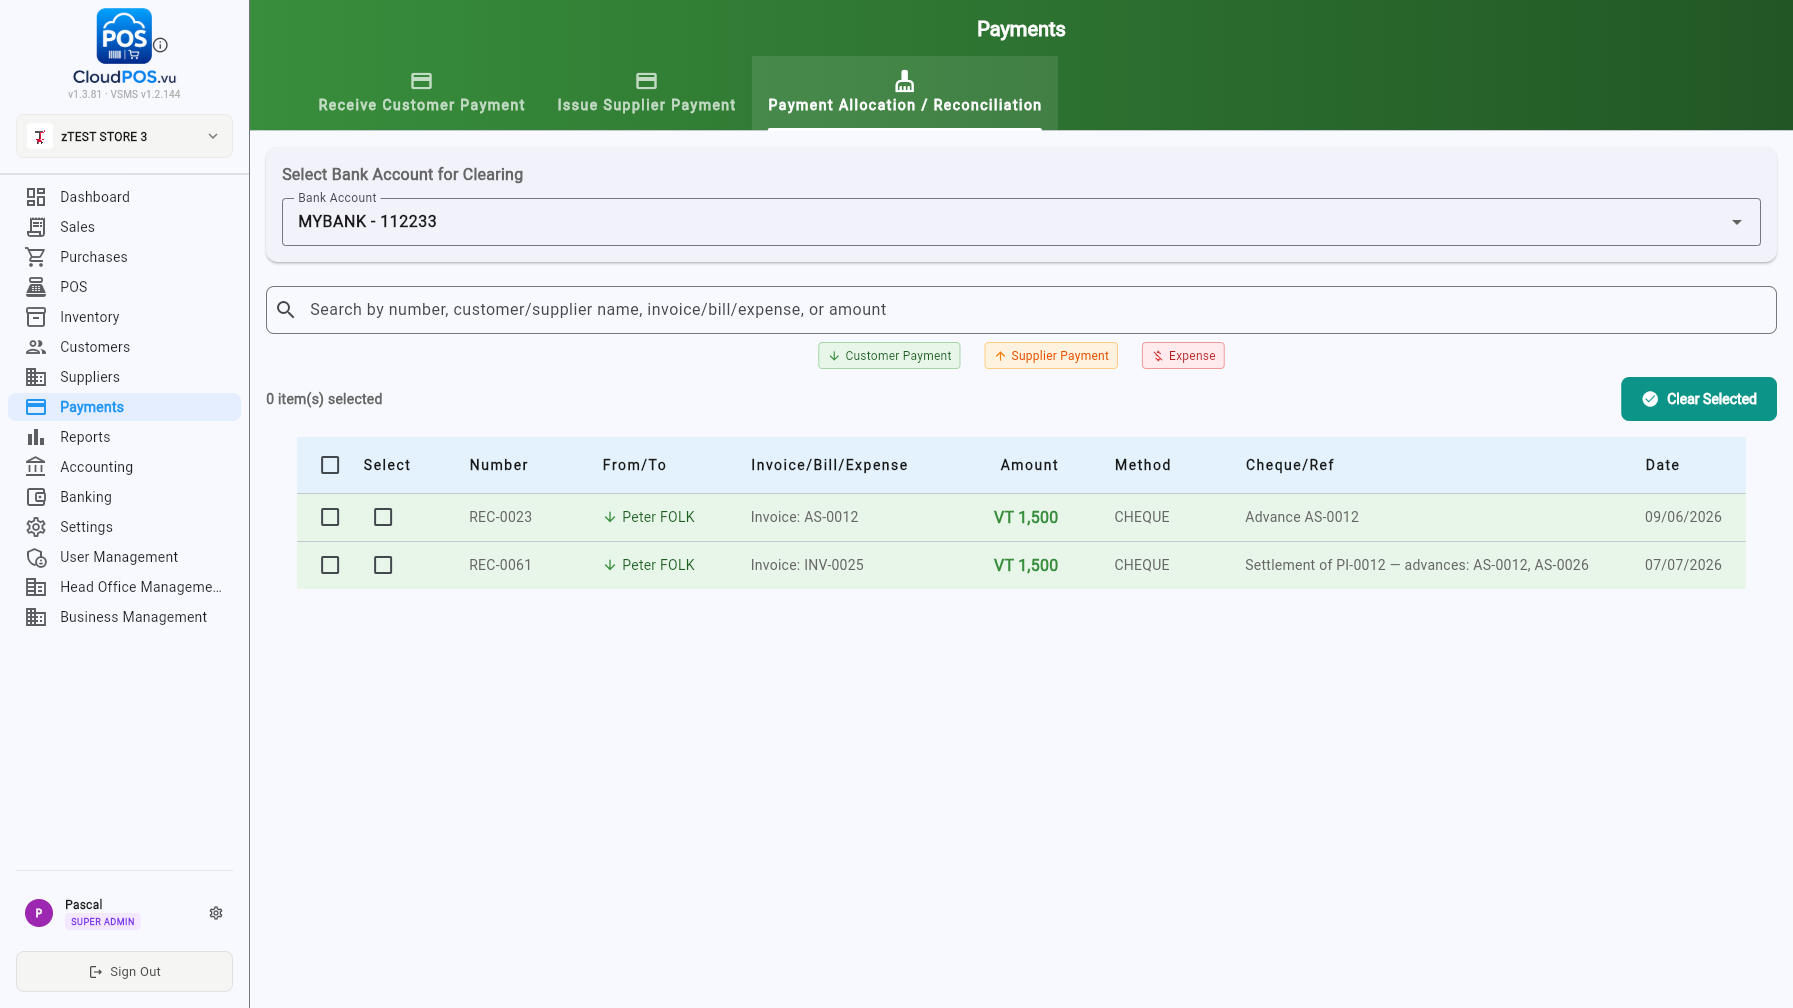
The Payments module combines three tabs:
- Receive Customer Payment — record a payment against any invoice or customer, with currency + exchange rate, method, date, reference and notes.
- Issue Supplier Payment — the same form for paying supplier bills.
- Payment Allocation / Reconciliation — pick a bank account, then tick unallocated customer payments, supplier payments and expenses and clear them in bulk.
Reports
35+ reports in seven categories, each with PDF, Excel and email exports
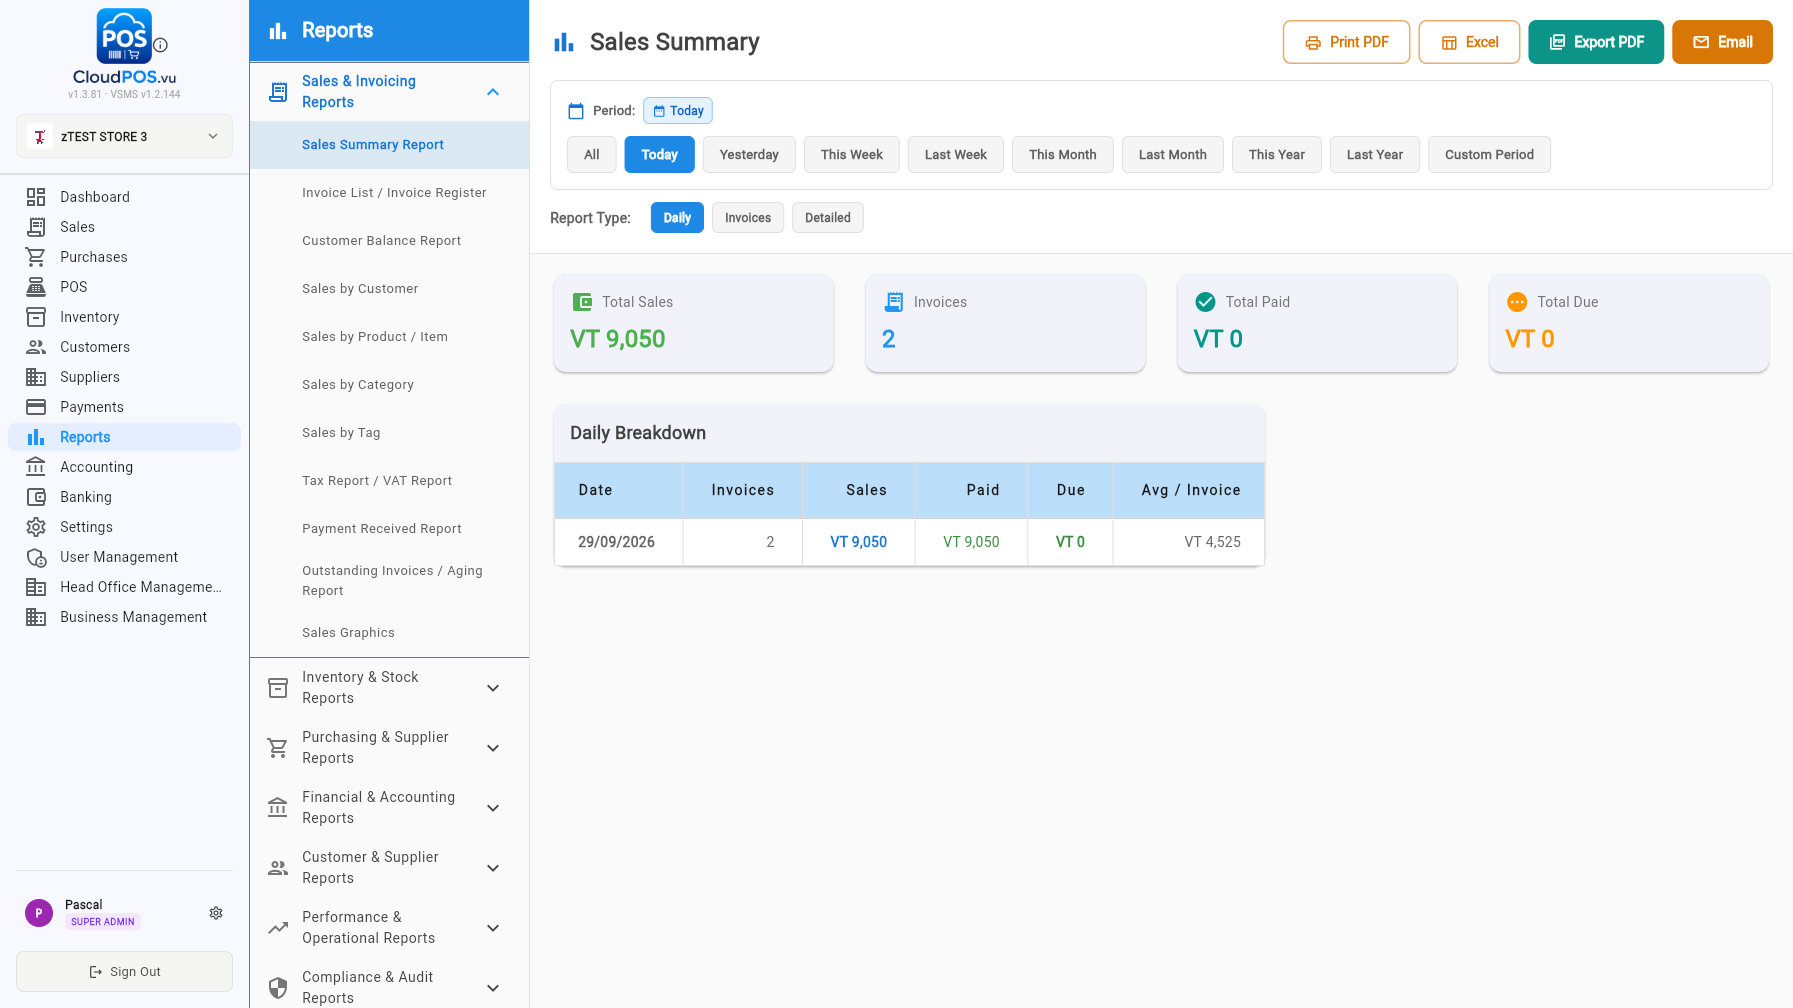
The Reports module has its own sidebar with seven categories. Every report has a period selector (All, Today, Yesterday, This/Last Week/Month/Year, Custom), report-type options where relevant, and export buttons (Print PDF, Excel, Export PDF, Email).
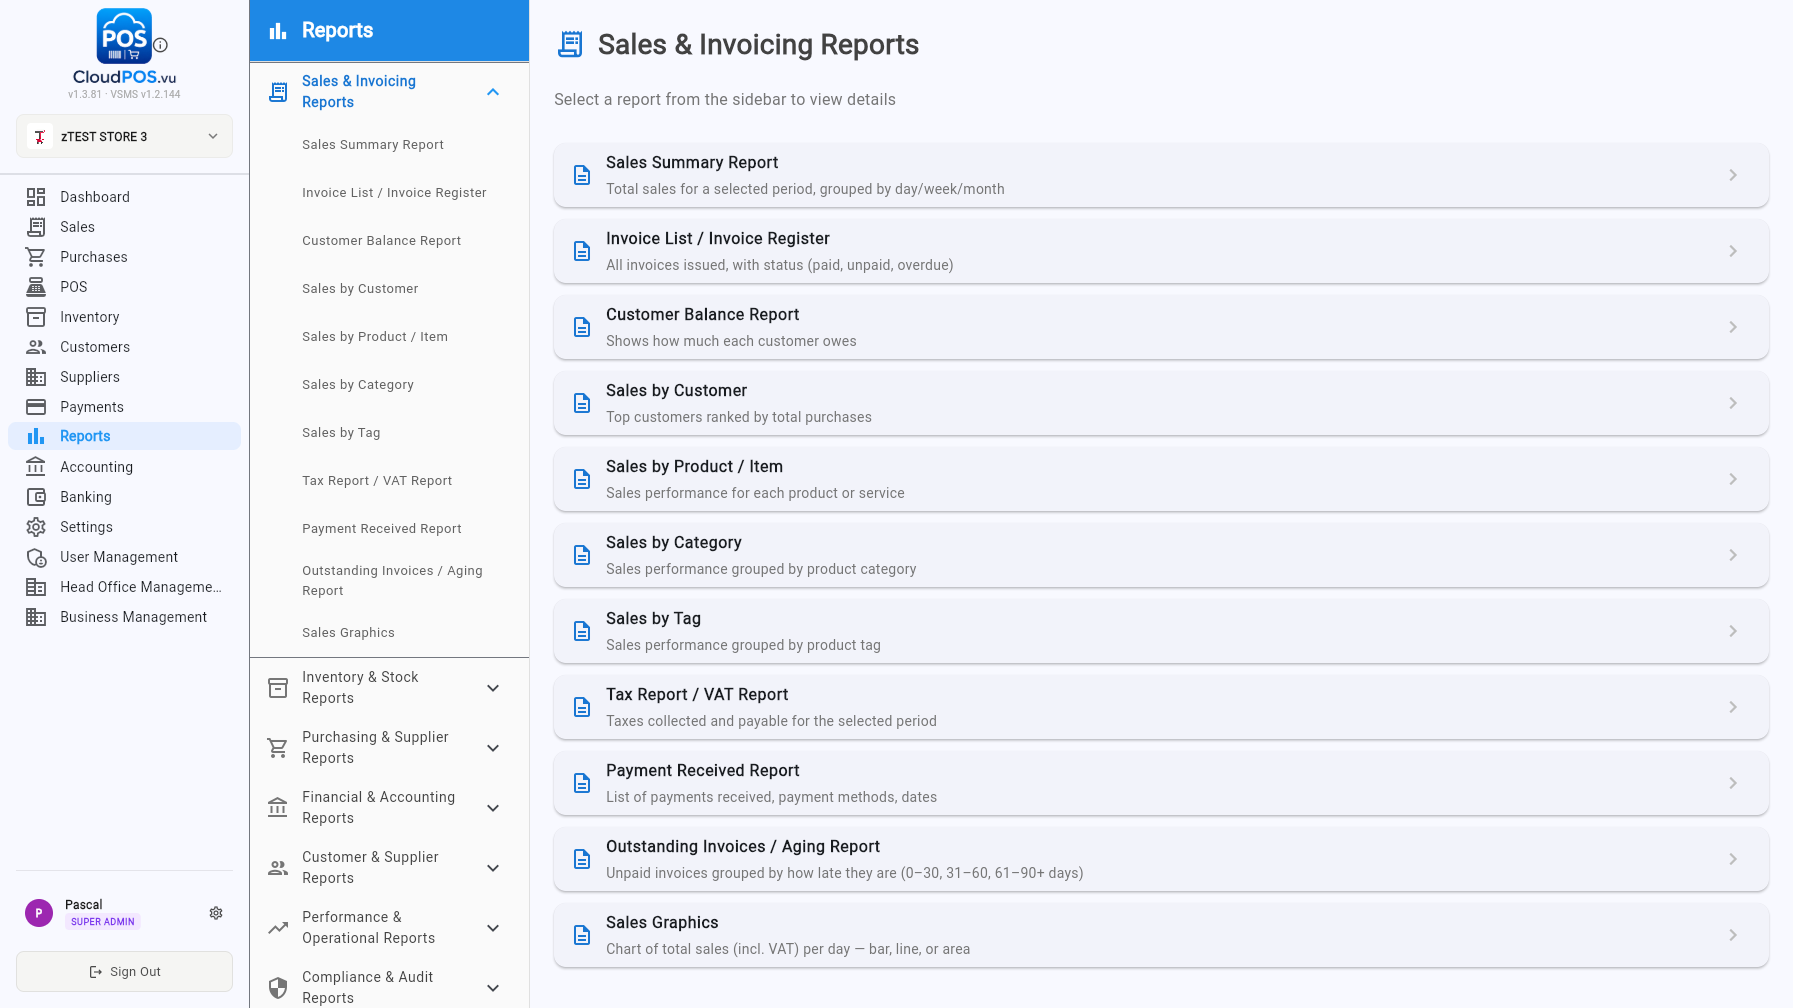
Sales Summary, Invoice List/Register, Customer Balance, Sales by Customer/Product/Category/Tag, Tax (VAT), Payment Received, Outstanding/Aging, Sales Graphics.
Stock Level, Low Stock/Reorder, Stock Movement, Item Valuation, Product Price List, Inventory Aging, Product Performance. (Stock Adjustment report: coming soon.)
Purchase register, supplier balances and aged payables.
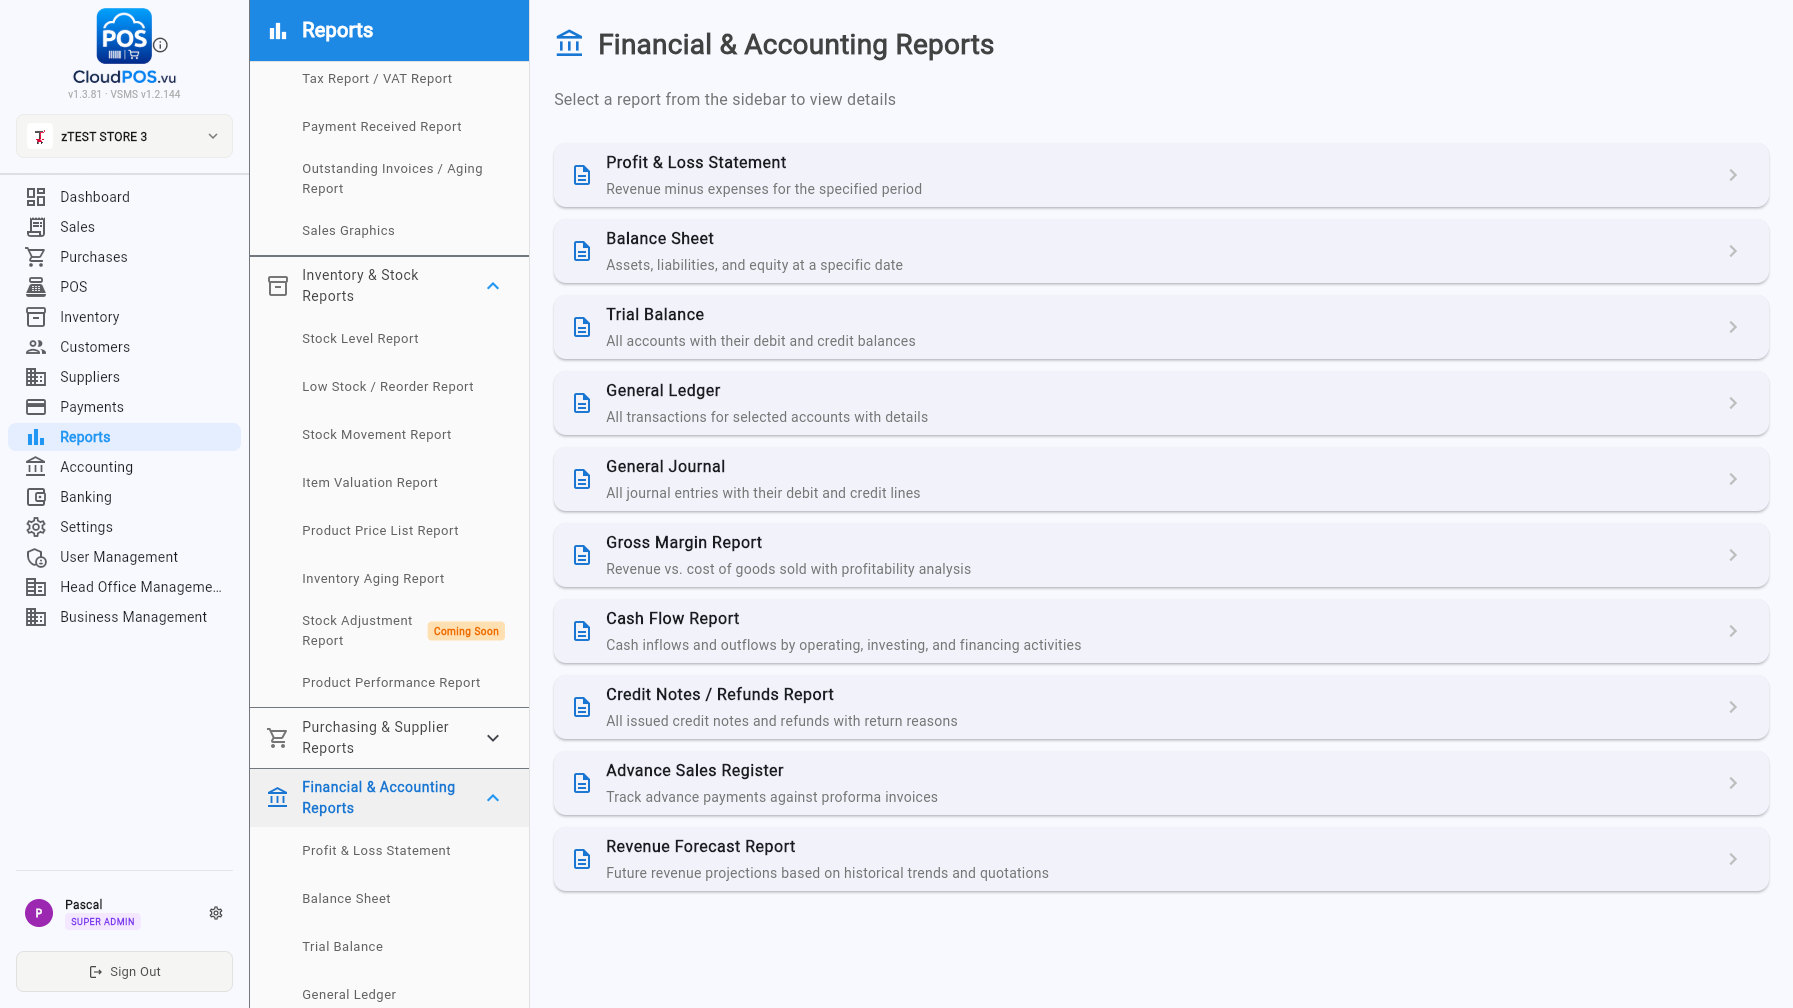
Profit & Loss, Balance Sheet, Trial Balance, General Ledger, General Journal, Gross Margin, Cash Flow, Credit Notes/Refunds, Advance Sales Register, Revenue Forecast.
Aging and balance reports for both sides of the ledger.
Employee/Salesperson performance, service delivery, job costing and turnaround-time reports (rolling out); audit and fiscal compliance reports.
Accounting & Banking
Chart of accounts, periods, VAT, year end — plus bank accounts and reconciliation
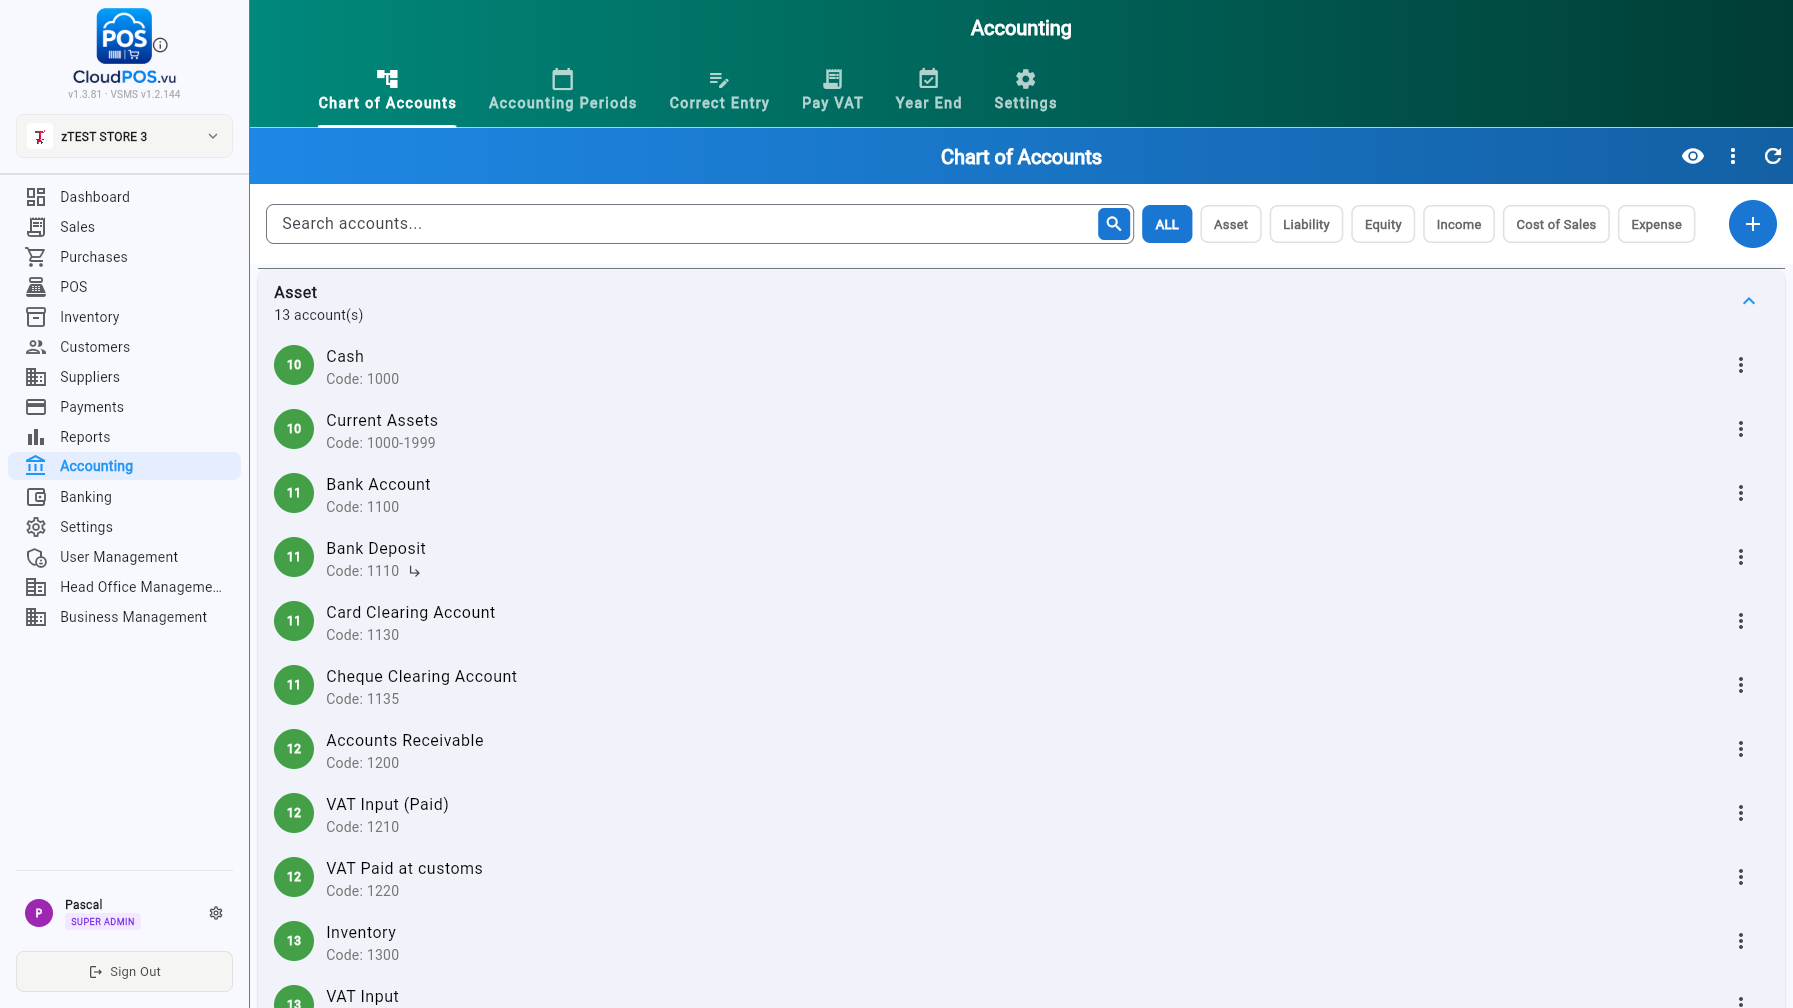
The Accounting module (dark-green theme) has six tabs:
- Chart of Accounts — your full account tree (Assets, Liabilities, Equity, Income, Cost of Sales, Expenses) with codes, search and per-type filters.
- Accounting Periods — open/close periods to protect reported figures.
- Correct Entry — post a correcting journal without editing source documents.
- Pay VAT — calculate and pay VAT for a period (locks the period once paid).
- Year End — run year-end close and roll retained earnings.
- Settings — accounting defaults and locking behaviour.
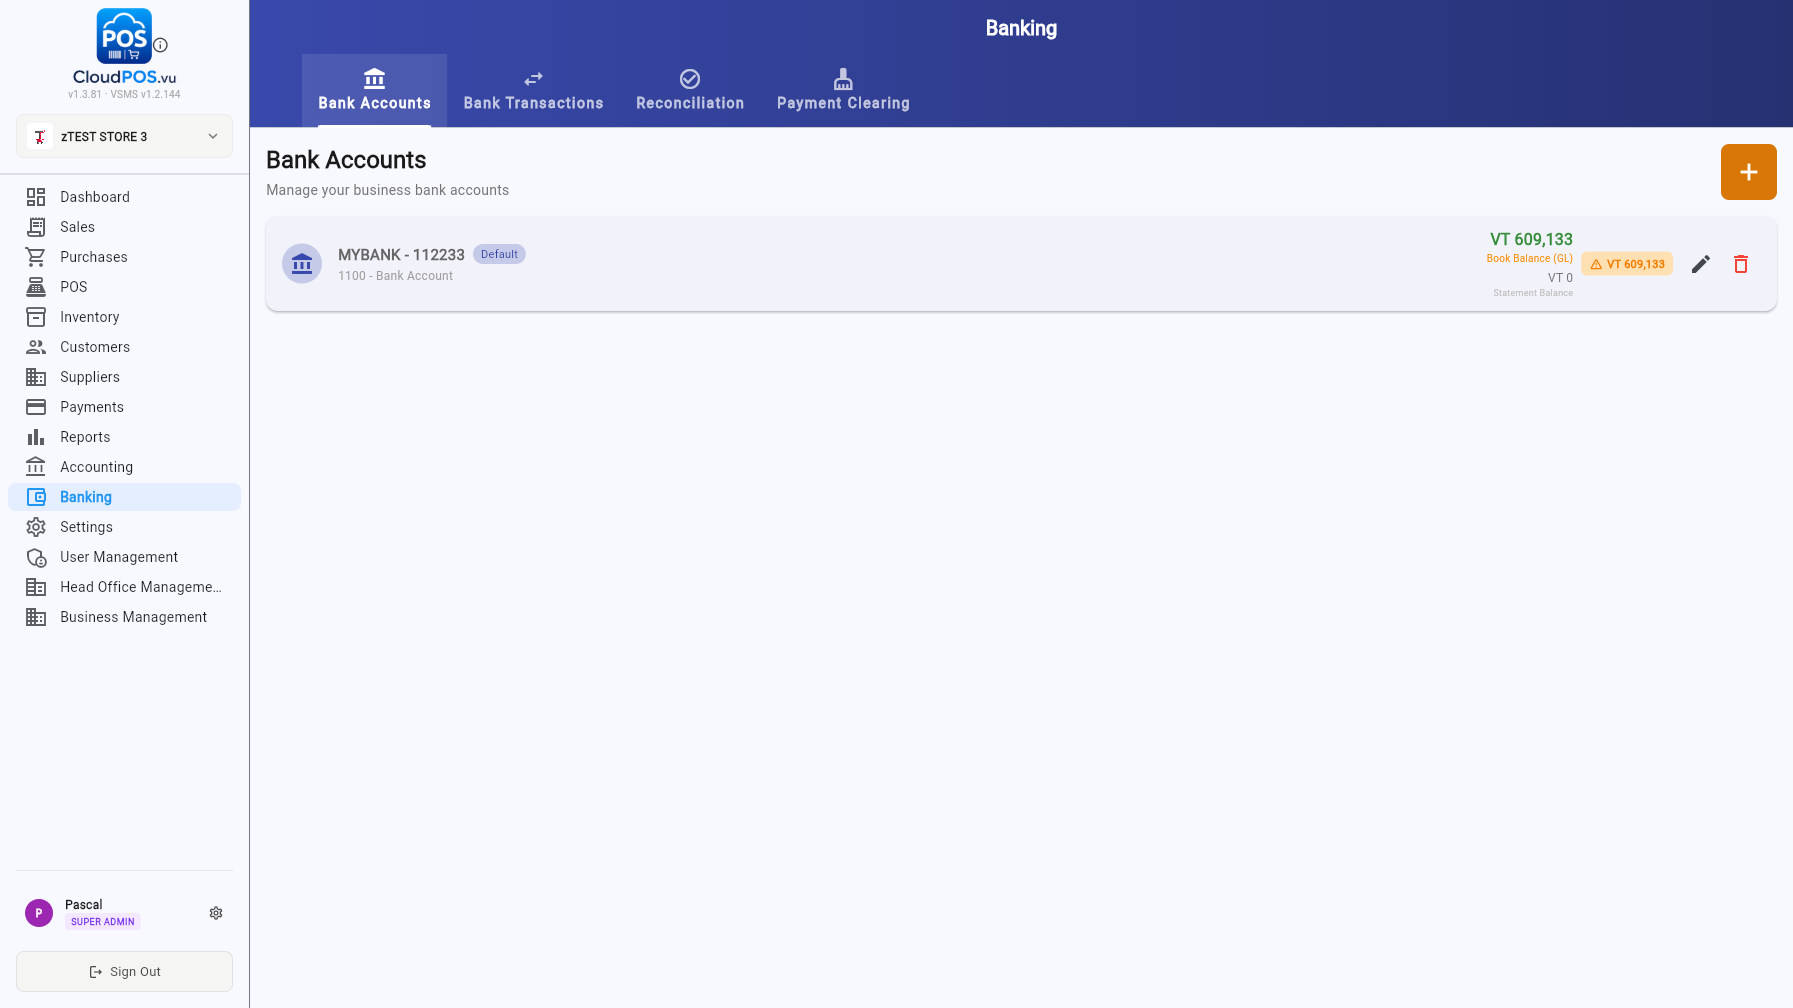
The Banking module has four tabs:
- Bank Accounts — manage bank accounts, each linked to a GL account (e.g. 1100 · Bank Account). Mark one as the default for payments; the card shows Book Balance (GL) vs. Statement Balance with a warning when they differ.
- Bank Transactions — every bank movement across accounts.
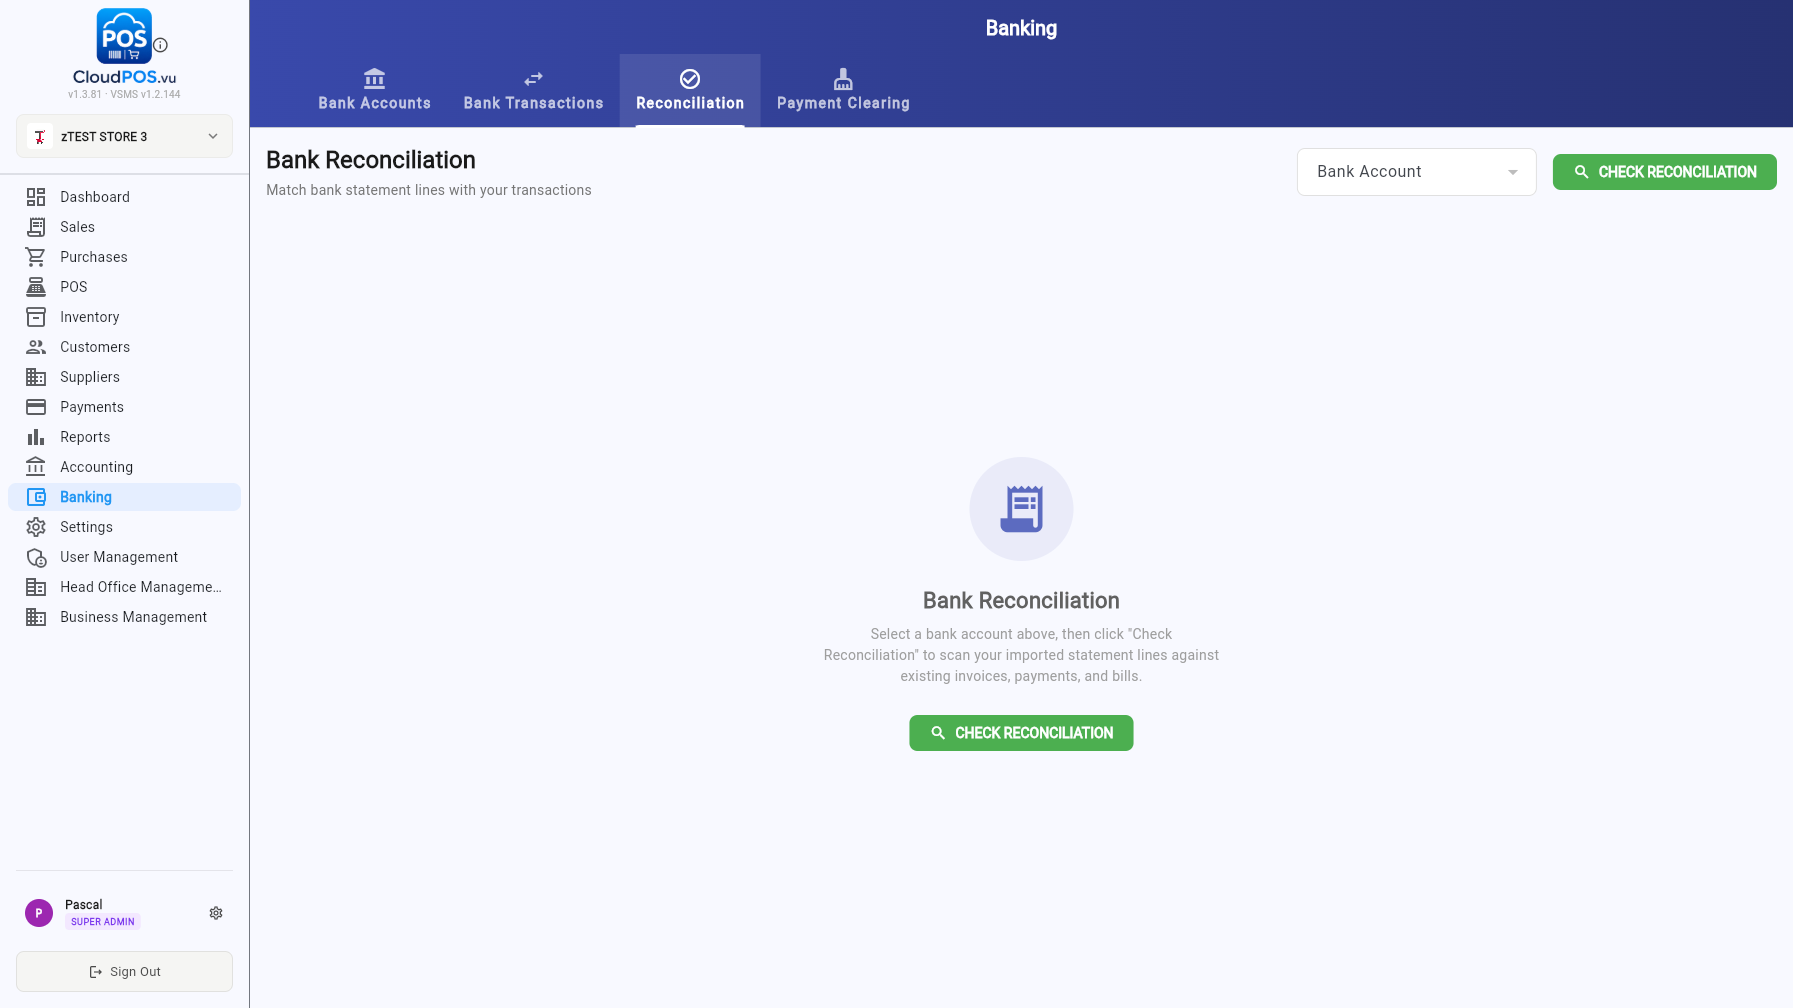
- Reconciliation — pick an account and run Check Reconciliation to scan imported statement lines against invoices, payments and bills.
- Payment Clearing — clear cheque and transfer payments against a bank account in bulk.
Administration
Users & cashiers, head offices, businesses and the business switcher
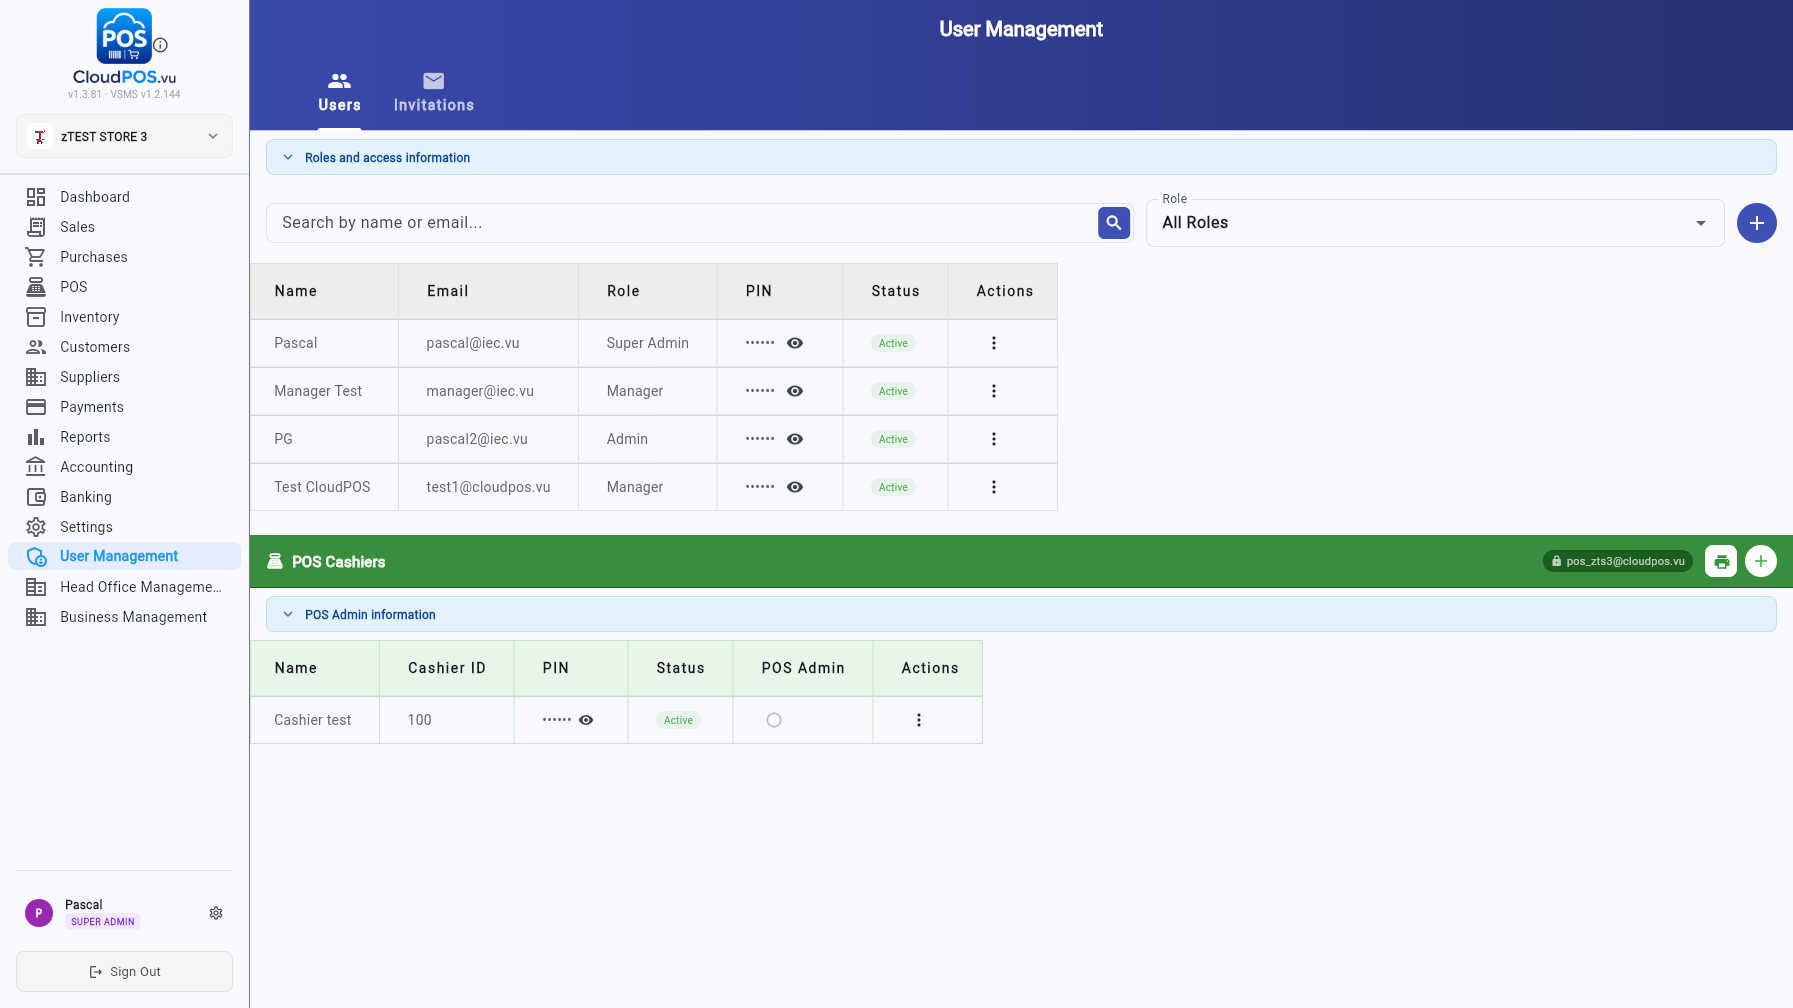
Manage back-office users and POS cashiers. The Users tab lists every user with role, PIN and status — search by name or email, filter by role, and use Roles and access information for what each role can do. The POS Cashiers section manages cashier IDs and PINs for terminal login, with the shared POS service-account email shown at the top. The Invitations tab tracks pending email invitations.
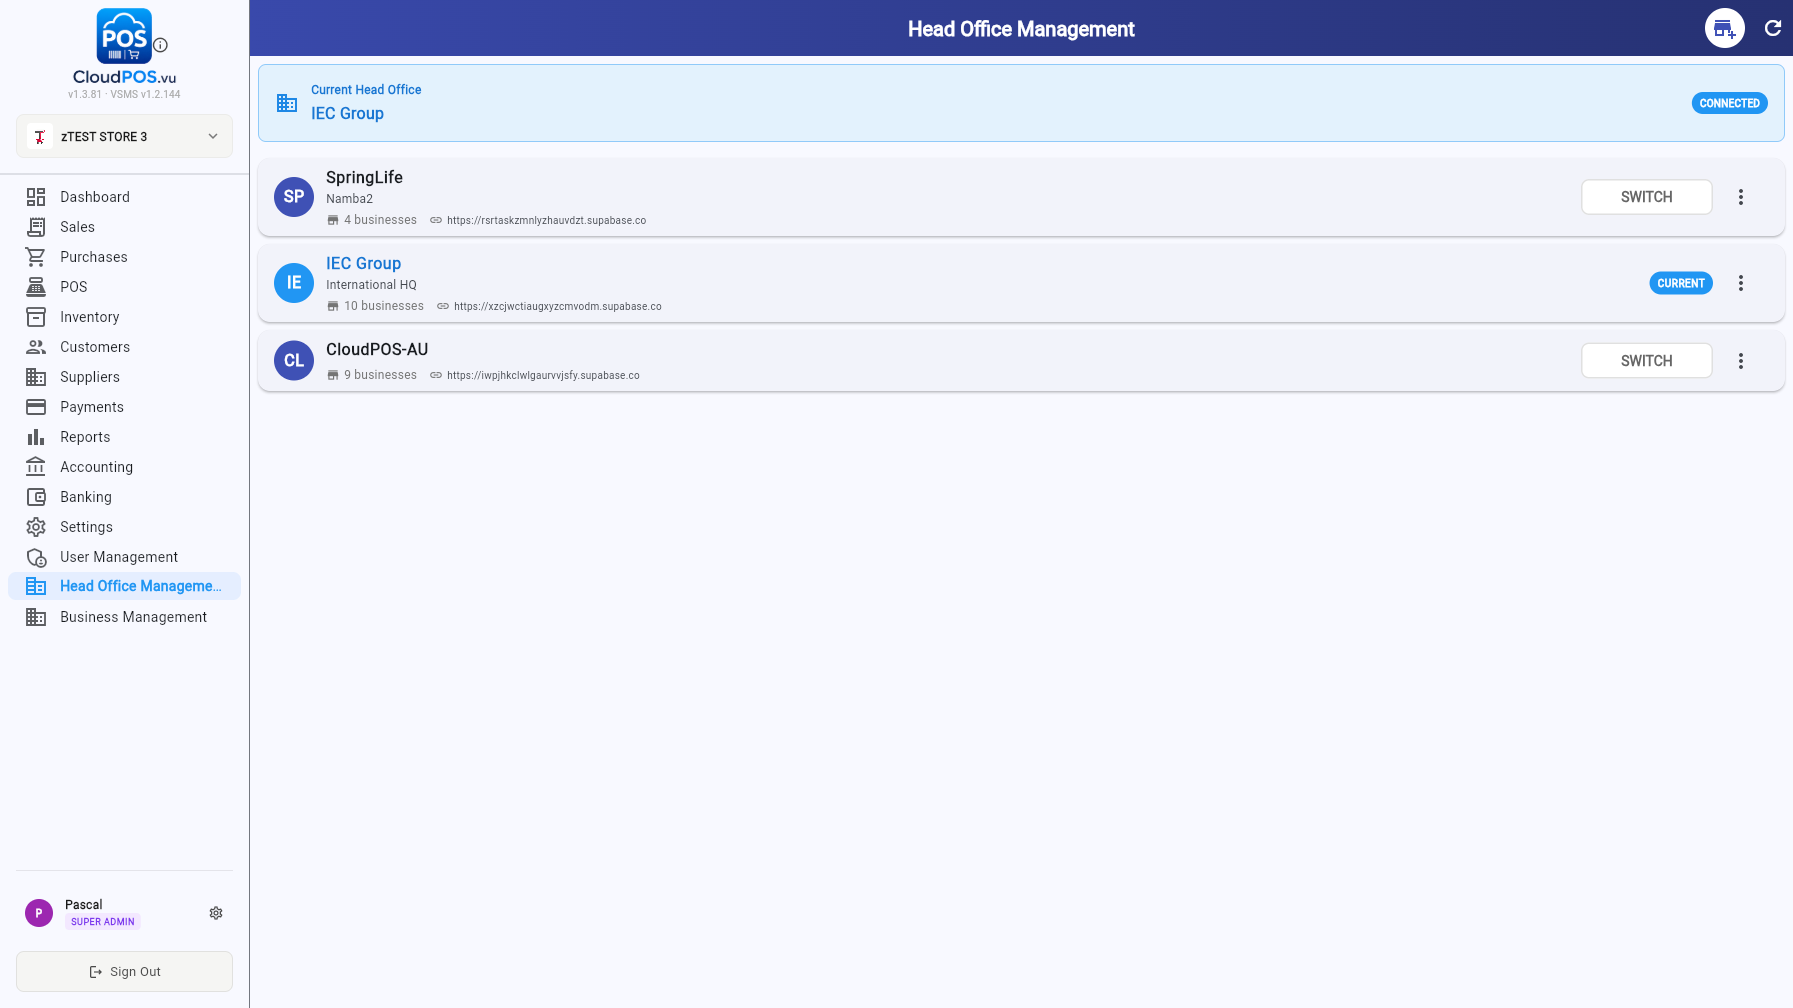
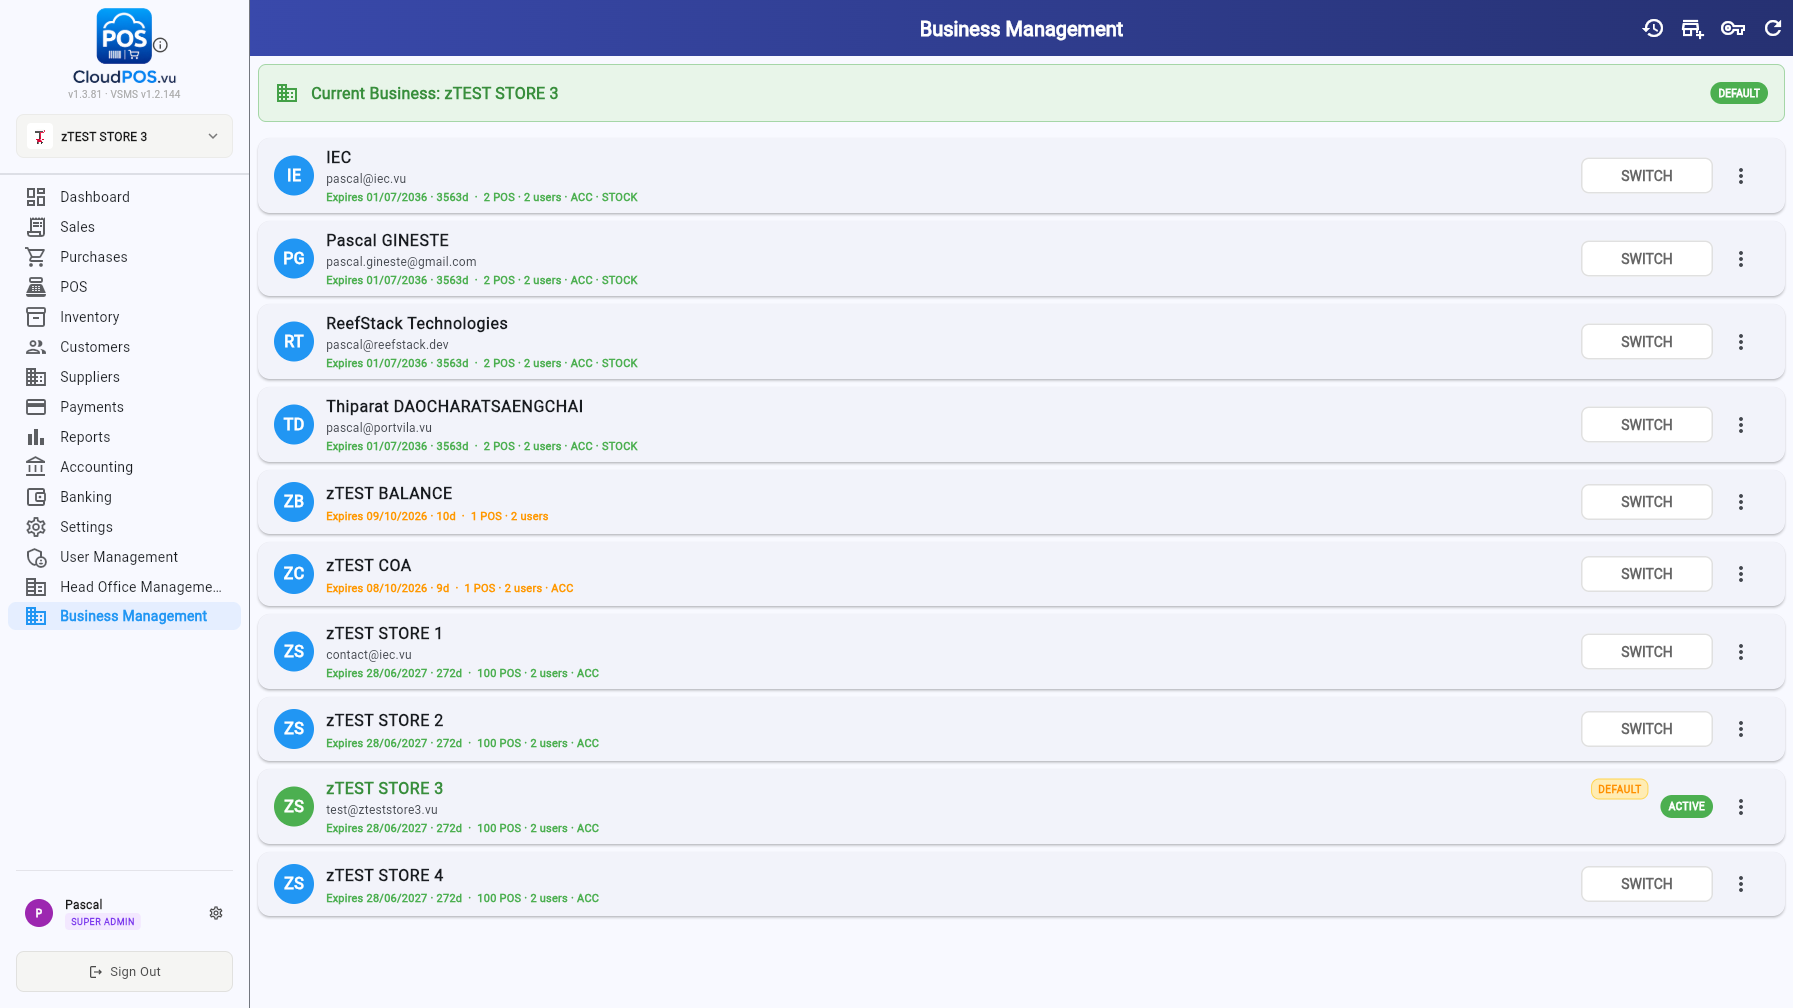
These two modules appear for Super Admin accounts and manage the multi-tenant setup:
- Head Office Management — the head-office groups (each backed by its own database), the businesses inside them, and switching the working head office.
- Business Management — every business across head offices with licence expiry, POS/user counts and Accounting/Stock flags. Switch business, restore a backup snapshot or move a business between head offices from the row menu.
Use the business switcher at the top of the sidebar to jump between the businesses you have access to; everything (data, settings, POS terminals) is scoped per business.