CloudPOS-WebPrinting
A small local program that lets CloudPOS.vu on the Web print receipts to your thermal printer. This manual explains how to install it and use its configuration screen.
What it does (and why you need it)
When you run CloudPOS in a web browser, the browser cannot send print jobs to a receipt printer on its own — this is a hard browser security rule. CloudPOS-WebPrinting is a tiny program that runs on the same computer as the browser. The web app sends the receipt to the proxy; the proxy forwards it to the printer.
http://127.0.0.1:9101).It supports two ways to reach a printer:
- Windows Spooler — pick a printer installed in Windows (USB printers, or network printers added to Windows).
- TCP / IP — reach a network printer directly by its IP address (usually port
9100).
Install on a POS terminal
You only need the single file cloudpos-printing.exe (≈ 3.5 MB, no dependencies to install).
cloudpos-printing.exe to a permanent folder, for example
C:\Program Files\CloudposPrinting\.
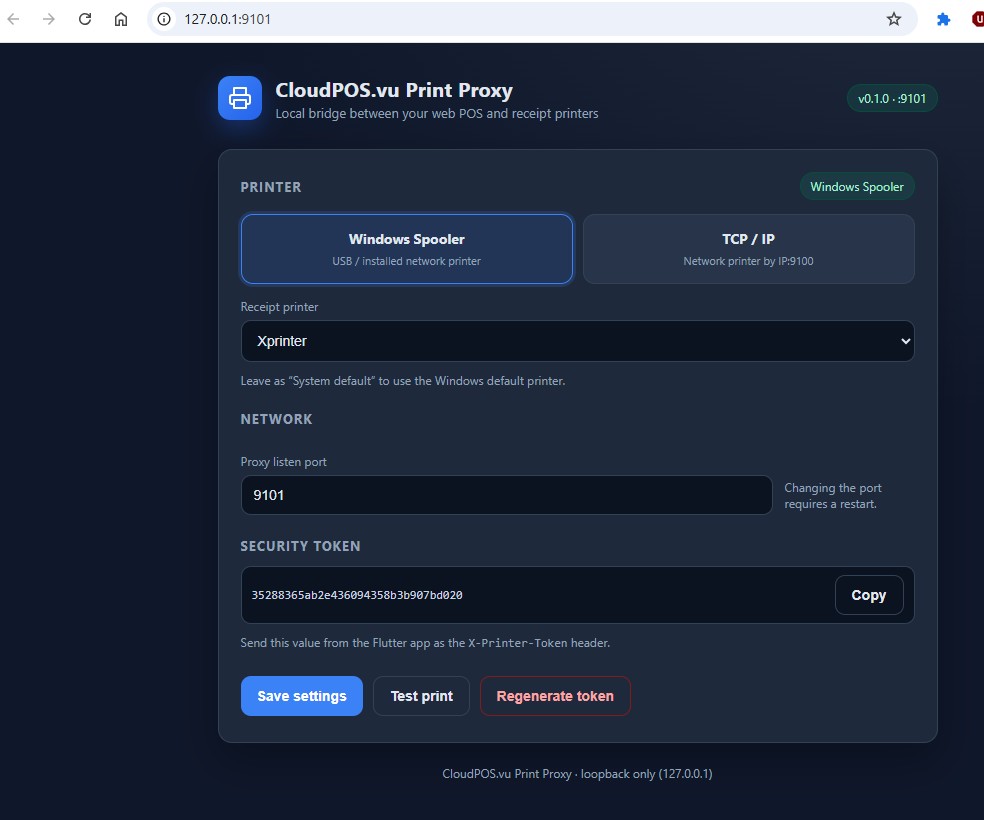
The configuration screen
This is the screen shown in the screenshot above. Here is what each part does.
1 · Printer mode (Windows Spooler / TCP / IP)
192.168.1.50) and Port (usually 9100).
The printer accepts the bytes silently and may not respond — that is normal.
2 · Network — Proxy listen port
The port the web app connects to (default 9101). You almost never need to change this.
If you do change it, the proxy must be restarted for it to take effect, and the Proxy URL inside
CloudPOS must be updated to match.
3 · Security token
A secret that proves to the proxy that your CloudPOS app is allowed to print. Without it, any website the operator opens could print garbage to your printer. Click Copy to copy it.
4 · Action buttons
Pair with the CloudPOS web app
A one-time setup on each terminal:
http://127.0.0.1:9101.Run as a service + tray icon (production)
For reliable printing that survives logouts and starts at boot, run the proxy as a Windows service
(no icon), plus a tray app for the Config menu. Both come from the same .exe with
different flags:
| Part | Command | Started by |
|---|---|---|
| Service (no icon, boots at start) | cloudpos-printing.exe --serve | NSSM (auto) |
| Tray (Config / About menu) | cloudpos-printing.exe --tray | Windows Startup folder (per user) |
The two share the same settings and token (in C:\ProgramData\CloudposPrinting\), so configuring
one configures both.
Install the service (with NSSM)
Download NSSM, then in a terminal as Administrator:
set EXE=C:\Program Files\CloudposPrinting\cloudpos-printing.exe

nssm install CloudposPrinting "%EXE%"
nssm set CloudposPrinting AppParameters "--serve"
nssm set CloudposPrinting AppDirectory "C:\Program Files\CloudposPrinting"
nssm set CloudposPrinting Start SERVICE_AUTO_START
nssm set CloudposPrinting AppStdout  "C:\ProgramData\CloudposPrinting\service.out.log"
nssm set CloudposPrinting AppStderr  "C:\ProgramData\CloudposPrinting\service.err.log"
nssm start CloudposPrinting
Start the tray at login
Create a shortcut to cloudpos-printing.exe --tray and place it in the Startup folder
(press Win+R → type shell:startup).
--serve (the worker) and --tray (the menu) is the only way to
have both reliable boot-time printing and a tray icon.
Tray menu
%ProgramData%\CloudposPrinting (logs, settings, token).Troubleshooting
“Test print” does nothing / “Cannot reach the proxy” in CloudPOS
- Is the tray icon visible, or the service running? Check
services.mscfor CloudposPrinting. - Open
http://127.0.0.1:9101/healthin the browser — you should see JSON with"ok":true. - Is the token correct? Re-copy it from this screen (or
token.txt) and re-pair CloudPOS. - Proxy URL must be
127.0.0.1, never a LAN IP like192.168.x.x.
Connection works, but nothing prints
- Click Test print on this screen. If it also fails, the printer selection is wrong.
- Spooler mode: correct printer chosen? Online and has paper?
- TCP mode: printer IP correct and on the same network? Try pinging it.
- Check the log:
%ProgramData%\CloudposPrinting\cloudpos-printing.log.
Files & locations
C:\Program Files\CloudposPrinting\cloudpos-printing.exe%ProgramData%\CloudposPrinting\settings.toml%ProgramData%\CloudposPrinting\token.txt%ProgramData%\CloudposPrinting\cloudpos-printing.log